Showing posts with label CAS-ual Fridays Stamps. Show all posts

Monday, July 26, 2021

CAS-ual Fridays Stamps July Release ~ Falling Leaves Stencil!!

Pin It

Hello Crafty Friends!! 

I'm here for Day 4 of the CAS-ual Fridays Stamps July Release!! Today I'm showcasing the NEW Falling Leaves Stencil!! SWOON!! I'm a LOVER of FALL, it's my FAVORITE Season!! So every year I look forward to designing with ALL of the Fall Products!! This is NEW Stencil has SO MANY possibilities!! 
Here's a Look at the NEW Falling Leaves Stencil!! 

Here's the Project I've made for today!! 

I LOVE the Colors of Fall, they make me SO HAPPY!! I Started with a Piece of Text Patterned Paper!! Then I Sprayed the back side of the Stencil with Therm O Web Pixie Spray!! I Placed it over my Card Panel and Inked the Stencil Design using Wilted Violet, Fossilized Amber, Rusty Hinge and Peeled Paint Distress Oxide Inks using my Blending Brushes!! Then I removed the Stencil and Inked over the Leaves LIGHTLY using the same Colors that I used for the leaves in that area!! 

I added some Water Splatters and let that Dry!! Then I added some Tim Holtz Gold Distress Paint and Black Soot Distress Paint Splatters for some texture!! I Stamped and Embossed the Sentiment "Thinking of you makes my heart" from the Smile Duo Set using Versa Fine Black Onyx Ink and WoW Clear Gloss Embossing Powder!! 

LOVE how it turned out and how FUN it is to mix and match Stamped, Die Cut and Stenciled Elements to create and SPECIAL Card to send this Fall!! 

THANKS SO MUCH for stopping by today and ALL Week for a Look at the NEW July Release!! 
I hope I've INSPIRED You!!??  
Don't forget to visit the CAS-ual Fridays Stamps Blog for a chance to WIN and to check out ALL of the other AMAZING DT Creations!! 

Have a FABULOUS WEEK!!
 

COUNTRY HUGS-N-KISSES
LARISSA  ๐Ÿ’—

Sunday, July 25, 2021

CAS-ual Fridays Stamps July Release ~ Partly Cloudy Stencil!!

Pin It

Hello Crafty Friends!! 

I'm here for Day 3 of the CAS-ual Fridays Stamps July Release!! Today I'm showcasing the NEW Partly Cloudy  Stencil and I just LOVE this NEW Stencil and ALL of the Possibilities!! 
Here's a Look at the NEW Partly Cloudy Stencil!!
Here's the Project I've created for today!! 
I Started by Die Cutting a Panel for my Focal Point Stenciled Scene!! I Placed the Stencil over the Panel and Inked the Cloud Borders using Salvaged Patina Distress Ink!! Then I Inked the Sun using Fossilized Amber, Carved Pumpkin and Rusty Hinge Distress Oxide Inks!! I created a FUN Layered Sun my rotating the Stencil and I LOVE how it looks!! 

Next I Inked the Rainbow!! I wanted it too look like it was coming from behind the Clouds, so I had to do some Masking with Purple Tape in order to extend some of the Rainbow Arches!! I think it was worth the extra work and LOVE how it came out!! I Inked with Festive Berries, Carved Pumpkin, Mustard Seed and Mowed Lawn Distress Inks!! 

I Stamped and Embossed the Sentiment from the Pretty Posies Stamp Set and then added some Trinity Stamps Fairy Rocks Rhinestones for some Sparkle!! Then I adhered the Stenciled Panel to a Sunny Studios Stamps Gingham Patterned Paper Panel and adhered the entire Panel to an A2 White Cardstock Cardbase!! 

THANKS SO MUCH for stopping by today!! I hope I've INSPIRED You!!?? Come back again tomorrow for a look at the NEW Falling Leaves Stencil!! 
Don't forget to visit the CAS-ual Fridays Stamps Blog for a chance to WIN and to check out ALL of the other AMAZING DT Creations!! 

Have a FABULOUS WEEKEND!! 


COUNTRY HUGS-N-KISSES
LARISSA  ๐Ÿ’—


Saturday, July 24, 2021

CAS-ual Fridays Stamps July Release ~ Jewish Stars Stencil!!

Pin It

Hello Crafty Friends!! 

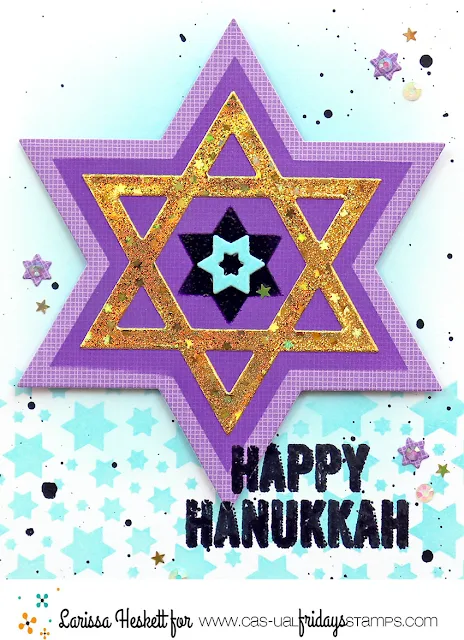
I'm here for Day 2 of the CAS-ual Fridays Stamps July Release!! Today I'm showcasing the NEW Jewish Stars  Stencil and I've paired it with several older Sets from CAS-ual Fridays Stamps to create a Happy Hanukkah Card!! 
Here's a Look at the NEW Jewish Stars Stencil!! 

Here's the Project I've made for today!! 

SWOON!! I LOVE the Regal look of this Card and the Colors really POP off the Card Panel!! 
I Started by Inking the Card Panel with some Tumbled Glass Distress Oxide Ink and then I used the NEW Jewish Stars Stencil to Ink the Stars at the bottom of the Card Panel also using Tumbled Glass Distress Oxide Ink!! Then I added some Black Soot Distress Paint Splatters!! 

Next I Die Cut the Star of David Die from some Therm O Web Toner Sheets that I Foiled with some Gina K Designs Glimmering Gold Fancy Foil!! I LOVE the Iridescent Stars and how it really makes the Die Cut come to life!! 

Then I Die Cut some Doodlebug Design Gingham Patterned Paper using the Large Star of David Die!! Then I used the NEW Jewish Stars Stencil to Stencil the Patterned Paper with some of the Wilted Violet Distress Oxide Ink with a Blending Brush!! 

Then I used the NEW Jewish Stars Stencil again and Inked the Small Star of David in the Center of the Large Inked Die Cut using Black Soot Distress Ink and an Ink Dauber!! Then I Embossed it with WoW Clear Gloss Embossing Powder!! I added a Small Open Star Die Cut from the Hanukkah Die Set Die Cut from some Cardstock I Inked with Tumbled Glass Distress Oxide Ink to the center of the Black Embossed Star!! I LOVE all of the Layers and different Textures!!

I Stamped and Embossed the "Happy Hanukkah" Sentiment from the Star of David Stamp Set onto the Card Panel and to part of the Large Star of David Die Cut, using Versa Fine Black Onyx Ink and WoW Clear Gloss Embossing Powder!! Then Heat Set it!! I adhered the Large Star of David Die Cut to the Card Panel using Foam Tape!! I added some of the Die Cut Mini Star of David Dies from the same Doodlebug Gingham Patterned Paper and adhered some Trinity Stamps Fairy Rocks Rhinestones to the center of them!! Then I adhered some Mini Gold Iridescent Stars and a few more Trinity Stamps Fairy Rocks Rhinestones to finish off the Design!! 
I LOVE how it turned out and how FUN it is to mix and match Stamped, Die Cut and Stenciled Elements to create and SPECIAL "Happy Hanukkah" Card to send this Holiday!! 

THANKS SO MUCH for stopping by today!! I hope I've INSPIRED You!!?? Come back again tomorrow for a look at the NEW Partly Cloudy Stencil!! 
Don't forget to visit the CAS-ual Fridays Stamps Blog for a chance to WIN and to check out ALL of the other AMAZING DT Creations!! 

Have a FABULOUS WEEKEND!! 

COUNTRY HUGS-N-KISSES
LARISSA  ๐Ÿ’—

Friday, July 23, 2021

CAS-ual Fridays Stamps July Release ~ Snowflake Stencil!!

Pin It
Hello Crafty Friends!! 

I'm here for Day 1 of the CAS-ual Fridays Stamps July Release!! Today I'm showcasing the NEW Snowflake Stencil!! SWOON!! I'm a LOVER of ALL things Snowflake!! Although I'm NOT ready for Snow and Cold Weather, it's been FUN Crafting Holiday and Winter Projects during the Heat of the Summer!! Somehow it makes it seem not quite as hot outside!! 
Here's a Look at the NEW Snowflake Stencil!!  

Here's the Project I've created for today!!
SWOON!! I LOVE the Color Combo of Turquoise, White and Metallic Silver for the Holidays!! Especially Snowflake Projects!! Makes me HAPPY to add some SPARKLE TOO!! 
I can't do Holiday Crafting without SPARKLE!! 
Let's get started!! 

I started by adding some Therm O Web Pixie Spray to the back of my Stencil!! This is a MUST have Product if you plan on Stenciling, especially if you're going to Mass Produce Holiday Cards!! Just makes the entire process Easier!! 

I Die Cut a Card Panel from a Piece of MFT Snowflake Patterned Paper and then Placed the NEW Snowflakes Stencil over the Top of the Card Panel and Inked with Peacock Feathers Distress Oxide Ink with a Blending Brush!! Then I applied some Gina K. Designs White Glitz Glitter Gel using a Stencil Pal!! After doing the one side of the Card, I removed the Stencil and washed it and then replaced it on the other side of the Card Panel and repeated the Process!! Then I set the Card Panel aside to Dry completely!! 
SWOON!! 
Here's a close up look at the Glittering Snowflakes!! 
Next I Cut a Small Panel from White Cardstock and Inked it with Peacock Feathers Distress Oxide Ink and then I Die Cut the "Merry Christmas" 4 Times from some White Cardstock and again from some Deco Foil Toner Sheets that I Foiled with Deco Foil in Sliver!! Then I adhered the Deco Foiled Die Cut on top of the White Cardstock Die Cuts for a Dimensional Sentiment and adhered the Sentiment to the center of the Inked White Cardstock Panel!! I wanted to add some Silver Splatters to my Card Panel so I added some Alloy Alcohol Splatters, and I LOVE the extra shine it adds to my Card Panel!! Then I adhered the Panel to the Patterned Paper Card Panel using Foam Tape for some dimension!! 
To finish off the Design I added some Silver Snowflake Sequins in different Sizes using Zots Bling Glue Dots and then added some Silver Jewels to the center of the Snowflakes for even more Sparkle!!  I adhered the Card Panel to an A2 White Cardstock Cardbase and my Card is ready to sent to someone SPECIAL this Holiday Season!! 

THANKS SO MUCH for stopping by today!! I hope I've INSPIRED You!!?? Come back again tomorrow for a look at the NEW Jewish Stars Stencil!! 
Don't forget to visit the CAS-ual Fridays Stamps Blog for a chance to WIN and to check out ALL of the other AMAZING DT Creations!! 

Have a FABULOUS WEEKEND!! 

COUNTRY HUGS-N-KISSES
LARISSA  ๐Ÿ’—

Saturday, April 24, 2021

CAS-ual Fridays Stamps April 2021 Release ~ Flower Duo!!

Pin It

HELLO CRAFTY FRIENDS!! 

I'm here with Day 2 of the CAS-ual Fridays Stamps April 2021 Release!! Today we're showcasing the NEW Flower Duo Stamp Set and coordinating Die Set!! 
Here's a look at the Entire Set!! 
A BEAUTIFUL Set right!!?? I LOVE that everything comes together!! 
Here's what I've created!! 
I Started by Cutting my Card Panel!! Then Inking the top portion of my Panel with Tumbled Glass Distress Oxide Ink!! 
Next I Stamped and Embossed the NEW Flower Duo Stamp Set Images!! I Stamped with Versa Fine Black Onyx Ink and Embossed with WoW Clear Gloss Embossing Powder!! Then I used Copic Markers to Color the Images in!! 
I used: Flowers: RV00, RV52 & RV55  N0 & N2 
Greenery: YG61, YG63 & YG67 
Then I Die Cut the Images out using the coordinating Die Set!! I added some White Gel Pen Details for some added Highlights!! 
Next I Stamped and Embossed the Sentiment onto my Card Panel using Versa Fine Black Onyx Ink and WoW Clear Gloss Embossing Powder!! I adhered the Images to the Top part of my Card and used a combination of Ultra Bond Liquid Adhesive and Gina K Designs Foam Squares for some variation in dimension!! 
I added some Trinity Stamps Fairy Rocks Rhinestones to finish off the Card Card with a little SPARKLE and I just LOVE the way it turned out!! I paired it with a TE Salt Water Taffy A2 Envelope and it's ready to be Mailed to someone SPECIAL!! 

Don't forget to visit the CAS-ual Fridays Stamps Blog to see ALL of the other AMAZING Inspiration being shared by the DT today and to leave a comment for your chance to WIN!! Come back tomorrow for a LOOK at the NEW Big Thanks Duo & Die Set!! I CAN'T wait to share what I've created!! 

THANKS SO MUCH for stopping by and I hope you have a FABULOUS WEEKEND!! 

COUNTRY HUGS-N-KISSES
LARISSA ๐Ÿ’—

Tuesday, September 29, 2020

CAS-ual Fridays Stamps September Release ~ Everyday Dragonflies & Dragonflies Fri-Dies!!

Pin It
HELLO CRAFTY FRIENDS!! 
Here's a close up look of the NEW Sets!! 
SWOON!! I LOVE how Elegant this Set is and that it's so versatile!! Here's what I've created for today!! 
I Started by Stamping and Embossing the Dragonfly Image onto my Card Panel using some WoW Embossing Powder in British Summer with my WoW Dual Speed Heat Tool!! !! Then I heat set it and Colored it in using Copic Markers!! I used: R11, R22 & R17 
Next I created a Mask to place over the Image and I Inked with some Tumbled Glass & Broken China Ink to match the Blue that is in the MFT Plaid Patterned Paper I used for the NND Scalloped Frame!! 
I finished the Design by Stamping and Embossing the Sentiment in WoW Bright White Embossing Powder and then I added some White Gel Pen Details to the Butterfly to help add some Highlights!! I also added a Few Studio Katia Pearls to add some Sparkle and finishes off the Card!! 

For TONS of AMAZING Inspiration make sure to visit the CAS-ual Fridays Stamps Blog and shop the NEWOld and Sale Products in the CFS Shop!! You can also use my discount code LARISSASENTME to SAVE 15% off anything in the Shop!! WHOOP WHOOP!! 

 Be sure to comment on each Release Post this week for your chance to win a $25 Mini Shopping Spree!! A random winner will be chosen from one of the days so increase your odds by visiting the CAS-ual Fridays Stamps Blog all week!! 
You don't have to wait until the end of the week to start filling your shopping cart either!!  
ALL of the NEW Release Sets are in the Shop NOW!! 

THANKS SO MUCH for stopping by today and I hope you'll come back tomorrow for a look at the NEW Sassy Celebration Stamp Set & Hooray Fri-Dies have a FABULOUS WEEK!! 

COUNTRY HUGS-N-KISSES
LARISSA ๐Ÿ’—

Monday, September 28, 2020

CAS-ual Fridays Stamps September Release ~ Slimline Pinked Fri-Dies Set!!

Pin It
HELLO CRAFTY FRIENDS!! 

I'm here today with Day #1 of the CAS-ual Fridays Stamps September Release and today we're showcasing the 
Here's a look at the Entire Set!!
SWOON!! I'm in LOVE with this set and ALL of the AMAZING Possibilities with all of the Dies Included in this Set!! 
Here's what I've created for today!! 
As soon as I Saw this Die Set I was thinking that the Circles and Pinked Circles reminded me of Party Pinwheels!! So that's the direction I went!! I wanted to go with a Pastel Color Palette and I wanted to use some MFT Patterned Paper along with some Iridescent Vellum for the Pinked Circles!! 
I also wanted to use the Little Word and Star Dies to Die Cut from the Center of the Circle Pinwheels!! I backed them with Black Cardstock Circles!! I LOVE how easy it is to back them by using the same Circle Dies!! Then I adhered the Iridescent Vellum Pinked Circles behind!! For the Background I wanted to create the look of Lights Glowing, so I used some Distress Oxide Inks in Tumbled Glass, Tattered Rose and Milled Lavender!! I over lapped the colors so it looked like one Cluster of Pinwheels!! Then I added some Water Splatters, some Black Soot Distress Paint Splatters and some Rose Quarts Shimmer Pen Splatters for some Iridescent Shimmer!! I adhered the Panel to a Black Pinked Frame and then adhered it to a Blue Cardstock Slimline Card Base!! 
I added a few Studio Katia Iridescent Star Jewels and some Iridescent Confetti Stars to finish off the Design!! I really LOVE how it turned out and think it shows that there are SO many possibilities with just the Dies from this Set!! I wanted to create a Coordinating Slimline Envelope so I Stamped and Embossed the NEW Sassy Celebration Stamp Set Sentiment and then added the left over Stars!! A few Black Soot Distress Paint Splatters and Rose Quarts Shimmer Pen Splatters for some Iridescent Shimmer and my Envelope was done!! 

For TONS of AMAZING Inspiration make sure to visit the CAS-ual Fridays Stamps Blog and shop the NEW, Old and Sale Products in the CFS Shop!! You can also use my discount code LARISSASENTME to SAVE 15% off anything in the Shop!! WHOOP WHOOP!! 

 Be sure to comment on each Release Post this week for your chance to win a $25 Mini Shopping Spree!! A random winner will be chosen from one of the days so increase your odds by visiting the CAS-ual Fridays Stamps Blog all week!! 
You don't have to wait until the end of the week to start filling your shopping cart either!!  
ALL of the NEW Release Sets are in the Shop NOW!! 

THANKS SO MUCH for stopping by today and I hope you'll come back tomorrow for a look at the NEW Everyday Dragonflies & Dragonflies Fri-Dies have a FABULOUS WEEK!! 

COUNTRY HUGS-N-KISSES
LARISSA ๐Ÿ’—

Saturday, July 11, 2020

CAS-ual Fridays Stamps & Crafting of Hue Sponsorship Blog Hop & SALE!!

Pin It

HELLO!!

I'm here with CAS-ual Fridays Stamps for the Crafting of Hue Sponsorship and SALE!! 
That's right ALL Stencils for $5.00!! 
I've created 2 Cards for today to show how you can Create 2 Cards out of 1 Stenciled Image!! 
Here's what I've created for today!! 
I started by Spraying the back side of my Pawesome Stencil with some Therm O Web Pixie Spray!! Then I placed the stencil over my Cardstock and applied a thin layer of Deco Foil Transfer Gel Duo using a Stencil Pal!! I removed the Stencil and let the Gel dry completely!! 
Once the Gel was completely Dry I cut a piece of Gina K Designs Fancy Foils in Radiant Red and ran it through my laminating Machine!! You can also run it through your die cutting machine!! 
Here's what it looks like after you run it through the laminating Machine!! Then SAVE that Negative piece because we'll use it to create our 2nd Card!! 
I placed the Negative Foil Piece onto a Deco Foil Toner Sheet that I cut to be the same Size as the Foil and ran it through my Laminating Machine!! Then removed the Film to reveal the Design!! SWOON!! I LOVE this part!! 
I picked a second color of Gina K Designs Fancy Foil in Sparkling Silver and cut a piece large enough to cover the Design!! Placed it down onto the Toner sheet and then ran it through my Laminating Machine!! I then added some Black Soot Distress Paint Splatters for some Texture!! 
Here's the Finished Cards!!
For this Card I Stamped the I'm Sorry for your loss sentiment onto the bottom half of the Card and added some Black Soot Distress Paint Splatters!! I fussy cut the Stenciled Foiled Toner Sheet and adhered it to the cardbase with Foam Tape!! I Stamped and Embossed the Heart Image from the Rainbow Bridge Stamp Set using Black Onyx Versa Fine Ink and WoW Clear Gloss Embossing Powder!! Then I Fussy Cut it out and Adhered it to the center of the Foiled Heart!!
For my Second Card I added some Black Soot Distress Paint Splatters over the Card Panel and then I Fussy Cut the Stenciled and Foiled Heart and added it to the Card using some Foam Tape!! I Stamped and Embossed the Heart Image from the Rainbow Bridge Stamp Set using Black Onyx Versa Fine Ink and WoW Clear Gloss Embossing Powder!! Then I Fussy Cut it out and Adhered it to the center of the Foiled Heart!!
I LOVE the way these cards turned out and I hope you feel INSPIRED!!??

How about a chance to win a mini shopping spree? 
Simply leave a kind comment on this post and all the designer posts for your chance to win before 11:59 pm mountain time July 12th, 2020
One lucky random winner from one of the hop stops (you won't know which one!) will get a $50 discount code to the shop!! 
Winner will be announced on Tuesday July 14th!! 


THANKS SO MUCH for stopping by today and I hope you have a FABULOUS WEEKEND!! 

COUNTRY HUGS-N-KISSES
LARISSA   ๐Ÿ’–