Showing posts with label Thank You Card. Show all posts

Thursday, June 20, 2024

Newton's Nook Designs June Release 2024~ Farmer Newton!!

Pin It

Tuesday, June 18, 2024

Newton's Nook Designs June Release 2024~ Beekeeper Newton!!

1K+Save


HELLO CRAFTY FRENDS!!

Welcome to Release Week for the Newton's Nook Designs June Release 2024!! Today I'm sharing a Project that I've made using the NEW Farmer Newton Stamp Set + coordinating NEW Farmer Newton Die Set!! 
Here's a Close up look at ALL of the NEW Products being showcased for Today!!

NEW Farmer Newton Stamp Set and 
coordinating NEW Farmer Newton Die Set


I Started by Stamping and Embossing the Images and coloring them with Copic Markers!! Then I Die Cut the Images out using the coordinating Die Set!! Then I  added some White Gel Pen Highlights!! 
Then I Die Cut the Card Panel using the Basic Frames Die Set from some White Cardstock and Inked the Background using Distress Oxide Inks in Salvaged Patina and Vintage Photo!! I added some Black Soot Distress Paint Splatters and then I adhered the Images using Foam Tape for some Dimension!! 
I Die Cut the Frames and Tags Frame from some of the NEW Farmyard Pattern Paper Pad and then adhered the Card Panel!! I LOVE how this turned out and I hope I've INSPIRED you today!! 

Enter to Win a $25 Prize!!

We will be choosing two lucky winners to win a $25 store credit for Newton's Nook Designs online shop! The winners will be chosen at random from the collective blog posts featuring our new products this week. For a chance to win, leave comments on the Design Team Member Blog Posts (see list below) from Monday June 17 through Thursday June 18. You will not know which blog has been chosen so the more you comment on the better your chances are of winning!! You have until Thursday, April 20th at 9 pm ET to comment -- winners will be announced on the NND blog on Friday, June 21st.

Check out all the awesome Design Team Blogs below to enter:

Newton's Nook Designs

Donna Idlet

Larissa Heskett

Samantha Mann

Diane Morales

Farhana Sarker

Amanda Wilcox

THANKS SO MUCH for stopping by today and make sure to join us again tomorrow for a look at more of the NEW Products that'll be available in the Newton's Nook Designs Store on Friday June 21st, 2024!! I hope you have a FABULOUS WEEK!! 

COUNTRY HUGS-N-KISSES
LARISSA
 ðŸ’–

Tuesday, August 15, 2023

Newton's Nook Designs August Release ~ Chrysanthemum Stamp Set + coordinating Chrysanthemum Die Set!!

Pin It
Newton's Nook Designs August Release Available August 18th 2023

 
HELLO CRAFTY FRIENDS!!

Welcome to Day of the Newton's Nook Designs August Release!! Toady we are Showcasing the NEW Chrysanthemum Stamp Set!! 
Here's a Look at the NEW Set!! 
Chrysanthemum Stamp Set + coordinating Chrysanthemum Die Set by Newton's Nook Designs
SWOON!! I LOVE this addition to the Floral Collection!!
Here's what I've created for today!! 

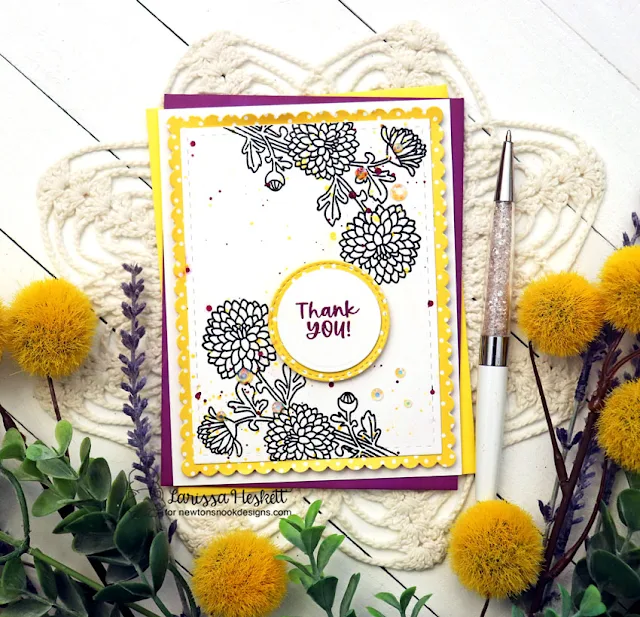
Thank You Card by Larissa Heskett for Newton's Nook Designs using Chrysanthemum Stamp Set, Chrysanthemum Die Set, Frames & Flags Die Set, Circle Frames Die Set and Springtime Paper Pad
I Started by Stamping and Embossing the Images onto the Card Panel using Versa Fine Black Onyx Ink and WoW Clear Gloss Embossing Powder!! Then I added some Yellow and Purple Distress Mica Splatters to the Card Panel!! SQUEAL!! I LOVE the POPS of both Color and Shimmer this adds to the Card!! 
Thank You Card by Larissa Heskett for Newton's Nook Designs using Chrysanthemum Stamp Set, Chrysanthemum Die Set, Frames & Flags Die Set, Circle Frames Die Set and Springtime Paper Pad
Then I Die Cut the Scalloped Rectangle Frame from the Frames & Flags Die Set from some of the Springtime Paper Pad in Yellow Dot Paper!! I also Die Cut a Circle from the same Paper using the Circle Frames Die Set!! I Stamped and Embossed the Sentiment using Seedless Preserves Distress Oxide Ink and WoW Clear Gloss Embossing Powder!! 
Thank You Card by Larissa Heskett for Newton's Nook Designs using Chrysanthemum Stamp Set, Chrysanthemum Die Set, Frames & Flags Die Set, Circle Frames Die Set and Springtime Paper Pad
I Adhered the Circle Sentiment on to the Card Panel using Foam Tape for some Dimension and then added some Trinity Stamps Fairy Rocks Rhinestones to finish off the Card Design!! I LOVE the Iridescent Sparkle!! 
Thank You Card by Larissa Heskett for Newton's Nook Designs using Chrysanthemum Stamp Set, Chrysanthemum Die Set, Frames & Flags Die Set, Circle Frames Die Set and Springtime Paper Pad

Would you like to win the “Chrysanthemum” Stamp Set?
This stamp set will be given away to ONE Lucky Winner!!

Here's how to win: Comment on the NND blog and Design Team blogs (see list below)! The winner will be chosen at random from the collective reveal posts. Make sure to check out each of their blogs and comment for your chance to win. You will not know which blog has been chosen so the more you comment on the better your chances are of winning! You have until Thursday August 17th at 9pm ET to comment  -- winners will be announced on the blog post on Friday, August 18th. 


THANKS SO MUCH for stopping by today!! Make sure to leave me comments from ALL of the Release Week Posts for your chance to WIN!!
Then check out the Newton's Nook Designs Blog on Friday, August 18th to see if you're one of the LUCKY Winners!! 

Have a FABULOUS WEEK!!

LARISSA HESKETT ðŸ’–

Monday, April 17, 2023

Thank You Card w/ Spellbinders!!

Pin It

Hello Crafty Friends!! 

I'm here today to share a Card using Spellbinders March Stitching Die of the Month~ Nested Layered Stitched Petal!! SWOON!! I LOVE this Die Set as there are SO MANY ways to use it!! If you follow me, then you KNOW that I LOVE to create Shaker Cards and I really wanted to show how you can create an Infinity Shaker Card even with the Stitched Die Cuts!! 

I also LOVE Daisies, so I've incorporated the Beautiful Daisies from the NEW Umbrella Bloom Etched Die Set!!
I Die Cut the Main portion of the Nested Layered Stitched Petal Die from some Spellbinders Indigo Cardstock and then I Stitched the Design with some Light Seagreen 964  Included in the Spellbinders DMC Color Essentials Floss Bundle that matches the Spellbinders Waterfall Cardstock that I used for the Die Cut and Pierced Background Panel!! 

Once everything was Stitched then I Die Cut the Beautiful Daisies from the NEW Umbrella Bloom Etched Die Set using some Spellbinders Snowdrift Cardstock for the Flowers and some Spellbinders Peridot Cardstock for the Leaves!! I adhered all of the Flowers to the center of the Stitching using some Therm O Web Zots Bling Adhesive Dots!! Then I adhered some Trinity Stamps Lumionous Yellow Baubles to the Center of all of the Daisies as well as the Large openings in the Center of the Pierced Design!! 

Next I created the Infinity Shaker Card Panel adhering the Die Cut and Pierced Background Panel that was Stamped with the the "Thank You" Sentiment in some Navy Ink, to some Snowdrift Cardstock and then using a Waffle Flower Infinity Shaker Panel to adhere to the Panel, leaving the Top open so I could add ALL of my BEAUTIFUL Shaker Elements!! I added some Iridescent Mini Butterfly (24 Color/Set 3D Butterfly Nail Glitter Sequins) along with some Taylored Expressions Tiny Diamonds-Pastel and some Sequins in White, Navy (both Matte and Metallic)!! I Closed the Top of the Panel and the Infinity Shaker is READY to SHAKE!! I LOVE the Mix and the Sparkle, Shine and Playfulness it adds to the Card Design!!

I Adhered the Stitched Panel to the top of the Infinity Shaker Panel and the Card Panel was adhered to a White Cardstock A2 Cardbase!! I LOVE the way it turned out!! 
So there you have it a BEAUTIFUL Infinity Shaker Card using the Spellbinders March Stitching Die of the Month-Nested Layered Stitched Petal!! I LOVE this set as there are SO MANY ways to use them!! Infinity Shaker Cards are just one idea!! I'll be back soon to share another Idea!! THANKS SO MUCH for stopping by today and I hope you have a FABULOUS WEEK!! 


COUNTRY HUGS-N-KISSES
LARISSA  💗

Sunday, March 1, 2020

Paper Smooches March #1 Challenge ~ Anything Goes!!

Pin It
Hello Crafty Friends!! 

Today starts the NEW Paper Smooches March Challenge!! Our challenges are a fun way to get you inspired!! This months theme is-ANYTHING GOES.
Challenge deadline: March 14th, 2018 at 11:59pm PST
Winners will be posted on March 16th. 
Next challenge begins March 15th. 

Here are the rules: 
  1. Create a NEW project (card, tag, layout, journaling page, etc).
  2. You must use at least one Paper Smooches stamps/dies or free digital images- please link to our website: http://www.papersmoochesstamps.com
  3. Post your project on your blog/social media platform and submit a direct link to your post/image using our linking system. 
  4. Please display our banner on your blog post (right click on the banner and save to your computer. If you have any trouble, I am happy to email the image to you, savannahland2 at comcast dot net)
  5. All skill levels are welcome!!! 
  6. You can enter as many times as you like! 
Here's what you are playing for: 3 winners

  • One winner will win a prize pack (pictured below)
  • One winner will receive a $25 Paper Smooches gift certificate
  • One winner will receive a $5 Paper Smooches gift certificate
Thank You Card by Larissa Heskett for Paper Smooches using Sportsball, Seeing Stars, Vanilla Verbiage, Starry Stencil #papersmooches #papersmoochesstars #thankyoucard
Today I've made a Card to THANK the Coach of my son Beckett's Traveling Basketball Team!! They just finished their 7th Grade Season and had a Party to CELEBRATE!! I LOVE the way it turned out!! I LOVE being able to Personalize Cards like this and the Sportsball Set is a FUN one for ALL things Sports related!! I started by Masking off the Area in the top 2/3 of the Card!! THen I Stamped and Embossed the Basketball Images!! I used Copic Markers to color them in using VR00. VR02, YR18 & YR68!! Then I Stamped and Embossed another Basketball and Die Cut it out using the coordinating  Dies!! I wanted to add a POP of Red and Grey as those are our Colors!! So I used the Starry stencil and applied some Candied Apple Red Distress Ink to place the Stars!! I then took the Seeing Stars Stamp Set and Stamped the Little Stars in MFT Grey Grout Ink!! 
I then added some Black Soot Distress Paint Splatters and finished off the design with some Star and Mini Star Silver Confetti for a touch of Sparkle!! Then I Stamped and Embossed the Thank You Speech Bubble using the Vanilla Verbiage Stamp Set and Die Cut it out using the Vanilla Verbiage Icons Dies!! I adhered the Panel to the Cardbase using Foam Tape and then adhered the Basketball and the Thank You Speeche Bubble using Foam Tape for some Dimension!! I LOVE the way it turned out and I KNOW the Coach appreciated it, as ALL of the Boys signed it!! 

THANKS SO MUCH for stopping by today and I CAN'T wait to see what you create for the Challenge!! 
Have a FABULOUS WEEK!! 

COUNTRY HUGS-N-KISSES
LARISSA   ðŸ’–

Friday, July 28, 2017

Flip Flopsome Card w/ Paper Smooches and Several Challenges!! =)

Pin It
 
HELLO!!
I'm stopping in to share a BEAUTIFUL and FUN Card I've made for a couple Challenges and for a SPECIAL Friend!! She LOVES Summer because it includes two of her FAVORITE things, Flowers and Flip Flops!! As I sat down to create this Thanks You Card I got the FUN Idea to include the two on my Card!! Then as I was trying to figure out the PERFECT Sentiment, I came up with a FUN Play on Words!! I used a Couple different Sentiments from Paper Smooches to create my own Sentiment that DISCRIBES her PERFECTLY!!  THANKS YOU FOR BEING FLIP FLOPSOME!!  =)
SQUEAL!! How FUN is that for a Play on Words!!?? I KNOW its going to make her SMILE!!


I started by creating my own Patterned Paper using the Sweet Flip Flop Image from the Paper Smooches Summer Lovin Stamp Set!! I Stamped and Embossed them onto some Distress Watercolor Paper!! Then I added some Ranger Ink Black Soot Distress Paint by Tim Holtz!! I Die Cut the Largest Paper Smooches Ovals 1 Dies from some Distress Watercolor Paper and then Stamped and Embossed my Sentiment!! I used the Many Thanks Stamp Set for the Thank You Sentiment, the Spectrum Stamp Set for the some and the Summer Lovin Stamp Set for the Flip Flop!! Then I inked the Oval with Tumbled Glass Distress Ink and added some Hibiscus Flowers also from the Summer Lovin Stamp Set!! I Stamped and Embossed them onto Distress Watercolor Paper!! I Colored them with Copic Markers and then added some White Gel Pen High Lights, Tonic Studios Shimmer Pen and some Morning Dew Nuvo Drops for dimension!! I added some Sequins for some more Color and Sparkle and my Card was done!!
 
I'm Playing along with the

 
Paper Smooches: Anything Goes Challenge


Simon Says Stamp Wednesday Challenge: Anything Goes


Color Throwdown Challenge #453

THANKS SO  MUCH for stopping by and I hope you have a FABULOUS WEEKEND!!
COUNTRY HUGS-N-KISSES
LARISSA    =)

Thursday, September 15, 2016

Paper Sweeties September 2016 Release Party!! =)

Pin It

Hello!!
Welcome t the New Paper Sweeties September Release Party!! =) SQUEAL!! These New Products are just SO FUN!! I hope you were inspired yesterday by the Sneak Peek Projects the Design Teamies and I shared!!??  If you missed yesterday’s festivities, click –> HERE <– to check out all the creativity!!  Before we get to my projects for today, let’s meet the newest Products for this month – just in time for all your fall craft projects, cards, layout, invitations and more:
PS-185
SC-185
PS-186
SC-186
PS-183
I just LOVE LOVE LOVE the Pumpkins and thought it would be FUN to use them to create a Sweet Fall Scene!! So I Stamped and Embossed 3 of the Pumpkins and then 1 of the Pilgrim Hats!! I Watercolored them using my Zig Clean Color Real Brush Markers and I LOVE White Pumpkins so I had to add one to the Mix!! =) I also Stamped some Leaves and Vines and then Die Cut Everything using the coordinating Dies!! I Stamped the FUN Dictionary Styled Sentiment from the Set several times to create a Border Element for my Card Design onto some Lawn Fawn Plaid Paper!! I Die Cut an Avery Elle Scalloped Border in Orange to make the Scene have a Visual Triangle of Orange!! I wanted a Waterolored background and then I added some Texture with some Distress Paint Splatters in both Black Soot and Picket Fence!! A Few Sequins Finishes off the Design!! I LOVE LOVE LOVE the way it turned out!!
Don't forget to stop by the rest of the AMAZING DT Blogs to see what they have created!!
We’d love for you to play along with the September Inspiration Challenge at Paper Sweeties – for a chance to win a $25 SHOPPING SPREE from the boutique along with a Guest Designer invitation to join us for the next challenge!  What fun inspiration we have this month — will you create a card, layout, sweet treat or something else?
papersweeties-inspiration#47
Have you seen our NEWEST KIT OF THE MONTH!!??  Beginning this month, our card kits have been RESTRUCTURED!!  Our customers asked and we listened!!  Beginning September 15th, our kits will NOW INCLUDE the New Stamps each month that were used to create the cards!!  You’ll get TWO*NEW* Stamp Sets along with all the pre-cut supplies you will need to create two beautiful cards each month – WOW!!
September2016
You can purchase the kits one month at a time OR subscribe to the Kit of the Month CLUB to save $5 each month!  You’ll get a fun Kit Club Member button that you can wear to all your crafty events and receive FUN mailbox inspiration shipped directly to you around the 15th of each month!  Hop on over to take a little peek!  If you’re SPOTTED wearing a Kit Club Member button at a stamp show that we attend, you’ll get a {sweet} PRIZE at the show!
GOING, GOING … GONE!! We’ve added loads of products to our RETIRING SOON category … check it out and get your favorites at up to 50% OFF before they are gone forever!  (Limited quantities … available while supplies last).
THANKS SO MUCH for stopping by today and I hope you'll come back tomorrow for the Paper Sweeties Release Rewind!! You WON"T WANT to MISS IT!!
Have a FABULOUS WEEK!!
COUNTRY HUGS-N-KISSES
LARISSA  =)