Showing posts with label Gems. Show all posts

Thursday, July 28, 2022

Spellbinders in July Celebration 2022!!

Pin It
Hello Crafty Friends!! 

I'm here today as a Part of the Spellbinders in July Celebration!! SQUEAL!! If you haven't seen the NEW Release you'll WANT to go and check it out!! I'm in LOVE, and have MORE Ideas than I do time to create!! LOL!! ALWAYS the BIGGEST Problem in my situation!! 
I'm sharing 3 STUNNING Cards today using the NEW Stitched Petals Diamond Background Die along with the Christmas Blooms Etched Die Set and the Mini Blooms and Sprigs Etched Die Set to add some Dimensional Florals!! 
I Started by Die Cutting some Wood Grain Patterned Paper using the NEW 
Stitched Petals Diamond Background Die!! Then I Stitched the Pattern using some Floss in 115, 3348 & 800896!! 

Here's a Close up of the Floss Number and the Stitched Design!! 

Next I Die Cut the Poinsettia Flowers from the Christmas Blooms Die Set from some Phonebooth Color Essentials Cardstock and then Inked the Centers with some Mahogany Distress Ink for some Dimension!! 

After adhering the Die Cut Poinsettia Blooms to the Stitched Panel using Multi Medium Matte Adhesive I then added some Metallic Red Sequins to the Center of the Poinsettia Blooms again using Multi Medium Matte Adhesive and then added some of the Aura AB Color Essential Gems to finish off the Design and I LOVE how the Panel turned out!! 
I Stamped and Embossed the "Happy Birthday" Sentiment from the Birthday Unboxing Sentiments Stamp Set using Versa Mark Ink and Spellbinders White Embossing Powder onto some of the NEW Mahogany Color Essentials Cardstock!! Then I Die Cut the Sentiment Strip using the Mini Slimline A Etched Die Set and adhered it to my Card Panel using some Foam Tape for some Dimension!! 

I Adhered the Card Panel to a Cardbase made from some of the NEW Mahogany Color Essentials Cardstock!! I LOVE how the Stitched Card Panel POPS of the Cardbase!! 

Here's a Close Up look at ALL of that STUNNING Dimension and Stitched Details!! The Sparkle from the Metallic Sequins and Aura Gems just really makes the Design!! 
I also LOVE that you can change the Sentiment and this Card Design can be used for the Holidays, or an Anniversary or even a Thinking of You or Thank You Card!! 
I Started by Die Cutting some Gingham Patterned Paper using the NEW Stitched Petals Diamond Background Die!! Then I Stitched the Pattern using some Floss in 966, 33 & 800896!!
Here's a Close up of the Floss Number and the Stitched Design!! 
Next I Die Cut the Poinsettia Flowers from the Christmas Blooms Die Set from some Purple Mist Color Essentials Cardstock and then Inked the Centers with some Seedless Preserves Distress Ink for some Dimension!!
After adhering the Die Cut Poinsettia Blooms to the Stitched Panel using Multi Medium Matte Adhesive I then added some Iridescent Sequins to the Center of the Poinsettia Blooms again using Multi Medium Matte Adhesive and then added some of the Spectrum AB Color Essential Gems to finish off the Design and I LOVE how the Panel turned out!!
I Adhered the Card Panel to a Cardbase made from some of the Onyx Color Essentials Cardstock!! I LOVE how the Stitched Card Panel POPS of the Cardbase!! 

Here's a Close Up look at ALL of that STUNNING Dimension and Stitched Details!! The Sparkle from the Metallic Sequins and Aura Gems just really makes the Design!! 
SWOON!! I LOVE the way this Card turned out and I think its FUN to show how you can stitch on Patterned Paper to get a completely FUN look!! ENDLESS POSSIBILITIES!! 
Now for a BONUS Card!! I wanted to show how even though this is a Christmas Die, the Design is such that it can be used for ANY Design!! I personally LOVE Mums in the Fall and thought it would be FUN to create some Fall Mums on this Card using the Mini Blooms and Sprigs Die Set!! SWOON!! Isn't it STUNNING!!?? Who's ready for Fall!!??  
I Started by Die Cutting some White Cardstock using the 
NEW Stitched Petals Diamond Background Die!! Then I Inked the Background of the Panel with some Tattered Rose Distress Oxide Ink and some Fossilized Amber Distress Ink to add a POP of Color to the Background Panel!! Then I  Stitched the Pattern using some Floss in 69, 6211 & 800334!!
I repeated the SAME Steps to assemble the Card only using the Mini Blooms and Sprigs Die Set to Die Cut the Blooms from some of the Barely Peach Color Essentials Cardstock!! I wanted a FULLER Bloom so I Die Cut 2 Blooms for each!! I Inked the Bottom Layer with some Mahogany Distress Ink and the Top Bloom with some Tattered Rose Distress Ink, then adhered them together!! 
I added some Peach Sequins to the Center of the Blooms and then added some of the Aura AB Color Essential Gems to finish off the Design!! I adhered the Card Panel onto a Pomegranate Color Essentials Cardbase and my Card is ready to send to someone SPECIAL this Fall!! 

So there you have it, 3 STUNNING Cards using the 
NEW Stitched Petals Diamond Background Die along with the Christmas Blooms Etched Die Set and the Mini Blooms and Etched Die Set to add some Dimensional Florals!! I LOVE how VERSITAL this Designs is and how just by changing up the Floss Colors and the Floral Dies you use, you can create for ANY Season!! Also, just by changing the Sentiment you can Create for ANY Occasion too!! 
I hope I've INSPIRED you and if you give this Card Design a try I hope you'll TAG me on Social Media as I'd LOVE to see what you create!! THANKS SO MUCH for stopping and I hope you have a FABULOUS WEEKEND!! 

COUNTRY HUGS-N-KISSES
LARISSA  💖

S U P P L I E S Below you will find links to the supplies used to create this project(s). Click the icon for the store underneath the thumbnails to start shopping. Where available I use compensated affiliate links at no extra cost to you. Your support helps me to keep bringing you new projects. Thank you!! 💓

Tuesday, March 13, 2018

Paper Sweeties March 2018 Blast from the Past Favorites Day 1!! =)

Pin It


HELLO!! 
I'm here with Paper Sweeties for the
Paper Sweeties March 2018 Blast from the Past Favorites Day 1!!
Let's take a look at the Products I chose to FEATURE today!!
I've used the

 
I wanted to create a SWEET Easter Shaker Card and I thought it would be FUN to use ALL of these Products together!! I Stamped and Embossed all of the Images and then used the coordinating Dies to Die Cut them out!! I colored them with Copic Markers and added some Gel Pen Details, Tonic Studios Aqua Shimmer Pen and Morning Dew Nuvo Drops!!  I Created an Oval shaped Window for the resemblance of an Easter Egg!! I added a Mix of Pretty Pink Posh Sequins and Gems and my Shaker Card was done!!
I hope you'll stop by to see what the rest of the AMAZING DT have created!!
Michelle Bala
Nancy Salkeld

THANKS SO MUCH for stopping by come back tomorrow for another Blast from the Past Project!! Have a FABULOUS WEEK!!

I'm Linking up

Simon Says Stamp Monday Challenge: Eater/Spring Inspiration

Grab our badge:
Word Art Wednesday Challenge #324-#325:
Anything
Goes

Simon Says Stamp Wednesday Challenge: Girl Power
 
COUNRTY HUGS-N-KISSES
LARISSA    =)

Wednesday, April 12, 2017

Newton's Nook Designs April Release ~ "Simply Relative"!! =)

Pin It


HELLO!!
Happy Wednesday and Welcome to the Second Day of the New Newton's Nook Designs April Release!! Today we're showcasing the New "Simply Relative" Stamp Set!! I LOVE LOVE LOVE these New Sentiments in this Set and think you will too!! Let's take a Look at the FULL Set, Sold Separately available Friday April 14th, 2017!!

 
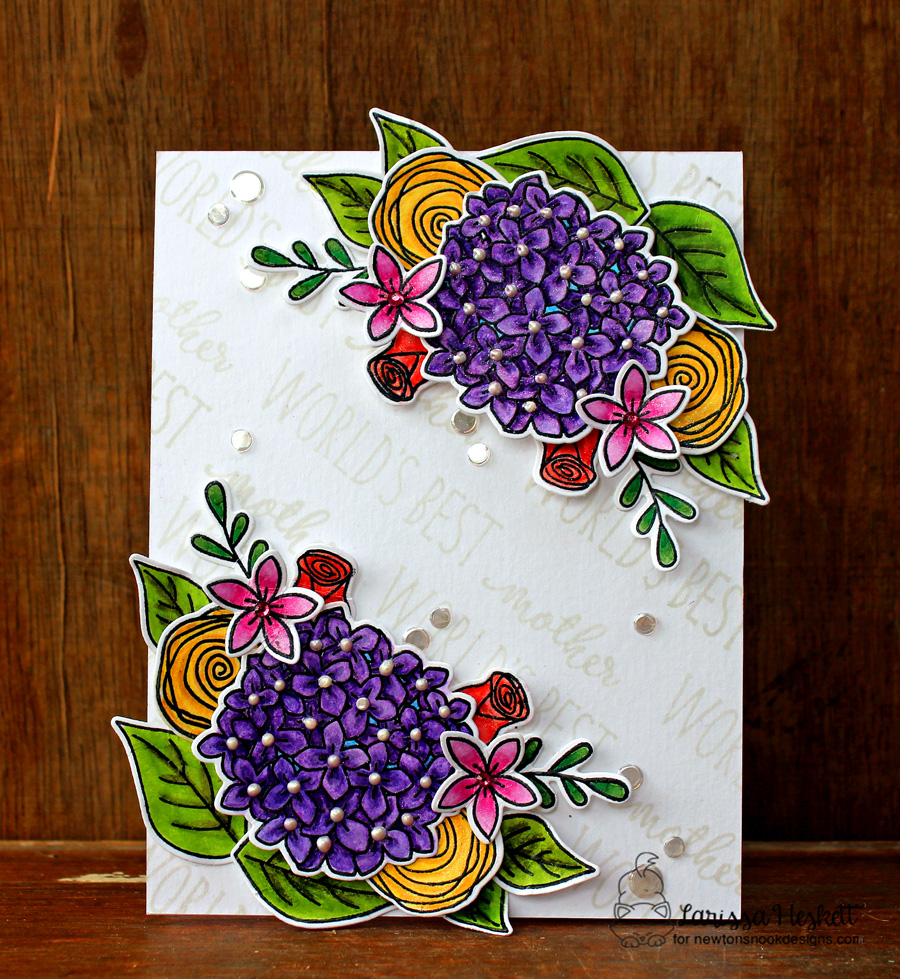
I started by Stamping and Embossing all o my Images onto Distress Watercolor Paper!! I don't know what my fetish is with this Watercolor Paper, but I LOVE it for every type of Coloring except for my Zig Markers which I like to use only on Bristol Paper!! I used Copic Markers for these (Hydrangea Cluster: BV00, BV02, V09   Pink Flowers: RV52, RV55, RV09
Roses: R20, R22, R05   Leaves: YG25, YG17, YG97   Sprigs: G24, YG45, G19  
Jar: B0000, B000, BG45 )
I then added some Spectrum Noir Clear Glitter Pen to the Flowers and the Jar to make them Sparkle!! I LOVE the way it looks on real Life!! I added Tonic Studios Nuvo Drops in Pearl Seashell to the Centers of the Hydrangea Flowers and some Pink Gems to the Pink Flowers!! I think it adds such a BEAUTIFUL Little Detail to the Flowers!! I didn't want a BUSY background because I wanted the Flower Bouquet to POP OFF the card so I decided to add some Stamped Words for a Simple but Elegant Background using MFT Hybrid Ink in Grout Gray!! A few of the words are from the "Lovely Blooms" Stamp Set, but a Few are from the New "Simply Relative" Stamp Set !! =) I LOVE LOVE LOVE the way it turned out and I hope I've INSPIRED you today!!??   =)

Would you like to WIN the Simply Relative Stamp Set!!??
This set will be given away to ONE lucky winner!
Here's how to win:
Comment on the NND blog and Design Team blogs (see list below)! The winner will be chosen at random from the collective reveal posts. Make sure to check out each of their blogs and comment for your chance to win. You will not know which blog has been chosen so the more you comment on the better your chances are of winning! You have until Thursday April 13th at 9pm CST to comment  -- winners will be announced on the blog post on Friday, April 14th. 
Check out all the awesome Design Team Blogs below to enter:
 
THANKS SO MUCH for stopping by and I hope you'll come back tomorrow for a look at the New  "Newton's " Stamp Set!! You WON'T want to miss it!! 
Have a FABULOUS WEEK!!
                  Simon Says Stamp Wednesday Challenge: Happy Birthday!!
COUNTRY HUGS-N-KISSES
LARISSA    =)

Tuesday, April 11, 2017

Newton's Nook Designs April Release ~ Lovely Blooms!! =)

Pin It


HELLO!!
Happy Tuesday and Welcome to the Second Day of the New Newton's Nook Designs April Release!! Today we're showcasing the New "Lovely Blooms" Stamp Set + Coordinating Die Set!! I LOVE LOVE LOVE these New Images and the New Dies and think you will too!! Let's take a Look at the FULL Sets, Sold Separately available Friday April 14th, 2017!!
 SQUEAL!! What a SWEET Set!! I LOVE LOVE LOVE Floral Sets as I LOVE to Garden!! I used to not like it as growing up it seemed like more of a CHORE I had to do (planting, watering pulling weeds) and I just didn't enjoy it!! Then after going to college and getting married and having a house of my own I started to realize the BEAUTY and Tranquility of Gardening!! I didn't view it as "Work" any more and my Mother-In-Law taught me ALOT about different Flowers!! I still have the Very First Mother's Day Mini Rose Bush she gave to me when we were expecting Beckett and it makes me SMILE and think of her EVERY year as it Blooms!! I MISS her and our time spent shopping for and planting flowers each Spring and Fall!! This Card was made for her for her Birthday coming up, even though she'll NEVER see it in person, I KNOW she can see it from Heaven and I KNOW she would have LOVED it and Displayed it as she did ALL of the Cards I made for her!!  =)
I started by Stamping and Embossing all o my Images onto Distress Watercolor Paper!! I don't know what my fetish is with this Watercolor Paper, but I LOVE it for every type of Coloring except for my Zig Markers which I like to use only on Bristol Paper!! I used Copic Markers for these (Hydrangea Cluster: BV00, BV02, V09   Pink Flowers: RV52, RV55, RV09  
Roses: R20, R22, R05   Leaves: YG25, YG17, YG97   Sprigs: G24, YG45, G19  
Jar: B0000, B000, BG45 )
I then added some Spectrum Noir Clear Glitter Pen to the Flowers and the Jar to make them Sparkle!! I LOVE the way it looks on real Life!! I added Mini Pearl Gems to the Centers of the Hydrangea Flowers and some Pink Gems to the Pink Flowers!! I think it adds such a BEAUTIFUL Little Detail to the Flowers!! I wanted a Tag so I decided to use the Banner Die from the Garden Window Die Set and White Embossed the Grandma Sentiment then added it to the Jar!! I didn't want a BUSY background because I wanted the Flower Bouquet to POP OFF the card so I decided to add some Stamped and Embossed Words for a Simple but Elegant Background!! A few of the words are from the "Lovely Blooms" Stamp Set, but a Few are a Sneak Peek from the New "Simply Relative" Stamp Set coming on Wednesday!! =) I LOVE LOVE LOVE the way it turned out and I hope I've INSPIRED you today!!??   =)
Would you like to WIN the “Lovely Blooms” Stamp Set!!??
This set will be given away to ONE lucky winner!
Here's how to win: 
Comment on the NND blog and Design Team blogs (see list below)! The winner will be chosen at random from the collective reveal posts. Make sure to check out each of their blogs and comment for your chance to win. You will not know which blog has been chosen so the more you comment on the better your chances are of winning! You have until Thursday April 13th at 9pm CST to comment  -- winners will be announced on the blog post on Friday, April 14th. 
Check out all the awesome Design Team Blogs below to enter:
 
THANKS SO MUCH for stopping by and I hope you'll come back tomorrow for a look at the New  "Simply Relative" Stamp Set!! You WON'T want to miss it!! 
Have a FABULOUS WEEK!!
COUNTRY HUGS-N-KISSES
LARISSA    =)

Sunday, April 9, 2017

Folk Art Fox Card w/ Newton's Nook Designs!! =)

Pin It
Newton
HELLO!!
Today I'm sharing this Folk Art Fox Card I made for the Newton's Nook Designs Blog using the New Cottage Garden Stamp Set and the Coordinating Cottage Garden Die Set!!
 
I've been having a BLAST playing with the New Distress Oxide Inks from Tim Holtz and I created the AMAZING Teal Color on those Foxes by Layering Two Ink Colors, Cracked Pistachio and Faded Jeans!! After I Stamped and Embossed the images with Clear Embossing Powder, I trimmed them out using the coordinating Cottage Garden Die Set and added them on the card in a FUN Folk Art Pattern along with some of the other SWEET Images ALL from the Cottage Garden Stamp Set!! I rotated them in different directions to resemble a lovely Folk Art Pattern that you'd find on a Plate or Wall Hanging!! Then to finish off my card I added some Gems to the Flowers on the Images and some Black Gel Pen to the Eyes of each of the Fox Eyes then the "Hello, Friend" Sentiment Embossed in White Embossing Powder onto a Black Banner from the Garden Window Die Set!! Which is on SALE for this Week ONLY!! (Through April 14th)
It's MY FAVORITE Banner Die and I think if you'd look I use it on more than 1/2 of my Cards!! It's just the PERFECT Size!!  =)
THANKS SO MUCH for stopping by and I HOPE you'll join us ALL Next Week as we Showcase the NEW April 2017 Release!! SQUEAL!! You're NOT gonna want to MISS it!!  =)
Here's some Sneak Peeks just to get you EXCITED!! HEHEHE!!  =)
SAVE THE DATE: Reveals start Monday, April 10th andnew products will be for sale on FRIDAY, April 14th!! 
I'm also Linking up to the
workitwedbanner
COUNTRY HUGS-N-KISSES
LARISSA    =)