Showing posts with label For You Die. Show all posts

Wednesday, April 14, 2021

Paper Sweeties April 2021 New Release Sneak Peeks!!

Pin It
HELLO CRAFTY FRIENDS!!

I'm showcasing the NEW 2nd Quarter Paper Sweeties Sweet Kit!! SWOON!! If you LOVE to create Handmade Goodies to share with Friends and Family this is a PERFECT Kit for you!! Here's a Look at the Contents of the Kit!! 
Here's a closeup look at both Stamp Sets and the coordinating Die Set included in the Kit!! 


I've created a SWEET Gift Tag for today using the NEW Sweet Mini Duo: Homemade and the Sweet Mini: Homemade Add-on: For You along with the For You Die Set!! 
I Stamped and Embossed the Oven Mit Images using Versa Fine Black Onyx Ink and some WoW Clear Gloss Embossing Powder!! Then I used Copic Markers to color in the Image!! 
I used Pink: R81 & R85    
White: N0 & N3
Then I Die Cut the Image out using the coordinating Dies!! 
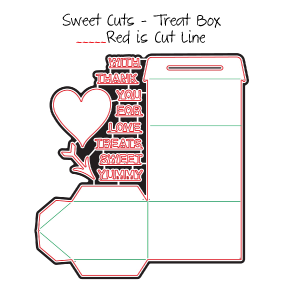
I applied some Tumbled Glass Distress Oxide Ink to the Background of the For You Stitched Tag and then Stamped and Embossed the Sentiment and used Foam Tape to POP up the Oven Mit Images!! I adhered a BEAUTIFUL Scrap Ribbon Bow to the Top of the Tag using some of the Cotton Candy Seam Binding Ribbon using Zots Bling Adhesive Dots to adhere it to the Mini Clothes Pin!!
 Then I created a Treat Box using the Treat Box Die and adhered the Clothes Pin to the Top of the Treat Box!! Fill it with a SPECIAL Homemade Treat and its ready to give!! 

Sweet Kits Club Subscription - SAVE $5 on each quarterly kit!!

For more inspiration please visit the rest of the AMAZING Design Team Blogs!! 

THANKS SO MUCH for stopping by and I hope you have a FABULOUS Week!!

COUNTRY HUGS-N-KISSES
LARISSA   ðŸ’—

Friday, February 14, 2020

Paper Sweeties Look Back Inspiration Day #2!!

Pin It

HELLO!!  


I'm here with Paper Sweeties for Look Back Inspiration Day #2!! This month we're taking a look back at some of my FAVORITE Paper Sweeties Products!! 
I've made a CUTE Dog House Treat Box for today's look Back!! LOVE LOVE LOVE how EASY these Treat Boxes are to create and they can be used for so many occasions!! Here's the Sets so you can check them out if you've missed them!!??
                                                   Treat Box Sweet Cuts


                  Treat Box Add-on: Home & Garden

          Treat Box Add-on: Home & Garden Sweet Cuts

Sent From My Heart
Sent From My Heart Sweet Cuts

Here's the CUTE Dog House Treat Box I've created for today!!
I started by Die Cutting all of the Pieces to create the Box!! I knew I wanted to use the Pieces for a Copper Roof and some Siding so I Die Cut them and Inked the Edges using some Gathered Twigs Distress Ink!! I also used the SWEET Image from the Sent From My Heart Stamp Set and used the coordinating Sent From My Heart Sweet Cuts to Die Cut the Puppy out!! I also Stamped and Die Cut Images from the Sweeties Pets Stamp Set and Sweeties Pets Die Set!! I Colored all of the Images with Copic Markers and added some Gel Pen and Nuvo Drops details!! I Stamped and Embossed the Sentiment onto the Tag Die Cut from the Beautiful Little Wishes Die Set and attached it to my Box using a Mini Clothes Pin!! I hope this gives you some ideas on ways to use these AWESOME Sets!! 

The Design Team is sharing some fabulous inspiration...be sure to check out their blogs!!
Debbie Marcinkiewicz  Paper Sweeties

THANKS SO MUCH for stopping by and I hope you have a FABULOUS WEEKEND!!

COUNTRY HUGS-N-KISSES
LARISSA    =)

Sunday, November 17, 2019

25 Days of Christmas Tags 2019 w/ Paper Sweeties!!

Pin It
Image may contain: text
Hello Crafty Friends!!
I'm here with Paper Sweeties sharing a SWEET Tag FULL of Texture and Sparkle as part of the 
25 Days of Christmas Tags 2019 
hosted by Tracy McNeely!! 

I've used the BEAUTIFUL For You Sweet Cuts Die for the Stitched Tag!! One cut from White Cardstock and one from Patterned Paper that I got from the Paper Sweeties October Card Kit!! I've also used the Foam Snowflakes that I covered with some Clear Glitter also included in that kit!! I added some Tumbled Glass Distress Oxide Ink to the Tag Base and then Die Cut the smallest Circle Scalloped Frame from some Therm O Web Deco Foil Flock in the NEW Blue Sky color!! I added some Dark Blue Cardstock to the back of the frame and then added the Glittered Foam Snowflake to the center of the Frame!! I LOVE all of the Texture and Sparkle!! A Snowflake Sequin and a Jewel finishes off the Snowflake!! I stamped and embossed the sentiment from the Merry Little Christmas Stamp Set and then finished off the Tag by adding a sprinkling of Sequins and Jewels to the background and some Frosting Seam Binding Ribbon that I inked to age it alittle and added aTwine Bow to finish it off!!  

Such a SWEET Tag to create!! I hope I've INSPIRED you to create some Tags of your own!!??  THANKS SO MUCH for stopping by and I hope you have a FABULOUS WEEKEND!!

COUNTRY HUGS-N-KISSES
LARISSA   =)

Sunday, September 15, 2019

Paper Sweeties September Release 2019 Rewind!!

Pin It
HELLO CRAFTY FRIENDS!!

Welcome to Day 3 of the Paper Sweeties 
September Release 2019!! 
I created a SWEET Love Ewe Card for today that could be used for MANY Occasions!! I'm thinking a New Baby Card would be PERFECT!!  I'm using the *NEW* stamp set called "Ewe Make Me Happyalong with the coordinating "You Make Me Happy" Sweet Cuts Die Set!! 
Here's a look at the *NEW* Sets!! 
I LOVE the NEW Sets this Month and ALL of the ways that you can use them!! I wanted to make a New Baby Card and used the Stamps to create my own Patterned Paper!! Then I Stamped and Embossed the Ewe Image onto some Plaid Patterned Paper and and used Copic Markers to add some Shading!! I also Colored in the Legs and the Face!! 
I added some Nuvo Drops in Blizzard Glitter to add some Sparkle to the Hearts, some of the Strips on the Legs and the Center of the Flower!! I also added some White Gel Pen Details!! Isn't it just the SWEETEST lil' Ewe!!?? I LOVE the way it turned out!! 
I used the For You Stitched Tag Sweet Cuts Die and inked the background to layer the Ewe onto using some Foam Tape and then adhered it to the Cardbase using more Foam Tape!! I added the Twine and Bubble Gum Seam Binding Bow to the top of the Tag and my card was finished!!

For more inspiration please visit the rest of the AMAZING Design Team Blogs!! 
THANKS SO MUCH for stopping by and come back tomorrow for some more AWESOME Inspiration!! Have a FABULOUS WEEKEND!!

COUNTRY HUGS-N-KISSES
LARISSA     =)

Wednesday, August 14, 2019

Paper Sweeties August 2019 Release Party!!

Pin It

HELLO CRAFTY FRIENDS!!

Welcome to Day 2 of the Paper Sweeties 
August Release 2019!! 
I created a SWEET I'm Proud of You Interactive Tag using the *NEW* stamp set called "Cupcakes and Sprinkles" Stamp Set and the coordinating "Cupcakes and Sprinkles" Sweet Cuts Die Set + the *NEW* "Best Day Ever" Stamp Set!!
Here's a look at the *NEW* Sets!! 


I wanted to create a SWEET I'm Proud of You Tag, with School Starting this Week!! I'm using the *NEW* Sets along with a few of the older sets!! I Started by Die Cutting one of the Paper Sweeties For You Stitched Gift Tags from some Distress Watercolor Paper!! Then I Stamped the Tag using some of the Sentiments from the I'm So Proud Of You Stamp Set with Grey Grout Ink!! I Stamped and Embossed the Cupcake Image and  Apple Image and Colored them using Copic Markers!! I also used the Notebook Image from the Planner Series Checklist Stamp Set and Fussy Cut it out!! I Stamped and Embossed the "Son" Sentiment from the *NEW* Best Day Ever Stamp Set!! 

I wanted to create an Interactive Report Card and I Stamped and Embossed the sentiment onto the inside using  some Red WoW Glitter Embossing Powder for the PROUD and Son!! I LOVE the way it turned out, and I LOVE how you can use the *NEW* Best Day Ever Stamp Set to combine with so many of the other Sentiment  Stamp Sets!! I added the Tag to a Gift Bag made from some Chalkboard Patterned Paper and added A Mini Cloths Pin and a Strawberry Seam Binding Bow to finish off the Treat Box, that I creating by using the Sweet Cuts Treat Box Die!! I hope this gives you some ideas on a different way to use these AWESOME Sets!!

For more inspiration please visit the rest of the AMAZING Design Team Blogs!! 

THANKS SO MUCH for stopping by and I hope you have a FABULOUS WEEK!! 

COUNTRY HUGS-N-KISSES
LARISSA   =)

Sunday, July 14, 2019

Paper Sweeties July 2019 Release Sneak Peeks!!

Pin It

HELLO CRAFTY FRIENDS!!

Welcome to Day 1 of the Paper Sweeties 
July Release 2019!! 
I created a SWEET Gift Tag using the *NEW* stamp set called "Beach Therapy" Stamp Set and the coordinating "Beach Therapy" Sweet Cuts Die Set!!
 Here's a look at the NEW Sets!!
Beach Therapy


I LOVE the Colors and Textures of Nautical, so that was my jumping off point with this Gift Tag/Bag!! I wanted to use the Negative shape of the Anchor that I Die Cut from the center of the For You Tag and I backed it with another For You Stitched Tag Sweet Cuts Die from some Nautical Striped Patterned Paper!! Then I stamped and embossed the Beach Therapy onto the bottom of the Tag using some WoW Red Glitter Embossing Powder!!  
I adhered it to a Burlap Gift Bag and added a Frosting Seam Binding Bow along with a Red Gross Grain Bow and some Nautical Twine Bow finishes off the Design!! This is SURE to BRIGHTEN anyone's Day!! 

For more inspiration please visit the rest of the AMAZING Design Team Blogs!! 

THANKS SO MUCH for stopping by and I hope you have a FABULOUS WEEKEND!! 

COUNTRY HUGS-N-KISSES
LARISSA   =)

Saturday, April 13, 2019

Paper Sweeties April Release Sneak Peeks ~ Hello!! =)

Pin It
HELLO CRAFTY FRIENDS!!

Welcome to Day 1 of the Paper Sweeties 
April Release 2019 Sneak Peeks!! 
I created a SWEET Gift Tag using a *NEW* stamp set called "Hello" Stamp Set which will be live in the Paper Sweeties shop TOMORROW!!
I Started by Die Cutting the For You Stitched Tag from some Distress Watercolor Paper!! I inked the Background of the Tag with some Tumbled Glass and Cracked Pistachio Distress Inks!! It's REALLY light, but in real life its really striking against the Stamped Flowers!! Then I Stamped the Flowers using Distress Oxide Inks in Tattered Rose, Abandoned Coral and Candied Apple for the larger Flower, Victorian Velvet and Seedless Preserves for the smaller Flowers and  Peeled Paint and Peacock Feathers for the Leaves!! I also Stamped the Sentiment using Peacock Feathers and then I adhered it to a Gift Bag with a Mini Clothes Pin and added a Strawberry Seam Binding Bow to finish it off!! I LOVE the way it turned out!!  

For even MORE Inspiration please visit the rest of the AMAZING Design Team Blogs!! 

THANKS SO MUCH for stopping by and I hope you come back tomorrow for a look at the NEW Products!!
Have a FABULOUS WEEKEND!!

 COUNTRY HUGS-N-KISSES
LARISSA