Showing posts with label April Release. Show all posts

Saturday, April 13, 2019

Paper Sweeties April Release Sneak Peeks ~ Hello!! =)

Pin It
HELLO CRAFTY FRIENDS!!

Welcome to Day 1 of the Paper Sweeties 
April Release 2019 Sneak Peeks!! 
I created a SWEET Gift Tag using a *NEW* stamp set called "Hello" Stamp Set which will be live in the Paper Sweeties shop TOMORROW!!
I Started by Die Cutting the For You Stitched Tag from some Distress Watercolor Paper!! I inked the Background of the Tag with some Tumbled Glass and Cracked Pistachio Distress Inks!! It's REALLY light, but in real life its really striking against the Stamped Flowers!! Then I Stamped the Flowers using Distress Oxide Inks in Tattered Rose, Abandoned Coral and Candied Apple for the larger Flower, Victorian Velvet and Seedless Preserves for the smaller Flowers and  Peeled Paint and Peacock Feathers for the Leaves!! I also Stamped the Sentiment using Peacock Feathers and then I adhered it to a Gift Bag with a Mini Clothes Pin and added a Strawberry Seam Binding Bow to finish it off!! I LOVE the way it turned out!!  

For even MORE Inspiration please visit the rest of the AMAZING Design Team Blogs!! 

THANKS SO MUCH for stopping by and I hope you come back tomorrow for a look at the NEW Products!!
Have a FABULOUS WEEKEND!!

 COUNTRY HUGS-N-KISSES
LARISSA

Thursday, April 11, 2019

Newton's Nook Designs April Release ~ Newton's Birdhouse, Mother's Day & Father's Day!! =)

Pin It
Hello!!
SQUEAL!!
         I'm here with Day 3 of the 
               Newton's Nook Designs April Release 2019!! 
.       Today we're showcasing the NEW "Newton's Birdhouse" Stamp Set + coordinating "Newton's Birdhouse" Die Set, "Mother's Day" Stamp Set & "Father's Day"Stamp Set!!  

Let's take a look at the AWESOME New Products!! 

For this Card I wanted to create a BEAUTIFUL Spring/Summer Scene!! I started by steciling the Background Clouds!! Using the Sky Borders Die to create a Stencil from some 6X6 Stenciling Plastic!! I use it for most of my Sky backgrounds!! I used a combo of Tumbled Glass and Cracked Pistachio!! Then I wanted to create a SUN w/ Sun Rays coming from behind the NEW Fence Die so I used the Sunscape Stencil using Scattered Straw and instead or rubbing the ink on which would create a GREEN color I just pounced it on the the Yellow would stay crisp!! 
I LOVE the way it turned out!! 
I wanted a White Picket Fence so I die Cut the NEW Fence Die and used a N2 Copic Marker to add some shading!! I used the Land Borders Die for the Grass Die Cut from some TE Carfdstock and then used Peeled Paint, Mowed Lawn and Gathered Twigs to add some shading and dimension, plus some shadows!! A few Flowers from the Woodland Spring and Bunny Hop Stamp Sets finish off the Ground Design!! For my sentiment I Stamped and Embossed it onto the NEW Speech Bubble Die and then added another SWEET Bird to finish it off!! I Die Cut the Scalloped Frame from some Lawn Fawn Patterned Paper using the Frames & Flags Die Set!! 

I used the NEW Mother's Day Stamp Set and combined it with the typewriter image from My Type Stamp Set to create a stunning combination!! I Stamped and Emboissed the XOXO Sentiment and a Heart with some WoW Glitter Embossing Powder in Red for some Sparkle!! I also added a few extra flowers around the typewriter using stamps from the Lovely Blooms Stamp Set,  Bunny Hop Stamp Set, and Woodland Spring Stamp Set along with their coordinating dies. I used Copic Markers to color everything in, going for a Bright and Cheerful color Palette!! The beautiful image was framed with a scallop edged frame cut out using our Frames & Flags Die Set from some Sunny Studio Patterned Paper!! 
Some Pretty Pink Posh Irridescent Jewels were scattered around and I added Nuvo Glitters Drops to the centers of all of the Flowers for some extra Spatrkle!! I LOVE the way the Design came together!!  

For my last Card I used the NEW Deco Foil Copper Metallix Gel to stencil the NEW Hardwood Stencil onto some Simple Stories Wood Grain Patterend Paper!! I used the Stencil Pal and the NEW Pixie Spray and then removed the Stencil to let the Gel Dry!! It's such a NEAT look in real Life!!
I Stamped and Embossed the NEW Father's Day Stamp onto some TE Sugar Cube Cardstock that I inked with some Tumbled Glass and Stormy Sky Distress Inks and then Die Cut using the Ginka K Designs Labels Die Set!! I also Fussy Cut some TE Kraft Cardstock using the Die to create a Frame that I inked with Gathered Twigs Distress Ink to make it POP!! I Die Cut some Authentique Denim Patterned Paper for the Base!! Inking it with some Chipped Sapphire Distress Ink to make it POP!! 
I colored the Images using Copic Markers and then I added some Glossy Accents to make them POP!! I added the Label to my Card using Foam Tape and then I added some Honey Bee Stamps Glass Bubbles scattered around for some added Shine and Color!! I really like how it turned out and just KNOW my Father-In-Law is going to LOVE it come Father's Day!! 

Would you like to win the “Newton's Birdhouse” Stamp Set!!??  
Here's how to win: 
Comment on the NND blog and Design Team blogs (see list below)! The winner will be chosen at random from the collective reveal posts. Make sure to check out each of their blogs and comment for your chance to win. You will not know which blog has been chosen so the more you comment on the better your chances are of winning! You have until Thursday April 11th at 9pm EST to comment  -- winners will be announced on the blog post on Friday, March 15th.
Check out all the awesome Design Team Blogs below to enter:

THANKS SO MUCH for stopping by today!! 
The New Products will be available tomorrow Friday April 12th!! 
Don't forget to visit the NND Blog tomorrow to see if your one of the LUCKY WInners and I hope I've INSPIRED you all week with ideas on how to use these AMAZING New Products!! 

Have a FABULOUS WEEK/WEEKEND!!

Monday, April 8, 2019

Newton's Nook Designs April Release ~ "Oink" Stamp Set, "Oink" Die Set, "Fence" Die Set, "Speech Bubble" Die Set & Hardwood Stencil!! =)

Pin It
Hello!!
SQUEAL!!
         I'm here with Day 1 of the 
               Newton's Nook Designs April Release 2019!! 
.       Today we're showcasing the NEW  
"Oink" Stamp Set + coordinating "Oink" Die Set, "Fence" Die Set, "Speech Bubble" Die Set, and the Hardwood Stencil!! 
Let's take a look at the AWESOME New Products!!
SQUEAL!! How FUN are these NEW Products!!?? I had a BLAST creating with them and I just LOVE how this interactive card turned out!! If you've followd me for very long, you KNOW that I use the word SQUEAL alot!! So this Set REALLY makes me SMILE!! I knew as soon as I saw the two similar posed Pig Images that I wanted to use the Lawn Fawn Magic Picture Changer Die and create a FUN Birthday Card!! 
I stamped by stamping and embossing the Pig Images onto some Distress Watercolor Cardstock!! Then I used Copic Markers to color them it!! I used R000, R00, R02, N2 for the Pig body, E31, E33 for the Hooves and BG11, BG45 & BG49 for the Bow and Party Hat which I stamped from the Newton Celebrates Stamp Set!! I used the Sky Borders Die Set to create a Stencil and Inked up the Clouds for the background of the Scene!! Then I also used the Land Border Die to Die Cut the Grass for the Scene!! I used Tumbled Glass, Cracked Pistachio and Stormy Sky Distress Inks for the Sky, and Peeled Paint and Mowed Lawn Distress Ink for the Grass!! I DIe Cut the NEW Fence Die from some Simple Stories Woodgrain Patterned Paper and then I added it to the Scene after I inked it with Gathered Twiggs Distress Ink!! I Stamped and Embossed the Sentiment onto the NEW Speech Bubble Die and adhered it to the Front of the Scene!! Some MFT Gingham Patterned Paper finishes off the Design!! 

Here's a QUICK Video of the Card in action!! 
SQUEAL!! It makes me so HAPPY!! 

Would you like to win the “Oink” Stamp Set!!??  
Here's how to win: 
Comment on the NND blog and Design Team blogs (see list below)! The winner will be chosen at random from the collective reveal posts. Make sure to check out each of their blogs and comment for your chance to win. You will not know which blog has been chosen so the more you comment on the better your chances are of winning! You have until Thursday April 11th at 9pm EST to comment  -- winners will be announced on the blog post on Friday, March 15th.
Check out all the awesome Design Team Blogs below to enter:

THANKS SO MUCH for stopping by today!! 
The New Products will be available Friday April 12th!! 
Don't forget to visit again tomorrow for a look at the NEW "Cluck" Stamp Set + coordinating "Cluck" Die Set!! 

Have a FABULOUS WEEK!!
COUNTRY HUGS-N-KISSES
LARISSA   =)

Wednesday, April 5, 2017

Pineapple Gift Bags w/ Paper Smooches April Guest Designer!! =)

Pin It

Grab our banner


HELLO & HAPPY HUMP DAY!! 
SQUEAL!! I'm SO EXCITED!!
Today I'm here today for my FIRST Post with Paper Smooches as their April Guest Designer!! I CAN'T WAIT to share what I've made for today!! I'm also linking up to the New Paper Smooches April Challenge: Showers!! I was thinking Showering You with Gifts!!?? Hope that Counts!!??  =)
I had SO MUCH FUN Playing with the April Release Products!! After getting my goodies, I decided it would be FUN to create a Pineapple Gift Bag!! I've used SEVERAL of the New Products, but also a few older products too!! =) Let's take a Look!!
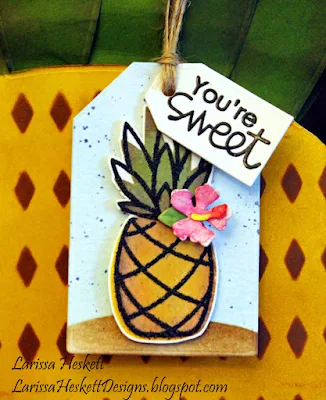
For the Gift Bags I used the Bunny Card Die to create the Base of the Gift Bag!! I'll share some photos at the end to show how I did this!! I also used the Largest of the Gift Tags 2 Die, Pineapple 2 Die, Pineapple Crush 2 Stamp Set, Fun & Flirty Stamp Set, Harlequin Die, Bunny Card Die!!! I used the Harlequin Die as a Stencil to add the Texture to the Pineapple Bag using Tea Dye and Gathered Twigs Distress Inks!!  wanted a more FULL Design so offset the Harlequin Design and created my own Design!! I used Mustard Seed, Fossilized Amber and Gathered Twigs for the Pineapple Base and Peeled Paint, Mowed Lawn and Gathered Twigs for the Pineapple Head!! For the Tag I Die Cut the Tag Stitched Die from Distress Watercolor Paper and then added some Distress Ink in Tumbled Glass and added Water for a Watercolored Look!! Once dry I added some Faded Jeans Distress Ink Splatters!! I then used an Embossing Powder tool and covered the Tag so I could Stamp and Emboss the Sentiments!! I used the Fun & Flirty Stamp Set Sentiment and Embossed it with Versa Fine Black Ink with Clear Embossing Powder and the Pineapple Crush 2 Stamp Set Sentiment with VersaMark Ink with Red Embossing Powder!! I created the Pineapple with the Pineapple 2 Die and Inked the Base with Mustard Seed, Fossilized Amber and Gathered Twigs and Peeled Paint, Mowed Lawn and Gathered Twigs for the Pineapple Head then for the Pineapple Details I used Tea Dye and Gathered Twigs Distress Inks!! I wanted it to POP so I added some Clear Embossing Powder!! I LOVE the added Texture it added to the Pineapple!! For the Sunglasses I Die Cut them from Black Cardstock and used Tonic Studio Morning Dew Nuvo Drops for the Lenses and then added some Fine Iridescent Glitter to make them Shimmer!!  I used a Tiny Heart Die from the Gift Tags 3 Die Set and Embossed it with the same Red Embossing Powder!!  
I made the Pineapple Gift Bag the same way as above only just used the Harlequin Die to Ink as the Die is!! I Die Cut the Large Tag from the Gift Tag Die Set from Distress Watercolor Paper and then added some Distress Ink in Tumbled Glass and added Water for a Watercolored Look!! Once dry I added some Faded Jeans Distress Ink Splatters used added Gathered Twigs for the Ground!! I Stamped and Embossed the Solid Pineapple and Head Images from the Pineapple Crush Stamp Set using Distress Oxide Inks in Fossilized Amber, Spiced Marmalade and Vintage Photo!! The Head was Stamped in Peeled Paint and Vintage Photo!! Then I took the Outline Image  from the Pineapple Crush Stamp Set and Stamped and Embossed it with Versa Fine Black Onyx Ink and used Walnut Stain Distress Embossing Powder!! SQUEAL!! I LOVE LOVE LOVE the Texture and realism it gives to the Image!! Then for some added SWEETNESS I added a Mini Hibiscus Flower from the Flip Flops Die Set!!
I used the Tiny Tag Die from the Gift Tags 3 Die Set and Stamped and Embossed it with the Sentiment from the Pineapple Crush Stamp Set!!  I used May Arts Burlap Twine for the Tags and I CAN'T WAIT to give these away!! I hope I've INSPIRED you and if you'd like to recreate one of these SWEET Pineapple Gift Bags for yourself here's how I created them!! 
 To Create the Bags I Die Cut a Bunny Card using a 5 3/4 inch wide X 8 1/2 inch Long Piece of 110 lb. Cardstock two Times!! You will have to cut alittle off the edges of the Die Cut as its alittle Wider than the Die!! I then Cut Two Cardstock Die Cut Pieces at a Time (making a total of 8 Die Cut Leaves) I started with 2 7 Inch Pieces and Die Cut the Bunny Card Ears as shown below!! Then Die Cut them in half to get 4 Sets of Ears!!
For the Bag I kept the Bunny Card Base as is and then added the Bunny Ears Die Cut Pieces to either side to create the First Row of 6 Leaves!! Shown Below!!
 Then for the Second Layer of Leaves I used 2 Sets of Bunny Ears Die Cuts Folding the one set in on its self to fit in the Center of the Bunny Ear Base!!
  
                                                    Here they are when added together!!
Then you use your Distress Inks to Ink everything and to add the Harlequin Stencil Designs!! I even Inked the Backsides of the Leaves so that when put together the Bag looked finished!! You could also use Colored Cardstock or Patterned Paper if you didn't want to Ink the Cardstock!! I also think it would be FUN to use Tissue Paper for the Top of the Pineapple too!!?? So MANY ways you could go about creating these FUN Pineapple Gift Bags!!
 Hope this leaves you INSPIRED to look at your Dies in a different way to get MORE out of them!!?? 
THANKS SO MUCH for stopping by and I hope to see you next Wednesday for my 2nd Post with Paper Smooches as their April Guest Designer!!
Have a FABULOUS WEEK!! 
I'm also linking up to the
These Gift Bags would make the Sweetest Birthday Gift Bags!!??  =)
COUNTRY HUGS-N-KISSES
LARISSA  =)