Pin It

 HELLO & HAPPY HUMP DAY!!
SQUEAL
HELLO & HAPPY HUMP DAY!!
SQUEAL!! I'm
SO EXCITED!!
Today I'm here today for my FIRST Post with
Paper Smooches as their
April Guest Designer!! I CAN'T WAIT to share what I've made for today!! I'm also linking up to the New
Paper Smooches April Challenge: Showers!! I was thinking Showering You with Gifts!!?? Hope that Counts!!?? =)
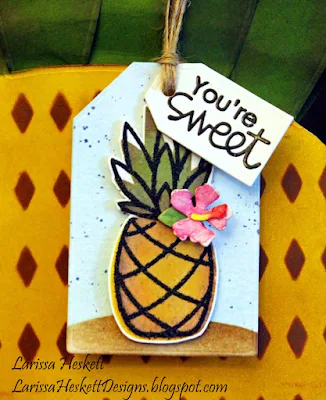
I had SO MUCH FUN Playing with the April Release Products!! After getting my goodies, I decided it would be FUN to create a Pineapple Gift Bag!! I've used SEVERAL of the New Products, but also a few older products too!! =) Let's take a Look!!


For the Gift Bags I used the
Bunny Card Die to create the Base of the Gift Bag!! I'll share some photos at the end to show how I did this!! I also used the Largest of the
Gift Tags 2 Die,
Pineapple 2 Die,
Pineapple Crush 2 Stamp Set,
Fun & Flirty Stamp Set,
Harlequin Die,
Bunny Card Die!!! I used the
Harlequin Die as a Stencil to add the Texture to the Pineapple Bag using Tea Dye and Gathered Twigs Distress Inks!! wanted a more FULL Design so offset the Harlequin Design and created my own Design!! I used Mustard Seed, Fossilized Amber and Gathered Twigs for the Pineapple Base and Peeled Paint, Mowed Lawn and Gathered Twigs for the Pineapple Head!! For the Tag I Die Cut the Tag Stitched Die from Distress Watercolor Paper and then added some Distress Ink in Tumbled Glass and added Water for a Watercolored Look!! Once dry I added some Faded Jeans Distress Ink Splatters!! I then used an Embossing Powder tool and covered the Tag so I could Stamp and Emboss the Sentiments!! I used the Fun & Flirty Stamp Set Sentiment and Embossed it with Versa Fine Black Ink with Clear Embossing Powder and the Pineapple Crush 2 Stamp Set Sentiment with VersaMark Ink with Red Embossing Powder!! I created the Pineapple with the Pineapple 2 Die and Inked the Base with Mustard Seed, Fossilized Amber and Gathered Twigs and Peeled Paint, Mowed Lawn and Gathered Twigs for the Pineapple Head then for the Pineapple Details I used Tea Dye and Gathered Twigs Distress Inks!! I wanted it to POP so I added some Clear Embossing Powder!! I LOVE the added Texture it added to the Pineapple!! For the Sunglasses I Die Cut them from Black Cardstock and used Tonic Studio Morning Dew Nuvo Drops for the Lenses and then added some Fine Iridescent Glitter to make them Shimmer!! I used a Tiny Heart Die from the
Gift Tags 3 Die Set and Embossed it with the same Red Embossing Powder!!


I made the
Pineapple Gift Bag the same way as above only just used the
Harlequin Die to Ink as the Die is!! I Die Cut the Large Tag from the
Gift Tag Die Set from Distress Watercolor Paper and then added some Distress Ink in Tumbled Glass and added Water for a Watercolored Look!! Once dry I added some Faded Jeans Distress Ink Splatters used added Gathered Twigs for the Ground!! I Stamped and Embossed the Solid Pineapple and Head Images from the
Pineapple Crush Stamp Set using Distress Oxide Inks in Fossilized Amber, Spiced Marmalade and Vintage Photo!! The Head was Stamped in Peeled Paint and Vintage Photo!! Then I took the Outline Image from the
Pineapple Crush Stamp Set and Stamped and Embossed it with Versa Fine Black Onyx Ink and used Walnut Stain Distress Embossing Powder!!
SQUEAL!! I
LOVE LOVE LOVE the Texture and realism it gives to the Image!! Then for some added SWEETNESS I added a Mini Hibiscus Flower from the
Flip Flops Die Set!!
I used the Tiny Tag Die from the
Gift Tags 3 Die Set and Stamped and Embossed it with the Sentiment from the
Pineapple Crush Stamp Set!! I used May Arts Burlap Twine for the Tags and I CAN'T WAIT to give these away!! I hope I've INSPIRED you and if you'd like to recreate one of these
SWEET Pineapple Gift Bags for yourself here's how I created them!!
To Create the Bags I Die Cut a Bunny Card using a 5 3/4 inch wide X 8 1/2 inch Long Piece of 110 lb. Cardstock two Times!! You will have to cut alittle off the edges of the Die Cut as its alittle Wider than the Die!! I then Cut Two Cardstock Die Cut Pieces at a Time (making a total of 8 Die Cut Leaves) I started with 2 7 Inch Pieces and Die Cut the Bunny Card Ears as shown below!! Then Die Cut them in half to get 4 Sets of Ears!!
For the Bag I kept the Bunny Card Base as is and then added the Bunny Ears Die Cut Pieces to either side to create the First Row of 6 Leaves!! Shown Below!!
Then for the Second Layer of Leaves I used 2 Sets of Bunny Ears Die Cuts Folding the one set in on its self to fit in the Center of the Bunny Ear Base!!
Here they are when added together!!
Then you use your Distress Inks to Ink everything and to add the Harlequin Stencil Designs!! I even Inked the Backsides of the Leaves so that when put together the Bag looked finished!! You could also use Colored Cardstock or Patterned Paper if you didn't want to Ink the Cardstock!! I also think it would be FUN to use Tissue Paper for the Top of the Pineapple too!!?? So MANY ways you could go about creating these FUN Pineapple Gift Bags!!
Hope this leaves you INSPIRED to look at your Dies in a different way to get MORE out of them!!??
Have a FABULOUS WEEK!!
I'm also linking up to the
These Gift Bags would make the Sweetest Birthday Gift Bags!!?? =)
COUNTRY HUGS-N-KISSES
LARISSA =)