Showing posts with label Aqua Shimmer Pen. Show all posts

Wednesday, March 24, 2021

Lovely, Amazing You Coffee Card w/ Newton's Nook Designs!!

Pin It

HELLO CRAFTY FRIENDS!!  
I'm joining in the FUN Spring/Summer Coffee Lovers Blog Hop today sharing a Card I've made using Products from Newton's Nook!! SQUEAL!! I'm SO IN LOVE with the way it turned out!! I don't know about you, but I honestly have DREAMS about my Stamps!! 😉
This Card Design was one of those Dreams!!
I Started by stamping and embossing the Images!! I Stamped in Versa Fine Black Onyx Ink and used WoW Clear Gloss Embossing Powder to Emboss them!! Then I colored with Copic Markers (N0, N2 & N4  YG00, YG11 & YG17)!! 
I Stamped the Little Lilies Stamp Set Image three times and die cutting it out with the coordinating Little Lilies Die Set. I knew I wanted to create a Wreath so I Die Cut a Circle Die Cut and arranged the three Little Lilies die cuts around the circle!! Then I  Stamped and Embossed several of the Single Lily Bloom Images from the same Little Lilies Stamp Set and some of the Blooms, Leaves and Sprigs from the Lovely Blooms Stamp Set.  I colored everything with Copic Markers (R00, R11 & R22  Y00, Y11 & YR23  G00, G05 & G19) and added some Tonic Studios Aqua Shimmer Pen and some Pretty Pink Posh Jewels to the center of the Blooms!! I arranged the Images to round out my Wreath Design!! Doesn't it look so beautiful!? 

I KNEW I wanted to tuck a Coffee Mug into the center of the Wreath so I Stamped and Embossed the Newton's Mug Image!! Again Coloring with Copic Markers 
(C3, C1 & C00   E40, E42, E43 & E47) Then I Die Cut the Image out using the coordinating Newton's Mug Die Set!! I Added some of the Flowers to the Coffee Mug to add even more BEAUTY to the Design!! LOVE being able to use my Images in unexpected ways and to be able to combine them with some of my other FAVORITE Sets!!
 For my card base I used the Bubbly Stencil to create a soft background of bubbles with Tumbled Glass Distress Ink and added some  Black Soot Distress Paint Splatters and Nuvo drops in Bubblegum Blush and Strawberry Coulis too!! I finished off the card by Stamping and Embossing the "Lovely, Amazing, You" sentiment from the Happy Little Thoughts Stamp Set!! I absolutely LOVE the way it turned out and I KNOW its going to bring a SMILE to the recipients Face!! 
THANKS SO MUCH for stopping by today!! I hope I've INSPIRED you on some ways to combine your Images to create a STUNNING Scene and I hope you have a FABULOUS WEEK!! 

COUNTRY HUGS-N-KISSES
LARISSA 💗

Sunday, March 14, 2021

Paper Sweeties March 2021 Featured Products Inspiration Day #2!!

Pin It

HELLO!! 

Welcome to Day 2 of the Paper Sweeties March 2021 Featured Products Inspiration!! 
I wanted to create another Shaker Card today using SEVERAL Sets, but one of my FAVORITE add on Sets is the Sweeties Pets Stamp Set, along with the coordinating Sweeties Pets SWEET CUTS!! 
Here's my Card for today!! 
I've used the SWEET Emma Stamp Set and the coordinating Emma Die Set to create my Doll!! 
SQUEAL!! Isn't she just the SWEETEST!!??
 Then I dressed her in the Outfit!! I used some Gingham Patterned Paper and a plain Pink Cardstock to layer the outfit together!! I LOVE the dimension it gives to her outfit!! The Shirt and Shoes were stamped from the Life is a Picnic Stamp Set and the Jumper is from the Sweetie Pie Stamp Set!! I colored everything with Copic Markers!! 
I Stamped and Embossed the Puppy from the Sweeties Pets Stamp Set and used the coordinating Dies to Cut her out!! Copic Markers were used to Color her in!! The Bicycle was stamped and embossed onto my Card front from the Hugs and Kisses Stamp Set and Colored with Copic Markers!! I also added some Hearts and Circles; Stamping and Embossing them with WoW Bright White Embossing Powder on the Card front of the card from the Be Happy Stamp Set!! I LOVE being able to combine several sets together to create my own scene!!

Please continue to hop along and visit the AMAZING Design Team blogs to be inspired by their AMAZING projects:

A MONTH LONG SPECIAL 
 BUY 3 DOLL AND/OR OUTFIT STAMP SETS 
GET ONE FREE!!  
(This sale does NOT include Sweet Cuts Dies) 
  Customer must leave name of FREE set they want in comment section of order form on the Paper Sweeties Website during Checkout!!
There's NO LIMIT to how many sets you can earn for FREE - 
You'll get 1 FREE stamp set for every 3 that you Buy!! 


THANKS SO MUCH for stopping by today and come back tomorrow for another FUN Project!!  
Have a FABULOUS WEEK!!

COUNTRY HUGS-N-KISSES
LARISSA 💗

Wednesday, November 18, 2020

Newton's Nook Designs November 2020 Winter Release ~ Snowman Roundabout!

Pin It
HELLO CRAFTY FRIENDS!! 
I'm here with Day 3 of the 
Today we're showcasing the NEW "Snowman Roundabout" Stamp Set!! This set coordinates with the Previously Released Circle Frames Die and the Banner Trio Die Set!! 
Let's take a look at the AWESOME New Set!!
How SWEET are these Snowmen from the NEW Snowman Roundabout Stamp Set!!?? I LOVE Snowmen and the possibilities with this Set are ENDLESS!!?? I decided to create a STUNNING Card and Gift Tag/Bag Set to give away this Winter!! I LOVE that it's versatile so it can be used for ANY Occasion too!!  
How SWEET are these Snowmen from the NEW Snowman Roundabout Stamp Set!!?? I've paired it with some WoW Clear Gloss Embossing Glitter, Copic Markers and some Lawn Fawn Patterned Papers!! SWOON!! LOVE how they turned out!! 
Let me walk you through the steps!! 
I Started by Stamping the NEW Snowman Roundabout Stamp onto a Piece of White Distress Watercolor Cardstock using my MISTI Stamping Tool and Vers Fina Black Onyx!! Then I applied some WoW Clear Gloss Embossing Powder!! I heat set it using my WoW Dual Speed Embossing Tool!!
Then I Die Cut the Image out using a Circle Die!! Next I Die Cut the Circle Frames Die from some Lawn Fawn Pattern Paper!! I adhered the Embossed Circle onto the Scalloped  Frame using some Ultra Bond Adhesive after I Colored the Images using Copic Markers: Turquoise: BG10, BG45 & BG49   Green: G00, G13 & G19  Red: R14, R37 & R39   Pink: RV00, R81 & R34   Purple: V01, V15 & V06   Black: C3, C5 & C8   Yellow: Y00, Y15 & YR23   Brown: E43, E49    Orange: YR00 & YR18   Shadows: C2
Then I Stamped the bottom 1/2 of the Card using the same NEW Snowman Roundabout Image using some TE Sea Salt Ink!! I added some Black Soot Distress Splatters and some Shimmer Pen Splatters for some extra Sparkle! Then I Stamped and Embossed the sentiment using Versa Fine Black Omyx Ink and WoW Embossing Clear Gloss Powder!! I used the Turquoise Copic Markers to color in the BRR Images!! I added some PPP Snowflake Sequins and some Teal Pearls to the Center of the Snowflakes and some Simmer Pen to the Snowman Hats, Scarves, Gloves and Noses to add some much needed Sparkle!! 
I Started by creating my Gift Bag from some Lawn Fawn Patterned Paper and then I got started on creating my coordinating Gift Tag!! I Started by Stamping the NEW Snowman Roundabout Stamp onto a Piece of Tim Holtz Distressed Watercolor Paper Cardstock using my MISTI Stamping Tool and Versa Fine Black Onyx Ink!! Then I applied some WoW Clear Gloss Embossing Powder!! I heat set it using my WoW Dual Speed Embossing Tool!!
Next I Die Cut the Tag from the Embossed Image using the Fancy Edges Tag Die Set!! Then I Die Cut the Tags Times Two Die from some TE Salt Water Taffy Cardstock!! I Heat Embossed the Let's Party Sentiment from the Newton Celebrates Stamp Set onto the Tag using some Versa Fine BlackOnyx Ink and WoW Clear Gloss Embossing Powder!! I added some Snowflake Sequins to finish off the Design adhering some Teal Pearls to the center of the Snowflakes!! 
To finish off the Design I created a Scrap Ribbon Bow and adhered it to the top of a White Mini Clothes Pin using a few Bling Zots Adhesive Dots!! Then I used the Mini Clothes Pin to adhered the Tag to the Gift Bag!! PERFECT for almost any Small Gift or a Gift Card this will be ready to use for an ANY Occasion Gift!! 

Would you like to win the “Snowman Roundabout” Stamp Set!!?? This stamp set will be given away to ONE lucky winner!!

Here's how to win: Comment on the NND blog and Design Team blogs (see list below)! The winner will be chosen at random from the collective reveal posts. Make sure to check out each of their blogs and comment for your chance to win. You will not know which blog has been chosen so the more you comment on the better your chances are of winning! You have until Thursday November 19th at 9pm EST to comment  -- winners will be announced on the blog post on Friday, November 20th. 

Check out all the awesome Design Team Blogs below to enter:

Newton's Nook Designs

Ellen Haxelmans

Larissa Heskett

Samantha Mann

Zsofia Molnar

Maria Russell

Andrea Shell

Tatiana Trafimovich

Amy Tsuruta

Amanda Wilcox


THANKS SO MUCH for stopping by today!! 
Come back tomorrow for a look at the 
NEW "Newton's Snowman" Stamp Set + coordinating Dies and Happy New Year Stamp Set!!
Don't forget to check out the Newton's Nook Designs Blog on the 20th to see if you're one of the LUCKY Winners!! 
Have a FABULOUS WEEK!!

COUNTRY HUGS-N-KISSES
LARISSA   ðŸ’—

Monday, May 13, 2019

Paper Sweets May Release Sneak Peeks!! =)

Pin It
HELLO CRAFTY FRIENDS!!

Welcome to Day 1 of the Paper Sweeties 
May Release 2019!! 
I created a SWEET Card using the *NEW* stamp set called "Truck Add On: Life is an Adventure" Stamp Set and the coordinating "Truck Add On: Life is an Adventure" Sweet Cuts Die Set which will be live in the Paper Sweeties Shop tomorrow May 15th!! 
 Here's a look at the Card I made, I LOVE how it turned out!! 
I Started by stamping the Truck Image from the Merry Christmas Ya'll Stamp Set and the Camper from the NEW Truck Add On: Life is an Adventure Stamp Set!! I Colored them in using Copic Markers!! (Truck/Camper: BG11, BG45, BG49  Y11, YR23  Tires: N8, N6 & N4  Camper: N0, N2 & N4  Door/Curtains: R43, R46 & R89  Windows: BG0000 & BG11) 
I added some Tonic Studios Aqua Shimmer Pen to the Windows, Lights and Hearts and then added some Morning Dew Nuvo Drops for some Dimension and Shine!! 
I added some White Gel Pen hightlights, and then added them to the Cardbase I created!! 
For even MORE Inspiration please visit the rest of the AMAZING Design Team Blogs!!

THANKS SO MUCH for stopping by and I hope you come back tomorrow for a look at the NEW Products!!
Have a FABULOUS WEEK!!

 COUNTRY HUGS-N-KISSES
LARISSA

Friday, March 29, 2019

CAS-ual Fridays Stamps Spring Release Week ~ Just Breath Fri-Dies!!

Pin It

HELLO!!
Welcome to Day 6 of the CAS-ual Fridays Stamps Spring Release Week!!
Today we're showcasing the NEW Just Breath Fri-Dies!!
SQUEAL!! How CUTE is this Set!!?? I just LOVE ALL of the possibilities!!
For my Card today I wanted to create a "Just Breath" Scene Card!! I thought the Somebunny Stamp Set was PERFECT for this!! I Stamped and Embossed the Image and then used the coordinating Bunnie Fri-Dies!! I used Copic Markers to Color my Images!! Using N4, N2 & N0 for the Bunnies body, R00 for the Checks and inside of the Ears. I used Y11, Y15 and YR23 for the Stars!! I added Morning Dew Nuvo Drops to the Stars and Moon for some dimension!! 
For the Card Background I used a Cloud Stencil that I created using a NND Sky Border Die and Inked it using Faded Jeans and Chipped Sapphire Distress Ink!! I wanted a Night Sky!! I used Picket Fence Distress Paint and added some Paint Platters for the look of tiny Stars!! Then added a sprinkling of Pretty Pink Posh Mini Star Silver Sequins!! For the Sentiment "Just Breathe", I die Cut the Words 5 Times and adhered them together Inking the Top Layer with Tumbled Glass, Fadded Jeans and Chipped Sapphire Distress Inks!! I adhered them to the NND Cloud Border Die that I just inked the edges of so it wouldn't be so stark against the Dark background!! I stamped the Sentiment "Everybunny Needs Some Bunny Sometime" which I thought fit the Scene I created also from the Somebunny Stamp Set!! 
I LOVE the way it turned out!! 

For TONS of AMAZING Inspiration make sure you stop by the rest of the AMAZING DT Blogs to see what they've created!! Also make sure to visit the CAS-ual Fridays Stamps Blog for a chance to WIN and shop the NEW Products in the CFS Shop!! You can also use my  discount code LARISSASENTME to SAVE 15%!! WHOOP WHOOP!! 

THANKS SO MUCH for stopping by today and I hope you'll come back tomorrow for a look at the NEW Tin Roof Cover Fri-Die!! You're gonna LOVE them!! Have a FABULOUS WEEK!!
COUNTRY HUGS-N-KISSES
LARISSA   =) 

Friday, November 2, 2018

CAS-ual Fridays Stamps November Release 2018 ~ Pear Tree Fri-Dies!!

Pin It

No automatic alt text available.

HELLO CRAFTY FRIENDS!!
I'm here today with Day 6 the LAST Day of the 
CAS-ual Fridays Stamps November Release 2018!!
Today we're showcasing the NEW Pear Tree Fri-Dies!! These Dies coordinate with the previously released Partridge in a Pear Tree Stamp Set!! 


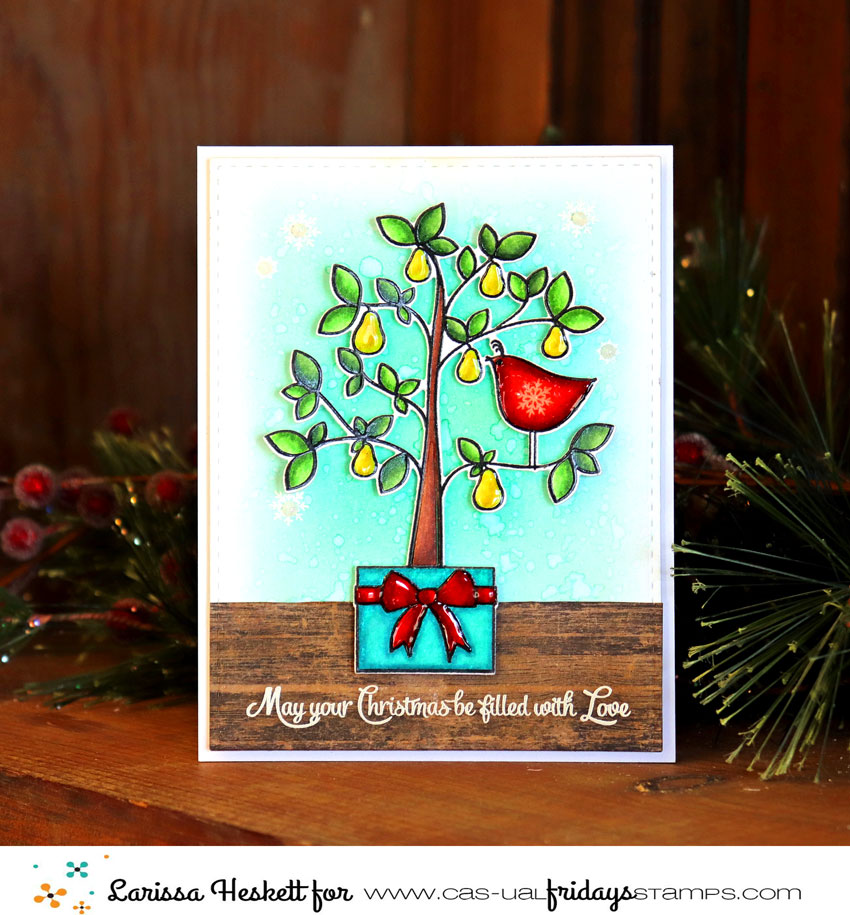
For my Card Today I started by Stamping and Embossing the Partridge in a Pear Tree Image!! I used the NEW coordinating Pear Tree Dies to Die Cut it out!! I wanted to add a Snowflake to the Bird so I Stamped and Embossed the Snowflake using White Embossing Powder and then used a Tonic Studios Aqua Shimmer Pen to color over the Bird, Pears and the Bow for some Sparkle, then I added Morning Dew Nuvo Drops for some Dimension and I just LOVE how it turned out!! For the Background I inked with Tumbled Glass and Peacock Feathers Distress Ink and added some Water Droplets for some texture!! Then I Stamped and Embossed some Snowflake Images in White Embossing Powder!! I added some Tonic Studios Blizzard Glitter Drops to the Center of the Snowflakes and that finished off the background!! For the Ground I Cut a piece of Tim Holtz Wood Patterned Paper and then Stamped and Embossed the Sentiment in White Embossing Powder!! 
I used 3-D Foam Squares to POP up areas on my Pear Tree and adhered it to the Cardbase!! 

THANKS SO MUCH for stopping by and I hope you'll come back tomorrow for Day 6 of the Release!!


COUNTRY HUGS-N-KISSES
LARISSA    =)

Thursday, July 19, 2018

Newton's Nook Designs July Release and 5 Year Celebration ~ "5 Mini Stamp Sets" & Coordinating Dies!!

Pin It

               Hello!!
                  SQUEAL!!
                   I'm here with Day 2 of the 
               Newton's Nook Designs July Release 2018!! 
                            Today we're showcasing the NEW  
 "5 Mini Stamp Sets" and Coordinating Dies!!
                  Let's take a look at the AWESOME New Products!!
How SWEET are these NEW Mini Sets!! There's something for EVERYONE and at such a GREAT Price Point!! I CAN'T WAIT to see what you create with them!! 
Here's what I've created for today!! 

This Koala has my HEART!! I thought it would be PERFECT paired with the NND Tropical Leaves Stencil and the Toucan Party Stamp Set and the Toucan Party Die Set, Aloha Newton Stamp Set and the NEW coordinating Aloha Newton Die Set!! I've also used the Sweet Lil' Flowers form the NEW "Cozy Campers" Stamp and Die Set showcased on Tuesday!! I started by creating my Background by Stenciling the Tropical Leaves Stencil using Distress Inks!! Water Droplets add EXTRA Texture!! Then I added some ColoriQue Black Diamond Ink Splatters!! I Die Cut the NND Frameworks Scalloped Frame from Black Cardstock!! I Stamped and Embossed the Images and then Die Cut them!! I used Copic Markers to color them and used some Tonic Studios Nuvo Drops for the Nose and Pineapple!! I added some Studio Katia Iridescent Crystals to the center of the Flowers for some EXTRA Sparkle!! The Sentiment was Stamped and Embossed using the Pineapple Delights Stamp Set!! 

How SWEET is this Ice Cream Cone Kitty!! EEKKK!! I just LOVE it!! I KNEW I wanted to create a Background!! I Stamped and Embossed the Images about 3/4 way up on my Cardbase!! I then took the Sunscape Stencil and Stenciled by Background using Spun Sugar Distress Ink!! ColoriQue Black Diamond Ink Splatters adds some Texture!! I Stamped and Embossed my Image 2 and Fussy Cut the top of the Ice Cream Cone to POP up for some 3-D Dimension!! I used Copic Markers to Color it and added a Bow from the Papa Bear Set!! The Frame wasDIe Cut using a Lawn Fawn Scalloped Circle Die Set!! I Stamped and Embossed the Sentiment using WoW Silver Glitter Embossing Powder and added some Pretty Pink Posh Jewels and some Studio Katia Crystals!! 

I LOVE this Kitty Donut Image!! I wanted to create a LARGE Donut to use as my Focal Point!! I Started by Stamping and Embossing the Background!! I used the Sprinkle Image and the Sentiment from the Newton's Donut Stamp Set!! Then I Die Cut the Scalloped Circle Die from Studio Katia!! I added Dots of Nuvo Drops for my Sprinkles and added another Bow from the Papa Bear Set!! 

Would you like to win a $20 store credit to Newton’s Nook Designs?
ONE lucky comment will be chosen from each reveal day to win! 
Here's how to win: 
Comment on the NND blog and Design Team blogs (see list below)! The winner will be chosen at random from the collective reveal posts. Make sure to check out each of their blogs and comment for your chance to win. You will not know which blog has been chosen so the more you comment on the better your chances are of winning! You have until Thursday July 19th at 9pm EST to comment  -- winners will be announced on the blog post on Friday, July 20th.
Check out all the awesome Design Team Blogs below to enter:
THANKS SO MUCH for stopping by today!! 
I CAN'T WAIT to show what I've made using the NEW 
5 new mini sets + coordinating dies Stamp Sets tomorrow!!   
The New Products will be available on Friday July 20th!!