Monday, September 30, 2019

Paper Sweeties Sweet Kit Fall/Winter 2019 Release!!

Pin It
HELLO CRAFTY FRIENDS!!

Welcome to the FIRST look at the NEW Paper Sweeties 
I created a couple SWEET Cards for today using products from the *NEW* Sweet Kit!! 
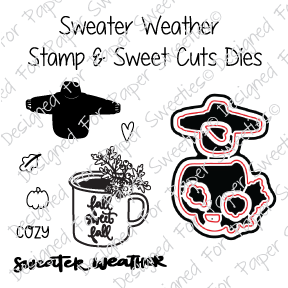
Here's a look at the *NEW* Sets included in the Kit!! 


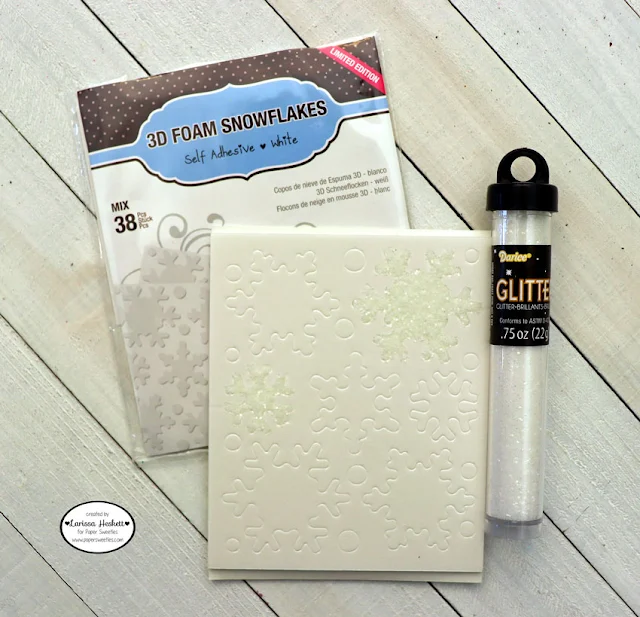
 I  used the 3D Foam Snowflakes and covered them with the Darice Glitter included in the Kit!! It's SUPER easy and they're so BEAUTIFUL!!
 I created a Cardbase using some of the Cardstock from the Kit and then Die Cut some of the Patterned Paper from the Kit!! I Die Cut a Circle and inked the center with some Tumbled Glass Distress Oxide Ink and then added the 3D Foam Snowflake to the Center of the Circle!! Then Stamped and Embossed the Sentiment and added it to the Card!!
For my second Card I wanted to use the Embossing Folder included in the Kit and then used Distress Oxide Inks to make the Embossed Tree come to life!! I added water splatters amd some Paint splatters to add some extra dimension and texture!! I Stamped and Embossed the sentiment and then added some of the Sequins from the Kit for some Sparkle and shine!! 

For more inspiration please visit the rest of the AMAZING Design Team Blogs!! 
Debbie Marcinkiewicz – Paper Sweeties
Karen Bull 

THANKS SO MUCH for stopping by today and have a FABULOUS WEEK!!

COUNTRY HUGS-N-KISSES
LARISSA     =)

Sunday, September 29, 2019

Enjoy your Birthday with Brutus Monroe!!

Pin It
Hello Crafty Friends!! 
I'm back today to share a STUNNING Birthday Card using some of the NEW Brutus Monroe Foil from the 2019 Fall and Winter Release for my 2nd post as a Guest Designer!! 
I started by Stamping and Embossing the Enjoy Sentiment from the Take Flight Stamp Set using some of the Raven Ink and then added some Clear Embossing Powder!! I Heat Set it and then cut a Piece of the Gold Static Foil and ran it through my Laminating Machine on the 1 setting!! I LOVE the way Embossed Sentiments look when they are foiled!! 
Next I Foiled some of the Therm O Web Toner Sheets with the Brutus Monroe Gold Static Foil and then used a Scalloped Frame Die to Die Cut the Foiled Toner Sheet!! I LOVE the added POP of Shine it adds to the Card and it also ties in the Embossed and Foiled Sentiment too!! 
I Stamped and Embossed the Happy Birthday Sentiment underneath the Foiled Sentiment and then I Stamped and Embossed the Butterfly Image above the Foiled Sentiment!! I inked the background with some Tumbled Glass Distress Oxide Ink and then used some Black Paint to add some Paint Splatters!! I wanted to add some 3D Dimension to the Butterfly so I Stamped and Embossed it again onto another piece of Cardstck and Fussy Cut it out after Coloring it in with Copic Markers!! I used Y11, Y15 & YR23  V01, V15 & V09  N2 and used a Black Marker to color the edges of the Image for a seamless look!! Then I used some Zots Bling Adhesive Dots to adhere jut the center of the Butterflies together!! I Layered it together and adhered it to a Brutus Monroe Heather Cardbase!! Some Midas Nuvo Shimmer Pen was added so the Yellow parts of the Butterfly for some added Sparkle!! 
I LOVE how it turned out and I hope it gives you some ideas on ways to use those AMAZING New Foils!! 
THANKS so much for stopping by and I hope you have a FABULOUS Week!! 

COUNTRY HUGS-N-KISSES
LARISSA   =)

National Coffee Day Blog Hop 2019 with CAS-ual Fridays!!

Pin It
Image may contain: coffee cup


 I Like BIG CUPS Interactive Card 

Product Needed:
CAS-ual Fridays Stamps Bushy Tailed Stamp Set
CAS-ual Fridays Stamps Fox Banner Fri-Dies 
CAS-ual Fridays Stamps Coffee Cup Fri-Dies 
CAS-ual Fridays Stamps Hot Coffee Stamp Set 
CAS-ual Fridays Stamps Coffee Talk Stamp Set
CAS-ual Fridays Stamps Time for Coffee Stamp Set
CAS-ual Fridays Stamps Bubble Box Fri-Dies 
Stitched Rectangle Dies 
Stitched Banner Dies
MFT Double Slider Die-namics
MFT Hybrid Natural Ink 
MFT Hybrid Milk Chocolate Ink
Oatmeal Cardstock 
Wood Grain Patterned Paper
Lawn Fawn Perfectly Plaid Chill Patterned Paper
Lawn Fawn Push Here Stamp Set
Peacock Distress Ink 
Walnut Distress Paint 
Tonic Studios Nuvo Glaze 
Ranger Clear Embossing Powder
Ranger Navy Metallic Embossing Powder 
Copic Markers 
Foam Tape 
Tim Holtz Tiny Attacher 
Thick Plastic Bag 
Double Sided Adhesive Tape 
Manual Die Cutting Machine 

Heat Tool 
Misti Stamping Tool 


1. Die Cut a Stitched Rectangle for your Card Front Panel from some Oatmeal Cardstock. 
2. Ink the Card Front Panel background using Peacock Distress Ink. 
3. Use Hybrid Natural Ink to stamp "Coffee" Design onto the Oatmeal Cardstock using the Time for Coffee Stamp Set. 
4. Add some Walnut Distress Paint Splatters to resemble Coffee. 
5. Die Cut Wood Grain Patterned Paper using the Stitched Rectangle Die and adhere it to the bottom of the Card Front Panel for the Bottom of the Card.
6. Die Cut the Coffee Cup Fri-Die from the Plaid Chill Patterned Paper and ink the Edges using Peacock Distress Ink.
7. Stamp and Emboss the sentiment from the Hot Coffee Stamp Set using Navy Metallic Embossing Powder to the front of the Coffee Cup. For the Coffee inside the Cup color the Die Cut with Copic Markers and then add a layer of Nuvo Glaze. Set asdie to Dry. 
8. Stamp the Fox from the Bushy Tailed Stamp Set and color with Copic Markers. Die Cut using the coordinating Fox Banner Fri-Dies!! 
9. In order to create the Slider mechanism you'll need to Die Cut the Slots using the MFT Double Slider Die behind the Coffee Cup. Cut a strip of thick plastic to 1/2 inch and adhere it through the Slots created by the Double Slider Die. Adhere the strip together using a Mini Attacher making sure to leave alittle wiggle room for your plastic strip to slide freely. 
10. You'll adhere the Fox image to the Bottom edge of the Plastic Strip using some strong Double Sided Adhesive tape. 
11. Die Cut a Banner Strip to use for your Pull Strip using a Stitched Banner Die. Stamp the Sentiment "Pull Here" from the Push Here Stamp Set at the bottom of the Strip. 
12. Adhere the Sentiment Strip to the back side of the Double Slider mechanism using some strong Double Side Adhesive Tape.  
13. Add some Foam Tape to the outside edges of the Coffee Cup making sure not interfere with the Fox Image sliding up. 
14. Adhere the Coffee Cup over the Top of the Fox and pull the Pull Strip to insure that the Fox Images "POPS" up. 
15. For the inside of the Card Die Cut the Bubble Box Die from some of the Plaid Chill Patterned Paper and Ink the edges using Peacock Distress Ink. 
16. Die Cut a Smaller Bubble Box Image from some Oatmeal Cardstock. Stamp and Emboss the "I Love You More Than" Sentiment using Clear Embossing Powder over Hybrid Milk Chocolate Ink. Stamp and Emboss the "Coffee" Sentiment also from the Coffee Talk Stamp Set using the same Navy Metallic Embossing Powder. 
17. Stamp the 3rd Sentiment from the Coffee Talk Stamp Set using Hybrid Milk Chocolate Ink. 
18. Add some Rusty Hinge Distress Ink to the Center of the Oatmeal Cardstock and finish by adding some Water Droplets for some Texture. Adhere the two Bubble Box Dies together and adhere them to the inside of the card. 


            Happy Birthday Coffee Card

Products Needed:
CAS-ual Fridays Stamps Bushy Tailed Stamp Set
CAS-ual Fridays Stamps Coffee Cup Fri-Dies
CAS-ual Fridays Stamps To Go Cup Fri-Dies 
CAS-ual Fridays Stamps Peace Love & Coffee Stamp Set
CAS-ual Fridays Stamps Bom Diggity Stamp Set
Stitched Rectangle Dies
MFT Hybrid Natural Ink
Versa Mark Embossing Powder 
White Cardstock 

Wood Grain Patterned Paper

Lawn Fawn Perfectly Plaid Chill Patterned Paper
 Peacock Distress Ink 
Tonic Studios Nuvo Glaze
Ranger Navy Metallic Embossing Powder 
Ranger Watering Can Embossing Powder

Copic Markers 
Foam Tape 
Double Sided Adhesive Tape

Manual Die Cutting Machine 
Heat Tool 
Misti Stamping Tool 


1. Die Cut a Stitched Rectangle for your Card Front Panel from some White Cardstock. 

2. Ink the Card Front Panel background using Peacock Distress Ink. 
3. Use Hybrid Natural Ink to stamp "Hooray!" Design onto the White Cardstock using the Bushy Tailed Stamp Set. 
4. Stamp some Paint Splatters from the Bomb Diggity Stamp Set using Versa Fine Embossing Ink and Emboss them using Navy Metallic Embossing Powder. 
5. Die Cut Wood Grain Patterned Paper using the Stitched Rectangle Die and adhere it to the bottom of the Card Front Panel for the Bottom of the Card. 
6. Stamp and Emboss the "Happy Birthday" Sentiment from the Bushy Tailed Stamp Set using Navy Metallic Embossing Powder. Stamp and Emboss the "Wishing You a Day Filled With" using Watering Can Embossing Powder. I added some Peacock Distress Ink to mae the Sentiments POP.
7. Die Cut the Coffee Cup Fri-Die from the Plaid Chill Patterned Paper and ink the Edges using Peacock Distress Ink. Stamp and Emboss the Tiny Heart in the Center of the Coffee Cup and Emboss it using some WoW Glitter Embossing Powder. For the Coffee inside the Cup color the Die Cut with Copic Markers and then add a layer of Nuvo Glaze. Set asdie to Dry.
8. Stamp the Fox from the Bushy Tailed Stamp Set onto the To Go Cup Die Cut.  Color with Copic Markers. Die Cut the other pieces for the To Go Cup and use Copic Markers to add some Texture and shading. 
9. Adhere the To Go Coffee Cup together using strong Double Sided Adhesive and adhere it to the Card Front using Foam Tape. 
10. Stamp and Emboss the Sentiment Peace Love and Coffee on the inside of the Card using Navy Metallic Embossing Powder. 

Three Top Tips: 
1. Stamping onto Patterned/Stamped Paper can add lots of character to your Stamped Animal Images. 
2. Add dimension with Paint or Embossing Powder. It adds a POP to your cards without a ton of bulk.
3. Mix and match your Images/Dies to create your own Designs. I ENJOY being able to create something personalized for someone Special.


To  make things even MORE fun, we put our entire COFFEE COLLECTION on SALE! Woot Woot!! No code needed, we marked them down for you already so just load your goodies in your shopping cart. The Girl Fridays all have savings codes for you on their blogs, so be sure to visit them to get one. You CAN use it ON TOP of the SALE price


THANKS SO MUCH for stopping by and I hope you have a FABULOUS WEEK!! 
Don't forget to visit ALL of the stops for your chance to WIN!! 

COUNTRY HUGS-N-KISSES
LARISSA   =)

Saturday, September 28, 2019

Shrink Film Butterfly Earrings and Gift Tags w/ Brutus Monroe!!

Pin It

HELLO CRAFTY FRIENDS!! 
I'm SO EXCITED to be Guest Designing for Brutus Monroe!! I LOVE SO MANY of the AMAZING Products and had such a FUN time creating with them!!  I LOVE giving Handmade Gifts and being able to use my Stamps in more than one way!! I have two different techniques for creating some Butterfly Earrings that ANYONE is sure to Cherish!! Plus it's such a simple process that you could even have your Friends or Kids get crafty with you too!! 
First I created the Stenciled Cardstock to create my Tags!! 
I started by using a piece of Brutus Monroe Wagon Cardstock!! I sprayed the back of my Brutus Monroe Mermaid Lagoon ~ Tangled Wave Stencil with some Therm O Web Pixie Spray and adhered it over the Cardstock!! Then I took some of the Brutus Monroe Glitter Glaze in Scarlet and applied it over the Stencil using my Stencil Pal!! 
I removed the Stencil and washed it along with my Stencil Pal and set it aside to Dry!! I LOVE the way the colors work together!! It the PERFECT combination!! 
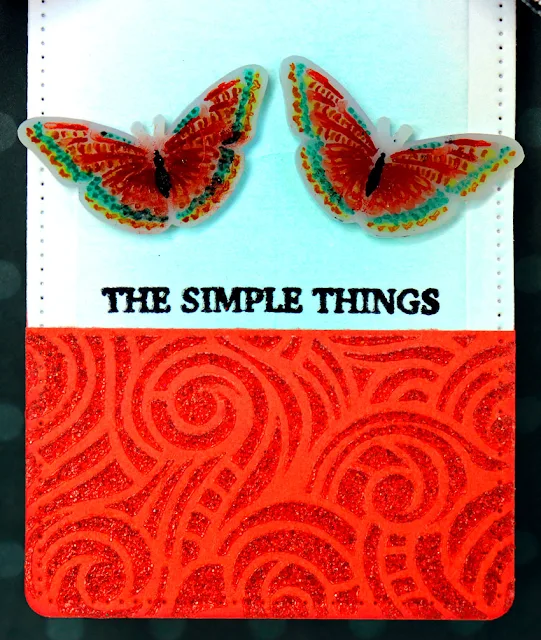
Next I Stamped the Butterfly Image from the Take Flight Stamp Set onto the Shrink Film using StazOn Brown Pigment Ink and used Copic Markers in (Y11, YR23, R02, R05, R08, E41, N6 & N10) to color in the Image on the Backside of the Inked Shrink Film!! I wanted to create a STUNNING Watercolored look!! I LOVE the results!! 
Next I Fussy Cut the Butterfly Images out and used my Heat Gun to Shrink them!! I LOVE the way they turned out!! Almost like they were hand painted!! I adhered the Earring Backs onto the back using some E6000 Glue that I placed onto the Earring Back using a Toothpick as it doesn't take much Glue!! Then set them aside for 24 Hours to cure!! 
I Die Cut the Tag from some Brutus Monroe Not Your Mamas Cardstock and Die Cut the Bottom portion from the Stenciled Wagon Cardstock and adhered it to the bottom of the Tag after inking with some Tumbled Glass Distress Ink!! I also Stamped and Embossed the Sentiment from the Taking Flight Stamp Set and then Pierced a couple holes into the Tag to place the Earrings onto the Tag!!  
If you wanted to use just the Image alone, you'd just Stamp the Butterfly Image onto the Brutus Monroe Shrink Film and Fussy Cut them out then Shrink them using your Heat Gun!! 
I followed the same steps to adhere the Earring backs and then I create the Gift Tag!! I LOVE that you customize these for the recipient and their tastes!! Such a FUN Gift to both create and receive!!  
THANKS SO MUCH for stopping by today and I hope I've INSPIRED you you to give this a try for any gifts you may need to give, or as a FUN Project to make with a Friend or Child!! No matter what I KNOW you'll LOVE it!! 

COUNTRY HUGS-N-KISSES
LARISSA   =)

Friday, September 27, 2019

2 Cards for the Newton's Nook Designs & WoW Embossing Inspiration Week!!

Pin It
Image may contain: text
HELLO CRAFTY FRIENDS!! 
I'm here with the FUN Newton's Nook Designs & WoW Embossing Inspiration Week!! I'm a HUGE FAN of both of these companies!! If you follow me you'll know that I might be alitte OBSESSED with the WoW Glitter Embossing Powders!! Infact, I probably use it on the majority of my Projects!! 😬 
I've created 2 Projects today!! First I've made this SWEET Halloween Card!! I just LOVE this Witchy Newton Image!! It makes me SMILE every time I see it!! If you're an animal lover too, I'm SURE you have the same reaction!!?? 
Best Witches by Larissa Heskett for Newton's Nook using Witchy Newton, Gingham Stencil, Cascading Stars Stencil, Bokeh Stencil Set WoW Witching Hour Embossing Powder Distress Oxide Inks TE Cardstocks #newtonsnook #wowembossing #halloweencards
I started by creating my FUN background using the NEW Gingham Stencil!! I just LOVE this Stencil and there are SO MANY ways to use it!! I've used both Dusty Concord and Carved Pumpkin Distress Oxide Inks!! I sprayed the back of my stencil with some Therm O Web Pixie Spray, then placed it over my A2 Cardstock panel!! I Started with the Dusty Concord Distress Oxide Ink and inked the design!! Then removed the Stencil and washed the excess Ink off!! I wanted to create a FUN Crosshatched Design so I flipped the Stencil and then replaced it over the Inked Design linking it up again using Carved Pumpkin Distress Oxide Ink!! I absolutely LOVE the results!!
Halloween makes me think of ALL things FUNKY!! So I thought it would be FUN to use the Bokeh Stencil Set over the top of the Gingham and I Inked it up with an Ink Dauber using Versa Fine Black Onyx Ink after using an anti-static tool!! Then added some of the WoW & Simon Says Stamp Witching Hour Embossing Powder!! SWOON!! All of that SPARKLE makes this girls HEART HAPPY!! It's hard to see in the Photos, but in real life this Powder is just AWESOME!! 
I wanted to create a Background to help ground my Sweet Image, so I Die Cut a Circle and inked with Caved Pumpkin Distress Oxide Ink!! Went over it with an Anti-static Tool and then placed the Cascading Stars Stencil over the Circle Die Cut and Inked used Rusty Hinge Distress Oxide Ink and Embossed them using WoW Gloss Clear Embossing Powder!! A few Water Splatters add some extra texture to the background!!! Then I adhered my Stamped and Embossed Image that I colored with Copic Markers!! 
Best Witches by Larissa Heskett for Newton's Nook using Witchy Newton, Gingham Stencil, Cascading Stars Stencil, Bokeh Stencil Set WoW Witching Hour Embossing Powder Distress Oxide Inks TE Cardstocks #newtonsnook #wowembossing #halloweencards
I framed the Background Circle with a couple other Circle Die Cuts one from TE Oreo Cardstock and and one from TE Grape Jelly Cardstock and then Stamped and Embossed the "Best Wishes" Sentiment onto a Circle Die Cut from the Frames Squared Die Set using WoW Clear Gloss Embossing Powder!! I Framed it to match the Focal Image and adhered both using Foam Tape to my Cardbase!! A few Sequins with some Iridescent Jewels finishes off the Design!! 
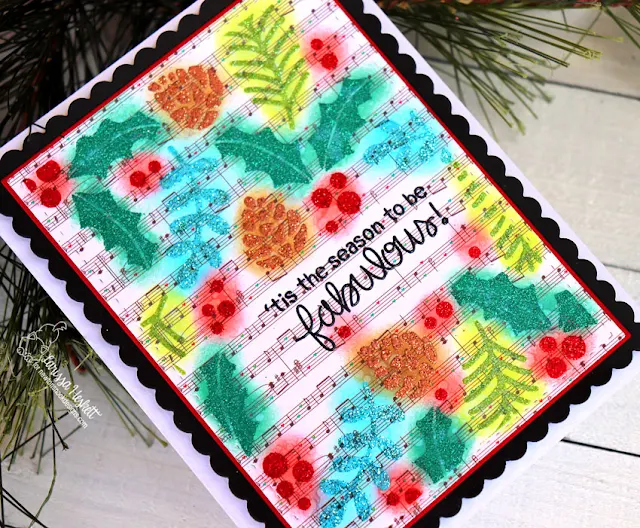
Tis' the Season to be Fabulous by Larissa Heskett for Newton's Nook Designs using Holiday Foliage Stencil, Frames and Flags Die Set, WoW Embossing Glitter Powder, TE Cardstock & Distress Oxide Inks #newtonsnook #wowembossing #holidaycards
For my Last Card I wanted to create a FESTIVE Holiday Card!! I LOVE Music Paper for the Holidays and I thought it would be FUN to create an Embossed Stencil Design!! I LOVE how it turned out and hope you'll give this Technique a try this Holiday Season!! 
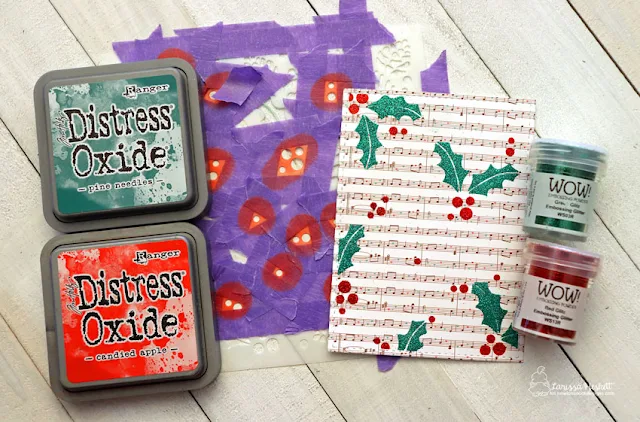
I started by spraying the back of the Holiday Foliage Stencil with some Therm O Web Pixie Spray and then I placed it over the Lawn Fawn Music Patterned Paper!! I then took an Ink Dauber and Inked the Holly Leaves with Pine Needles Distress Oxide Ink after using some Purple Tape to mask them off!! I covered the Inked leaves with WoW Green Glitz Glitter Embossing Powder and heat Set it!! I removed the Purple Tape washed off the Stencil and then replaced it over the Design masking off the Berries!! I inked them with Candied Apple Distress Oxide Ink and then Embossed them with WoW Red Glitz Embossing Powder and Heat set them!! Then before I Stenciled any more of the Design, I Stamped and Embossed the sentiment from the Christmas Haul Stamp Set!! I LOVE this sentiment and I used the WoW Gloss Clear Embossing Powder over my Versa Fine Black Onyx Ink!! 
I then repeated the Process filling in the other Images using Distress Oxide Ink in Vintage Photo Distress Oxide Ink for the Pine Cones and Embossing with Metallic Copper Sparkle Embossing Powder, Peeled Paint Distress Oxide Ink and Embossing with Lime Ricky Embossing Powder!! For the last Images I Inked with Versa Mark Ink and Embossed with Calypso Embossing Powder!! I thing the Design is AMAZING the way that it is, but I wanted to make the Embossed Design POP even more, so I used the same Distress Oxide Inks along with an Ink Dauber to Ink over the Images!! Then I splattered it with some Water Droplets to help add some more Texture!! 
Tis' the Season to be Fabulous by Larissa Heskett for Newton's Nook Designs using Holiday Foliage Stencil, Frames and Flags Die Set, WoW Embossing Glitter Powder, TE Cardstock & Distress Oxide Inks #newtonsnook #wowembossing #holidaycards
 I Die Cut a TE Cherry Pop Cardstock Panel and then Die Cut the Frames and Flags Scalloped Frame from some TE Oreo Cardstock!! Then I adhered it to the Card Base using some Foam Tape to POP it up and add some Dimension!! I LOVE this Card!! 


I hope I've given you some ideas on ways to mix your Images and Stencils with the AWESOME WoW Glitter Embossing Powders!! Don't forget to stop by both of Newton's Nook Designs Blog and the WoW Embossing Blog for MORE inspiration and to get entered for chances to WIN!!
Prizes
Newton’s Nook Designs: $25 gift card
WOW! Embossing Powder: $25 gift card
Here's how to win: Leave comments on the NND & Design Team blog posts using WOW products all week (September 23-27) to enter. One winner will be randomly chosen from blog posts throughout the week so the more posts you leave comments on the better your chances are of winning! You have until Friday September 27th at midnight CST to comment. The winner will be announced on the NND blog post on Monday, September 30th.
THANKS SO MUCH for stopping by and I hope you have a FABULOUS WEEKEND!!
COUNTRY HUGS-N-KISSES
LARISSA =)

Friday, September 20, 2019

Good Vibes Halloween Card w/Newton's Nook and Therm O Web!! =)

Pin It

HELLO CRAFTY FRIENDS!! 

I'm here with Newton's Nook Designs today as part of a WEEK FULL of AMAZING Inspiration with Therm O Web!! If you follow me, then you already know I actually design for both companies!! So I already LOVE to mix these Products together and as you'll see by my Project today its a PERFECT pairing!!
I started by mixing together some White Pearl Metallix Gel and some Gina K Designs White Glitz Glitter Gel!! Then I sprayed the backside of my NND Ghost Stencil with some Pixie Spray and placed it over my Black Card Panel!! Then set it aside to Dry!! 
I Stamped and Embossed the "Good Vibes" Sentiment from the Tropical Fringe Stamp Set using some WoW White Embossing Powder after heat setting it, I placed it back into my Mini MISTI Stamping Tool and restamped it using Versa Mark Ink and then Embossed it again using WoW Glow-in-the-Dark Embossing Powder!! I wanted a Ghost to look like it was SPOOKING OUT behind the sentiment so I used Purple Tape to Mask one of the Ghosts from the Ghost Stencil and then applied the Custom Gel I made again by using the Stencil Pal and set it aside to dry!! 
I Die Cut a Frame for the Stenciled Panel using the Framework Die Set from some Sweet Mango Cardstock and inked the edges with some Wilted Lilac Distress Oxide Ink!! and adhered it to some Taylored Expressions Patterned Paper using some 3D Foam Squares!! 
I Die Cut some Circles using the Frames Squared Die Set and adhered the Sentiment to it!! I inked with some Wilted Lilac Distress Oxide Ink and used some 3D Foam Squares to adhere it to the Stenciled Ghost Panel!!
 Here's a Close-up look at the Card!! I LOVE the Sparkle and Texture!! 
 Here's a Close up look at the Glow-in-the-Dark Sentiment!! It's SO FUN!! I hope you feel INSPIRED by my project today!!?? 

THANKS SO MUCH for stopping by today and I hope you'll visit both the Newton's Nook Designs Blog and the Therm O Web Blog to get entered to WIN some AMAZING Prizes, plus be INSPIRED by even more AMAZING Projects!! 

Have a FABULOUS WEEK!! 

COUNTRY HUGS-N-KISSES
LARISSA   =)

Sunday, September 15, 2019

Paper Sweeties September Release 2019 Rewind!!

Pin It
HELLO CRAFTY FRIENDS!!

Welcome to Day 3 of the Paper Sweeties 
September Release 2019!! 
I created a SWEET Love Ewe Card for today that could be used for MANY Occasions!! I'm thinking a New Baby Card would be PERFECT!!  I'm using the *NEW* stamp set called "Ewe Make Me Happyalong with the coordinating "You Make Me Happy" Sweet Cuts Die Set!! 
Here's a look at the *NEW* Sets!! 
I LOVE the NEW Sets this Month and ALL of the ways that you can use them!! I wanted to make a New Baby Card and used the Stamps to create my own Patterned Paper!! Then I Stamped and Embossed the Ewe Image onto some Plaid Patterned Paper and and used Copic Markers to add some Shading!! I also Colored in the Legs and the Face!! 
I added some Nuvo Drops in Blizzard Glitter to add some Sparkle to the Hearts, some of the Strips on the Legs and the Center of the Flower!! I also added some White Gel Pen Details!! Isn't it just the SWEETEST lil' Ewe!!?? I LOVE the way it turned out!! 
I used the For You Stitched Tag Sweet Cuts Die and inked the background to layer the Ewe onto using some Foam Tape and then adhered it to the Cardbase using more Foam Tape!! I added the Twine and Bubble Gum Seam Binding Bow to the top of the Tag and my card was finished!!

For more inspiration please visit the rest of the AMAZING Design Team Blogs!! 
THANKS SO MUCH for stopping by and come back tomorrow for some more AWESOME Inspiration!! Have a FABULOUS WEEKEND!!

COUNTRY HUGS-N-KISSES
LARISSA     =)