Showing posts with label Stencil Pal. Show all posts

Friday, July 24, 2020

I like you Cat-itude w/ Newton's Nook Designs!!

Pin It
Newton
HELLO CRAFTY FRIENDS!! 
HAPPY Friday!! Who's ready for the Weekend!!?? I am, it's Fair Weekend so we have LOTS going on and I'm bracing myself for just 3 more weeks of FUN with my boys before School starts!! I'm really NOT ready!! 
I'm up on the Newton's Nook Designs Blog today sharing a really NEAT Technique I call Negative Stenciling!! I came up with it after wanting to use the Negative pieces after I Deco Foil Flock a project!! 
I Like Your Cat-itude by Larissa Heskett created for Newton's Nook Designs using the Meow Stencil, Frames & Flags Die Set, Cat-itude Stamp Set and Frames Squared Die Set along with Therm O Web Deco Foil, Deco Foil Flock and Transfer Gel Duo!! #newtonsnook #newtonsnookdesigns #meowstencil #catitude #thermoweb #decofoil #decofoilflock
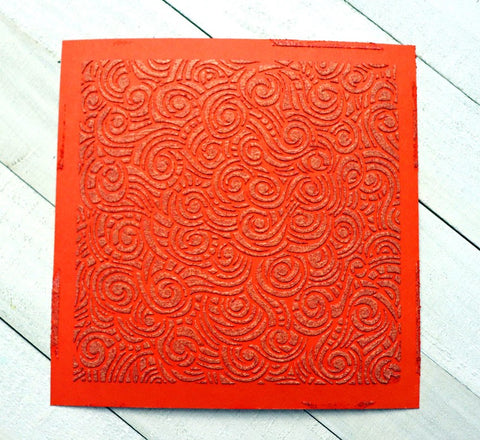
Here's the Card I've created for today!! I had a Negative piece of White Latte Deco Foil Flock that I had left over after creating another Card!! I didn't want to wast the entire sheet of Deco Foil Flock, so I decided to try and Stencil over the Negative space and these are the results!! SWOON!! It's hard to see in the photos, but the Negative Stenciled design is Inlaid into the Deco Foil Flock Sheet!! In real life it looks so AWESOME and I'm sure the recipients will look at it and WONDER!!?? How did they do that!!?? 
I Like Your Cat-itude by Larissa Heskett created for Newton's Nook Designs using the Meow Stencil, Frames & Flags Die Set, Cat-itude Stamp Set and Frames Squared Die Set along with Therm O Web Deco Foil, Deco Foil Flock and Transfer Gel Duo!! #newtonsnook #newtonsnookdesigns #meowstencil #catitude #thermoweb #decofoil #decofoilflock
First step is to spray the back of your Meow Stencil with some Pixie Spray!! Then place it over the Negative Deco Foil Flock Sheet lining up the Stenciled Design!! Then Stencil over the Design with some Deco Foil Transfer Gel Duo using a Stencil Pal!! Remove the Stencil and set the panel aside to dry!! Once completely Dry I used the Rainbow Shattered Glass Deco Foil Sheets to Foil over the Stenciled Design!! I removed the Deco Foil Film and this is the AMAZING Result!! I just LOVE how AWESOME it looks!! 
I Like Your Cat-itude by Larissa Heskett created for Newton's Nook Designs using the Meow Stencil, Frames & Flags Die Set, Cat-itude Stamp Set and Frames Squared Die Set along with Therm O Web Deco Foil, Deco Foil Flock and Transfer Gel Duo!! #newtonsnook #newtonsnookdesigns #meowstencil #catitude #thermoweb #decofoil #decofoilflock
I Die Cut the Panel and then added the Frames and Flags Scalloped Die Cut Frame from some Black Cardstock!! I Stamped and Embossed the Sentiment from the Cat-itude Stamp Set!! Onto a Circle Cut from the Frames Squared Die Set and backed it with a Black Cardstock Circle then I added a Mini Clay Heart to finish off the Design!! I really hope you'll give this Technique a try!! The final results are HARD to to BEAT!! 

THANKS SO MUCH for stopping by and I hope you have a FABULOUS Weekend!! 

COUNTRY HUGS-N-KISSES
LARISSA   ๐Ÿ’—

Friday, June 5, 2020

Double the BEAUTY using the NEW Butterfly Stencil Set from Newton's Nook Designs!!

Pin It
HAPPY FRIDAY!! 
I'm up on the Newton's Nook Designs Blog today sharing two BEAUTIFUL Cards using the STUNNING NEW Butterfly Stencil Set!! SWOON!! 
Butterflies Stencil Set by Newton's Nook Designs
If you LOVE Butterflies like I do, then this Butterfly Stencil Set is going to be a MUST have to add to your Crafty Stash!! (Enabler Alert ๐Ÿ˜œ)
For my first Card I've used the Stencil Set along with some Therm O Web Metallix Gel and some Therm O Web and Gina K Designs Glitz Glitter Gels!! SWOON!! Talk about a SHOWSTOPPER!! Can't you just picture me just doing my HAPPY DANCE!! ๐Ÿ’ƒ
I Started by Inking the Card Panel!! I like to use the Tim Holtz Distress Watercolor Paper, but ANY Cardstock would work!! I used both Tumbled Glass and Peacock Feathers Inking with my Blender Brushes and then I added some Water Splatters for some Texture!! 
Next I added the Stencil #1 over the Inked Card Panel after I sprayed if with some Therm O Web Pixie Spray!! I then applied a Small amount of the Mettalix Gel in Black Ice using the Stencil Pal!! 
After the Gel was completely dry, I applied the Stencil #2 over the top of the Metallix Gelled Butterflies!! Again I Sprayed the back of the Stencil with Pixie Spray!! Then I applied the Glitz Glitter Gels in Bubble Gum, Lovely Lavender and Silver using the Stencil Pal!! I was just careful while applying the gel, but you could also use some Purple Tape to help keep the colors seperate while applying if you think you need to for some added protection!! 
Here's a Close up look!! Isn't it BEAUTIFUL!! I LOVE the added dimension that you get too with the layers!! Makes the Butterflies POP even more!! 
I Die Cut the Panel using a Stitched Rectangle Die and then I Stamped and Embossed the Sentiment from the NEW Floral Roundabout Stamp Set onto some TE Sea Salt Cardstock with Versa Mark Ink and WoW Bright White Embossing Powder!! I Die Cut it out using the NEW Banner Trio Die Set and applies it to my Card using some Gina K Designs Foam Squares!! I added some Pretty Pink Posh Silver Jewels to finish off the Bodies of the Butterflies and then added the Panel onto a Scalloped Rectangle Die Cut from the Frames & Flags Die Set from some TE Oreo Cardstock and adhered it onto a White A2 Cardbase with some Foam Tape for some dimension!! 
For my second Card I used some Deco Foil Transfer Gel and my FAVORITE Rainbow Scattered Deco Foil!! Talk about a HAPPY Card!!  ๐Ÿฆ‹
I started by Inking the Stencil #1 with some Black Soot Distress Ink onto a TE Toffe Cardstock!! Again I sprayed the back of my Stencil with Therm O Web Pixie Spray!! 
Next I applied the Therm O Web Deco Foil Transfer Gel to the Stencil #2 layer that was sprayed with the Pixie Spray and applied over the top of the Inked Butterflies using the Stencil Pal!! The Stencils are etched with the design for REALLY easy work when it comes to layering the designs together!! Takes ALL of the guess work out for you!! 
Then I applied the Therm O Web Rainbow Shattered Glass Deco Foil over the top of the Dry Transfer Gel Duo and I ran it through my Die Cutting Machine!! SWOON!! Talk about STUNNING!! I added some Picket Fence Distress Paint Splatters for some Texture and Stamped and Embossed the Sentiment in some WoW Bright White Embossing Powder from the NEW Hummingbird Stamp Set onto some TE Oreo Cardstock and Die Cut it out using the NEW Circle Frames Die Set!! Then added the Panel onto a Scalloped Rectangle Die Cut from the Frames & Flags Die Set from some TE Oreo Cardstock and adhered it onto a White A2 Cardbase with some Foam Tape for some dimension!! 
I LOVE the way they turned out and I LOVE that there are SO MANY possibilities with this STUNNING NEW Butterfly Stencil Set!! SWOON!! 

THANKS SO MUCH for stopping by today and I hope you have a FABULOUS WEEKEND!! 

COUNTRY HUGS-N-KISSES
LARISSA  ๐Ÿฆ‹

S U P P L I E S
Below you will find links to the supplies used to create this project(s). Click the icon for the store underneath the thumbnails to start shopping. Where available I use compensated affiliate links at no extra cost to you. Your support helps me to keep bringing you new projects. Thank you!!

Sunday, October 13, 2019

You Are My Sunshine w/ Brutus Monroe!!

Pin It

Hello Crafty Friends!! 
I'm here today to share my last Guest Designer Project for Brutus Monroe!! I've created a STUNNING Card combining a Stenciled Glitter Glaze Background with Stamped Images!! 
I started by using a piece of Brutus Monroe Wagon Cardstock!! I sprayed the back of my Brutus Monroe Mermaid Lagoon ~ Tangled Wave Stencil with some Therm O Web Pixie Spray and adhered it over the Cardstock!! Then I took some of the Brutus Monroe Glitter Glaze in Scarlet and applied it over the Stencil using my Stencil Pal!! 
I removed the Stencil and washed it along with my Stencil Pal and set it aside to Dry!! I LOVE the way the colors work together!! It the PERFECT combination!! 
Next I Stamped and Embossed the Butterfly Image from the Take Flight Stamp Set and used Copic Markers in (Y11, YR23, R02, R05, R08, E41, N6 & N10) to color in the Image!! I added some Morning Dew Nuvo Drops to the Body of the Butterfly and the some of the Details on the Wings!! I also added some Midas Shimmer Pen to add some Gold Shimmer to the Yellow areas of the Butterfly!! I Stamped the Sentiment from the Sunshine Sunflower Stamp Set and inked it with some Zest Ink to make it POP!! 
I adhered the Butterfly Image after Fussy Cutting it out onto the Stenciled Card Panel using some Brutus Monroe Foam Tape!! I also added Foam Tape to the Sentiment and adhered it underneath the Butterfly!! A few Gold Foiled Pearls were scattered around to finish off the Design!! I layered a piece of Brutus Monroe Macchiato Cardstock and Die Cut a Scalloped Frame from some Brutus Monroe Lunch Bag Cardstock that I inked with some Walnut Distress Ink to tie it all together!! I adhered the Panel onto a Not Your Mamas Cadrbase and my card is ready to send to BRIGHTEN someone's Day!! 
THANKS SO MUCH for stopping by today and I hope I've INSPIRED you to give the Stenciled Glitter Glaze Technique a try with your Stamped Images!! Not only do they add texture, but the Sparkle and Shine are just STUNNING!! 
Have a FABULOUS WEEK!! 
COUNTRY HUGS-N-KISSES
LARISSA    =)

Saturday, September 28, 2019

Shrink Film Butterfly Earrings and Gift Tags w/ Brutus Monroe!!

Pin It

HELLO CRAFTY FRIENDS!! 
I'm SO EXCITED to be Guest Designing for Brutus Monroe!! I LOVE SO MANY of the AMAZING Products and had such a FUN time creating with them!!  I LOVE giving Handmade Gifts and being able to use my Stamps in more than one way!! I have two different techniques for creating some Butterfly Earrings that ANYONE is sure to Cherish!! Plus it's such a simple process that you could even have your Friends or Kids get crafty with you too!! 
First I created the Stenciled Cardstock to create my Tags!! 
I started by using a piece of Brutus Monroe Wagon Cardstock!! I sprayed the back of my Brutus Monroe Mermaid Lagoon ~ Tangled Wave Stencil with some Therm O Web Pixie Spray and adhered it over the Cardstock!! Then I took some of the Brutus Monroe Glitter Glaze in Scarlet and applied it over the Stencil using my Stencil Pal!! 
I removed the Stencil and washed it along with my Stencil Pal and set it aside to Dry!! I LOVE the way the colors work together!! It the PERFECT combination!! 
Next I Stamped the Butterfly Image from the Take Flight Stamp Set onto the Shrink Film using StazOn Brown Pigment Ink and used Copic Markers in (Y11, YR23, R02, R05, R08, E41, N6 & N10) to color in the Image on the Backside of the Inked Shrink Film!! I wanted to create a STUNNING Watercolored look!! I LOVE the results!! 
Next I Fussy Cut the Butterfly Images out and used my Heat Gun to Shrink them!! I LOVE the way they turned out!! Almost like they were hand painted!! I adhered the Earring Backs onto the back using some E6000 Glue that I placed onto the Earring Back using a Toothpick as it doesn't take much Glue!! Then set them aside for 24 Hours to cure!! 
I Die Cut the Tag from some Brutus Monroe Not Your Mamas Cardstock and Die Cut the Bottom portion from the Stenciled Wagon Cardstock and adhered it to the bottom of the Tag after inking with some Tumbled Glass Distress Ink!! I also Stamped and Embossed the Sentiment from the Taking Flight Stamp Set and then Pierced a couple holes into the Tag to place the Earrings onto the Tag!!  
If you wanted to use just the Image alone, you'd just Stamp the Butterfly Image onto the Brutus Monroe Shrink Film and Fussy Cut them out then Shrink them using your Heat Gun!! 
I followed the same steps to adhere the Earring backs and then I create the Gift Tag!! I LOVE that you customize these for the recipient and their tastes!! Such a FUN Gift to both create and receive!!  
THANKS SO MUCH for stopping by today and I hope I've INSPIRED you you to give this a try for any gifts you may need to give, or as a FUN Project to make with a Friend or Child!! No matter what I KNOW you'll LOVE it!! 

COUNTRY HUGS-N-KISSES
LARISSA   =)