Showing posts with label Frames Squared Die Set. Show all posts

Thursday, August 17, 2023

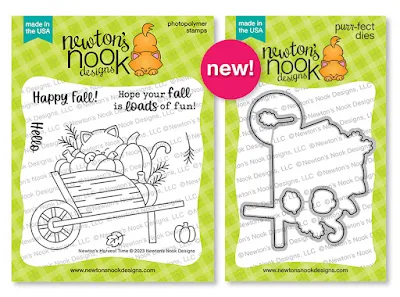
Newton's Nook Designs August Release ~ Newton's Harvest Time Stamp Set + coordinating Newton's Harvest Time Die Set!!

Pin It
Newton's Nook Designs August Release Available August 18th 2023

 
HELLO CRAFTY FRIENDS!!

Welcome to Day of the Newton's Nook Designs August Release!! Toady we are Showcasing the NEW Newton's Harvest Time Stamp Set + coordinating Newton's Harvest Time Die Set!! 
Here's a Look at the NEW Set!! 
Newton's Harvest Time Stamp Set + coordinating Newton's Harvest Time Die Set by Newton's Nook Designs
I ADORE this New Set and the FUN Sentiments that can be used for several Occasions!!
Here's what I've created for today!! 
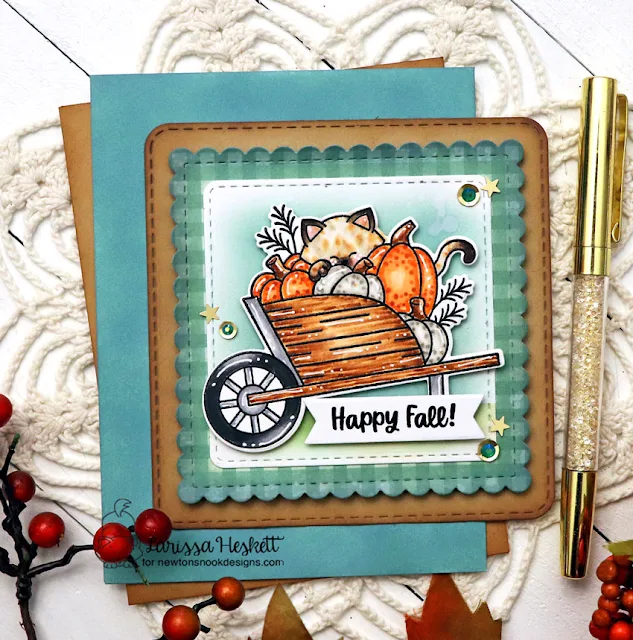
Happy Fall Card by Larissa Heskett for Newton's Nook Designs using Newton's Harvest Time Stamp Set, Newton's Harvest Time Die Set, Frames Squared Die Set, Frames & Flags Die Set and  Autumn Paper Pad
I Started by Stamping and Embossing the Image using Versa Fine Black Onyx Ink and WoW Clear Gloss Embossing Powder!! 
Happy Fall Card by Larissa Heskett for Newton's Nook Designs using Newton's Harvest Time Stamp Set, Newton's Harvest Time Die Set, Frames Squared Die Set, Frames & Flags Die Set and  Autumn Paper Pad
Then  used Copic Markers to Color the Image!! 
Orange: YR00, YR18 & YR68        
Cheeks: RV11
White Pumpkins: W0, W2 & W5         
Brown: E30, E33 & E37      Kitten: E40, E43, E47 & E99        
Grey: N0, N2 & N4           Black: N0, N3, N6 & N8
Then I Die Cut the Image out using the coordinating Die Set!! I added Black & White Gel Pen Details!! 
Happy Fall Card by Larissa Heskett for Newton's Nook Designs using Newton's Harvest Time Stamp Set, Newton's Harvest Time Die Set, Frames Squared Die Set, Frames & Flags Die Set and  Autumn Paper Pad
For the Card Panel I Die Cut some White Cardstock using the Frames Squared Die Set!! Then Inked the background using Speckled Egg and Bundled Sage Distress Oxide Inks!! Then I Die Cut a Piece of Plaid Patterned Paper from the Autumn Paper Pad using the Scalloped Square Frame again from the Frames Squared Die Set and I Inked the Edges using Speckled Egg Distress Oxide Ink!! I also Die Cut a Piece of Kraft Cardstock using the Largest of the Frames Squared Dies and Inked the Edges using Vintage Photo Distress Oxide Ink!! I adhered the Image using Foam Tape and then Stamped and Embossed the Sentiment onto a Banner from the Frames & Flags Die Set and adhered it to the Card Panel using Foam Tape!! Then I finished off the Design with some Gold Sequins and Gold Star Confetti!! I LOVE how t turned out and the Warn Fall Colors make me EXCITED for the Fall Season ahead!! 

Would you like to win the “Newton's Harvest Time” Stamp SetThis stamp set will be given away to ONE Lucky Winner!!

Here's how to win: Comment on the NND blog and Design Team blogs (see list below)! The winner will be chosen at random from the collective reveal posts. Make sure to check out each of their blogs and comment for your chance to win. You will not know which blog has been chosen so the more you comment on the better your chances are of winning! You have until Thursday August 17th at 9pm ET to comment  -- winners will be announced on the blog post on Friday, August 18th. 


THANKS SO MUCH for stopping by today!! Make sure to leave me comments from ALL of the Release Week Posts for your chance to WIN!!
Then check out the Newton's Nook Designs Blog tomorrow Friday, August 18th to see if you're one of the LUCKY Winners!! 

Have a FABULOUS WEEKEND!!

LARISSA HESKETT ðŸ’–

Saturday, May 1, 2021

InterNational Scrapbooking Day w/ Therm O Web & Page Maps!!

Pin It
HELLO CRAFTY FRIENDS!! 


I'm here with Therm O Web, as today is International Scrapbooking Day!! YIPPEE!! We want to CELEBRATE by offering a Chance to WIN a $30 Gift Card to the Therm O Web Store + some Goodies from Photoplay Paper!! 

All you have to do is create either a Layout or a Card that's INSPIRED by one of the Page Maps Sketches above and share with us Via Social Media, making sure to TAG #thermoweb so they can find it!!  
I've created a Duo of Cards for today using the 1st Sketch as my INSPIRATION along with some NEW Therm O Web Deco Foil Toner Card Fronts and some Newton's Nook Designs Products as we just finished up a FULL Week of Collaborations w/ even more chances to WIN that EXPIRES on SUNDAY!! So if you haven't already make sure you ENTER HERE and HERE for a chance to WIN!!
I Started with the NEW Deco Foil Toner Card Fronts ~ Time to Fly!! Then I Cut a piece of Deco Foil in Rainbow Shattered Glass large enough to cover the Toner Card Front and ran it through my Laminating Machine!! 
SWOON!! How BEAUTIFUL is this!! Then SAVE the Negative Foil as we'll use this to make our Second Card!! 
I took the Negative Foil Piece and Placed it over a Piece of Deco Foil Toner Sheets and ran it through my Laminating Machine!! Then removed the Film and SWOON!! Another Piece for my Second Card Panel!! NO WASTE!! 
Then I added some Black Soot and Picket Fence Distress Paint Splatters for some dimension!! 
I Started by Cutting a Strip of Vellum for BOTH Cards!! Then I Die Cut the NND Frames Squared Die Set Label from both Black and White Cardstock!! 
Next I Die Cut the Smaller Label from the NND Slimline Frames & Windows Die Set again from both White and Black Cardstock!! 
Then I also Die Cut the Same Small Label twice from a Piece of Deco Foil Toner Sheet that I Foiled with the Rainbow Shattered Glass Deco Foil!! I LOVE how it POPS on top of the Large Label Die Cut!! I tried to line up the Dies so that the Labels would be Die Cut from the same Color area for a seamless Design!! 
Next I Die Cut 4 of the NND Butterfly Images using the NND Slimline Frames & Potholes Die Set!! Again using the same Deco Foil Toner Sheet that I foiled with the Rainbow Shattered Glass Deco Foil!! I tried to align it again with area of the Card Panel so the Foil colors would be Seamless!! 
Just make me HAPPY!! 
I adhered the Vellum Strips to the Deco Foiled Toner Card Front Panels using Gina K Designs Foam Tape!! Then I adhered the Small Label on top using some Ultra Bond Adhesive!! I Adhered the Large Label using another piece of Gina K. Designs Foam Tape and then adhered the Small Deco Foiled Toner Sheet Label on top of the Large Label using more Ultra Bond Adhesive!! 
I Stamped the Small Stitched Circles Die Cut from the NND Circle Frames Die Set using the "You are so Kind" Sentiment from NND Little Lilies Stamp Set!! I Embossed with WoW Embossing Powder in Clear Gloss & Bright White!! Then I adhered some Trinity Stamps Midnight Ball Baubles!! The iridescent Color pairs so well with the Rainbow Deco Foil when moved in the Light!! 

So there you have it a DUO of Cards using by the 1st Sketch!! I hope I've INSPIRED you and that you'll join in on the FUN for SEVERAL chances to WIN!! Just follow the LINKS I've provided!! 
Also, here's another way to SAVE this WEEKEND taking advantage of a ONE DAY SALE!!


Hope you have a FABULOUS WEEKEND and that you get the Chance to CREATE!! 

COUNTRY HUGS-N-KISSES 
LARISSA 💖

Tuesday, May 19, 2020

Newton's Nook Designs May 2020 Release ~ Monarchs and Butterflies Stencil!!

Pin It
Hello!!
I'm here with Day 2 of the Newton's Nook Designs May Release!! Today we're showcasing the NEW 
"Monarchs" Stamp Set + coordinating Monarchs Die Set and the Butterflies Stencil Set!! 
Let's take a look at the AWESOME New Sets!!
Monarchs Stamp and Die Set by Newton's Nook Designs
Butterflies Stencil Set by Newton's Nook Designs
SWOON!! How BEAUTIFUL is this NEW Set!! 
I'm SO EXCITED about it and all of the possibilities!!
 Here's what I've created for today!! 
Thinking of You Monarch Card by Larissa Heskett for Newton's Nook Designs using Monarchs Stamp and Die Set, Banner Trio Die and Frames Squared Die Set #newtonsnookdesigns #newtonsnook #monarchsstampset #banertrio #framessquared
I Started by Stamping the Monarch Image from the NEW "Monarchs" Stamp Set and then Die Cut it out using the NEW coordinating Monarchs Dies!! I Colored it with Copic Markers using YR00, YR02 & YR68   BG10 & BG45!! Then I Die Cut the Frame from the Frames Squared Die Set from some TE Cardstock and adhered the Butterfly using Foam Tape just to the body so the Wings could be folded up for some dimension!! Then I Stamped and Embossed the same Monarch Image onto the bottom half of my Card Panel!! I Stamped in Versa Fine Black Onyx Ink and Embossed with WoW Clear Gloss Embossing Powder!! I added some Black Soot Distress Paint Splatters!! 
Thinking of You Monarch Card by Larissa Heskett for Newton's Nook Designs using Monarchs Stamp and Die Set, Banner Trio Die and Frames Squared Die Set #newtonsnookdesigns #newtonsnook #monarchsstampset #banertrio #framessquared
I Die Cut the NEW Banner Trio Die from some TE Oreo Cardstock and then cut another Strip from some White Cardstock to Stamp and Emboss my Sentiment!! I adhered the Framed Butterfly onto the Cardbase using Foam Tape and then adhered the Banner over the bottom part of the Framed Butterfly using liquid adhesive just for the Tails!! I added some Pretty Pink Posh Jewels in Aquamarine and some Studio Katia Pearls to add some Sparkle and I used a Tonic Studios Glitter Pen to add some Sparkle to the Butterfly!! I LOVE how it turned out and can't wait to Create MORE Cards with this Set!! 

Would you like to win the“Monarchs Stamp Set!!?? 
We will choose ONE lucky winner for each stamp set!
Here's how to win: Comment on the NND blog and Design Team blogs (see list below)! The winner will be chosen at random from the collective reveal posts. Make sure to check out each of their blogs and comment for your chance to win. You will not know which blog has been chosen so the more you comment on the better your chances are of winning! You have until Thursday May 21st at 9pm EST to comment  -- winners will be announced on the blog post on Friday, May 22nd.
Check out all the awesome Design Team Blogs below to enter:

THANKS SO MUCH for stopping by today!!  
Don't forget to visit tomorrow for a look at the NEW "HummingbirdStamp Set + coordinating dies and a check out the Newton's Nook Designs Blog on the 22nd to see if you're one of the LUCKY Winners!! 
Have a FABULOUS WEEK!!

COUNTRY HUGS-N-KISSES
LARISSA 🦋

Friday, May 8, 2020

Hang in there Card with Newton's Nook Designs!!

Pin It

Hello Crafty Friends!! 

I'm up on the Newton's Nook Blog today sharing this Hang In There Card!! It's SURE to BRIGHTEN someones Day!! Especially with all that's going on in the World right now!! 
I LOVE that this Image can be used for almost ANY occasion and it can be used for any recipient as well!! 
 LOVE playing around with the NND Stencils and trying to create different backgrounds!! For this Card I created a 2 Color Design using the Gingham Stencil and Scattered Straw and Tumbled Glass Distress Oxide Inks!! I LOVE the way it looks!! Just by simply off setting it I was able to create the 2 Color Design!! You can get SO MANY variations from just this one Stencil!! SQUEAL!! I LOVE being able to use my Products like this!! 
I used the Newton Hangs Out Stamp Set to Stamp and Emboss the Image!! Then I used Copic Markers to Color it in!! (Tree: E33, E35 & E37  YG11, YG25 & YG45  Newon: E40, E42, E43 & E44  R00  R43, R46 & R89  Y11 & YR23  Bird: BG000 & BG11  Y11 & YR23  YR00 & YR18  R00)  I Die Cut out the Image using the coordinating Newton Hangs Out Die Set!! Then I added it to a Stitched Square Die Cut that I inked using Tumbled Glass Distress Oxide Ink!! I added some Water Splatters for some Texture!! White Gel Pen Details were added as well as some Tonic Studios Nuvo Drops in Morning Dew to Newton's Paws, Nose, Collar and the Birds Beak for some Dimension and Shine!! I Die Cut a Lawn Fawn Peacock Cardstock Scalloped Square using the Scalloped Square from the Frames Squared Die Set!! I LOVE the way it turned out!!

THANKS SO MUCH for stopping by today and I hope you have a FABULOUS and BLESSED Mother's Day Weekend!! HUGE HUGS sent out to ALL of you AMAZING Mom's during this time!! I hope you all know that YOU ARE AMAZING!! KEEP up the GREAT Work!! 

COUNTRY HUGS-N-KISSES
LARISSA  💗


Friday, December 20, 2019

Christmas Card and Gift Bag w/ Newton's Nook Designs!!

Pin It
Hello Crafty Friends!!

 I'm up on the Newton's Nook Designs Blog today with this SWEET and EASY Gift Set 
                    for any of those last minute Cards/Gifts you may need to create!! 
So for my Projects today I've actually used some of the Scraps that I had left over from my Newton's Nook Designs EXCLUSIVE email Project!! If you're not signed up for that email Feature you can sign up HERE so you DON'T MISS OUT on another Feature!! NEW EXCLUSIVE Projects are shared each Tuesday!! 
I Started by Spraying the back side of the NND Ornament Stencil and then adhered it to my Card Panel and used Distress Inks with Ink Daubers!! I used Candied Apple, Spiced Marmalade, Wild Honey, Peeled Paint & Peacock Feathers!! Then I splattered it with Water Droplets for some Texture!! Then I used Distress Inks to added some Color around the Ornaments!! 
I repeated that same process on another panel!! Stopping with just the Inking of the Ornaments on the stencil!! Then I Layered a thin coating of Therm O Web Deco Foil Transfer Gel using my Stencil Pal!! Then set it aside to Dry!! 
 Once the Gel is Dry, this is what the Panel will look like!! I LOVE the look on its own too, but I wanted to use the Negative Therm O Web Brutus Monroe Gold Static Foil piece that I had left over from another project I created!! You can find that project HERE!! I ENJOY being able to share ways to MAXIMIZE your products and using those negatives and left over scraps are ALL part of that process!! Meaning from the same core products you can create 3 Cards and a Gift Bag!! 
WHOOP WHOOP!!  
Next I layered the Negative Foil piece over the top of the Stenciled Ornament piece and then ran it through my Laminating Machine!! Its hard to see in the Photo, but the Ornaments like like they are Glass 3D Ornaments and that Gold Static Foil is just STUNNING in real life!! SWOON!! This is one of my FAVORITE Techniques for using those left over Foiled Pieces!! I hope you'll give it a try as I KNOW you'll just LOVE the results too!! 
To create my Card I cut a 1 inch strip off the Side of the Stenciled Ornament Card Panel after adding some Black Soot Distress Paint Splatters!! Before Die Cutting the Panel I made sure to line up the pattern with my left over Negative Foiled Strip so that the Pattern would Line up SEAMLESSLY!! Then I adhered the Negative Foiled Strip to the back side of the Stenciled Card Panel lining up the Stenciled Design!! I then backed the Panel with some TE Oreo Cardstock and then Die Cut a NND Frames & Flags Die Cut Panel from some Lawn Fawn Paper Bag Cardstock!! I inked the edges with some Gathered Twigs Distress Ink!! For the Center of the Card I Die Cut the Frame from the NND Squares Framed Die Set also from some Lawn Fawn Paper Bag Cardstock and then added the layered Circles also from the same Die Set!! I Stamped and Embossed the Sentiment from the NND Holiday Fringe Stamp Set and inked the center with some Wild Honey Distress Ink to help make the Sentiment POP!! I added some of the Pine Leaves Die Cut from some TE Avocado Cardstock using the NND Pines & Holly Die Set!! I inked the edges using a combination of Pine Needles, Peeled Paint and Gathered Twigs Distress Oxide Ink!! Then added a Die Cut Cardinal from the NND Forrest Scene Builder Die Set from some TE Cherry Pop Cardstock!! I LOVE the way this card turned out and hope I've INSPIRED you to give these techniques a Try to use up ALL of those Scraps and leftover pieces!! 
I created a coordinating Gift Bag by using the same Techniques!! I just Die Cut the Tag using the NND Fancy Edges Tag Die and Die Cut the Stitched Circle from the NND Squares Framed Die Set!! I Stamped and Embossed the Sentiment and Inked the center using Wild Honey Distress Ink to help make it POP!! A few Pine Leaves were added and a BIG Red Bow finishes it off!! 

 I hope I've INSPIRED you today to use ALL of those leftovers!! Just look at the BEAUTIFUL Projects that await the SPECIAL recipient!!   
THANKS SO MUCH for stopping by and I hope you have a VERY FABULOUS & BLESSED CHRISTMAS WEEKEND!!

COUNTRY HUGS-N-KISSES
LARISSA   =)

Wednesday, November 13, 2019

Newton's Nook Designs November Release 2019 ~ Penguin Pile & Let it Snow!!

Pin It

Hello!!
SQUEAL!!
         I'm here with Day 3 of the Newton's Nook Designs November Release!! 
       Today we're showcasing the NEW  
"Penguin PileStamp Set + coordinating "Penguin PileDies and the 
"Let it Snow" Mini Stamp Set!! 
Let's take a look at the AWESOME New Products!!
Piles of Warm Winter Wishes by Larissa Heskett for Newton's Nook Designs using Penguin Piles, Bokeh Stencil, Fancy Edges Tags Die #newtonsnook #newtonsnookdesigns #penguinpile
How SWEET are those Penguins!!?? I LOVE them and with the Holiday Season approaching rapidly, I thought it would be FUN to show how AMAZING they look on Winter/Holiday Tags!! I have several Family/Friends with Winter Birthdays so this Tag Design is going to be PERFECT for those!! I can coordinate the Colors of my Image with the Patterned Paper I want to use and it make coloring the Image a BREEZE too!! I started by Stamping and Embossing the Image and coloring it in with Copic Markers!! I used (Penguins: N0, N2, N4, N6 & N8   Cheeks: R00  Beaks & Feet: YR00 & YR68  Red: R43, R46 & R89  Green: YG61, YG63 & YG67  Pink: RV00, RV11 & RV34  White: N0 & N2) 
I Die Cut the Image out using the coordinating Die!! Then I added White Gel Pen Details Black Glaze Pen to the Eyes and Blizzard Glitter Nuvo Drops to the Rims of the Hats and Ear Muffs!! I also added some Morning Dew Nuvo Drops to the Beaks and Feet for some dimension and shine!! 
Piles of Warm Winter Wishes by Larissa Heskett for Newton's Nook Designs using Penguin Piles, Bokeh Stencil, Fancy Edges Tags Die #newtonsnook #newtonsnookdesigns #penguinpile
I Die Cut 2 Tags using the Fancy Edges Tag Die!! One from White Cardstock and one from some Patterned Paper!! I then used the Bokeh Stencil as a Mask to Highlight the area where I planned on Stamping and Embossing the Sentiment!! I used Tumbled Glass Distress Ink and then Inked over it with Cracked Pistachio Distress Oxide Ink to get the perfect match for the Patterned Paper!! I added some Water Splatters and let it dry!! Then I used a Static Bag to coat over the Inked Circle and Stamped and Embossed the Sentiment!! I Masked parts of the sentiment in order to Highlight a couple of the words!! I used WoW Embossing Powder in Clear and Rockin' Red!! The Irridescent Glitter in the Embossing Powder coordinates with the Iridescent Glitter in the Blizzard Nuvo Drops!! I used a Mini White Clothes Pin to attach the Tags to the Gift Bag and then created a Scrap Ribbon Bow!! I LOVE the way it turned out and just know it's going to bring SMILES to the recipient!! 
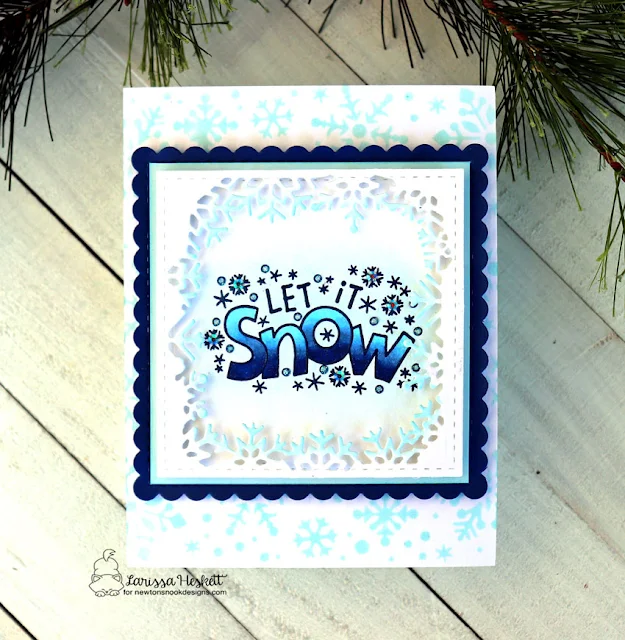
Let it Snow by Larissa Heskett for Newton's Nook Designs using Let it Snow, Frames Squared and Snowfall Stencil #letitsnow #newtonsnook #newtonsnookdesigns #snowfallstencil
For my second Card I wanted to showcase this BEAUTIFUL Sentiment!! I Stamped and Embossed the Sentiment with some Distress Oxide Chipped Sapphire Ink and WoW Clear Gloss Embossing Powder!! I used Copic Markers to color it in with an Ombre` Design!! 
I used (B02, B32, B34, B37 & B39)
I then used a Stitched Square Die to Die Cut the Sentiment centering in in the Middle!! I wanted to Frame the Sentiment so I Die Cut another Stitched Square and used the Sunny Studio Stamps Layered Snowflake Frame Die and Die Cut it from the center of the Stitched Square!! It fit the NND Frames Squared Scalloped Frame PERFECTLY!! I wanted the Snowflakes to tie into the Design some I inked the tips of the Snowflakes with some Tumbled Glass Distress Oxide Ink!! For the Cardbase Panel I used the NND Snowfall Stencil and inked with Tumbled Glass Distress Oxide Ink!!  

Let it Snow by Larissa Heskett for Newton's Nook Designs using Let it Snow, Frames Squared and Snowfall Stencil #letitsnow #newtonsnook #newtonsnookdesigns #snowfallstencil
I Adhered the Stitched Squares together using some TE Foam Strips after adding some Blizzard Glitter Nuvo Drops to the Snowflakes and some Iridescent Jewels to the center of the Large Snowflakes!! I LOVE the additions of Sparkle!! Then I glued the Stitched Square to the center of the Scalloped Square!! I added Foam Tape to the back of the Scalloped Square and adhered it to the A2 Snowflake Stenciled Cardbase!!  This Card is just STUNNING in real like and could be used for SO MANY occastions just by adding an additional Stamped Sentiment on the inside of the Card!! 

Would you like to win the “Penguin Pile"Stamp Set!!?? 
This stamp set will be given away to ONE lucky winner!!
Here's how to win: 
Comment on the NND blog and Design Team blogs (see list below)! The winner will be chosen at random from the collective reveal posts. Make sure to check out each of their blogs and comment for your chance to win. You will not know which blog has been chosen so the more you comment on the better your chances are of winning! You have until Thursday November 14th at 9pm EST to comment  -- winners will be announced on the blog post on Friday, November 15th
Check out all the awesome Design Team Blogs below to enter:

THANKS SO MUCH for stopping by today!!  
Don't forget to visit the Newton's Nook Designs Blog on the 15th to see if you're one of the LUCKY Winners and come back tomorrow for a look at the 
NEW "Frosty FolksStamp Set + coordinating Dies!! 
Have a FABULOUS WEEK!!

I'm also Linking Up: 


I was inspired by my Tags for Day 3 and I want to Highlight the Sentiment 
this time and I LOVE the way it looks!! 

COUNTRY HUGS-N-KISSES
LARISSA  =)