Showing posts with label Autumn Paper Pad. Show all posts

Thursday, October 30, 2025

Happy Autumn Card w/ Newton's Nook Designs!!

Pin It
HELLO CRAFTY FRIENDS!!
 

I'm up on the Newton's Nook Designs Blog today, showcasing the Autumn Oval Stamp Set & coordinating Oval Frames Die Set, the Autumn Paper Pad, Autumn Meows Paper Pad, the NEW Autumn Fields Stamp and coordinating Autumn Field Die Set, Pumpkin Tails Stamp Set and Circle Frames Die Set!! SWOON!! I'm in LOVE with this these Images and how they can be used together!! Think about your other FAVORITE Fall Images and how they can be paired together to create a BEAUTIFUL Fall Scene!!
I Started by Stamping and Embossing the NEW Autumn Oval Image onto Distress Watercolor Cardstock!! I Stamped with Versa Fine Black Onyx Ink and Embossing with WoW Embossing Powder!!
Then I Color the Image with Copic Markers!!
 

Orange: YR00, YR18 & YR68    Coral: R00, R11, & R32      Green: YG00, YG17 & G18   Dark Green: YG61, YG63 & YG67     Teal: BG70, BG72 & BG75
Brown: E40, E43 & E47     Yellow: Y00, Y11 & YR23     Purple: V00, V04 & V15    Turquoise: BG10, BG13 & BG15


Blue: B21, B32 & B18     Maroon: R81, R85 & R89      Orange: YR00, YR18 & YR68   Green: YG61, YG63 & YG67
Yellow: Y00, Y13 & YR23    Brown: E40, E43 & E47
White: W0, W2 & W5     Black: N0, N3 & N6    
Pink: RV00

Then I Die Cut ALL of the Images using the coordinating NEW Autumn Fields Die Set!! I added some White Gel Pen Highlights!!


Next, I Fussy Cut the Image out and Die Cut a Scalloped Circle using the Oval Frames Die Set from some Kraft Cardstock!! I adhered the Image to the Frame and then set it aside!! 
Then I worked on the Card Panel!! I Die Cut some Patterned Paper from the Autumn Paper Pad and added some Black Soot Distress Paint Splatters!! I adhered the Scalloped Oval onto the Panel using Foam Tape and then added some Trinity Stamps Fairy Rocks Rhinestones to finish off the Design and to add some Sparkle!! 

I Adhered the Scarecrow Image along with some of the Pumpkins to the Oval Die Cut again using some Foam Tape for Dimension!! 
Then for the Sentiment I Die Cut a Circle from the Circle Frames Die Set from White Cardstock and Inked the center with some Rusty Hinge Distress Oxide Ink then Stamped and Embossed the Sentiment from the NEW Pumpkin Tails Stamp Set!! Then I Die Cut a Layering Circle from some more Pattern Paper from the Autumn Meows Paper Pad and Layered them together!! I adhered it to the Card Panel and I LOVE how it finishes off the Design!! Such a BEAUTIFUL Fall Scene using some of my FAVORITE Fall Products and I hope this INSPIRED you to combine some of your FAVORITE Fall Images to create some Scene Cards for your Card Giving needs!! 
THANKS SO MUCH for stopping by today!! 
HAPPY Crafting, Friends!! 


Larissa Heskett ❤

Thursday, September 11, 2025

Newton's Nook Designs September ~ Falloween Release ~ Autumn Fields and Pumpkin Tails!!

Pin It

Newton's Nook Designs Falloween Release available September 12th, 2025

Hello Crafty Friends!!

Welcome to Release Week for the Newton's Nook Designs September 2025 ~ Newton's Nook Designs Falloween Release!! Today I'm sharing a couple Projects that I've made using the NEW Autumn Fields and Pumpkin Tails Stamp Sets + Coordinating Dies!!
Here's a Close up look at ALL of the NEW Products being showcased for Today!!
Newton's Nook Designs Autumn Fields Stamp Set & Pumpkin Tails Stamp Set + coordinating Die Sets
SQUEAL!! How AMAZING are these NEW Sets for today!! If you follow me then you know that I LOVE to create Scenes and these Sets are going to be some of my FAVORITES for Fall Scenes!! NND has so many Products that will coordinate with these for even MORE Options!! Here's what I created for today!! 
Hello Autumn Card by Larissa Heskett for Newton's Nook Designs using Autumn Fields, Framework Die Set, Bright Basics Paper Pad, Basic Frames Die Set and Circle Frames Die Set
I Started by Stamping and Embossing the Images from the NEW Autumn Fields Stamp Set using Versa Fine Black Onyx Ink and WoW Clear Gloss Embossing Powder!! Then I Colored the Images using Copic Markers!! 
Hello Autumn Card by Larissa Heskett for Newton's Nook Designs using Autumn Fields, Framework Die Set, Bright Basics Paper Pad, Basic Frames Die Set and Circle Frames Die Set
Blue: B21, B32 & B18     Maroon: R81, R85 & R89      Orange: YR00, YR18 & YR68   Green: YG61, YG63 & YG67
Yellow: Y00, Y13 & YR23    Brown: E40, E43 & E47
White: W0, W2 & W5     Black: N0, N3 & N6    
Pink: RV00
Then I Die Cut ALL of the Images using the coordinating
NEW Autumn Fields Die Set!! I added some White Gel Pen Highlights and then I added some Glossy Accents to the center of the Sunflowers for some Dimension and Shine!! 

For the Background Panel I Die Cut a Piece of White Cardstock using the Basic Frames Die Set!! Then I Inked the Background using Gathered Twigs and Salvaged Patina Distress Oxide Inks!! I Masked the Bottom of the Panel and then added some Black Soot Distress Paint Splatters as well as some Salvaged Patina Distress Spritz Splatters!! I LOVE the Texture and Shimmer it adds to the Background!! 
I Layered the Images together to create my Scene using some Foam Tape on some of the Images for some Dimension!! Using Foam Tape really adds LIFE to the Design!! 
Hello Autumn Card by Larissa Heskett for Newton's Nook Designs using Autumn Fields, Framework Die Set, Bright Basics Paper Pad, Basic Frames Die Set and Circle Frames Die Set
I Die Cut some Pattern Paper from the Bright Basics Paper Pad using the Framework Die Set, cutting it on a Diagonal for a FUN Look and adhered the Stitched Background Panel!! Then for the Sentiment I Die Cut a Circle from the Circle Frames Die Set from White Cardstock and Inked the center with some Salvaged Patina Distress Oxide Ink then Stamped and Embossed the Sentiment!! Then I Die Cut a Layering Circle from some more Pattern Paper from the 
Bright Basics Paper Pad and Layered them together!! I adhered it to the Card and I LOVE how it finishes off the Design!! 

Pick of the Patch Card by Larissa Heskett for Newton's Nook Designs using Circle Frames Die Set, Pumpkin Tails Stamp Set, Autumn Fields Stamp Set, and Autumn Paper Pad
For my Second Card I've created a FUN Shaker Scene Card and it just makes me HAPPY!! 
I Started by Die Cutting the Stitched Circles in order to create my Shaker Frame!! I Die Cut several layers of White Cardstock using the 
Circle Frames Die Set!! I adhered them all together to create the Shaker Frame and then I Die Cut a Piece of Acetate!! I added ALL of the Trinity Stamps Shaker Embellishments along with some Clay Pumpkins from This Calls for Confetti!! SWOON!! I LOVE all of these Embellishments together as they add such a FUN touch to the Design!! I also added several Stamped and Embossed Pumpkin Images in order to go with the Sentiment and Theme of being at a Pumpkin Patch!! I Die Cut a Circle from some Kraft Cardstock and then a Stitched Scallop Circle from some Pattern Paper from the Autumn Paper Pad!! 
Pick of the Patch Card by Larissa Heskett for Newton's Nook Designs using Circle Frames Die Set, Pumpkin Tails Stamp Set, Autumn Fields Stamp Set, and Autumn Paper Pad
I Die Cut the Card Panel from some Pattern Paper also from the 
Autumn Paper Pad!! Then I adhered the Scalloped Circle Shaker to the center of the Card Panel!! 
I Stamped and Embossed the Images from the NEW Pumpkin Tails Stamp Set using Versa Fine Black Onyx Ink and WoW Clear Gloss Embossing Powder!! Then I Colored the Images using Copic Markers!! 
Orange: YR00, YR18 & YR68   Green: YG61, YG63 & YG67
Yellow: Y00, Y13 & YR23    Brown: E40, E43 & E47 
White: W0, W2 & W5    Black: N0, N3 & N6    Pink: RV00

Then I Die Cut ALL of the Images using the coordinating NEW Pumpkin Tails Die Set!! I added some White Gel Pen Highlights

Then for the Sentiment I Die Cut a Circle from the Circle Frames Die Set from White Cardstock and Inked the center with some Speckled Egg Distress Oxide Ink then Stamped and Embossed the Sentiment!! Then I Die Cut a Layering Circle from some Kraft Cardstock and Layered them together!! I adhered it to the Card and I LOVE how it finishes off the Design!!
Pick of the Patch Card by Larissa Heskett for Newton's Nook Designs using Circle Frames Die Set, Pumpkin Tails Stamp Set, Autumn Fields Stamp Set, and Autumn Paper Pad
I LOVE how this Card turned out and I hope it INSPIRES You to create some Shaker Cards using your FAVORITE Images for a one of a kind Shaker Scene Card!! 

Enter to Win a $25 Prize!!

One lucky winner will receive a $25 prize to spend at Newton's Nook Designs online shop! The winner will be chosen at random from the collective blog posts featuring our new products this week. For a chance to win, leave comments on the Design Team Member Blog Posts (see list below) from Tuesday September 9 through Thursday September 11th. You will not know which blog has been chosen so the more you comment on the better your chances are of winning! You have until Thursday, September 11th at 9 pm ET to comment -- winners will be announced on the NND blog on Friday, September 12th.

Check out all the awesome Design Team Blogs below to enter:

Newton's Nook Designs

Donna Idlet

Larissa Heskett

Samantha Mann

Diane Morales

Amanda Wilcox


THANKS SO MUCH for stopping by today I hope you feel INSPIRED!!?? Make sure to join us again tomorrow for another look at the NEW Products!! We'll also be sharing MORE Inspiration with an Instagram Hop on Friday and another chance to WIN!! The New Products will be available in the Newton's Nook Designs Store on Friday September 12th, 2025!!
I hope you have a 
FABULOUS WEEK!! 

COUNTRY HUGS-N-KISSES
LARISSA
 💖


Thursday, August 17, 2023

Newton's Nook Designs August Release ~ Newton's Harvest Time Stamp Set + coordinating Newton's Harvest Time Die Set!!

Pin It
Newton's Nook Designs August Release Available August 18th 2023

 
HELLO CRAFTY FRIENDS!!

Welcome to Day 4 of the Newton's Nook Designs August Release!! Toady we are Showcasing the NEW Newton's Harvest Time Stamp Set + coordinating Newton's Harvest Time Die Set!! 
Here's a Look at the NEW Set!! 
Newton's Harvest Time Stamp Set + coordinating Newton's Harvest Time Die Set by Newton's Nook Designs
I ADORE this New Set and the FUN Sentiments that can be used for several Occasions!!
Here's what I've created for today!! 
Happy Fall Card by Larissa Heskett for Newton's Nook Designs using Newton's Harvest Time Stamp Set, Newton's Harvest Time Die Set, Frames Squared Die Set, Frames & Flags Die Set and  Autumn Paper Pad
I Started by Stamping and Embossing the Image using Versa Fine Black Onyx Ink and WoW Clear Gloss Embossing Powder!! 
Happy Fall Card by Larissa Heskett for Newton's Nook Designs using Newton's Harvest Time Stamp Set, Newton's Harvest Time Die Set, Frames Squared Die Set, Frames & Flags Die Set and  Autumn Paper Pad
Then  used Copic Markers to Color the Image!! 
Orange: YR00, YR18 & YR68        
Cheeks: RV11
White Pumpkins: W0, W2 & W5         
Brown: E30, E33 & E37      Kitten: E40, E43, E47 & E99        
Grey: N0, N2 & N4           Black: N0, N3, N6 & N8
Then I Die Cut the Image out using the coordinating Die Set!! I added Black & White Gel Pen Details!! 

Happy Fall Card by Larissa Heskett for Newton's Nook Designs using Newton's Harvest Time Stamp Set, Newton's Harvest Time Die Set, Frames Squared Die Set, Frames & Flags Die Set and  Autumn Paper Pad
For the Card Panel I Die Cut some White Cardstock using the Frames Squared Die Set!! Then Inked the background using Speckled Egg and Bundled Sage Distress Oxide Inks!! Then I Die Cut a Piece of Plaid Patterned Paper from the Autumn Paper Pad using the Scalloped Square Frame again from the Frames Squared Die Set and I Inked the Edges using Speckled Egg Distress Oxide Ink!! I also Die Cut a Piece of Kraft Cardstock using the Largest of the Frames Squared Dies and Inked the Edges using Vintage Photo Distress Oxide Ink!! I adhered the Image using Foam Tape and then Stamped and Embossed the Sentiment onto a Banner from the Frames & Flags Die Set and adhered it to the Card Panel using Foam Tape!! Then I finished off the Design with some Gold Sequins and Gold Star Confetti!! I LOVE how t turned out and the Warn Fall Colors make me EXCITED for the Fall Season ahead!! 

Would you like to win the “Newton's Harvest Time” Stamp Set? This stamp set will be given away to ONE Lucky Winner!!

Here's how to win: Comment on the NND blog and Design Team blogs (see list below)! The winner will be chosen at random from the collective reveal posts. Make sure to check out each of their blogs and comment for your chance to win. You will not know which blog has been chosen so the more you comment on the better your chances are of winning! You have until Thursday August 17th at 9pm ET to comment  -- winners will be announced on the blog post on Friday, August 18th. 


THANKS SO MUCH for stopping by today!! Make sure to leave me comments from ALL of the Release Week Posts for your chance to WIN!!
Then check out the Newton's Nook Designs Blog tomorrow Friday, August 18th to see if you're one of the LUCKY Winners!! 

Have a FABULOUS WEEKEND!!

LARISSA HESKETT 💖

Friday, November 4, 2022

Fall Pumpkins Hello Fall Card w/ Newton's Nook Designs!!

Pin It
HELLO CRAFTY FRIENDS!! 

I'm up on the Newton's Nook Designs Blog sharing this FUN Hello, Fall Card sharing how you can use the NEW Jack-O-Lantern Stencil Set to create some Fall Pumpkins!! I LOVE being able to STRETCH my Products and this is a REALLY FUN Technique!! 
If you LOVE Texture and adding Dimension this will definitely be a Technique you want to try!! 
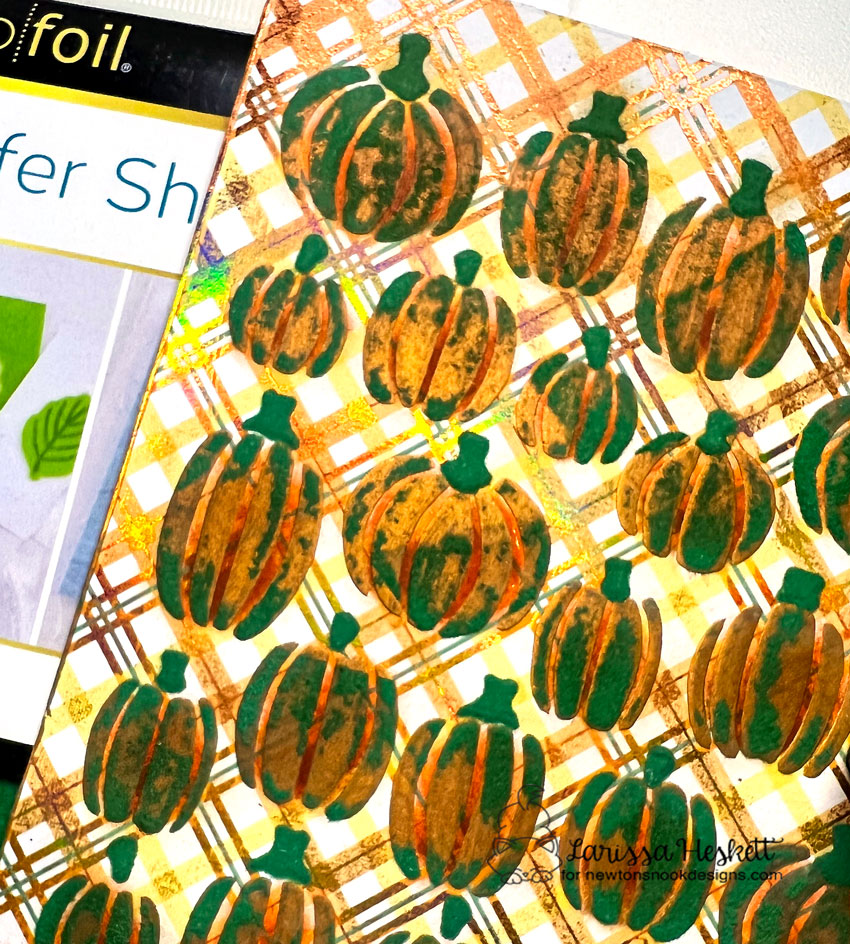
I Started with a Piece of Newton's Nook Designs Autumn Paper Pad and then Sprayed the Jack-O-Lantern Stencil with some Pixie Spray and adhered it over the Plaid Paper!! I pressed it firmly into place and then applied a Thin Layer of Deco Foil Transfer Gel Duo using my Stencil Pal!! I Removed the Stencil and then let the Gel Dry Completely!! It will be completely Clear once its Dry!! 

Once Completely Dry I then took a Piece of Peach Princess Deco Foil over the Gel and ran it through the MINC Laminating Machine!! SWOON!! Just look at the Iridescent Shine and I also LOVE the Texture as the Pumpkins are raised off the Patterned Paper!! Then I Inked over the Pumpkins with some Carved Pumpkin and Gathered Trigs Distress Inks!! It really makes them POP off the Panel!! 
Next I Inked the Stems with the Second Jack-O-Lantern Stencil, using Gathered Twig Distress Ink and then I applied some of the Deco Foil Transfer Gel Duo and again set it aside to Dry Completely!! 
Once Dry Completely I then placed a Piece of Emerald Green Deco Foil Flock Sheets over the top and ran it through my Die Cutting Machine!! There are MANY Options here!!
TIP: If you don't want the Pumpkins Flocked Green, then just Run the Flock over the Stems ONLY!! You can simply just place the Flock over and press over with your Finger or a Burnishing Tool and the Flock will Transfer to the Stems!! I personally LOVE that they are Flocked as I LOVE the realistic Texture on some of the Pumpkins straight from the Garden!! Then I applied some Gathered Twigs Distress Ink over the Flocked Pumpkins and Stems to add even more Dimension and Texture to the Pumpkins!! 
Here's a Close up look at the Pumpkins!! SWOON!! How FUN is that Texture, Sparkle and Shine!!?? I LOVE the finished results SO MUCH!! It would be FUN to try this Technique with other Color ways too as Pumpkins are FUN in a Rainbow of Colors RIGHT!!??
This Angle shows the Shine of the Foil better!! I may be bias, but Techniques like this just make me HAPPY!! I LOVE being able to create something Life like and FULL of Texture and Dimension!! MAKES ME HAPPY!! 
Then I adhered the Stenciled, Foiled and Flocked Panel onto a Die Cut Scalloped Frame from some Kraft Cardstock using the Frames & Flags Die Set!! I Inked the Edges with some Gathered Twigs Distress Ink and then placed the Panel onto an A2 White Cardstock Base!! 
 I Stamped and Embossed the Hello, Fall Sentiment from the Heartfelt Fall Stamp Set with Versa Fine Black Onyx Ink and Embossed with WoW Clear Gloss Embossing Powder onto a Stitched Circle from the Circle Frames Die Set and then Colored the Sentiment using an E84 Copic Marker!! Then I inked with with some Carved Pumpkin Distress Ink to add some Warmth to the Sentiment Circle!! I Layered the Sentiment with another Circle Die Cut from Kraft Cardstock and added it to the Card Panel using Foam Tape!!

I LOVE the way this Card turned out as it represents EVERYTHING I LOVE about Fall Pumpkins!! SWOON!! 
THANKS SO MUCH for stopping by today and I hope you have a FABULOUS WEEK!! 

COUNTRY HUGS-N-KISSES
LARISSA  🍂

Friday, September 2, 2022

THANKFUL for You w/ Newton's Nook Designs!!

Pin It
HELLO CRAFTY FRIENDS!!
 

I'm up on the Newton's Nook Designs Blog today, showcasing the NEW Autumn Oval Stamp Set & coordinating Oval Frames Die Set and the Autumn Paper Pad!! SWOON!! I'm in LOVE with this Image and LOVE that it can be used for ANY Occasion, just by changing out the Sentiment!!

I Started by Stamping and Embossing the NEW Autumn Oval Image onto Distress Watercolor Cardstock!! I Stamped with Versa Fine Black Onyx Ink and Embossing with WoW Embossing Powder!!
Then I Color the Image with Copic Markers!!
 

Orange: YR00, YR18 & YR68    Coral: R00, R11, & R32      Green: YG00, YG17 & G18   Dark Green: YG61, YG63 & YG67     Teal: BG70, BG72 & BG75
Brown: E40, E43 & E47     Yellow: Y00, Y11 & YR23     Purple: V00, V04 & V15    Turquoise: BG10, BG13 & BG15  
 

Then I Fussy Cut the Image out and Die Cut a Scalloped Circle using the Oval Frames Die Set from some Kraft Cardstock!! I adhered the Image to the Frame and then set it aside!! 

Then I worked on the Card Panel!! I Die Cut some Patterned Paper and added some Black Soot Distress Paint Splatters!! I adhered the Scalloped Oval onto the Panel using Foam Tape and then added some Trinity Stamps Fairy Rocks Rhinestones to finish off the Design and to add some Sparkle!! I LOVE the way this Card turned out and the HAPPY Color Palette makes me SO EXCITED for ALL things FALL!! 
Here's another Card I made using the Same Image, but this goes to show that there are SO MANY Color Combos available to make this IMAGE SHINE!! If you LOVE ALL things Fall this is an AMAZING Image to Color!! You can find the Blog Post HERE with Complete Details on how I Colored it!! 

I hope this INSPIRES you to get those Fall Images Out and Color!! Plus, ENJOY a SALE this Weekend too!! 

This Weekend! We're celebrating Labor Day with a SALE! 
Save 15% off your order now through Monday, September 5th!!
THANKS SO MUCH for stopping by today!! 

Have a FABULOUS Labor Day WEEKEND!! I hope you get to spend it doing something you LOVE!! 

LARISSA HESKETT 🧡