Showing posts with label Ghosts Stencil. Show all posts

Friday, September 3, 2021

Wishing You a Spooky Halloween w/ Newton's Nook Designs!!

Pin It
HELLO CRAFTY FRIENDS!! 

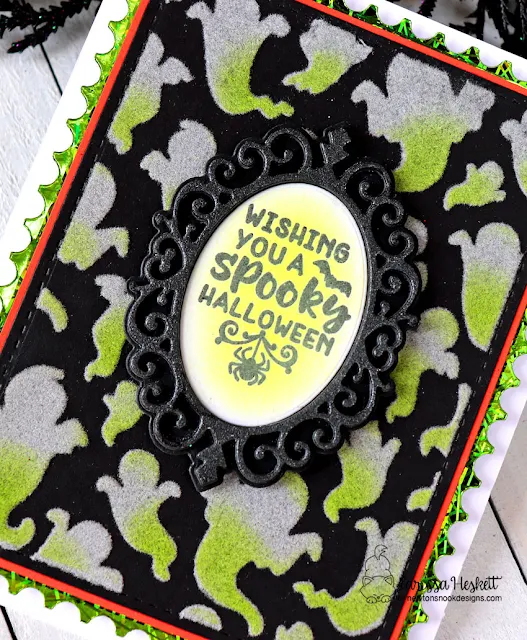
I'm up on the Newton's Nook Designs Blog today sharing this FABOOLOUS Glow-in-the-Dark Halloween Card FULL of Texture and Shine!!
I'm using the Creepy Cameos Stamp Set and Creepy Cameo Die Set along with the Ghost Stencil and Framework Die Set!! Let's get Started!! 
I Started by Creating the AWESOME Dimensional Cameo Frame!! I Mixed a combination of Gina K Designs Black Glitz Glitter Gel and Metallix Gel together and then applied a Thin Layer to a Piece of Distress Watercolor Cardstock using my Stencil Pal!! Then I set it aside to Dry Completely!! Then I Die Cut the Cameo Frame!! 
Then I Stamped and Embossed the Sentiment from the Creepy Cameos Stamp Set using Versa Mark Embossing Ink and WoW Glow-in-the Dark Embossing Powder!! SWOON!! In real Life it's SO FUN!! 
(On a Side Note, Photographing Glow-in-the-Dark Images are HARD!! If you have any pointers I'd LOVE the hear them!! THANKS in advance!!) 
Here's a Close up look at the Sentiment inside the STUNNING Glitter Glitz Frame!! 
Next I worked on the Stenciled Card Panel!! 

I Started by Spraying the back Side of the Ghost Stencil with Therm O Web Pixie Spray!! Then I adhered it to the Black Cardstock Card Panel and pressed it firmly into place!! Then I applied a Thin Layer of Deco Foil Transfer Gel Duo using a Stencil Pal!! Then I set it aside to Dry completely!! 
Once Dry, I added a Piece of White Latte Deco Foil Flock over the top of the DRY Deco Foil Transfer Gel and ran it through my Die Cutting Machine to burnish the Flock into the Deco Foil Transfer Gel!! Then I removed the Deco Flock backing and SQEUAL!! The Flocked Ghosts POP off the Card Panel!! 

I replaced the Ghost Stencil over the Flocked Ghost Images and then Inked with some Twisted Citron Distress Ink, using an Ink Dauber and Inking at the Bottom of the Ghost Images to add that Glow-in-the-Dark look!! I LOVE how the little touch of Ink really makes the Ghost Images POP of the Card Panel!! 

I adhered the Stencil and Flocked Card Panel onto an Orange Cardstock Panel!!
Then I adhered it to a Deco Foil Toner Sheet that was Foiled with some Brustus Monroe Green Static Deco Foil and then Die Cut it using the Framework Die Set!! I adhered it to an A2 Cardbase and my Card was Finished!! 
✱✱✱The Creepy Cameos Stamp Set and Creepy Cameo Die Set are part of the NND Retiring SALE and will only be available while supplies last so if you like these products, make sure you get them while you can and don't forget to see what else is retiring in our retiring sale category!!✱✱✱

THANKS SO MUCH for stopping by today!! I hope I've INSPIRED you on some FUN Techniques to use with your NND Products to create some AMAZING Halloween Cards to Bring a Glow-in-the-Dark BOO to someone SPECIAL!! 
Have a FABOOLOUS WEEKEND!! 


COUNTRY HUGS-N-KISSES
LARISSA  👻

S U P P L I E S
Below you will find links to the supplies used to create this project(s). Click the icon for the store underneath the thumbnails to start shopping. Where available I use compensated affiliate links at no extra cost to you. Your support helps me to keep bringing you new projects. 
Thank you!! 💓
Friday, September 20, 2019

Good Vibes Halloween Card w/Newton's Nook and Therm O Web!! =)

Pin It

HELLO CRAFTY FRIENDS!! 

I'm here with Newton's Nook Designs today as part of a WEEK FULL of AMAZING Inspiration with Therm O Web!! If you follow me, then you already know I actually design for both companies!! So I already LOVE to mix these Products together and as you'll see by my Project today its a PERFECT pairing!!
I started by mixing together some White Pearl Metallix Gel and some Gina K Designs White Glitz Glitter Gel!! Then I sprayed the backside of my NND Ghost Stencil with some Pixie Spray and placed it over my Black Card Panel!! Then set it aside to Dry!! 
I Stamped and Embossed the "Good Vibes" Sentiment from the Tropical Fringe Stamp Set using some WoW White Embossing Powder after heat setting it, I placed it back into my Mini MISTI Stamping Tool and restamped it using Versa Mark Ink and then Embossed it again using WoW Glow-in-the-Dark Embossing Powder!! I wanted a Ghost to look like it was SPOOKING OUT behind the sentiment so I used Purple Tape to Mask one of the Ghosts from the Ghost Stencil and then applied the Custom Gel I made again by using the Stencil Pal and set it aside to dry!! 
I Die Cut a Frame for the Stenciled Panel using the Framework Die Set from some Sweet Mango Cardstock and inked the edges with some Wilted Lilac Distress Oxide Ink!! and adhered it to some Taylored Expressions Patterned Paper using some 3D Foam Squares!! 
I Die Cut some Circles using the Frames Squared Die Set and adhered the Sentiment to it!! I inked with some Wilted Lilac Distress Oxide Ink and used some 3D Foam Squares to adhere it to the Stenciled Ghost Panel!!
 Here's a Close-up look at the Card!! I LOVE the Sparkle and Texture!! 
 Here's a Close up look at the Glow-in-the-Dark Sentiment!! It's SO FUN!! I hope you feel INSPIRED by my project today!!?? 

THANKS SO MUCH for stopping by today and I hope you'll visit both the Newton's Nook Designs Blog and the Therm O Web Blog to get entered to WIN some AMAZING Prizes, plus be INSPIRED by even more AMAZING Projects!! 

Have a FABULOUS WEEK!! 

COUNTRY HUGS-N-KISSES
LARISSA   =)

Thursday, August 22, 2019

Newton's Nook Designs August Release ~ Witchy Newton, Happy Howl-oween & NEW Ghosts Stencil!!

Pin It
Hello!!
SQUEAL!!
         I'm here with Day 4 of the 
.       Today we're showcasing the NEW  
"Witchy Newton" Stamp Set + "Happy Howl-oween" Stamp Set + coordinating Die Sets and the NEW Ghosts Stencil!! 
 
For my first Card I want to show that you can use those Images as is and create a FUN and VIBRANT Background to make them POP!!! I used Distress Oxide Inks in Scattered Straw, Carved Pumpkin and Shaded Lilac for the Sky using the Cascading Stars Stencil!! For the Ground I used Peeled Paint and Black Soot along with the Hills & Grass Stencil!! Then I framed the whole panel with a postage edged frame from our Framework Die Set in some Passion Punch & Oreo TE Cardstock and created my Cardbase from some TE Build a Scene Halloween Patterend Paper!! 


I Started by created that shiny bat background using the Flying Bats Stencil with Therm O Web Deco Foil Transfer Gel and Brustus Monroe Foil!!  Then I layered the image of the kitty from the NEW Witchy Newton Stamp Set which I colored with Copic Markers in a purple and orange boot!! I added the little "boo" from our Boo Hoo Stamp Set using Glow in The Dark Embossing Powder so it glows!! Then I framed the whole panel with a postage edged frame from our Framework Die Set in some Passion Punch TE Cardstock and created my Cardbase from some TE Salt Water Taffy Cardstock!! 

Would you like to win the "Witchy Newton" Stamp Set or the "Happy Howl-oween" Stamp Set!!?? 
This stamp set will be given away to ONE lucky winner!!
ONE lucky comment will be chosen from each reveal day to win!! 
Here's how to win: 
Comment on the NND blog and Design Team blogs (see list below)! The winner will be chosen at random from the collective reveal posts. Make sure to check out each of their blogs and comment for your chance to win. You will not know which blog has been chosen so the more you comment on the better your chances are of winning! You have until Thursday August 22nd at 9pm EST to comment  -- winners will be announced on the blog post on Friday, August 23rd.
Check out all the awesome Design Team Blogs below to enter:

THANKS SO MUCH for stopping by today!! 
The New Products will be available tomorrow Friday August 23rd!! 
Don't forget to visit the NND Blog again tomorrow to see if you're one of the LUCKY Winners and to shop for the NEW Products!!   
Have a FABULOUS WEEK!!

COUNTRY HUGS-N-KISSES
LARISSA  =)