Showing posts with label Stamping. Show all posts

Wednesday, April 17, 2024

Newton's Nook Designs April Release 2024 ~ Cherry Blossoms!!

Pin It
Newton's Nook Designs April Release 2024 Available in Stores Friday April 19th, 2024


HELLO CRAFTY FRENDS!!
Welcome to Release Week for the Newton's Nook Designs April Release 2024!! Today I'm sharing a Project that I've made using the NEW Cherry Blossoms Stamp Set and coordinating NEW Cherry Blossoms Die Set Die Set!! 
Here's a Close up look at ALL of the NEW Products being showcased for today!!
Newton's Nook Designs Cherry Blossoms Stamp Set and coordinating Cherry Blossoms Die Set
SWOON!! I LOVE this NEW Cherry Blossoms Set!!
There are so many ways it can be used, here's how I used it today!! 
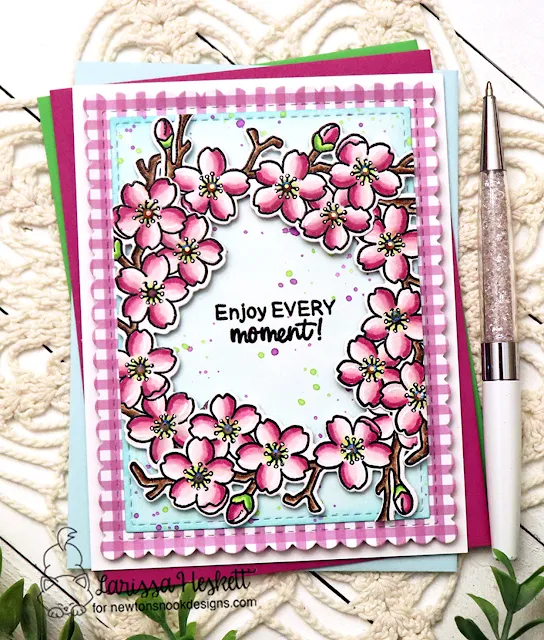
Enjoy Every Moment Card created by Larissa Heskett for Newton's Nook Designs using Cherry Blossoms Stamp Set, Cherry Blossoms Die Set, Pastel Basics Pattern Paper, Basic Frames Die Set, Frames and Flags Die SetI Started by Stamping and Embossing the Images 4 Times!! I Stamped with Versa Fine Black Onyx Ink and Embossed with WoW Clear Gloss Embossing Powder!! Then I used Copic Markers to color the Images!! 
Enjoy Every Moment Card created by Larissa Heskett for Newton's Nook Designs using Cherry Blossoms Stamp Set, Cherry Blossoms Die Set, Pastel Basics Pattern Paper, Basic Frames Die Set, Frames and Flags Die SetPink: RV00, RV34 RV55     Green: YG00, YG13 & YG17
Brown: E40, E43 & E47
Then I used the coordinating NEW Cherry Blossoms Die Set to Die Cut the Images out!! I added White Gel Pen Highlights and then adhered some Trinity Stamps Fairy Rocks Rhinestones to the center of all of the Cherry Blossom Blooms!! SWOON!! I LOVE the Iridescent Sparkle it adds!! 
Enjoy Every Moment Card created by Larissa Heskett for Newton's Nook Designs using Cherry Blossoms Stamp Set, Cherry Blossoms Die Set, Pastel Basics Pattern Paper, Basic Frames Die Set, Frames and Flags Die Set
Next I created the Card Panel!! 
I Die Cut the NEW Basic Frames Die from some White Cardstock and I Inked it with some Tumbled Glass Distress Oxide Ink!! Then I Added some Victorian Velvet and Peeled Paint Distress Oxide Ink Splatters!! Once the Panel was dry I Stamped and Embossed the Sentiment in the center of the Card Panel!! 
Enjoy Every Moment Card created by Larissa Heskett for Newton's Nook Designs using Cherry Blossoms Stamp Set, Cherry Blossoms Die Set, Pastel Basics Pattern Paper, Basic Frames Die Set, Frames and Flags Die Set
Next I adhered the Images to the Card Panel using Foam Tape for some Dimension creating a Frame around the Edge of the Panel!! Then I Die Cut some of the NEW Pastel Basics Pattern Paper using the Frames and Flags Die Set!! I adhered the Card Panel to the Pattern Paper Panel and adhered the Panel to an A2 White Cardstock Cardbase!! I LOVE how this turned out and and feel like you could create this same design and have FUN by changing the Color Combos that you use!! I hope this INSPIRES You and I can't wait to see what you create with this Set!!

Enter to Win a $25 Prize!!

We will be choosing two lucky winners to win a $25 store credit for Newton's Nook Designs online shop! The winners will be chosen at random from the collective blog posts featuring our new products this week. For a chance to win, leave comments on the Design Team Member Blog Posts (see list below) from Monday April 15 through Thursday April 18. You will not know which blog has been chosen so the more you comment on the better your chances are of winning!! You have until Thursday, April 18th at 9 pm ET to comment -- winners will be announced on the NND blog on Friday, April 19th.

Check out all the awesome Design Team Blogs below to enter:

Newton's Nook Designs

Donna Idlet

Ellen Haxelmans

Larissa Heskett

Samantha Mann

Zsofia Molnar

Diane Morales

Farhana Sarker

Tatiana Trafimovich

Amanda Wilcox

THANKS SO MUCH for stopping by today and make sure to join us again tomorrow for a look at more of the NEW Products that'll be available in the Newton's Nook Designs Store on Friday April 19th, 2024!! I hope you have a FABULOUS WEEK!! 
COUNTRY HUGS-N-KISSES
LARISSA
 ðŸ’–

Tuesday, April 16, 2024

Newton's Nook Designs April Release 2024 ~ Floral Delights!!

Pin It
Newton's Nook Designs April Release 2024 Available in Stores Friday April 19th, 2024

HELLO CRAFTY FRENDS!!
Welcome to Release Week for the Newton's Nook Designs April Release 2024!! Today I'm sharing a Project that I've made using the NEW Floral Delights Stamp Set and coordinating NEW Floral Delights Die Set Die Set!! 
Here's a Close up look at ALL of the NEW Products being showcased for today!!
Newton's Nook Designs Floral Delights Stamp Set and coordinating Floral Delights Die Set
SWOON!! I LOVE this NEW Floral Delights Stamp Set and ALL of the AMAZING Images and Sentiments that can be used in so many ways!!
I CAN'T WAIT to see what you create with it!! 

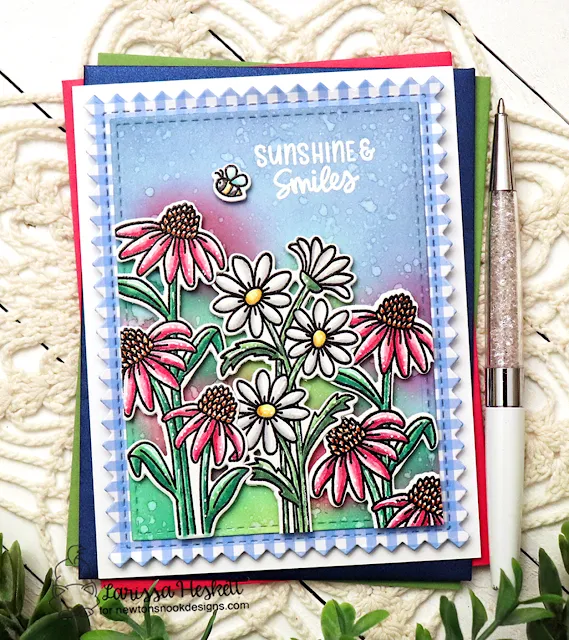
Sunshine & Smiles Card created by Larissa Heskett for Newton's Nook Designs using Floral Delights, Basic Frames Die Set, Pastel Basics Pattern Paper, Frames and Tags Die Set
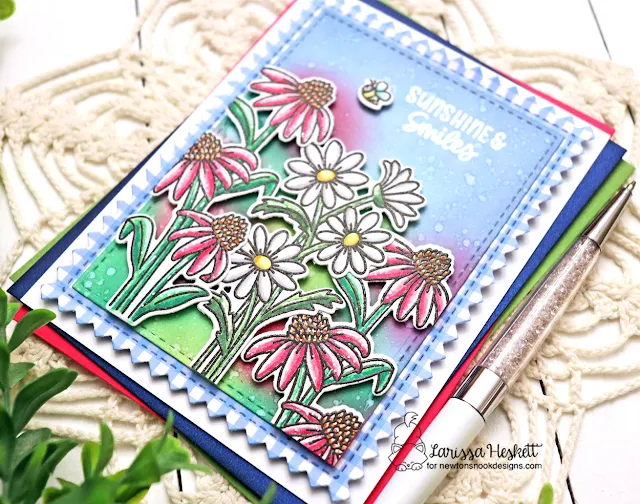
I Started by Stamping and Embossing the Images using Versa Fine Black Onyx Ink and WoW Clear Gloss Embossing Powder!! Then I used Copic Markers to Color the Images!!
Sunshine & Smiles Card created by Larissa Heskett for Newton's Nook Designs using Floral Delights, Basic Frames Die Set, Pastel Basics Pattern Paper, Frames and Tags Die Set
Pink: RV00, RV55 & RV19      Orange: YR00  & YR68      Yellow: Y00, Y13 & YR23     Green: G00 & G29      Green: YG03 & YG67      N0 & N3
Then I Die Cut the Image out using the NEW Floral Delights Die Set!! Next I added some White Gel Pen Highlights and I LOVE the way they look!! 
Sunshine & Smiles Card created by Larissa Heskett for Newton's Nook Designs using Floral Delights, Basic Frames Die Set, Pastel Basics Pattern Paper, Frames and Tags Die Set
For the Background I Die Cut the NEW Basic Frames Die from some White Cardstock and I Inked it with some Tumbled Glass and Faded Jeans Distress Oxide Inks!! Then I Added some Picked Raspberry, Lucky Clover and Peeled Paint Distress Oxide Ink!! I Placed the Images over my Background Panel and tried to Ink where the Flowers and Greenery were!!  Then I added some Water Splatters and let the Panel Dry!! Once Dried I Stamped and Embossed the Sentiment with some WoW Bright White Embossing Powder!! I LOVE the way it POPS off the Inked Background!! 
Sunshine & Smiles Card created by Larissa Heskett for Newton's Nook Designs using Floral Delights, Basic Frames Die Set, Pastel Basics Pattern Paper, Frames and Tags Die Set
Next I adhered the Images to the Card Panel using Foam Tape for some Dimension!! Then I Die Cut some of the NEW Pastel Basics Pattern Paper using the NEW Frames and Tags Die Set!! I adhered the Card Panel to the Pattern Paper Panel and adhered the Panel to an A2 White Cardstock Cardbase!! I LOVE how this turned out and and feel like you could create this same design and have FUN by changing the Color Combos that you use!! SO MANY POSSIBILITIES!! I hope this INSPIRES You and I can't wait to see what you create with this Set!! 


Enter to Win a $25 Prize!!

We will be choosing two lucky winners to win a $25 store credit for Newton's Nook Designs online shop! The winners will be chosen at random from the collective blog posts featuring our new products this week. For a chance to win, leave comments on the Design Team Member Blog Posts (see list below) from Monday April 15 through Thursday April 18. You will not know which blog has been chosen so the more you comment on the better your chances are of winning!! You have until Thursday, April 18th at 9 pm ET to comment -- winners will be announced on the NND blog on Friday, April 19th.

Check out all the awesome Design Team Blogs below to enter:

Newton's Nook Designs

Donna Idlet

Ellen Haxelmans

Larissa Heskett

Samantha Mann

Zsofia Molnar

Diane Morales

Farhana Sarker

Tatiana Trafimovich

Amanda Wilcox

THANKS SO MUCH for stopping by today and make sure to join us again tomorrow for a look at more of the NEW Products that'll be available in the Newton's Nook Designs Store on Friday April 19th, 2024!! I hope you have a FABULOUS WEEK!! 
COUNTRY HUGS-N-KISSES
LARISSA
 ðŸ’–

Wednesday, December 28, 2016

I'm THANKFUL for YOU with Honey Bee Stamps!! =)

Pin It

Hello!!
I'm here today to share a FUN Card I've made for the Honey Bee Stamps Blog and this is SADLY my LAST Post with Honey Bee Stamps as a part of their Design Team!! I have ENJOYED creating with ALL of you and I look forward to still creating and ROCKING my Honey Bee Stamps in the Future to INSPIRE ALL of you, so I hope you’ll still join me on my Blog for MORE Inspiration!!

Today I’ve made a FUN Card using the Hello Gorgeous Stamp Set along with the Hello Gorgeous Sweet Cuts Die Set, the Ten Things Stamp Set, and the Coordinating Ten Things Honey Cuts Die Set, the Let It Snow Stamp Set, and the Coordinating Let It Snow Honey Cuts Die Set, the Happiness Stamp Set, the Sending You Sentiments Stamp Set and the Thanks and Giving Stamp Set!! I wanted to create a FUN Floral Collage with Feathers hanging from it and this is what I came up with!!


I Started by Stamping and Embossing Two of the Floral Cluster Images from the Hello Gorgeous Stamp Set onto Distress Watercolor Paper and then I used the Coordinating Hello Gorgeous Sweet Cuts Die Set to Die Cut them both out!! I used my Zig Markers to Watercolor the Images and then I Stamped and Embossed the Feathers from the Ten Things Stamp Set and used the Coordinating Ten Things Sweet Cuts Die Set to Die Cut them out and Watercolored them using my Zig Markers!! I needed a Banner so I Die Cut the Banner from the Let It Snow Sweet Cuts Die Set from some Black Cardstock and then Embossed the Sentiment in White Embossing Powder from the Ten Things Stamp Set!! I wanted a Detailed Background so I used the Ten Things Stamp Set and Stamped the Circle Scribble Images with Black Versa Fine Ink onto Distress Watercolor Paper that I Die Cut using a Stitched Rectangle Die with White Embossing Powder!! I LOVE the Distressed look that you get!! Then I Stamped and Embossed the Large “You” Sentiment from the Thanks and Giving Stamp Set with Clear Embossing Powder!! I adhered the two Floral Cluster Arrangements together using Foam Tape and then I adhered it to my Card using Foam Tape!! I adhered the Feathers Dangling from the Floral Clusters and then adhered the Banner coming from behind the Feathers!! I added some Sparkling Clear Sequins and then I Stamped and Embossed and Sentiment Rectangle for the Inside of my Card!! I LOVE LOVE LOVE the way it turned out and I can’t wait to send it to a Special Friend!!
I thought I’d re-share a Few of my FAVORITE Projects too beings this is my LAST POST!!


THANKS SO MUCH for letting me INSPIRE You and for Stopping by my Blog today!! I look forward to seeing you in the Future and if you create anything I hope you’ll share it on Social Media as I LOVE to see what you have created!! I hope you have a FABULOUS New Year and that its FILLED with LOTS and LOTS of Crafting!!  =)
I'm also linking up to the Simon Says Stamp Work It Wednesday Challenge: Create Something New
workitwedbanner
and the Simon Says Stamp Wednesday Challenge: Anything Goes

COUNTRY HUGS-N-KISSES
LARISSA    =)

Thursday, December 22, 2016

Holly Jolly Gift Tag w/ Honey Bee Stamps!! =)

Pin It

HELLO!!
SQUEAL!! Christmas is just Days away!!  I'm up on the Honey Bee Stamps Blog today to share a FUN Gift Tag for any of those LAST Minute Gifts that you have to Wrap!!
I LOVE LOVE LOVE to use my Products to make Gift Tags and the Holidays are a PERFECT time to pull them out and use them in yet another AWESOME Way!! To start my Gift Tag I  used the Let It Snow Stamp Set along with the coordinating Let It Snow Sweet Cuts Die Set to Stamp and Die Cut the Sweet Snowman and Bird Images using Distress Markers to Color (Tumbled Glass, Black Soot, Ground Expresso, Carved Pumpkin and Candied Apple) on the Stamps and then Stamping them onto some Distress Watercolor Paper!! I then took a Water Brush and went over some of the Lines to add alittle bit of Watercolored Texture!! I wanted the Snowman to have some Sparkle so I added some of the BEAUTIFUL Ice Chips Glitter!! I LOVE the FUN texture and Sparkle it adds to the Sweet Image!! I also added some to the Ground so it looks like Real Snow!! I Die Cut a Tag Image and Watercolored the Background and then added some of the Pretty Snowflake Images form the Let It Snow Set!! I did the same Technique of Coloring on the Stamp with my Distress Markers using (Tumbled Glass, Salty Ocean and Faded Jeans) to get a FUN Tie Died look!! Then I Embossed them using Clear Embossing Powder!! I added the Sentiment in Black Onyx Versa Fine Ink and then Embossed it using Clear Embossing Powder!! For the Back of the Tag I used the Merry & Joy Stamp Set and Stamped and Embossed the To and From!! Then I repeated the Snowflakes the same way I did them on the Front of the Tag to add some Color and FUN to the Back of the Tag too!!
I hope you give this SWEET Gift Tag a try and if you do I hope you’ll share what you make with us on Social Media!! We LOVE LOVE LOVE to see what you create using the AMAZING Honey Bee Stamps Products!!
I'm also Linking up to the Simon Says Stamp Wednesday Challenge: Make It Sparkle!! 

THANKS SO MUCH for stopping by today and I hope you have a FABULOUS Holiday Week/Weekend!!
COUNTRY HUGS-N-KISSES
LARISSA    =)