Showing posts with label Cardmaking. Show all posts

Wednesday, April 17, 2024

Newton's Nook Designs April Release 2024 ~ Cherry Blossoms!!

Pin It
Newton's Nook Designs April Release 2024 Available in Stores Friday April 19th, 2024


HELLO CRAFTY FRENDS!!
Welcome to Release Week for the Newton's Nook Designs April Release 2024!! Today I'm sharing a Project that I've made using the NEW Cherry Blossoms Stamp Set and coordinating NEW Cherry Blossoms Die Set Die Set!! 
Here's a Close up look at ALL of the NEW Products being showcased for today!!
Newton's Nook Designs Cherry Blossoms Stamp Set and coordinating Cherry Blossoms Die Set
SWOON!! I LOVE this NEW Cherry Blossoms Set!!
There are so many ways it can be used, here's how I used it today!! 
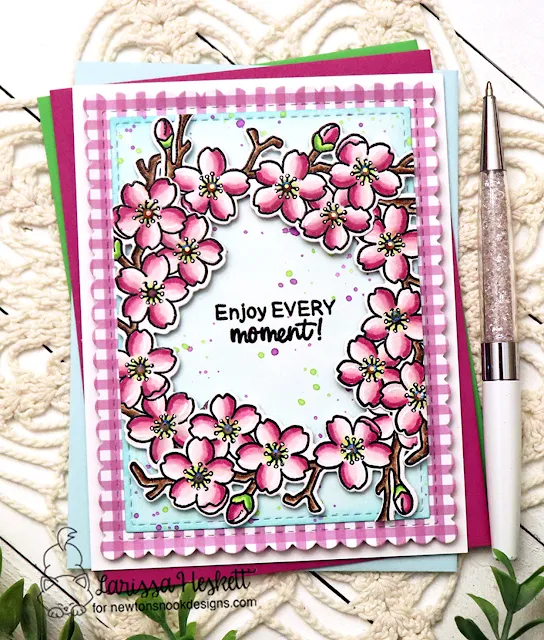
Enjoy Every Moment Card created by Larissa Heskett for Newton's Nook Designs using Cherry Blossoms Stamp Set, Cherry Blossoms Die Set, Pastel Basics Pattern Paper, Basic Frames Die Set, Frames and Flags Die SetI Started by Stamping and Embossing the Images 4 Times!! I Stamped with Versa Fine Black Onyx Ink and Embossed with WoW Clear Gloss Embossing Powder!! Then I used Copic Markers to color the Images!! 
Enjoy Every Moment Card created by Larissa Heskett for Newton's Nook Designs using Cherry Blossoms Stamp Set, Cherry Blossoms Die Set, Pastel Basics Pattern Paper, Basic Frames Die Set, Frames and Flags Die SetPink: RV00, RV34 RV55     Green: YG00, YG13 & YG17
Brown: E40, E43 & E47
Then I used the coordinating NEW Cherry Blossoms Die Set to Die Cut the Images out!! I added White Gel Pen Highlights and then adhered some Trinity Stamps Fairy Rocks Rhinestones to the center of all of the Cherry Blossom Blooms!! SWOON!! I LOVE the Iridescent Sparkle it adds!! 
Enjoy Every Moment Card created by Larissa Heskett for Newton's Nook Designs using Cherry Blossoms Stamp Set, Cherry Blossoms Die Set, Pastel Basics Pattern Paper, Basic Frames Die Set, Frames and Flags Die Set
Next I created the Card Panel!! 
I Die Cut the NEW Basic Frames Die from some White Cardstock and I Inked it with some Tumbled Glass Distress Oxide Ink!! Then I Added some Victorian Velvet and Peeled Paint Distress Oxide Ink Splatters!! Once the Panel was dry I Stamped and Embossed the Sentiment in the center of the Card Panel!! 
Enjoy Every Moment Card created by Larissa Heskett for Newton's Nook Designs using Cherry Blossoms Stamp Set, Cherry Blossoms Die Set, Pastel Basics Pattern Paper, Basic Frames Die Set, Frames and Flags Die Set
Next I adhered the Images to the Card Panel using Foam Tape for some Dimension creating a Frame around the Edge of the Panel!! Then I Die Cut some of the NEW Pastel Basics Pattern Paper using the Frames and Flags Die Set!! I adhered the Card Panel to the Pattern Paper Panel and adhered the Panel to an A2 White Cardstock Cardbase!! I LOVE how this turned out and and feel like you could create this same design and have FUN by changing the Color Combos that you use!! I hope this INSPIRES You and I can't wait to see what you create with this Set!!

Enter to Win a $25 Prize!!

We will be choosing two lucky winners to win a $25 store credit for Newton's Nook Designs online shop! The winners will be chosen at random from the collective blog posts featuring our new products this week. For a chance to win, leave comments on the Design Team Member Blog Posts (see list below) from Monday April 15 through Thursday April 18. You will not know which blog has been chosen so the more you comment on the better your chances are of winning!! You have until Thursday, April 18th at 9 pm ET to comment -- winners will be announced on the NND blog on Friday, April 19th.

Check out all the awesome Design Team Blogs below to enter:

Newton's Nook Designs

Donna Idlet

Ellen Haxelmans

Larissa Heskett

Samantha Mann

Zsofia Molnar

Diane Morales

Farhana Sarker

Tatiana Trafimovich

Amanda Wilcox

THANKS SO MUCH for stopping by today and make sure to join us again tomorrow for a look at more of the NEW Products that'll be available in the Newton's Nook Designs Store on Friday April 19th, 2024!! I hope you have a FABULOUS WEEK!! 
COUNTRY HUGS-N-KISSES
LARISSA
 💖

Tuesday, April 16, 2024

Newton's Nook Designs April Release 2024 ~ Floral Delights!!

Pin It
Newton's Nook Designs April Release 2024 Available in Stores Friday April 19th, 2024

HELLO CRAFTY FRENDS!!
Welcome to Release Week for the Newton's Nook Designs April Release 2024!! Today I'm sharing a Project that I've made using the NEW Floral Delights Stamp Set and coordinating NEW Floral Delights Die Set Die Set!! 
Here's a Close up look at ALL of the NEW Products being showcased for today!!
Newton's Nook Designs Floral Delights Stamp Set and coordinating Floral Delights Die Set
SWOON!! I LOVE this NEW Floral Delights Stamp Set and ALL of the AMAZING Images and Sentiments that can be used in so many ways!!
I CAN'T WAIT to see what you create with it!! 

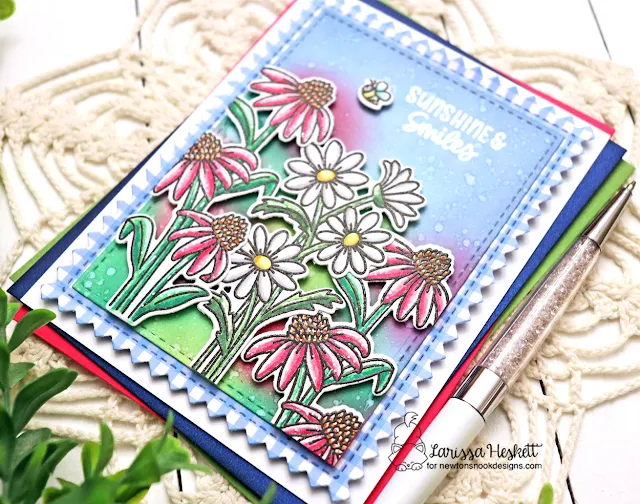
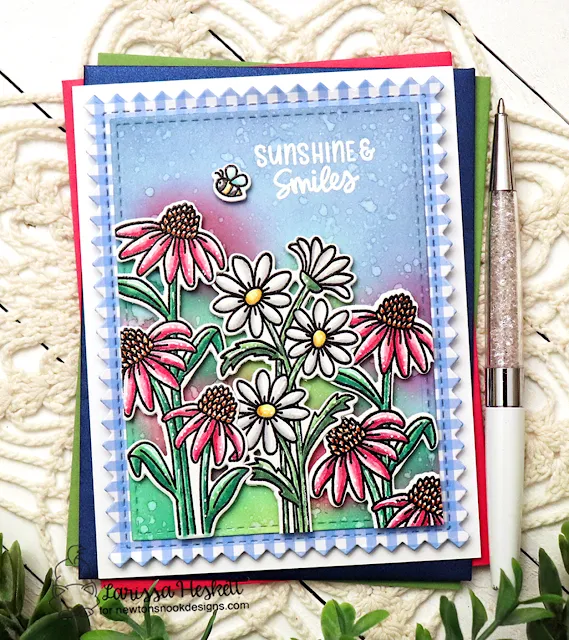
Sunshine & Smiles Card created by Larissa Heskett for Newton's Nook Designs using Floral Delights, Basic Frames Die Set, Pastel Basics Pattern Paper, Frames and Tags Die Set
I Started by Stamping and Embossing the Images using Versa Fine Black Onyx Ink and WoW Clear Gloss Embossing Powder!! Then I used Copic Markers to Color the Images!!
Sunshine & Smiles Card created by Larissa Heskett for Newton's Nook Designs using Floral Delights, Basic Frames Die Set, Pastel Basics Pattern Paper, Frames and Tags Die Set
Pink: RV00, RV55 & RV19      Orange: YR00  & YR68      Yellow: Y00, Y13 & YR23     Green: G00 & G29      Green: YG03 & YG67      N0 & N3
Then I Die Cut the Image out using the NEW Floral Delights Die Set!! Next I added some White Gel Pen Highlights and I LOVE the way they look!! 
Sunshine & Smiles Card created by Larissa Heskett for Newton's Nook Designs using Floral Delights, Basic Frames Die Set, Pastel Basics Pattern Paper, Frames and Tags Die Set
For the Background I Die Cut the NEW Basic Frames Die from some White Cardstock and I Inked it with some Tumbled Glass and Faded Jeans Distress Oxide Inks!! Then I Added some Picked Raspberry, Lucky Clover and Peeled Paint Distress Oxide Ink!! I Placed the Images over my Background Panel and tried to Ink where the Flowers and Greenery were!!  Then I added some Water Splatters and let the Panel Dry!! Once Dried I Stamped and Embossed the Sentiment with some WoW Bright White Embossing Powder!! I LOVE the way it POPS off the Inked Background!! 
Sunshine & Smiles Card created by Larissa Heskett for Newton's Nook Designs using Floral Delights, Basic Frames Die Set, Pastel Basics Pattern Paper, Frames and Tags Die Set
Next I adhered the Images to the Card Panel using Foam Tape for some Dimension!! Then I Die Cut some of the NEW Pastel Basics Pattern Paper using the NEW Frames and Tags Die Set!! I adhered the Card Panel to the Pattern Paper Panel and adhered the Panel to an A2 White Cardstock Cardbase!! I LOVE how this turned out and and feel like you could create this same design and have FUN by changing the Color Combos that you use!! SO MANY POSSIBILITIES!! I hope this INSPIRES You and I can't wait to see what you create with this Set!! 


Enter to Win a $25 Prize!!

We will be choosing two lucky winners to win a $25 store credit for Newton's Nook Designs online shop! The winners will be chosen at random from the collective blog posts featuring our new products this week. For a chance to win, leave comments on the Design Team Member Blog Posts (see list below) from Monday April 15 through Thursday April 18. You will not know which blog has been chosen so the more you comment on the better your chances are of winning!! You have until Thursday, April 18th at 9 pm ET to comment -- winners will be announced on the NND blog on Friday, April 19th.

Check out all the awesome Design Team Blogs below to enter:

Newton's Nook Designs

Donna Idlet

Ellen Haxelmans

Larissa Heskett

Samantha Mann

Zsofia Molnar

Diane Morales

Farhana Sarker

Tatiana Trafimovich

Amanda Wilcox

THANKS SO MUCH for stopping by today and make sure to join us again tomorrow for a look at more of the NEW Products that'll be available in the Newton's Nook Designs Store on Friday April 19th, 2024!! I hope you have a FABULOUS WEEK!! 
COUNTRY HUGS-N-KISSES
LARISSA
 💖

Friday, May 5, 2023

HAPPY Cinco De Meow w/ Newton's Nook Designs!!

Pin It
HELLO CRAFTY FRIENDS!! 

I'm up on the Newton's Nook Blog today sharing this
HAPPY Cinco De Meow Infinity Shaker Card!! I wanted to share this FUN Card using SEVERAL Different Products!! I LOVE being able to Mix-n-Match Products to come up with Designs and I LOVE how it turned out!! 
Cinco De Meow Card by Larissa Heskett for Newton's Nook Designs using Newton Loves Tacos, Confetti Stencil, Frames & Flags Die Set, Oval Frames Die Set and the Love & Woofs Patterned Paper
If you follow me, then you'll know that I LOVE Shaker Cards and this one was SO FUN to make!! Let's get Started!! 

For the Card Panel I used the Frames & Flags Scalloped Die to Die Cut some Cardstock and then I Sprayed the back of my Confetti Stencil with some Pixie Spray and pressed t firmly to the Cardstock then I added some Tape to mask off the Scalloped Edges of the Frame!! Then I Inked the Stencil with Salvaged PatinaTwisted Citron and Abandoned Coral Distress Oxide Inks!! I LOVE this Confetti Stencil as there are SO MANY FUN ways to use it!!
It's SO VERSATILE!! 
I removed the Stencil and how FUN is this Card Panel!! PERFECT for a BRIGHT and READY for a Celebration!! 
Cinco De Meow Card by Larissa Heskett for Newton's Nook Designs using Newton Loves Tacos, Confetti Stencil, Frames & Flags Die Set, Oval Frames Die Set and the Love & Woofs Patterned Paper
Next I Stamped and Embossed the Images from the Newton Loves Tacos Stamp Set  using Versa Fine Black Onyx Ink and Embossed with WoW Clear Gloss Embossing Powder!! 

I Colored the Image with Copic Markers!! 
Kitten: E40, E43 & E47   
Cheeks, Inside if Ears and Paws: R00
Green: YG03, YG17 & YG25    Coral: R00, R14 & R32
Turquoise: BG10, BG45 & BG49   
Tacos:
YR20, YR24 & E99   YG17 & R14

I used the coordinating Newton Loves Tacos Die Set to Die Cut the Images out and then I added some White Gel Pen Details!! 
Cinco De Meow Card by Larissa Heskett for Newton's Nook Designs using Newton Loves Tacos, Confetti Stencil, Frames & Flags Die Set, Oval Frames Die Set and the Love & Woofs Patterned Paper
I added the Infinity Shaker Pouch over the Backround Panel and added my FUN Shaker Elements ALL from Trinity Stamps!! Then I added the Oval Frame Die Cut from some of the Loves & Woofs Patterned Paper Pad!! I Added the Images to the Center of the Oval Frame, using Foam Tape for some Dimension and then I Stamped and Embossed the "Cinco De Meow" Sentiment onto a Vellum Strip using Versa Mark Ink and WoW Bright White Embossing Powder!! 

So there you have it, a FUN Cinco De Meow Infinity Shaker Card!! I hope I've INSPIRED you to Create a Card by Mixing and Matching SEVERAL of your Products together!! It's SO FUN coming up with different Designs!! 

THANKS SO MUCH for stopping by today and I hope you have a FABULOUS WEEK!! 

COUNRTY HUGS-N-KISSES
LARISSA  💗

Friday, April 21, 2023

Spellbinders April Stitching Die of the Month!!

Pin It
HELLO CRAFTY FRIENDS!! 

I'm here today to share a Couple Projects using the Spellbinders April Stitching Die of the Month Membership!! 
SWOON!! If you haven't seen ALL of the AMAZING Inspiration using this Set, hopefully this post will give you even more Ideas!! I LOVE how VERSITALE this Set it and I have some NEW Ideas using them to create a BEAUTIFUL Large Stitched Flower!! 

I Started by Die Cutting the different Layers of the Petals, Die Cutting 2 of Each Petal!! Then I Stitched the different Layers and adhered them together using some Double Sided Adhesive!! I adhered the Different Layers together using Foam Tape for some added Dimension as well as turning the Petals Up to add even more Dimension!! I rotated the Layers in order to achieve the FUN Flower Shape!! 

I Die Cut a Circle for the Center of the Flowers and used some WoW Glitter Embossing Powder to add some Sparkle and Shine to the Circle Center adhering it to the Flower using Double Sided Adhesive!! 
I Hot Foiled the Sentiment "Happy Birthday" from the Sentimental Ampersand Hot Foil & Die Set to the Fluted Classics Rectangle Die that was Die Cut from some Spellbinders Snowdrift Cardstock using some Copper Hot Foil and the Glimmer Hot Foil System!! SWOON!! I LOVE the way the Copper Hot Foil matches the Sparkle of the Sunflower Center!! It's just BEAUTIFUL!! 
I adhered the Stitched Sunflower and the Sunflowers Leaves that were cut using the Zinnia Etched Die Set from Patterned Paper to the Hot Foiled Fluted Classics Rectangle Die using some Double Sided Adhesive!! Then adhered the Panel to the Patterned Paper Card Panel using Foam Tape for Dimension!!

I repeated the same process only changing the Colors and Patterns of the Stitched Flower and Leaves!! 
I Die Cut a Circle for the Center of the Flowers and used some WoW Glitter Embossing Powder to add some Sparkle and Shine to the Circle Center adhering it to the Flower using Double Sided Adhesive!!

I Hot Foiled the Sentiment to the Fluted Classics Rectangle Die that was Die Cut from some Spellbinders Snowdrift Cardstock using some Matte Gold Hot Foil and the Glimmer Hot Foil System!! SWOON!! I LOVE the way the Matte Gold Hot Foil matches the Sparkle of the Flower Center!!
It's just BEAUTIFUL!!
 

I adhered the Stitched Flower and the Flower Leaves that were cut using the Zinnia Etched Die Set from Patterned Paper to the Hot Foiled Fluted Classics Rectangle Die using some Double Sided Adhesive!! Then adhered the Panel to the Patterned Paper Card Panel using Foam Tape for Dimension!!


I Created this last card the EXACT same way as the Last one, just changing the Patterned Paper!! I LOVE this Design as you can create ANY Flower Color Combo you'd like to coordinate with you Patterned Paper choice!!

Again I used WoW Glitter Embossing Powder to Cover the Circle Flower Center!! SWOON!! I LOVE the touch of Sparkle!! 

These Stitched Flowers are SO FUN to create!! I can using them for several different things including Party Decorations or a Banner for a Party!! I LOVE how Large they are and the FUN possibilities with the Color Combinations!! 

So there you have a NEW Idea on how you can use the Spellbinders April Stitching Die of the Month Membership!! I hope I've INSPIRED you today and I hope you'll check out ALL of the AMAZING Inspiration in the April 2023 Club Inspiration Roundup using the Spellbinders April Kits of the Month!! There are SO MANY FUN Products and there's still time to get the Kits this Month!! 

THANKS SO MUCH for stopping by today and I hope you have a FABULOUS WEEK!! 

COUNRTY HUGS-N-KISSES
LARISSA  💗

Friday, March 3, 2023

Basic Butterfly, Monarch Butterfly Details, Lacewing Butterfly, Botanical Butterfly & Petite Butterfly w/ Poshta Design ~ March Release Products 2023!!

Pin It
Hello Crafty Friends!! 
I'm SO EXCITED to be back for Day #3 of the Introduction Week for Poshta Design!! I hope you've been INSPIRED so far and I CAN'T wait to share what I've created for today!! 

Today, over on the Poshta Design Blog we're showcasing these NEW Products:

Basic Butterfly Die (retails for $24)

Monarch Butterfly Details Die (retails for $10)

Lacewing Butterfly Details Die (retails for $10)

Botanical Butterfly Details Die (retails for $10)

Petite Butterfly Die (retails for $12)

So you may have guessed after seeing what I've created the last 2 Days, but I have SEVERAL Projects to share again today!! Showcasing SEVERAL of the Products used together and in different ways to try and give you as many Ideas as I can when it comes to things you can create using these AMAZING New Products!! 
For my First Project I've create a Card using the NEW Basic Butterfly Die along with the NEW Monarch Butterfly Details Die, using the NEW Misty Morning Color Story!! 


SWOON!! This Color Story is STUNNING and the NEW Coral Reef Felt Roll is one of my FAVORITES!! 


I Die Cut the Felt Butterfly and then used the Monarch Details Die to add the Wing Designs!! Then I Die Cut the Base of the Butterfly again from some Patterned Paper and again from some 110 lb. White Cardstock to add some stability for the Base!! I Die Cut the Body of the Butterfly from some Navy Cardstock!! I Stitched it altogther using the coordinating DMC Floss included in the Color Story Kit!! 

Then I added some Iridescent Sequins and Seed Beads to the center of the Butterfly Body for some added Sparkle and it's STUNNING in real Life!! I Die Cut a Patterned Paper Card Panel using a Trinity Stamps Modern Embossed Rectangle Stack Die and then adhered the Butterfly to the Card Panel!! I Stamped and Embossed the Sentiment "Missing You" from the NEW Baby Bunny Stamp Set also from Trinity Stamps, Embossing with some WoW Embossing Powder to coordinate!! I adhered the sentiment Strip to the Card Panel using Foam Tape for some Dimension!! I LOVE how SWEET this Card turned out and when you have such a STUNNING Focal Point, there's no need for anything else!! For my Second Card, I've used the same Dies as above but this time I wanted to create a Shaker Butterfly Element using all Cardstock and Patterned Paper!! I Die Cut the Cardstock pieces including a Black Cardstock Base, an Orange Doodlebug Designs Gingham Patterned Paper Base, then 5 Black Cardstock Butterfly Bases that I Die Cut the Monarch Details from for the Frame of my Shaker!! I Fussy Cut the Inside edges of the Monarch Design away so the Shaker Elements had a place to shake freely, leaving the Edge so I could Stitch everything together!! Then I Die Cut an Acetate Base for the Shaker Window and 2 more Black Cardstock Bases with the Monarch Details for the Top of the Butterfly along with a Butterfly Body also from Black Cardstock!! I KNOW it sounds like alot of die cutting, but I promise the results are WORTH it!!

I used adhesive to tack all of the Base pieces of the Butterfly together, being careful just to Glue in the areas in between where the Stitching Dots are so you don't have a Sticky Mess when Stitching!! This doesn't have to be anything more that just getting things layered together in order to fill the Base with the Shaker Elements!! I added some Butterfly Confetti, and some Monarch Clay Embellishments and in person it's AMAZING seeing those Butterflies SHAKE inside of the Butterfly Shaped Shaker!! I placed the Acetate Window and the Monarch Top Pieces on top and then Stitched Everything together!! Then I Added the Butterfly Body and Stitched it in place adding the Sequins and Seed Beads from the NEW Misty Morning Color Story Collection!! 
 For the Card Panel I Foiled a Therm O Web Butterfly Fly Away Toner Card Front that I Foiled with Black Deco Foil and Colored with Copic Markers!! Then I added the Stamped and Embossed Sentiment again from the Trinity Stamps Baby Bunny Stamp Set and another Sentiment Foiled from the Deco Foiled Adhesive Transfer Designs Oh Hello!! I used Copper Deco Foil to Foil the Sentiment!! I LOVE how it turned out and KNOW the recipient to this SPECIAL Card will feel LOVED!! 
My Next Project uses a Burlap Gift Bag and I Stitched to it to added a Personalized Petite Butterfly from the NEW 
Petite Butterfly Die!! 

I Started by Die Cutting the Petite Butterfly from the NEW Misty Morning Color Story!! I Cut it Twice so I could create a Dimensional Butterfly!! Then I Stitched on some of the Sequins and Seed Beads again from the NEW Misty Morning Color Story and Stitched it directly to the Burlap Bag!! I Added some coordinating Pony Beads to the Ties of the Bag to add an EXTRA Punch of Color and SWEETNESS!! Then I Stamped and Embossed a Gift Tag from Trinity Stamps using a Sentiment from the Hello There Stamp Set!! I Adhered it to the Burlap Bag using a Mini Clothes Pin!! Just think of the AMAZING Gifts you can add to this and the Packaging will be just as SPECIAL and something the Recipient can use again to give a Gift to someone else and the Pattern can continue!!  
My Last Project uses a Printed Gold Glitter Polka Dot Canvas Gift Bag and I Stitched to it to added a Personalized Petite Butterfly!! I also added some of the Sequins and Seed Beads to add to the Gold Glitter Polka Dots for even more Sparkle and to Tie everything together!! I LOVE how it turned out!! 

I Started by Die Cutting the NEW Petite Butterfly from the NEW Misty Morning Color Story!! I Cut it Twice so I could create a Dimensional Butterfly!! Then I Stitched on some of the Sequins and Seed Beads again from the NEW Misty Morning Color Story and Stitched it directly to the Circle Base from the NEW Itty Bitty Basket that was Showcased Yesterday HERE!! I Then Stitched the Circle directly onto the Printed Canvas Bag!! I Added some coordinating Gold Pony Beads to the Ties of the Bag to add an EXTRA Punch of Color and SWEETNESS!! 

Then I Stamped and Embossed a Gift Tag from Trinity Stamps using a Sentiment from the NEW Peep Show Stamp Set!! I Adhered it to the Canvas Bag using a Mini Clothes Pin!! Just think of the AMAZING Gifts you can add to this and the Packaging will be just as SPECIAL and something the Recipient can use again to give a Gift to someone else and the Pattern can continue!!

I HOPE I've INSPIRED you today with SEVERAL Different ways to use these NEW Products!!?? Butterflies are one of my FAVORITES and I can definitely see finding even more ways to use ALL of these AMAZING Dies!! I think these would be BEAUTIFUL as Appliques for Shirts too!! Therm O Web has some AMAZING Products that would make that EASY and you wouldn't have to worry about putting them through the wash!! That might just be my next Project!! 

Don't forget to leave a comment on the Poshta Design Blog Posts EACH DAY for a chance to WIN a $50 Gift Certificate to the Poshta Design Store!! 

THANKS SO MUCH for joining me again today!! I hope I've INSPIRED you with the NEW Products being showcased today and don't forget to come back tomorrow for a look at a FEW EXTRA Projects I created to SHARE for RELEASE DAY!! EEKK!! So EXCITED to Share them with you!! 

Everything will be available TOMORROW Saturday, March 4th at Noon ET in the Poshta Design Store!! 
Have a FABULOUS WEEK!! 


COUNTRY HUGS-N-KISSES
LARISSA 🦋