Showing posts with label Easter Lily Stamp Set. Show all posts

Thursday, March 20, 2025

Rejoice in Spring Card with Newton's Nook Designs!!

Pin It

Rejoice in Spring Card by Larissa Heskett for Newton's Nook Designs using Daisies De Set, Easter Lily Stamp Set and Pastel Basics Pattern Paper

Hello Crafty Friends!!


I'm up on the Newton's Nook Designs Blog today with a BEAUTIFUL Spring Card using the NEW Daisies Die Set!! SWOON!! Daisies are my FAVORITE Flower and I LOVE Die Cutting!! There are so many FUN Ways to use this De Set to create Cards for ANY Occasion and I hope my Card INSPIRE you!! 
Rejoice in Spring Card by Larissa Heskett for Newton's Nook Designs using Daisies De Set, Easter Lily Stamp Set and Pastel Basics Pattern Paper
I Started by Die Cutting 6 Daisies and 10 Leaves all from White Cardstock!! I used Distress Oxide Inks to add Color to them using some Hickory Smoke for the Daisies and then Twisted Citron and Rustic Wilderness for the Leaves!! 
Rejoice in Spring Card by Larissa Heskett for Newton's Nook Designs using Daisies De Set, Easter Lily Stamp Set and Pastel Basics Pattern Paper
I added some Spun Sugar and Milled Lavender Distress Oxide Inks to the Centers of of the Daisies and then I added some WoW Neutral Shimmer Glitter Embossing Powder to the Centers of the Flowers!! I LOVE the Iridescent Sparkle it adds to the Daisies!! Then I adhered some Trinity Stamps Black Eyed Baubles to the center of the Daisies to finish them off!! 
Rejoice in Spring Card by Larissa Heskett for Newton's Nook Designs using Daisies De Set, Easter Lily Stamp Set and Pastel Basics Pattern Paper
Next I worked on the Card Panel Die Cutting White Cardstock and then I Die Cut some of the Pastel Basics Paper to the top of the Panel!! I added some Black Soot Distress Paint Splatters and then Stamped and Embossed the "Rejoice in Spring" Sentiment from the Easter Lily Stamp Set using Versa Fine Black Onyx Ink and Embossed with WoW Clear Gloss Embossing Powder!! I adhered the Daisies and Leaves and finished the design off with some Trinity Stamps Fairy Rock Rhinestones!! The Iridescent Sparkle coordinates with the Iridescent Sparkle from the Daisy Centers!!  

So there you have it, a BEAUTIFUL Spring C
ard using several of my FAVORITE Newton's Nook Designs Products!! I LOVE how BEAUTIFUL the Daisies turned out!! I hope this has you as EXCITED about those First Spring Daisies as I am!!??

THANKS SO MUCH for stopping by today and I hope I've INSPIRED you to create your own Infinity Shaker Card using some of your FAVORITE Newton's Nook Designs Products!! 
Have a FABULOUS WEEK, Crafty Friends!! 


Larissa Heskett

Friday, April 7, 2023

Easter Blessing w/ Newton's Nook Designs!!

Pin It
Hello Crafty Friends!! 

I'm up on the Newton's Nook Designs Blog today sharing this SWEET Easter Blessings Card!! I don't know about you, but I CAN'T believe it's Easter Weekend already!! The Year seems to be FLYING by and I'm trying to catch up!! lol!! 
Easter Blessings Card by Larissa Heskett for Newton's Nook Designs using Spring Roundabout Stamp Set, Circle Frames Die Set, Spring Blooms Patterned Paper Pad, Easter Lily Stamp Set I started by picking the Spring Roundabout Stamp Set along with the coordinating Circle Frames Die Set!! I Stamped and Embossed the Image with Versa Fine Black Onyx Ink and WoW Clear Gloss Embossing Powder!! Then I used Copic Markers to Color in the Image!! 
Easter Blessings Card by Larissa Heskett for Newton's Nook Designs using Spring Roundabout Stamp Set, Circle Frames Die Set, Spring Blooms Patterned Paper Pad, Easter Lily Stamp Set
Bunnies: E40, E43 & E44   Orange: YR00, YR18 & YR68   Green: YG61, YG63 & YG67    YG03, YG25    
Yellow: Y11, Y15 & YR23    Turquoise: BG10, BG45 & BG49    Pink: RV00, R81 & R85    
Purple: V00, V15 & V06  
White: C00, C1 & C3   Baskets: E31, E33 & E37   
Cheeks: RV11
I added some Tonic Studios Aqua Shimmer Pen and Midas Touch Gold Shimmer Pen to the images to add some SPARKLE!! Then I added both White and Black Gel Pen Details to finish off the Design!! 
Then I Die Cut the Image out using the Stitched Circle and adhered it over a Turquoise Cardstock Scalloped Circle Frame Die Cut!! SWOON!! I LOVE the contrast between the Turquoise and the Image!! Just makes me HAPPY and I'm SO READY for SPRING!! 
Easter Blessings Card by Larissa Heskett for Newton's Nook Designs using Spring Roundabout Stamp Set, Circle Frames Die Set, Spring Blooms Patterned Paper Pad, Easter Lily Stamp Set
I Die Cut the Stitched Card Panel from some of the NEW Spring Blooms Patterned Paper Pad and I LOVE how the Spring Roandabout Image POPS off the Background Patterned Paper!! Those Flowers are the same and match PERFECTLY with the Flowers in the Image!!  
Then I Stamped and Embossed the "Easter Blessings" Sentiment from the Easter Lily Stamp Set using Versa Fine Black Onyx Ink and WoW Clear Gloss Embossing Powder!! I added some Black Soot Distress Paint Splatters and a few Lavender Jewels to finish off the Design!! 
THANKS SO MUCH for stopping by today!! I hope you have a FABULOUS and BLESSED EASTER WEEKEND!! 

COUNTRY HUGS-N-KISSES
LARISSA 💗 

Friday, March 31, 2023

Easter Blessings Hippity Hop Card w/ Poshta Design!!

Pin It
Hello Crafty Friends!!

I'm back with another Project using the NEW Hippity Hop Die Set along with the NEW Gathered Garden Die Set both from Poshta Design!! I LOVE that these Dies can be used with BOTH Felt or Paper, making them SO VERSATILE!! Today I'm using some Doodlebug Design Patterned Paper and I LOVE the finished Design!! 
I Started by Die Cutting the NEW Hippity Hop Die Set to Die Cut the Bunny!! I'm EXTRA and I made sure that the Plaid Design lined up when I was Die Cutting ALL of the pieces, but I think it would be just as CUTE even if you didn't want to take the time to do that EXTRA Step!! I Stitched everything together using some White Embroidery Floss!! 

For the Card Panel I Die Cut some White Cardstock using a Trinity Stamps A7 Modern Embossed Layers Die Set and added some Texture with the Trinity Stamps Quilted Cover Slimline Die!! I ran it through on both the Top and the Bottom of the Panel, making sure that the Die didn't cut all the way through my Card Panel!! Then I Die Cut the Scalloped Panel from the A7 Envelope Builder Die Set from some Doodlebug Design Patterned Paper!! I added it to the A7 Cardbase and adhered the Bunny with some Foam Tape for some Dimension!! Then I added my "Easter Blessings" Sentiment from Newton's Nook Designs using the Easter Lily Stamp Set stamping with Versa Fine Black Onyx Ink and WoW Clear Gloss Embossing Powder!! I finished off the Design by adding some Trinity Stamps Fairy Rock Rhinestones for some added Sparkle!! 
Then I created a coordinating A7 Envelope using some Doodlebug Patterned Paper and the Trinity Stamps A7 Envelope Builder Die Set!! I LOVE how this Set turned out and hope I've INSPIRED you to try using your Poshta Design Die with some of your FAVORITE Papers for a one of a kind Card!! 

THANKS SO MUCH for stopping by today!! I hope you have a FABULOUS WEEKEND!! Then come back Next Week as I share a couple more Card Designs with you, again using the Poshta Design Products!! 

COUNTRY HUGS-N-KISSES
LARISSA 💗 

Friday, March 13, 2020

Congratulations Lily Gift Tag w/ Newton's Nook Designs!!

Pin It
HELLO CRAFTY FRIENDS!!  

I'm up on the Newton's Nook Designs Blog today sharing this BEAUTIFUL Congratulations Gift Tag!! It would be easy to switch it up for any Occasion you need this time of the year too!! Think Easter, Baptism, First Communion or even Birthday's!! 

I Stamped and Embossed the NEW Easter Lily Image onto some White Cardstock and then used Copic Markers to Color it in!! I used Lilies: E81 , Y00 & Y11  Stamen: Y11, Y15 & YR23  Leaves & Stems: YG61, YG25 & YG18   Then I Die Cut it out using the coordinating Easter Lily Die Set then I added someTonic Studios Sunset Glitter Nuvo Drops to the Stamen for some Sparkle!! I LOVE the way it makes the Lily Image come to life!! 
I Die Cut a Fancy Edges Tag and then Inked it with some Tumbled Glass Distress Ink and added some Peacock Feathers Distress Ink Splatters for some texture!! I adhered the Lily Image to the Tag with some Foam Tape and then Stamped and Die Cut the the Congratulations Sentiment from the NEW Bitty Bibs Stamp Set and adhered it with some Foam Tape!! Then I added it to a Woodgrain Gift Bag and added a Scrap Ribbon Bow!! 

THANKS SO MUCH for stopping by today!!  I hope I've INSPIRED you on ways to create a BEAUTIFUL Gift Tag to use for any of your gift giving needs!! 
Have a FABULOUS WEEKEND!! 

COUNTRY HUGS-N-KISSES
LARISSA   ðŸ’–

Thursday, February 20, 2020

Newton's Nook Designs February Release ~ Easter Lily & Hello Spring!!

Pin It
Hello!!
SQUEAL!!
         I'm here with Day 4 of the Newton's Nook Designs February Release!! 
       Today we're showcasing the NEW "Easter LilyStamp Set + coordinating "Easter LilyDies and the "Hello SpringStamp!! Let's take a look at the AWESOME New Sets!!
Easter Lily Stamp and Die Set by Newton's Nook Designs

Hello Spring Stamp by Newton's Nook Designs
Easter Blessings by Larissa Heskett for Newton's Nook Designs using Easter Lily Stamp and Die Set and Frames and Flags Die Set  #newtonsnook #newtonsnookdesigns #easterlily #eastercards
 For my first Card I wanted to use two of the Images!! I LOVE Lilies and this Image is just BEAUTIFUL!! I wanted to color them in a Traditional White Color, but I also think this would be just a BEAUTIFUL in other colors as well!! I Stamped and Embossed the Images and Colored them using Copic Markers!! I used Lilies: E81, Y00 & Y11   Greenery: YG61, YG63 & YG67) I then Die Cut them using the coordinating Die!! 
Easter Blessings by Larissa Heskett for Newton's Nook Designs using Easter Lily Stamp and Die Set and Frames and Flags Die Set  #newtonsnook #newtonsnookdesigns #easterlily #eastercards
 I Stamped and Embossed the Sentiment using WoW Clear Gloss Embossing Powder!! Then added Tumbled Glass Distress Oxide Ink to the top 3/4 of the Card Panel!! I added the Lily Images using Foam Tap and then adhered some Gold Pretty Pink Posh Jewels!! To finish off the Design I added some Tonic Studios Sunshine Glitter Nuvo Drops to the Stamen and adhered the Card Panel to a Frames and Flags Scalloped Frame Die Cut from some Wood Grain Patterned Paper that I inked with some Vintage Photo Distress Oxide Ink!! I LOVE the way it turned out!! 
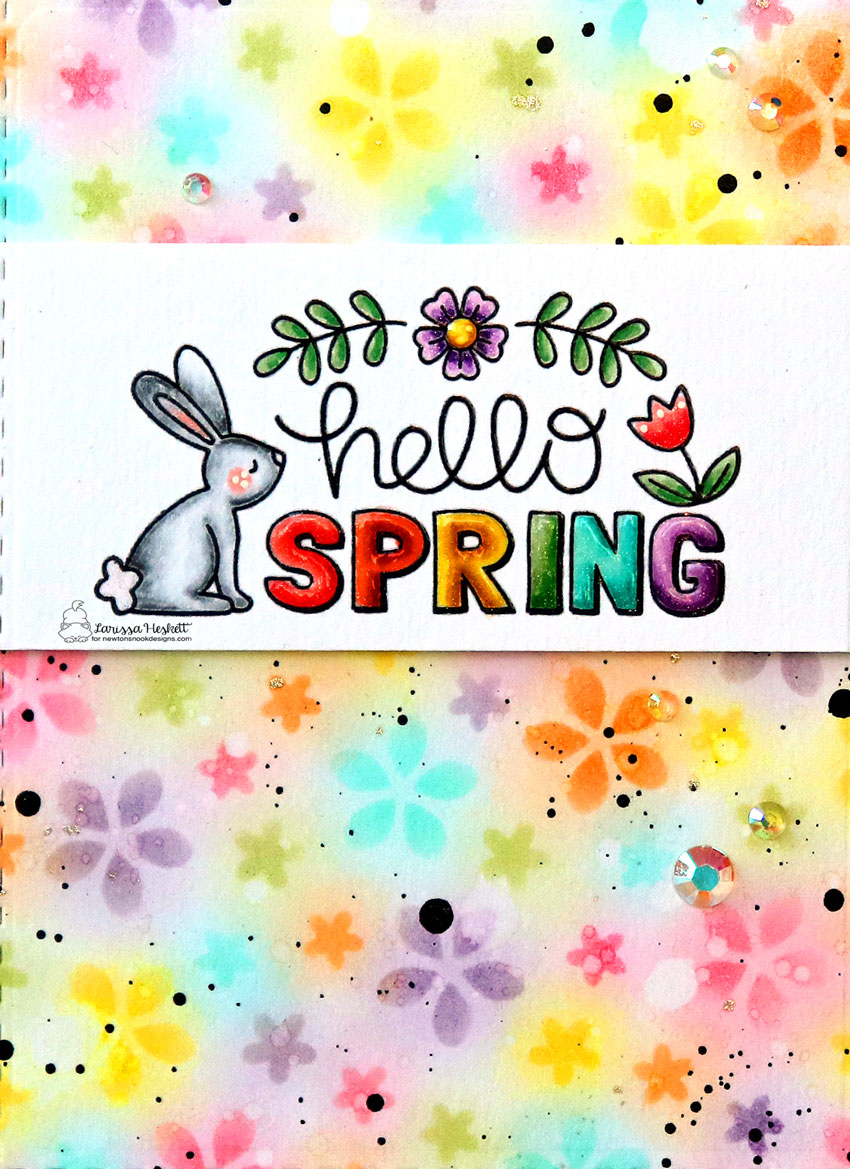
Hello Spring by Larissa Heskett for Newton's Nook Designs using Hello Spring Stamp, Petite Flowers Stencil and Frames and Flags Die Set  #newtonsnook #newtonsnookdesigns #hellospring #petiteflowersstencil #distressinks
I Started by Stamping and Embossing the NEW "Hello Spring" Image and colored it in using Copic Markers!! (Bunny: N0, N2 & N4  Cheeks and Inside of Ears: R11  Letters: R00, R11 & R22  YR00, YR02 & YR68  Y11, Y15 & YR23  YG61, YG63 & YG67  BG10, BG45, & BG49  V0, V09 & V15  Flowers: V0, V09 & V15  R00, R11 & R22  YG61, YG63 & YG67) 
Petite Flowers Stencil by Newton's Nook Designs
Next I created the STUNNING Floral Rainbow Patterned Paper using the NEW Petite Flowers Stencil!! I Sprayed the back of the Stencil with some Therm O Web Pixie Spray and adhered it to my Card Panel!! I then took Distress Inks in Worn Lipstick, Carverd Pumpkin, Mustard Seed, Peeled Paint, Peacock Feathers and Wilted Violet and added them over the Stencil using Ink Daubers!! Once the Stencil Design was filled in, I removed the Stencil and then applied a small amount of the same color of Ink over and around the Stenciled Image to tie the entire piece together!! I then added some Water Splatters and removed it, then applied some Black Soot Distress Paint Splatters!! I adhered the Hello Spring Strip with Faom Tape and Adhered some Pretty Pink Posh Iridescent Jewels!! Then I adhered the Card Panel to a Frames and Flags Scalloped Frame Die Cut from some TE Oreo Cardstock!! 
Hello Spring by Larissa Heskett for Newton's Nook Designs using Hello Spring Stamp, Petite Flowers Stencil and Frames and Flags Die Set  #newtonsnook #newtonsnookdesigns #hellospring #petiteflowersstencil #distressinks
To finish off the Design I applied some Morning Dew Nuvo Drops over the Letters, The Bunny Tail and to the center of the Flower and I added some White Gel Pen Highlights!! 
I LOVE the way it turned out and I hope it INSPIRES you to try to create your own Patterned Papers using your Stencils!! 

Would you like to win the Easter Lily” or the “Hello SpringStamp Set!!?? 
This stamp set will be given away to ONE lucky winner!!
Here's how to win: Comment on the NND blog and Design Team blogs (see list below)! The winner will be chosen at random from the collective reveal posts. Make sure to check out each of their blogs and comment for your chance to win. You will not know which blog has been chosen so the more you comment on the better your chances are of winning! You have until Thursday February 20th at 9pm EST to comment  -- winners will be announced on the blog post on Friday, February 21st.

Check out all the awesome Design Team Blogs below to enter:

THANKS SO MUCH for stopping by today!!  
Don't forget to visit the Newton's Nook Designs Blog on the 21st to see if you're one of the LUCKY Winners!! 
Have a FABULOUS WEEK!!

COUNTRY HUGS-N-KISSES
LARISSA  =)