Showing posts with label Pretty Pink Posh Jewels. Show all posts

Saturday, February 22, 2020

Celebrating w/ CAS-ual Fridays Stamps and Crafting of Hue!!

Pin It
HELLO!!
I'm here with CAS-ual Fridays Stamps and were joining in a Sponsor Weekend with the Crafting of Hue Facebook Group!! If you're looking for a FUN and INSPIRING FB Group to join this is an AMAZING one!! 
I'm using the SWEET "Somebunny" Stamp Set today!! This set is SO VERSATILE!! I LOVE that you can use it for so many occasions!! Here's a close up look at this Set!! 
Isn't it the CUTEST!!?? Today I'm sharing a Masculine Card!! I wanted to show how EASY this set makes it to create a more Masculine Design as those are sometimes the thing I struggle with the most because I'm always more drawn to the "PRETTY" Stamp Sets!! So I want to show how you can use any of those Images and make them more Masculine just by the Design and Colors that you use!!
 I Started by Die Cutting my Stitched Panel!! I then used some Therm O Web Purple Tape and Masked off the edges of the Panel!! I wanted to stamp the "Hoppy Birthday" Sentiment across the bottom 2/3 of my Card!! So I placed it in my MISTI Stamping tool and stamped the Sentiment to create my Design using some Grout Grey Ink from MFT!! This is one of my FAVORITE Grey Inks!! I use it ALOT and LOVE that it can go either Grey or Kraft depending on what colors you pair with it!! Once the Stamping was all done, I Stamped and Embossed the Bunny Image using Versa Fine Black Onyx Ink and Embossing with WoW Clear Gloss Embossing Powder!! If you follow me you know I LOVE to Emboss ALL of my Images because of how BOLD it makes them look especially after coloring it!! I used Copic Markers!! (Bunny: W0, W2 & W5   Cheeks and Inside of Ears: R11  Balloon: R43, R46 & R89) 


I added some Tonic Studios Shimmer Pen to the Balloon and the Cheeks and Inside of the Ears on the Bunny, then I added some Morning Dew Nuvo Drops to the Balloon for some Dimension and Shine!! I inked the Sky on the Panel with some Tumbled Glass Distress Oxide Ink and added some Water Splatters for some Texture!! I also added some Black Soot Distress Paint Splatters and I LOVE the extra touch it adds to the design!! I adhered the Bunny onto the Panel using Foam Tape and then finished off the design with a few Pretty Pink Posh Silver Jewels!! A NND Scalloped Frame Die Cut from some TE Oreo Cardstock finishes off the Design!! I hope I've INSPIRED you to try to create some Masculine Cards using those "CUTE" Images in your Stash!! 

THANKS SO MUCH for stopping by today and I hope you'll check out the Crafting of Hue FB Group if you're looking for a Friendly and Inspiring Group to join!! 
Have a FABULOUS WEEKEND!! 

COUNTRY HUGS-N-KISSES
LARISSA   =) 

Thursday, February 20, 2020

Newton's Nook Designs February Release ~ Easter Lily & Hello Spring!!

Pin It
Hello!!
SQUEAL!!
         I'm here with Day 4 of the Newton's Nook Designs February Release!! 
       Today we're showcasing the NEW "Easter LilyStamp Set + coordinating "Easter LilyDies and the "Hello SpringStamp!! Let's take a look at the AWESOME New Sets!!
Easter Lily Stamp and Die Set by Newton's Nook Designs

Hello Spring Stamp by Newton's Nook Designs
Easter Blessings by Larissa Heskett for Newton's Nook Designs using Easter Lily Stamp and Die Set and Frames and Flags Die Set  #newtonsnook #newtonsnookdesigns #easterlily #eastercards
 For my first Card I wanted to use two of the Images!! I LOVE Lilies and this Image is just BEAUTIFUL!! I wanted to color them in a Traditional White Color, but I also think this would be just a BEAUTIFUL in other colors as well!! I Stamped and Embossed the Images and Colored them using Copic Markers!! I used Lilies: E81, Y00 & Y11   Greenery: YG61, YG63 & YG67) I then Die Cut them using the coordinating Die!! 
Easter Blessings by Larissa Heskett for Newton's Nook Designs using Easter Lily Stamp and Die Set and Frames and Flags Die Set  #newtonsnook #newtonsnookdesigns #easterlily #eastercards
 I Stamped and Embossed the Sentiment using WoW Clear Gloss Embossing Powder!! Then added Tumbled Glass Distress Oxide Ink to the top 3/4 of the Card Panel!! I added the Lily Images using Foam Tap and then adhered some Gold Pretty Pink Posh Jewels!! To finish off the Design I added some Tonic Studios Sunshine Glitter Nuvo Drops to the Stamen and adhered the Card Panel to a Frames and Flags Scalloped Frame Die Cut from some Wood Grain Patterned Paper that I inked with some Vintage Photo Distress Oxide Ink!! I LOVE the way it turned out!! 
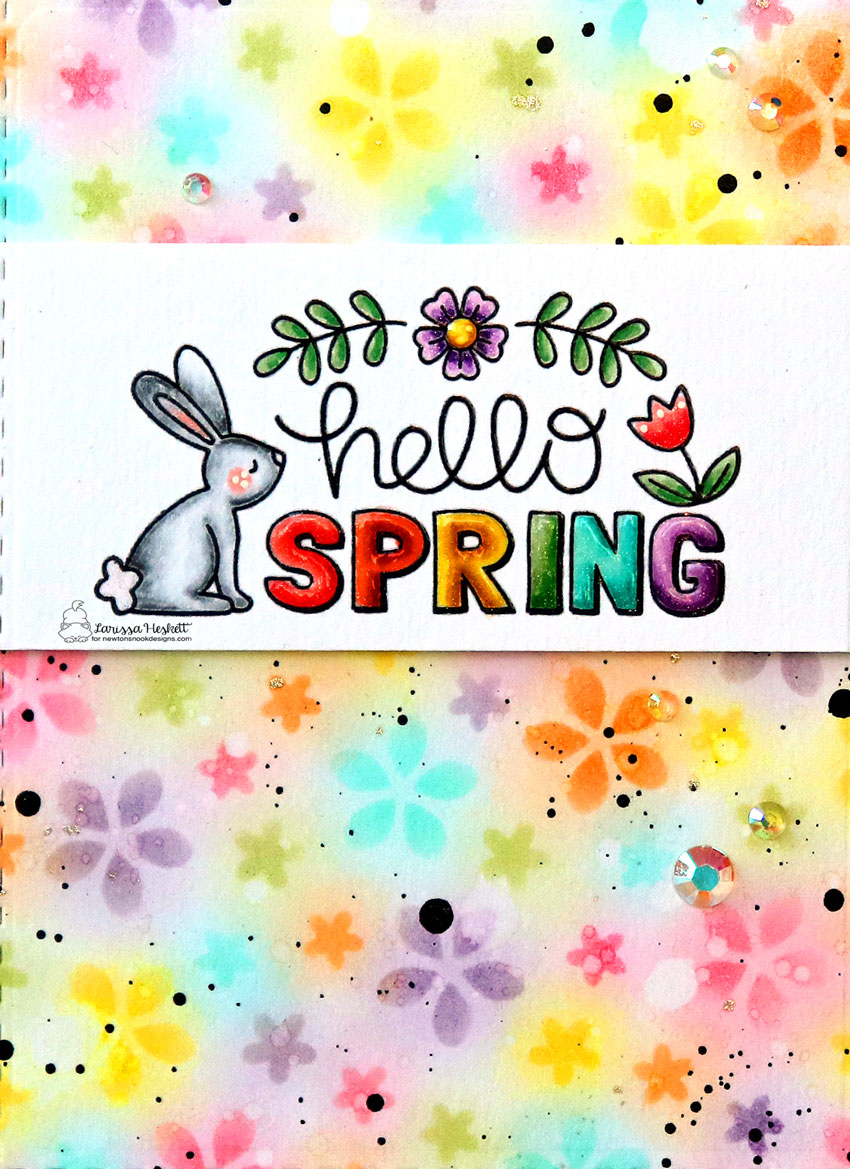
Hello Spring by Larissa Heskett for Newton's Nook Designs using Hello Spring Stamp, Petite Flowers Stencil and Frames and Flags Die Set  #newtonsnook #newtonsnookdesigns #hellospring #petiteflowersstencil #distressinks
I Started by Stamping and Embossing the NEW "Hello Spring" Image and colored it in using Copic Markers!! (Bunny: N0, N2 & N4  Cheeks and Inside of Ears: R11  Letters: R00, R11 & R22  YR00, YR02 & YR68  Y11, Y15 & YR23  YG61, YG63 & YG67  BG10, BG45, & BG49  V0, V09 & V15  Flowers: V0, V09 & V15  R00, R11 & R22  YG61, YG63 & YG67) 
Petite Flowers Stencil by Newton's Nook Designs
Next I created the STUNNING Floral Rainbow Patterned Paper using the NEW Petite Flowers Stencil!! I Sprayed the back of the Stencil with some Therm O Web Pixie Spray and adhered it to my Card Panel!! I then took Distress Inks in Worn Lipstick, Carverd Pumpkin, Mustard Seed, Peeled Paint, Peacock Feathers and Wilted Violet and added them over the Stencil using Ink Daubers!! Once the Stencil Design was filled in, I removed the Stencil and then applied a small amount of the same color of Ink over and around the Stenciled Image to tie the entire piece together!! I then added some Water Splatters and removed it, then applied some Black Soot Distress Paint Splatters!! I adhered the Hello Spring Strip with Faom Tape and Adhered some Pretty Pink Posh Iridescent Jewels!! Then I adhered the Card Panel to a Frames and Flags Scalloped Frame Die Cut from some TE Oreo Cardstock!! 
Hello Spring by Larissa Heskett for Newton's Nook Designs using Hello Spring Stamp, Petite Flowers Stencil and Frames and Flags Die Set  #newtonsnook #newtonsnookdesigns #hellospring #petiteflowersstencil #distressinks
To finish off the Design I applied some Morning Dew Nuvo Drops over the Letters, The Bunny Tail and to the center of the Flower and I added some White Gel Pen Highlights!! 
I LOVE the way it turned out and I hope it INSPIRES you to try to create your own Patterned Papers using your Stencils!! 

Would you like to win the Easter Lily” or the “Hello SpringStamp Set!!?? 
This stamp set will be given away to ONE lucky winner!!
Here's how to win: Comment on the NND blog and Design Team blogs (see list below)! The winner will be chosen at random from the collective reveal posts. Make sure to check out each of their blogs and comment for your chance to win. You will not know which blog has been chosen so the more you comment on the better your chances are of winning! You have until Thursday February 20th at 9pm EST to comment  -- winners will be announced on the blog post on Friday, February 21st.

Check out all the awesome Design Team Blogs below to enter:

THANKS SO MUCH for stopping by today!!  
Don't forget to visit the Newton's Nook Designs Blog on the 21st to see if you're one of the LUCKY Winners!! 
Have a FABULOUS WEEK!!

COUNTRY HUGS-N-KISSES
LARISSA  =)

Tuesday, December 10, 2019

Rainbow Gift Tags w/ CAS-ual Fridays for the Holidays!!

Pin It
HELLO CRAFTY FRIENDS!! 

Larissa here today to share a SUPER FUN Holiday Tag!! 
I have several Nieces and they ALL LOVE anything Rainbow so I thought it would be FUN to create some Rainbow Gift Tags!! I'm pretty sure these would make anyone on your Gift giving list SMILE in delight!!
I Started by Die Cutting my Tag by using the Tag Buddies Fri-Die Set and then I Stamped and Embossed the SWEET Angel from the NEW Angels Hugs Stamp Set with WoW White Embossing Powder!! Then I created a Mask in order to mask the Embossed Angel Image so I could Ink the Rainbow Background!! I used Distress Inks in Candied AppleCarved PumpkinMustard SeedPeeled PaintPeacock Feathers and Wilted Violet using Ink Daubers!! I then removed the Mask and used Copic Markers to Color in the Angel Image!! 
                          (Skin: E00, E11 & E13  Cheeks: RV11  Hair: E31, E33 & E37)
To finish off the Tag I added Glossy Accents to the Angel Wings, some White Gel Pen Freckles and some Pretty Pink Posh Gold Jewels to the center of several of the Flowers on the Robes!! I added the Tag to a White Shimmer Cardstock Pillow Box and added a FUN Rainbow Scrap Ribbon Bow!! It finishes off the Gift PERFECTLY and I just KNOW they are going to LOVE these this Holiday Season!! 

Don't forget to visit the CAS-ual Fridays Stamps Blog for TONS of AMAZING Inspiration and to shop the NEW, Old and Sale Products in the CFS Shop!! You can also use my discount code LARISSASENTME to SAVE 15% off anything in the Shop!! 
WHOOP WHOOP!! 

I'm also Linking up:


THANKS SO MUCH for stopping by today and I hope you have a FABULOUS WEEK!! 
Larissa ðŸ’—

Thursday, October 31, 2019

CAS-ual Fridays Stamps 7th Anniversary Release Week ~ This Sucks!!

Pin It
HELLO!! 
Welcome to the CAS-ual Fridays 7th Anniversary Release Week!! 

To celebrate their 7th anniversary, we'll have 6 days of jaw-dropping inspiration featuring 8 amazing new stamp sets! The best part is ALL of the NEW Sets are available in the shop NOW!! You can shop the entire new release today and then come back each day this week to see your new favorites in action.
Today we're showcasing the NEW "This Sucks" Stamp Set!! It's a 4x6 Stamp Set with an AMAZING collection of several Sentiments that can be used for LOTS of different Cards!! 
Here's a Look at this NEW Set!!

I wanted to showcase the LARGE Sentiment and knew I wanted to use a Rainbow Color Scheme!! I Started by Die Cutting the Rainbow Lawn Fawn Patterned Paper with an A2 Stitched Rectangle Die and then Die Cut a Large Circle from some Lawn Fawn Merman Cardstock!! I Die Cut a Smaller Circle Die Cut from some White Cardstock and then I Stamped the Sentiment "This Sucks" with Distress Oxide Inks in Candied Apple, Carved Pumpkin, Mustard Seed, Peeled Paint and Peacock Feathers using Ink Daubers to Ink up the Sentiment and blend the colors!! I Stamped using a Mini MISTI Stamping Tool so that I could restamp the Sentiment several times to get a CRISP Image!! Then I used WoW Clear Gloss Embossing Powder to Emboss the Sentiment!!
I LOVE the way it turned out!!  


To finish off the Design I stamped the Smaller "Maybe Swearing will Help" sentiment onto a Fog Banner with Versa Mark ink and Embossed it with WoW Embossing Powder!! I added some Hickory Smoke Distress Ink to make it POP and then I added it onto the Card using some 3D Foam Squares!! A scattering of Rainbow Jewels and Star Confetti finishes off the Design!!


Are you feeling inspired??
Aren't you glad you don't have to wait and you can get these beauties Right NOW?!
Be sure to visit the Girl Friday blogs to get tips and tricks on all the fun techniques and products they used to create their inspiration projects AND feel FREE to use my special discount code LARISSASENTME, to save 15% off on all of the NEW, OLD and SALE goodies in the CFS Shop!!
 

THANKS SO MUCH for stopping by and Join us again tomorrow when we showcase inspiration for another NEW Stamp Set!! Be sure to leave a comment each day for your chance to win one of the seven $15 gift codes!!
Have a FABULOUS WEEK!! 
COUNTRY HUGS-N-KISSES 
LARISSA  😘

Tuesday, October 29, 2019

CAS-ual Fridays Stamps 7th Anniversary Release Week ~ Ever After!!

Pin It

HELLO!! 
Welcome to the CAS-ual Fridays 7th Anniversary Release Week!! 

To celebrate their 7th anniversary, we'll have 6 days of jaw-dropping inspiration featuring 8 amazing new stamp sets! The best part is ALL of the NEW Sets are available in the shop NOW!! You can shop the entire new release today and then come back each day this week to see your new favorites in action.
Today we're showcasing the NEW "Ever After" Stamp Set!! It's a 4x6 Stamp Set with an AMAZING Collection of Sentiments that can be used for LOTS of different Cards!! 
Here's a Look at this NEW Set!!

SWOON!! I LOVE this Set!! All of those Sentiments make my heart HAPPY!! I wanted to show that you can use this set for not only Wedding or Anniversary Cards, but also just a Simple "I LOVE You" Card!! I also wanted to combine the BEAUTIFUL Hearts A2 Panel Fri-Die that I Die Cut from some Therm O Web Deco Foil Toner Sheets that I Foiled with some of the EXCLUSIVE "Rainbow Bright" Taylored Expressions & Therm O Web Deco Foil!! I backed it with an A2 Cardbase that I Inked with Tumbled Glass Distress Ink!! Added some water splatters and then adhered the Foiled Hearts A2 Panel!! I adhered some Pretty Pink Posh Jewels in Rainbow Colors to coordinate with the Foil!!  
For the sentiment Strip I knew I wanted to Foil the "LOVE" using the Rainbow Bright Foil, So I Stamped and Embossed just the "LOVE" sentiment and then ran it through my Laminating machine making sure I lined up the Foil pattern so it looks seamless on the card front!! Then I Stamped the rest of the sentiment and adhered the Sentiment Strip onto the card base using Foam Tape!! I LOVE how it turned out!! It's just alittle EXTRA touch that makes it POP!! PERFECT for anyone SPECIAL to show that you LOVE them!!


Are you feeling inspired??
Aren't you glad you don't have to wait and you can get these beauties Right NOW?!
Be sure to visit the Girl Friday blogs to get tips and tricks on all the fun techniques and products they used to create their inspiration projects AND feel FREE to use my special discount code LARISSASENTME, to save 15% off on all of the NEW, OLD and SALE goodies in the CFS Shop!!

THANKS SO MUCH for stopping by and Join us again tomorrow when we showcase inspiration for another NEW Stamp Set!! Be sure to leave a comment each day for your chance to win one of the seven $15 gift codes!!
Have a FABULOUS WEEK!! 
COUNTRY HUGS-N-KISSES 
LARISSA   =)

Monday, October 28, 2019

CAS-ual Fridays Stamps 7th Anniversary Release Week ~ Doing Great!!

Pin It
HELLO!! 
Welcome to the CAS-ual Fridays 7th Anniversary Release Week!! 

To celebrate their 7th anniversary, we'll have 6 days of jaw-dropping inspiration featuring 8 amazing new stamp sets! The best part is ALL of the NEW Sets are available in the shop NOW!! You can shop the entire new release today and then come back each day this week to see your new favorites in action.
Today we're showcasing the NEW "Doing Great" Stamp Set!! It's a 3x4 Stamp Set with an AMAZING Large Sentiment and a smaller "hang in there!" Sentiment that can be used for LOTS of different Cards!! Here's a Look at this NEW Set!! 

For my Card today I wanted the Sentiment to SHINE, so I stamped the Sentiment with Versa Fine Onyx Black Ink and Embossed it with WoW Clear Detail Embossing Powder and Heat Set it!! Then I inked over it with some Tumbled Glass Distress Oxide Ink and added some Water Splatters for some Texture!! I took a Dry Towel and buffed over the sentiment to make sure that there wasn't any residual Ink ontop of the embossed sentiment!! Then I Die Cut another Circle from some TE Cupcake Cardstock and adhered them together to create a Frame!!  
For the Card Base, I Stamped and Embossed the CAS-ual Fridays Heart to Heart Image with Versa Mark Ink and WoW Red Glitz Glitter Embossing Powder!! I centered the image on the left hand side of the Card so that there would be alittle white space on the right hand side!! I adhered the sentiment ontop using Foam Tape and then adhered a sprinkling of Red Metallic Sequins with some Pretty Pink Posh Aquamarine Jewels in the Center!! 

Are you feeling inspired??
Aren't you glad you don't have to wait and you can get these beauties Right NOW?!
Be sure to visit the Girl Friday blogs to get tips and tricks on all the fun techniques and products they used to create their inspiration projects AND feel FREE to use my special discount code LARISSASENTME, to save 15% off on all of the NEW, OLD and SALE goodies in the CFS Shop!!
 

THANKS SO MUCH for stopping by and Join us again tomorrow when we showcase inspiration for another NEW Stamp Set!! Be sure to leave a comment each day for your chance to win one of the seven $15 gift codes!!
Have a FABULOUS WEEK!! 
COUNTRY HUGS-N-KISSES 
LARISSA   =)

Friday, October 11, 2019

Thankful for everything Sunflower Days Card w/ Newton's Nook Designs!!

Pin It

HELLO CRAFTY FRIENDS!! 

I'm up on the Newton's Nook Designs Blog and I have a  BEAUTIFUL Thankful Card that I created using the Sunflower Days Stamp Set!! 
I wanted a FUN Design so I Stamped and Embossed the Image all around the outside edge of an A2 Cardbase!! Then I Colored in the Design using Copic Markers!! I used (Sunflowers: Y11, Y15 & YR23  Stems and Leaves: G61, G63 & G67  Flower Centers: E43, E47 & E49 Background: BG000, BG10 & Colorless Blender) I Die Cut the Frame from some TE Oreo Cardstock using the NND Frames and Flags Die Set!! 
Then I Die Cut the Stamped and Embossed Cardbase Panel using a Stitched Rectangle Die after Stamping and Embossing the Sentiments from the NND Thankful Thoughts Stamp Set and adhered the Stitched Panel onto the Oreo Scalloped Frame and adhered the outside Frame onto a Side Fold Cardbase!! 
I added some Foam to the back side of the Scalloped Frame and adhered it to the Cardbase!! I added some Black Soot Distress Paint Splatters and then added some Tonic Studios Nuvo Shimmer Pen in Midas Touch to the Center of the Sunflowers, the edges of the Frame and Card and added Splatters over the Card!! I LOVE the touch of SPARKLE it adds to the Design!! I also covered the center of the Flowers with some Morning Dew Nuvo Drops for some extra Dimension and Shine!! I also added some Pretty Pink Posh Jewels in and it finishes off the Design PERFECTLY!! 

THANKS SO MUCH for stopping by today, I hope I've given you some ideas on ways to stretch your smaller Images to make them the FOCAL of any Design!! Have a FABULOUS WEEKEND!! I'm attending the AMAZING Stamp Joy Event in Ankeny Iowa, so I KNOW my Weekend is going to be FULL of CRAFTING FUN!! 

Don't forget to join us ALL Week next week for the October NND Release Week!! You WON'T want to miss it!! 

            COUNTRY HUGS-N-KISSES
                           LARISSA   =)