Pin ItHello Crafty Friends!!
SQUEAL!! How AMAZING was yesterday's Showcase of the NEW Products!!?? I was blown away by ALL of the CREATIVE Creations and I just can't hardly contain my EXCITMENT for todays Products!! Let's get right to them shall we!!??
Itty Bitty Basket Die (retails for $26)
Hippity Hop Die (retails for $32)
Gathered Garden Die (retails for $16)
I combined several of these Products together and even combined some of them using Products from yesterdays Showcase, which you can find HERE if you missed it!!

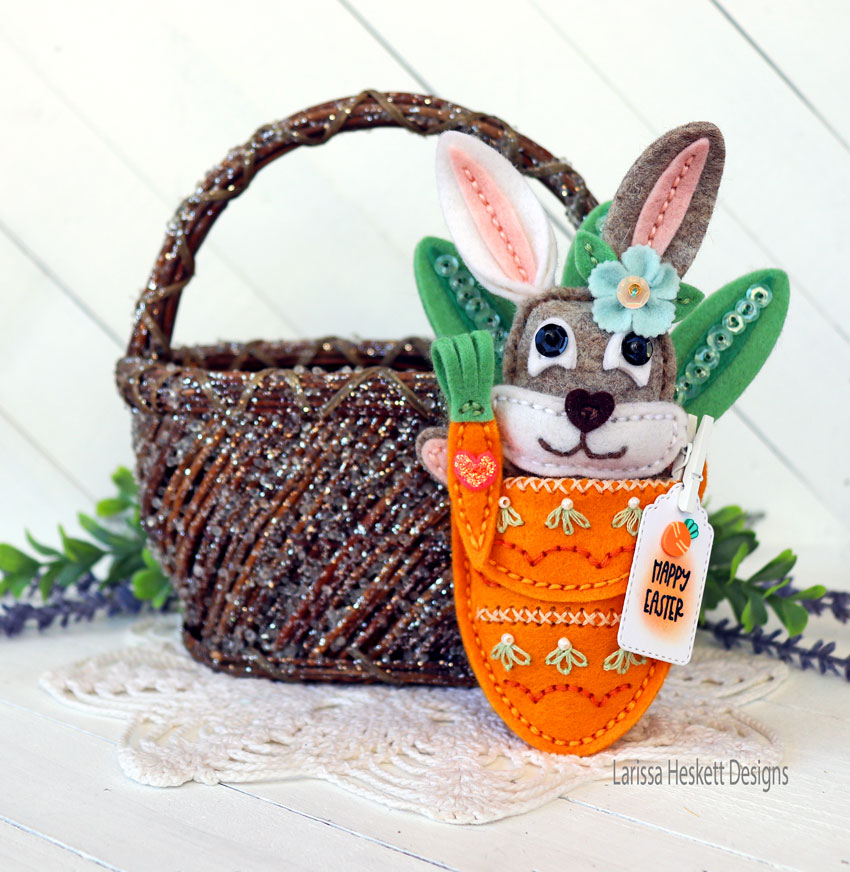
First up is the CUTEST Little Hippity Hop Die Set that I used to create this Plush Little Felt Bunny!! There are SO MANY options when it comes to how you want to put it together!! Lizzie is sharing a Video to walk you through the Process!! I's say the part that takes the longest here is Die Cutting all of the Pieces!! I literally cut everything out and put together a Mesh Zipper Pouch that I took with me!! I was able to stitch while riding in the Car and at the regular Season Basketball Games, Baseball Practices and the ALL Weekend Basketball Tournaments so I was able to get quit a few things Stitched while still ENJOYING my normal activities!! You could also Stitch them while watching TV!!

I Chose to work with the NEW Cobblestone Felt Roll!! It is a BEAUTIFUL Neutral Heathered Brown similar to Toasted Oat, but has more of a Pewter undertone!! It pairs nicely with the Tundra Felt Roll and I used the Paloma Felt Roll for the inside of the Ears, and Paw Pads on both the Hands and Feet!! I used the Glacier Ice Felt Roll for the Flower from the NEW Gathered Garden Die Set along with the Soft Jade Felt Roll for the Leaves of both the Flower and the Carrot Top!! Then I used the Clementine Felt Roll for the Carrot!! I decided to use the Walnut Felt Roll for the Nose as it coordinates nicely with the Neutral Tones in the Cobblestone Felt, but you could use ANY Color you wanted here!!  I wanted to share a Few things I did differently when putting my Bunny together, as I mentioned there are SEVERAL options for Creative License here so NOTHING is wrong!! It just comes down to your preferences and I personally LOVE the addition of some Plushness!! So I chose to Die Cut both of the Ears Twice for a Thicker Ear!! Then I added some Polly Fill to the Cheeks, Arms and Carrot for some added Dimension!! Again, these steps aren't necessary I just personally LOVE the added dimension it gives the Bunny!! I Die Cut the Eyes again to use as the Bunny Paws as well and Stitched them directly to the Arms!! Beings the Die Cuts the Stitching Dots in the Eyes, I was EASY to stitch directly to the Arms without needing the holes in the Arm Die Cuts themselves!! I also opted to Die Cut the Ears, Eyes, Nose and Arm Paws TWICE for some added dimension there too!! Since I Die Cut everything else Twice I just kept everything the same for a more symmetrical look to the finishes Bunny, if that makes Sense!!?? I also added the Heart (Nose Die) to the Carrot from some of the Ripe Raspberry Felt Roll and Stitched it to the Carrot for a touch of Sweetness (I Die Cut this Heart Twice as well)!! I wanted some added Sparkle so I added some Stickles Glitter Glue to the Top and let it dry completely and I just ADORE the look!! I added Black Sequins and Seed Beads to the Eyes and a Yellow Sequin and Seed Bead from the Dip Dyed Color Story Collection (restocked SOON) to the Center of the Flower!! These little touches of Sparkle REALLY add to the finished Design of this SWEET Bunny!!
  For the Back Side of the Bunny I opted for a Fluffy White Pom-Pom here and just stitched it to the back of the Bunny, but you could also use Fabric Glue or Hot Glue here too if you wished!! Then for the finishing touch I added a Small Heart (Nose Die) Die Cut from the same Paloma Felt Roll, again I Die Cut the Heart Twice here too!! I LOVE how it turned out and plan on making these CUTIES for my Nieces and Nephews for Easter!! I think they're going to ADORE them as much as I do!!??
  Remember the Carrot Pocket I shared yesterday HERE!! I created it in order to tuck the Bunny Inside for a Little Gift Package Presentation, but also for the Bunny to have a Place to LIVE!! If you wanted, you could add a little Ribbon String to create it into a Little Purse for Littles to be able to Carry around making it easier for them (and the Parents 😜to keep track of) Again there are NO WRONG Ideas here and I think it would be REALLY Sweet as a Purse/Bag too!! I also wanted to add a SWEET little Gift Tag using a Mini Clothes Pin to attach it to the Carrot Pocket!! I used a Trinity Stamps Mini Coffee Cup Sleeve and Décor Die Set for the Stitched Gift Tag and then Stamped the Sentiment from the NEW Peeps Show Stamp Set that I Stamped and Embossed onto the Tag!! Then I added some Carved Pumpkin Distress Oxide Ink for a POP of Color!! I finished it off by adding a 24 Carrots Clay Embellishment from Trinity Stamps using a Bling Mini Zots Glue Dot and It just finishes off the Gift Tag PERFECTLY!! It's ALL in the Details!!
The Bunny fits PERFECTLY and SNUG so NO worries on the Bunny Falling out!! Reminds me of the Book Knuffle Bunny both of my Boys LOVED when they were little!!
Infact, it would be a FUN addition to add to this Felt Bunny as a Gift for Easter!!


For my Next Project I'm showcasing the NEW Itty Bitty Basket Die Set!! I'm a Paper Crafter, so I have an UBUNDANCE of SWEET Patterned Papers that I have on hand and wanted to be able to use to create some CUTE Little Treat Baskets with and I LOVE how this turned out!! I Started by Die Cutting the Pieces!! Lizzie has a Video that will show the EXACT Process, but I wanted to share the pieces I Die Cut to show how I used Patterned Paper and the DO'S and DON'TS to the Process I found while creating my Project so it Streamlines the Process for you!!
I Die Cut the Side Pieces each TWICE mostly for the Stability for the Paper!! Once from the Patterned Paper and Once from some of the Petal Dot Felt Roll!! You'll need to Die Cut (12 Side Panels, instead of the regular 6 Panels needed to create just a Felt Basket) I adhered the pieces together with some Therm O Web Fabric Fuse Adhesive just to add even more stability to them, and it made it so much easier and faster to stitch as well!! They stay Pliable and don't harden which is another BONUS about using this Product with your Felt!!
 I Stitched everything together, but found that you defiantly want to use 2 Felt pieces for the Base Circles and also for the Handles as the Patterned Paper just isn't pliable enough to use without it tearing!! I wanted the Dot Pattern to be visible on both the top and bottom of the Handle so I ended up Die Cutting 2 of the Handles and Glued them together and then Stitched them to the Basket!! I also wanted to add a SWEET little Gift Tag and Bow!! So I used a Trinity Stamps Mini Coffee Cup Sleeve and Décor Die Set for the Stitched Gift Tag and then Stamped the Sentiment from the NEW Peeps Show Stamp Set that I Stamped and Embossed onto the Tag!! Then I added some Spun Sugar Distress Oxide Ink for a POP of Color!!
I Adhered the Felt Bow and Tag and filled the Basket with some Paper Grass and some Chocolate Malt Ball Eggs!! I LOVE how SWEET this turned out and feel like there are SO MANY options for these to use along with your FAVORITE Patterned Papers!! I hope I've INSPIRED you to give it a try!!?? 
I created this Basket the same way Lizzie Explains in her Video!! Only I wanted a Metallic Felt for the Base and Handle to tie into the Metallic Gold Dots Felt Roll on the Midas Touch Felt Roll!! So I'm using some Benzie Design Felt in Gold Metallic!! SWOON!! In real life this is a REGAL Looking Basket and I think these would be PERFECT for Graduation or Wedding Shower Table Center Pieces!! Fill with goodies and the attendees and ENJOY some Snacks while at the Party!!
 I again added some of the BEAUTIFUL Felt Flowers created using the NEW Gathered Garden Die Set!!
 Then I added another Trinity Stamps Tag Stamped with the "Happy Easter" Sentiment from the Peep Show Stamp Set in WoW Gold Embossing Powder!! Then I added some Victorian Velvet Distress Oxide Ink to match the Felt Flowers and I LOVE the STUNNING Design!! I did opt to fold the Basket inside out for the Flower/Scallop Design and I think its AWESOME that you can get 2 Different Shapes of Baskets from the Same Die Set!!
So there you have it SEVERAL Ideas today using the AMAZING NEW Products!!
Don't forget to leave a comment on the Poshta Design Blog Posts EACH DAY for a chance to WIN a $50 Gift Certificate to the Poshta Design Store!! THANKS SO MUCH for joining me again today!! I hope I've INSPIRED you with the NEW Products being showcased today and don't forget to come back tomorrow for a look at the NEW Designs being showcased tomorrow!!
Everything will debut this Saturday, March 4th at Noon ET in the Poshta Design Store!!
Have a FABULOUS WEEK!!
COUNTRY HUGS-N-KISSES