Showing posts with label Tim Holtz. Show all posts

Friday, August 1, 2025

WoW! Embossing Powder X Seth Apter "Heritage Quad" Celebration Blog Hop!!

Pin It


HELLO CRAFTY FRIENDS!! 

I’m so excited to be joining WOW! Embossing Powder for their latest Celebration Hop, highlighting the newly released Seth Apter “Heritage Quad”—available now!!

This brand-new Designer collaboration features four richly textured, earthy-toned embossing powders that reflect Seth’s signature mixed media aesthetic. Whether you’re into vintage layers, grungy textures or industrial tones, the Heritage Quad adds bold, dimensional detail to any make.

The WOW! Design Team and a lineup of talented guest designers have come together across blogs, Instagram, and YouTube to share our creative interpretations and inspire your next project.

๐Ÿ’ฅ And of course, there are PRIZES to be WON!! WOW! is giving away Three FABULOUS Prize Bundles, each featuring a curated selection of Seth Apter’s WOW! Products—including the Heritage Quad! Scroll down to find out how you can enter…

But first—let’s dive into the Inspiration!!

I was INSPIRED to create a Pretty Package Holiday Gift Card Holder using some Products from Tim Holtz and Taylored Expressions along with the NEW Seth Apter Heritage Quad!! SWOON!! I hope this INSPRES You to Create some Pretty Package Holiday Gift Card Holders for your Holiday Gift Giving needs this Season!!

I Started by Die Cutting the Base of the Taylored Expressions Pretty Package Die Set from some Tim Holtz Christmas Kraftstock Sparkle Paper!! I Die Cut the Bow & Ribbon from some TE Silver Foil Cardstock!! In real Life this is STUNNING a by itself, but with the addition of the WoW Embossed Poinsettia and Greenery, its Elevated to another Level!!

I Die Cut the Poinsettia from the Tim Holtz Die Set and Inked it with some Distress Ink in Fired Brick!! Then I applied some of the NEW Seth Apter Embossing Powder in Kiln!! I Heart Set it and I LOVE the Texture and Shine it adds to the Poinsettia!!
Here's a Close up look at the Layers once they were all Embossed!!
I Inked the Pine Leaves with some Rustic Wilderness and Vintage Photo Distress Oxide Inks then I applied the NEW Seth Apter Embossing Powder in Castleton!!
Here's a Close up look at the finished Pine Branches!!
Then I Inked the Larger Greenery Piece with some WoW Clear Embossing Ink and Covered the Greenery in the NEW Seth Apter Pumice Embossing Powder!!
Here's a Close up look at the Larger Greenery Piece!! It's SO STUNNING!!
I adhered everything together and then adhered it to the Top of the Pretty Package Box Lid!! I Stamped and Embossed the Tag using some WoW Clear Gloss Embossing Powder with a Sentiment from the TE Pretty Package Stamp Set - Holiday Tags!! I added a Metallic Twine and adhered it to the Pretty Package!!

I HOPE this INSPIRES you to create some Pretty Package Holiday Gift Card Holders for your Holiday Gift Giving needs this Season!! The NEW Seth Apter Heritage Quad really adds to that WOW Factor and its so EASY to create something with LOTS of Texture and Shine when your use them to create that SPECIAL Gift!!

๐ŸŽ Giveaway Details

To celebrate the release of the WOW! x Seth Apter “Heritage Quad”, we’re hosting a special multi-platform giveaway—giving you three chances to win a fabulous prize bundle!

WOW! is generously offering three prize bundles, each featuring a curated selection of WOW! Embossing Powder products from Seth’s mixed media range, including items from the brand-new Heritage Quad.

๐Ÿ•ฐ One winner will be chosen from each platform:
✔️ Blog Hop
✔️ Instagram Hop
✔️ YouTube Hop

To enter the Blog Hop Giveaway:

  1. Leave a comment on each stop along the hop

  2. Make sure to leave your comment by 6pm GMT Wednesday, 6th August 2025

  3. Winners will be announced on Thursday, 7th August 2025 over on the WOW! Embossing Powder blog

Want even more chances to win!!?? Make sure you join the YouTube and Instagram Hops too - each platform is a separate entry, and each comment on any of the stops is a separate entry!!


๐Ÿ”— Hop Details 


Thank you for stopping by!! If you enjoyed this post, be sure to follow/subscribe so you never miss new crafty inspiration. 


You should have arrived here from Michelle Burnier!! 

Next up, head over to Aditi Mahajan for more gorgeous inspiration!! 


Want to start from the beginning!!?? Check out the WOW! Embossing Powder Blog HERE!!


I hope you have a FABULOUS WEEKEND!! 

COUNTRY HUGS-N-KISSES
LARISSA
 ๐Ÿ’–

Wednesday, April 5, 2023

Thanks So Much Card w/ Poshta Design!!

Pin It
Hello Crafty Friends!! 

I'm here today with another Card using Products from Poshta Design Banded Egg Details Die along with a Tim Holtz Tree Rings 3-D Embossing Folder and a Sentiment from Newton's Nook Designs Daffodils Stamp Set!! 
I started by Die Cutting a Card Panel from a piece of Distress Watercolor Cardstock then Embossed it with the Tim Holtz Tree Rings 3-D Embossing Folder!! Then I added some Distress Oxide Inks in Salvaged Patina, Scattered Straw, Twisted Citron!! Then I added some Water Splatters for even more texture!! 
Then I took the Banded Egg Details Die (Tulip Base) and Die Cut it into the Card Panel!! Then I Die Cut all of the Tulip Pieces along with the Leaf Pieces from some Cardstock!! I Inked the Tulip pieces with some Fossilized Amber and Mustard Seed Distress Oxide Inks and Inked the Leaves with some Peeled Paint Distress Oxide Ink!!  
Then I Stitched all of the Tulips and Leaves onto the Card Panel!! SWOON!! I just LOVE how this Card turned out!! So much TEXTURE and I LOVE how FUN it is to stitch onto a Card Panel using a Simple Shape like the Tulips!! You could make some VERY Stunning CAS Cards using just those Tulips and could get a completely different look!! 

I finished the Card off by Stamping and Embossing the "Thanks So Much" Sentiment from the Newton's Nook Designs Daffodil Stamp Set onto a Die Cut Banner using Versa Fine Black Onyx Ink and WoW Clear Gloss Embossing Powder!! Then I adhered it to the Card Panel using Foam Tape and added some Trinity Stamps Crystal Clear Rhinestones for some added Sparkle!! 

Here's a Close up look at the Card Panel!! AWESOME Texture right!!?? I even LOVE these Colors!! Just make me HAPPY!! 

So there you have it another way to use some of those Smaller Detail Dies in the Banded Egg Details Die Set to create some Cards!! You could even use Felt for the Tulips for a completely different Design!! Seriously, the possibilities are ENDLESS with these Dies!! I hope I've INSPIRED you today and if you create something please Tag Me (@LarissaHeskettDesigns) and Poshta Design on Social Media as we LOVE to see what you're creating!! 

THANKS SO MUCH for stopping by today!! I hope you have a FABULOUS WEEK!! Join me on Friday for another Card using some Newton's Nook Designs Products!! 

COUNTRY HUGS-N-KISSES
LARISSA ๐ŸŒท

Friday, November 2, 2018

CAS-ual Fridays Stamps November Release 2018 ~ Pear Tree Fri-Dies!!

Pin It

No automatic alt text available.

HELLO CRAFTY FRIENDS!!
I'm here today with Day 6 the LAST Day of the 
CAS-ual Fridays Stamps November Release 2018!!
Today we're showcasing the NEW Pear Tree Fri-Dies!! These Dies coordinate with the previously released Partridge in a Pear Tree Stamp Set!! 


For my Card Today I started by Stamping and Embossing the Partridge in a Pear Tree Image!! I used the NEW coordinating Pear Tree Dies to Die Cut it out!! I wanted to add a Snowflake to the Bird so I Stamped and Embossed the Snowflake using White Embossing Powder and then used a Tonic Studios Aqua Shimmer Pen to color over the Bird, Pears and the Bow for some Sparkle, then I added Morning Dew Nuvo Drops for some Dimension and I just LOVE how it turned out!! For the Background I inked with Tumbled Glass and Peacock Feathers Distress Ink and added some Water Droplets for some texture!! Then I Stamped and Embossed some Snowflake Images in White Embossing Powder!! I added some Tonic Studios Blizzard Glitter Drops to the Center of the Snowflakes and that finished off the background!! For the Ground I Cut a piece of Tim Holtz Wood Patterned Paper and then Stamped and Embossed the Sentiment in White Embossing Powder!! 
I used 3-D Foam Squares to POP up areas on my Pear Tree and adhered it to the Cardbase!! 

THANKS SO MUCH for stopping by and I hope you'll come back tomorrow for Day 6 of the Release!!


COUNTRY HUGS-N-KISSES
LARISSA    =)

Tuesday, April 17, 2018

Newton's Nook Designs April Release 2018 ~ "Wedding Frills" and "Floral Lace" Stencil!!

Pin It

                            Hello!!
                               SQUEAL!!
                                     I'm here with Day 1 of the 

                          Today we're showcasing the NEW  
        "Wedding FrillsStamp Set + coordinating "Wedding FrillsDie Set and the "Floral Lace" Stencil!! 
                  Let's take a look at the AWESOME New Products!!

I started by Inking my Card base with a light coat of Tumbled Glass Distress Ink. Then I placed the Bubbly Stencil over the Card base securing with some Therm O Web Purple Tape and Inking with Tumbled Glass Distress Ink. Remove the Stencil and you've got a lightly stenciled Card base!! Then I Stamped and Embossed the Images onto some Distress Watercolor Paper and Die Cut them out using the Coordinating Dies!! I Colored them using Copic Markers and added some Tonic Studios Aqua Shimmer Pen and some Morning Dew Nuvo Drops for the Centers of the Flowers!! I Fussy Cut the Centers of the Larger Flowers and the Smaller Flowers to make the Design 3-D!! In real life its just BEAUTIFUL and adds the PERFECT Finishing touch to this simple Card Design!! I Stamped and Embossed the Sentiment and added a few Pretty Pink Posh Sparkling Clear Sequins and added some Morning Dew NuvoDrops to the center of each of the sequins to compliment the Nuvo Drops in the center of each of the Flowers!! 


This next Card was a Labor of LOVE!! ;) 
Ever have an idea and you can't let it rest until you figure out how to create it!! Well, this was that card for me!! I wanted to have the Negative part of the Stencil be in Foil!! Yep, you heard me Black Foil!! So after MANY attempts to get the desired look, I finally NAILED it!! What do you think!!??
I started by adhering the Stencil over a piece of Cardstock with some Therm O Web Purple Tape, then I added Deco Foil Transfer Gel over the top of the Stencil using my Tonic Studios Spatula!! I sat it aside to dry and then cut some Black Deco Foil to fit my Cardbase and Foiled the Dry Gel Stenciled Cardbase in my Laminating Machine!! I removed the Foil Film and WALLAH!! I had my Black Foil Negative!! Now to adhere it to my Project!! I picked a Neutral Designed Patterned Paper and used the Stencil to adhere over the Patterned Paper with some Therm O Web Purple Tape!! Then I chose several colors of Distress Oxide Inks and used Ink Daubbers to Color in the Stenciled Design!! After I was done inking up the Design, I added some Water Splatters to create some Oxidization and then I dried it with my Heat Tool!! I then Inked over the Design with my Versa Mark Ink Pad and coated the Design with Clear Embossing Powder!! I repeated this step 2 more times!! Once it was Dry I placed the Negative Foil Piece over the Cardbase making sure to line up the design as best as I could and adhered it using some Purple Tape!! I covered it with some Deco Foil Parchment Paper and ran it through my Laminating Machine!! Once it cools a bit I ran it through again and then it was time to remove the Film to see what I had!! SQUEAL!! I was SO HAPPY!! In real life this Card is AWESOME looking!! I then added a few Pretty Pink Posh Jewels and the NEW Essential Alphabet Die Cut letters that I created using the same Patterned Paper as the background and some Picked Raspberry Distress Oxide Ink!! I Die Cut 4 layers of Black Cardstock to make the letters more dimensional!! Then I created a Sentiment Banner using the Frames and Flags Die Set and White Heat Embossing the Sentiment from the  Simply Relative Stamp Set!! I adhered it with some Foam tape and my Card was done!! 

(Side Note ~ I will have step out photos of how I created this Card once I get my New Computer and re-edit the Photos!! 
THANKS for understanding!! 


Would you like to win the Wedding Frills” Stamp Set!!??
This stamp set will be given away to ONE Lucky Winner!!

Here's how to win: 
Comment on the NND blog and Design Team blogs (see list below)! Thewinner will be chosen at random from the collective reveal posts. Make sure to check out each of their blogs and comment for your chance to win. You will not know which blog has been chosen so the more you comment on the better your chances are of winning! You have until Thursday April 19th at 9pm EST to comment  -- winners will be announced on the blog post on Friday, April 20th. 
Check out all the awesome Design Team Blogs below to enter:
THANKS SO MUCH for stopping by today!! I CAN'T WAIT to share the rest of the Release with you!! Please come back again tomorrow for a look at the NEW "Umbrella Pals" Stamp Set +coordinating Die Set!! The New Products will be available on Friday April 20th!! Have a FABULOUS WEEK!!

I'm also Linking up


COUNTRY HUGS-N-KISSES
LARISSA     =)

Monday, April 16, 2018

Newton's Nook Designs April Release 2018 ~ "Newton's Graduation" + "Essential Alphabet Dies"!!

Pin It
                            Hello!!
                                     SQUEAL!!
                                     I'm here with Day 1 of the
               Newton's Nook Designs April Release 2018!!
                          Today we're showcasing the NEW  
        "Newton’s Graduation" Stamp Set + coordinating "Newton's Graduation" Die Set and the "Essential Alphabet" Die Set!!
                  Let's take a look at AWESOME New Products!!
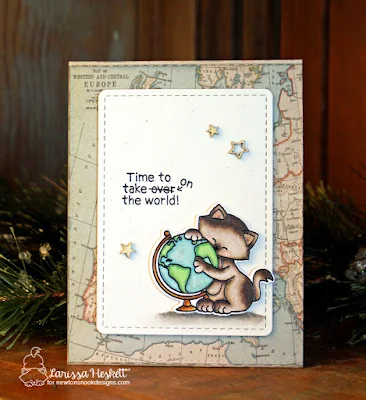
Here's the Card I've created for today!! I have several Friends with kids Graduating this year and that just seems strange!! How can we be getting old enough to have our kids Graduating from High School already!!?? I also realized that starting Next Year we'll be having a High School Graduate in the Family every 2 years for the next 10 years!!
SAY WHAT!! I'm going to BUSY!!  ;)
I wanted to give my Card more of an Adult Feeling so I chose to use some Time Holtz Patterned Paper and used the Frames & Flags Die Set to Create the Stitched Panel from some WPlus9 Oatmeal Cardstock!! Then I Stamped and Embossed the Image and Die Cut it out using the coordinating Dies!! I used Copic Markers to color my Image (E40, E43, E47, E49, and R20 for Newton, E99, Yr21, Yr24 Yr14 for the Globe Base, YG11, YG24, YG72, W2 for the Land, BG000, BG10, BG72, W2 for the Water, and W00, W2 and W5 for the Ground under Newton)!! I added some White Gel Pen Freckles and some Black Gel Pen for the Nose!! I think these details just finish of the Design and make the features POP!! I Stamped and Embossed the Sentiment and added a scattering of some Wooden Stars!! I have had a stash of these FOREVER!! I believe they were from Maya Road and I'm not sure if they are still available, but anything would work here!! I popped the Panel up using some Therm O Web 3-D Foam and my card was done!!
 
Would you like to win the Newton’s GraduationStamp Set!!??
This stamp set will be given away to ONE Lucky Winner!!
Here's how to win: 
Comment on the NND blog and Design Team blogs (see list below)! The winner will be chosen at random from the collective reveal posts. Make sure to check out each of their blogs and comment for your chance to win. You will not know which blog has been chosen so the more you comment on the better your chances are of winning! You have until Thursday April 19th at 9pm EST to comment  -- winners will be announced on the blog post on Friday, April 20th. 

Check out all the awesome Design Team Blogs below to enter:
 

THANKS SO MUCH for stopping by today!! I CAN'T WAIT to share the rest of the Release with you!! Please come back again tomorrow for a look at the NEW "Wedding Frills" Stamp Set + coordinating Die Set and the "Floral Lace Stencil"!! The New Products will be available on Friday April 20th!! Have a FABULOUS WEEK!!
 
COUNTRY HUGS-N-KISSES
LARISSA     =)