Thursday, December 31, 2020

CAS-ual Fridays Stamps Release ~ Pop Fizz Clink Stamps & Champagne Flute Dies!!

Pin It

Hello Crafty Friends!! 

I'm here for Day #1 of the CAS-ual Fridays Stamps Release!! All of the NEW Products are available NOW in the CAS-ual Fridays Stamps Shop!! 
Today we're showcasing the NEW Pop Fizz Clink Stamp Set and Champagne Flute Dies!! I LOVE these Sets and ALL of the Possibilities!! Here's a look at the NEW Sets!!  

So FUN right!!?? 
Here's what I've created for today!!

LOVE using Therm O Web Deco Foils on my Cards!! Especially for Special Occasion Cards!! Have you ever tried Foiling over your Stamped and Embossed Images!!??
Today I'm showing how you can add Deco Foils to your Stamped Images for a very Elegant Design!!
I Started by Stamping and Embossing the Champagne Flute Image from the NEW Pop Fizz Clink Stamp Set with Versa Fine Black Onyx Ink and Embossing with WoW Clear Gloss Embossing Powder!! Then I heat set it and then let it cool!! Then I used Copic Markers to Color in the Image!! I was going for a Light Champagne Color!! 
 I used Champagne: Y11 & Y21   Flute Glass: BG00, BG10
Then I Cut a Piece of Therm O Web Deco Foil in Champagne large enough to cover the Image and Ran it through my Laminating Machine on the #1 Setting!! You don't want it too hot when doing this Technique or it will distort the Image some!! Sometimes that's the look you want, but that wasn't the look I was going for on this Card!! 
SWOON!! I LOVE pulling back the Foil Sheet to reveal the Foiled Image!! It NEVER gets old!! PS Save that Negative Foil Piece as I'll be using it for another Card later in the weeks to come!! ๐Ÿ˜‰ I LOVE being able to use ALL of the Foil so there's NO WASTE!! SQUEAL!! I can't wait to share it with you!! I Die Cut the Champagne Flute Image out using the coordinating NEW Champagne Flute Dies!! 
To create my Card Panel I Die Cut the Stitched Rectangle and then Inked the Background with some Tumbled Glass Distress Oxide Ink!! I wanted to add some Text to the Background so I Stamped the Words "Fizz, Pop & Clink" using Tumbled Glass Distress Ink!! It's Subtle, but that's the look I was going for!! In real Life it really adds a neat touch to the Background!! 

I added some Water Splatters and then heat set it!! Then I took the 
NEW Bubbly Stencil with some Therm O Web Pixie Spray on the back to help keep it in place!! Then I adhered it over the Inked Background and applied more of the Tumbled Glass Distress Oxide Ink!! I wanted a random design so I didn't cover the entire Stencil!! Just concentrated on the right hand side of the Card Panel!! 
I wanted to add some more Champagne Deco Foil to my Card, but didn't want it to take away from the Main Focal Image!! So I took the Deco Foil Adhesive Pen and pressed down the Tip of the Pen onto a Plastic Lid repeatedly until I got enough of the Adhesive out in order to Splatter onto my Card Panel with a Paint Brush!! I let it Dry completely!! 
Once it was Dry I took the Negative Foil Piece and rubbed it over the Splatters of Deco Foil Adhesive on my Card Panel!! SWOON!! I LOVE not on the extra touch of Shine, but the adhesive also dries with some Dimension, so it adds a FUN dimension to the Card too!! To finish the Card Panel I added some Black Soot Distress Paint Splatters and I LOVE how it turned out!! 
I Stamped and Embossed the "Cheers" sentiment with Versa Fine Black Onyx Ink and Embossed it with WoW Clear Gloss Embossing Powder!! Then I Fussy Cut around the Sentiment!! I Adhered the Champagne Flute to my Card Panel with some Foam Tape and then I adhered the Sentiment also with Foam Tape just on the ends of the Sentiment to keep it the same dimension as the Champagne Flute!! I added a Few TE Gold Pearls to finish off the Design!!  
LOVE the way it turned out and I hope it gives you some Ideas on ways to use the NEW Sets!!
THANKS SO MUCH for stopping by today and I hope you'll stop back by tomorrow for a look at the NEW Salty Stamp Set & Margarita Glass Die Set!! 

If you feel like Shopping please use my CODE: LARISSASENTME for 15% off your Order!! 

Have a FABULOUS New Year's Eve!! 
Stay Safe and Healthy!! 
 Wishing you many BLESSINGS in 2021!! 

COUNTRY HUGS-N-KISSES
LARISSA   ๐Ÿท

Tuesday, December 22, 2020

Day 23 of the Paper Sweeties 25 Days of Christmas!!

Pin It

HELLO CRAFTY FRIENDS!! 
I'm up for Day 23 of the Paper Sweeties 25 Days of Christmas Celebration!! FULL of AMAZING Inspiration and Surprise SALES!! 
You won't want to miss a Day of the Festivities!! 
Here's what I've created for today!! 
I just had to create a Festive Cup of Peppermint Mocha Latte with a FULL Dollop of Cream for the front of a Treat Box!! YES PLEASE!! So YUMMY with Peppermint Sprinkles!! I used the Keep Calm and Drink Coffee Sweet Cuts to Die Cut my Cup from some Patterned Paper!! Then I Stamped and Embossed the "SWEET" Sentiment for a play on a Rea Dunn Cup using the Blessed Stamp Set!! I Stamped with Vera Fine Black Onyx Ink and Embossed with WoW Clear Gloss Embossing Powder!! Then for the Dollop of Cream I used the Frosting Image from the Cupcakes and Sprinkles Stamp Set and Die Cut it out using the coordinating Cupcakes and Sprinkles Die Set!! I Colored it with Copic Markers to match the Coffee Cup and make it a little more Festive!! Then added some Morning Dew Nuvo Drops to the Sprinkles for some Dimension and Shine!! 
I wanted to add a SWEET Gingerbread Cookie and some Holly to add to the Holiday Feel and Stamped and Fussy Cut the Images from the Happy Holidays Planner Series Stamp Set!! I used Copic Markers to Color them in and added some Morning Dew Nuvo Drops to the Berries and the Bow and some White Gel Pens to finish off the Images!! To finish off the design I used some Watermelon Seam Binding Ribbon, the Holly Leaves from the Meet Me Under the Mistletoe Sweet Cut Die Set Die Cut from some TE Avocado Felt and added a Large Turquoise Jingle Bell to the Treat Box using a Few Bling Zots Glue Dot!! I'm pretty sure this will make someone SMILE this Holiday Season!! As they find a Gift Certificate to our Local Coffee Stop inside!! 

Please bookmark our site and follow us on social media (links on right sidebar) to keep up to date with everything new from Paper Sweeties!  We’re hopping all month long, so be sure to come back each day to see a new project by one of our talented designers or a special surprise:

December 1st: planner team posts

December 2nd: Debbie Marcinkiewicz 

December 3rd: Karen Letchworth

December 4th:  SURPRISE DAY – choose your SALE when you shop ON-LINE through our website!

December 5th:  SURPRISE DAY – choose your SALE when you shop ON-LINE through our website!

December 6th:  SURPRISE DAY – choose your SALE when you shop ON-LINE through our website!

December 7th:  SURPRISE DAY – choose your SALE when you shop ON-LINE through our website!

December 8th: Karen Letchworth

December 9th: Larissa Heskett

December 10th:  Maria Patrick

December 11th:  Maria Patrick

December 12th:  Karen Letchworth

December 13th: Karen Bull

December 14th: Karen Bull

December 15th: Karen Bull

December 16th:  Larissa Heskett

December 17th:  Maria Patrick

December 18th:  Karen Letchworth

December 19th:  SURPRISE DAY – choose your SALE when you shop ON-LINE through our website!

December 20th:  Lisa Golzbein

December 21st: Lisa Golzbein

December 22nd:  Lisa Golzbein

December 23rd:  Larissa Heskett

December 24th:  Debbie Marcinkiewicz 

December 25th: Debbie Marcinkiewicz 

Merry Christmas and Happy Holidays to one and all!


THANKS SO MUCH for stopping by today and I hope you'll join us for the rest of the Celebration!! 

Have a FABULOUS WEEK!! 


COUNTRY HUGS-N-KISSES
LARISSA
  ๐Ÿ’—

Friday, December 18, 2020

Season of Joy Card with Newton's Nook Designs!!

Pin It
HELLO CRAFTY FRIENDS!! 
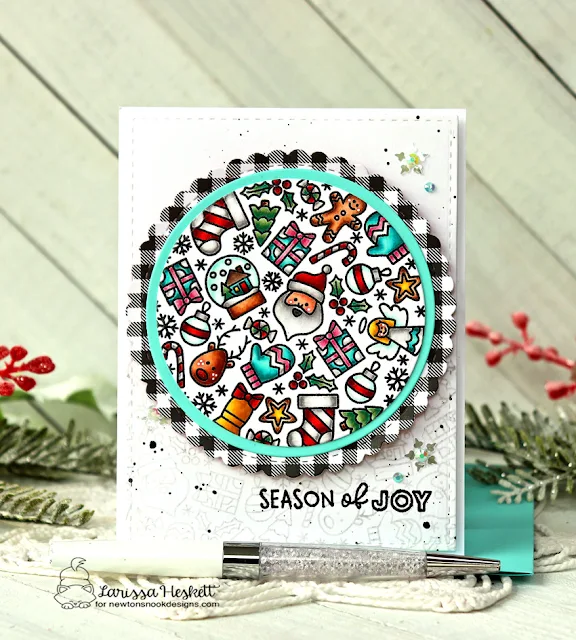
I'm up on the Newton's Nook Designs Blog today sharing this Festive and Colorful Season of Joy Card!! 
I Started by Stamping and Embossing the Christmas Roundabout Stamp Set with Versa Fine Black Onyx Ink and WoW Clear Gloss Embossing Powder!! 

I used Copic Markers to Color in the Images!! 
Red: R14 & R39  Yellow: Y11 & YR23  Green: YG61, YG63 & G19  Turquoise: BG13, BG45 & BG49  Brown: E31, E33 & E7  White: N0 & N2   Pink: R81, R83 & RV34   Light Turquoise: BG10 & BG13  Skin: E000, E11 & E13   Cheeks: RV11 

Then I Die Cut the Image out using the coordinating Circle Frames Die Set!! I Die Cut a Gingham Scalloped Circle also using the Circle Frames Die Set and adhered the Turquoise Colored Circle and the Colored Embossed Circle onto the Scalloped Circle adding some Foam Squares to the back side of the Scalloped Frame to adhered it to the Card Panel once it was ready!!  
I also colored some of the Images and Parts of the Images with Shimmer Pen to add some Sparkle and Shine!! I also added some White Gel Pen Highlights too!!
For the Card Panel I Stamped the NEW Christmas Roundabout Image twice onto the bottom of the Card Panel using my MISTI Stamping Tool in TE Sea Salt Ink!! I LOVE the tone on tone stamping look!! 

Then I Stamped and Embossed the Sentiment from the Stamp Set in Versa Fine Black Onyx Ink and Embossed with WoW Embossing Clear Gloss Powder!! I added some Picket Fence and Black Soot Distress Paint Splatters!! Then I added 3 Large Snowflake Sequins and 3 Iridescent Jewels to the Center of the Snowflakes!! 
LOVE the way it turned out!!
THANKS SO MUCH for stopping by today!! I hope you feel INSPIRED and are as EXCITED about the Holiday's as I am!! I'm looking forward to just hanging out and spending some time with my Boys!! I've MISSED them and I think they're looking forward to the BREAK from wearing their Masks ALL DAY EVERYDAY!! 
Have a FABULOUS WEEKEND!!

COUNTRY HUGS-N-KISSES
LARISSA   ๐Ÿ’—

Tuesday, December 8, 2020

Day 9 of the Paper Sweeties 25 Days of Christmas!!

Pin It

HELLO CRAFTY FRIENDS!! 
I'm up for Day 9 of the Paper Sweeties 25 Days of Christmas Celebration!! FULL of AMAZING Inspiration and Surprise SALES!! You won't want to miss a Day of the Festivities!!  
Today I've created a SWEET Gift Tag ready to decorate any of your Gifts this Holiday Season!! 
I LOVE being able to create my own Gift Tags using the products I already have and I LOVE the EAST yet BEAUTIFUL Design of this Tag!! They'd be EASY for any Mass Producing needs too!! 

I started by Stamping and Embossing my White Cardstock with Sentiments from the Merry Stamp Set!! I Stamped with WoW Embossing Ink and Embossed with some WoW Bright White Embossing Powder!! Then I used the SWEET Stitched Tags #2 Die Set and Die Cut the Stitched Tree from the Stamped and Embossed Cardstock!! 
I Die Cut a Striped Patterned Paper using the Stitched Tag For You Die Set!! Then I adhered the Embossed Stitched Tree Image to the Striped Stitched Tag using some Foam Tape!! 
I Die Cut another Stitched Tag Die using the For You Die Set from some Salt Water Taffy Cardstock and then Stamped and Embossed the Sentiment from the Happy Holidays Planner Stamp Set!! This set is on SALE right now so it be one you want to snag up before they're gone!! 
I LOVE the Secret Santa Sentiment!! So I Stamped and Embossed it using some WoW Bright White Embossing Powder and then I Stamped the To: Sentiment from the Stand Add-on: Sweet Treats Stamp Set and its ready to add the recipients name with a White Gel Pen!! 
To finish off the Tag I Die Cut the Holly Image from some Green Felt and adhered it behind a Large Jingle Bell using some Zots Bling Dots!! I adhered them to some Cotton Candy and Bubble Gum Seam Binding Bows along with some White Tulle!! I LOVE the way it finishes off the Tag and it's SURE to make a Statement when delivered to the recipient!! 

Please bookmark our site and follow us on social media (links on right sidebar) to keep up to date with everything new from Paper Sweeties!  We’re hopping all month long, so be sure to come back each day to see a new project by one of our talented designers or a special surprise:

December 1st: planner team posts

December 2nd: Debbie Marcinkiewicz 

December 3rd: Karen Letchworth

December 4th:  SURPRISE DAY – choose your SALE when you shop ON-LINE through our website!

December 5th:  SURPRISE DAY – choose your SALE when you shop ON-LINE through our website!

December 6th:  SURPRISE DAY – choose your SALE when you shop ON-LINE through our website!

December 7th:  SURPRISE DAY – choose your SALE when you shop ON-LINE through our website!

December 8th: Karen Letchworth

December 9th: Larissa Heskett

December 10th:  Maria Patrick

December 11th:  Maria Patrick

December 12th:  Karen Letchworth

December 13th: Karen Bull

December 14th: Karen Bull

December 15th: Karen Bull

December 16th:  Larissa Heskett

December 17th:  Maria Patrick

December 18th:  Karen Letchworth

December 19th:  SURPRISE DAY – choose your SALE when you shop ON-LINE through our website!

December 20th:  Lisa Golzbein

December 21st: Lisa Golzbein

December 22nd:  Lisa Golzbein

December 23rd:  Larissa Heskett

December 24th:  Debbie Marcinkiewicz 

December 25th: Debbie Marcinkiewicz 

Merry Christmas and Happy Holidays to one and all!


THANKS SO MUCH for stopping by today and I hope you'll join us for the rest of the Celebration!! 

Have a FABULOUS WEEK!! 


COUNTRY HUGS-N-KISSES
LARISSA 
๐Ÿ’—

Friday, December 4, 2020

8th Annual Deck the Halls with Inky Paws Blog Hop w/ Newton's Nook Designs!!

Pin It
Hello Crafty Friends!! 
I'm here today as part of the 8th Annual Deck the Halls with Inky Paws Blog Hop with Newton's Nook Designs!! Although I'm SO ready for 2020 to be over, I still just can't believe how FAST this year has seemed to fly bye!! I'm honestly NOT even complaining, I'm just trying to wrap my mind around ALL of the CRAZINESS from this Year and I'm looking forward to CELEBRATING the Holidays with my Boys and being THANKFUL for ALL that we have and Praying that 2021 will bring AMAZING Things!! 
That brings me to my Projects for today!! 
I was thinking about how CRAZY this Year has been and decided to create some Interactive ORNERY/PLAYFUL Projects to bring a SMILE or TWO to the Holidays this Year!! 
Here's a look at the Sets that I've used!! 
These Images just make me SMILE and can be used in so many ways!! Let's get started!! 
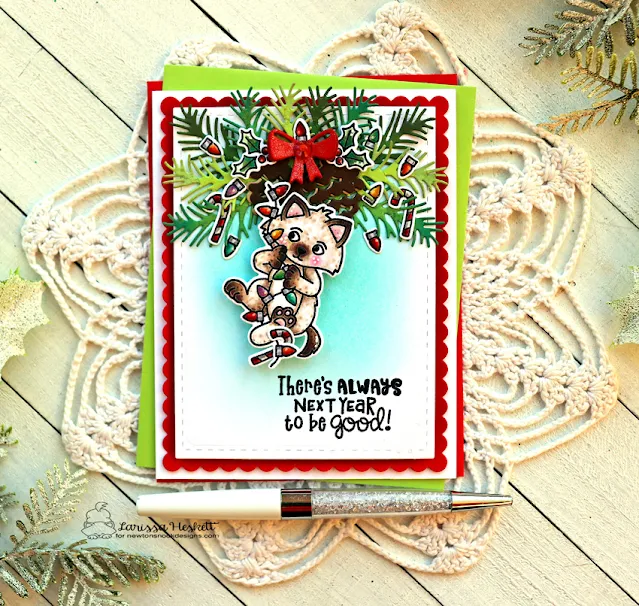
I Started by Stamping and Embossing the Playful Kitten Image, 2 of the Holly Images, 3 of the Candy Cane Images and Several of the Lightbulb Images onto some Distress Watercolor Paper using Versa Fine Black Onyx Ink and WoW Clear Gloss Embossing Powder!! 
Then I used Copic Markers to color them in!! 
Kitten: E40, E42, E43 & E44  Green: YG61 & G19 
Cheeks & Inside of Ears: RV11   Red: R14 & R39  Orange: YR02 & YR68   Yellow: Y11 & YR23  Purple: V01 & V06   Blue: BG13 & BG49 
Then I used the coordinating A Kitten Christmas Die Set and Die Cut the Images out using Purple Tape to Tape the Dies in place as I ran them through my Die Cutting Machine!! 
Next I used the Pines & Holly Die Set to Die Cut some of the Pines Branches from 3 different colors of Green Cardstock for some Variation!! I used some Distress Oxide Inks to add some Color to the Pines Branches and then I added them to the Top of my Card Panel!! I arranged them to create a Pine Swag in the Center of the Top of the Card Panel!!  
I also Die Cut 3 of the Bow Images from the same Pines & Holly Die Set from some Red Cardstock and layered them together to create a 3-D Bow and then I added a Gem to the Center of the  Bow for some Sparkle!! I Die Cut 4 of the Pinecone Images 2 from some Kraft Cardstock and 2 from some Brown Cardstock and glued them together off setting the Kraft Die Cuts behind the Brown Die Cuts to add some extra dimension to the Pine Cones!! I adhered everything together to create a Full Christmas Swag and I LOVE the way it turned out!! 
I wanted to have the Kitten Image appear to be Swinging from the Christmas Swag so I Die Cut a Small Circle (using the smallest Hero Arts Nesting Circle Infinity Die Set) from the Card Panel where I wanted the Kitten Image to Swing from!! Then I created a Small Tab (I used the Die from the Lawn Fawn Double Slider Surprise Die Set) and adhered a Penny to it using some Gina K Designs Terrific Tape, adhering the top of the Tab to the Kitten Image!!  Using a small Round Foam Disk, making sure that the Disk could move freely from the circle opening in the Card Panel!! The weight of the Penny will make sure that the Kitten Image will Swing back and forth from the Christmas Swag!! 
I just LOVE how FUN this Card is and think it will bring some MUCH NEEDED Laughter to the recipient this Holiday Season!! Are you SMILING Yet!!?? I sure am!! ๐Ÿ˜
For my Second Card I wanted to create a FUN Surprise Pull Tab Card Design!! I decided to use Images from the Christmas Puppies!! 
I wanted to use the Puppy in the Boot Image and have the Puppy with the Scarf POP up from behind him as a SURPRISE Stocking Stuffer!! 
I Started by Stamping and Embossing the Images onto some Distress Watercolor Cardstock using Versa Fine Black Onyx Ink and Embossed with WoW Clear Gloss Embossing Powder!! I colored the Images using Copic Markers!! 

Stocking Puppy: E40, E42, E43 & E44  Green: YG61 & G19 
Cheeks &  Inside of Ears: RV11   Red: R14 & R39  Black: W3, W5 & W8     Scarf Puppy: Y21, Y24, Y27 & E99  
Scarf: BG10, BG45, Bg49
Then I Die Cut the Images out using the coordinating Christmas Puppies Die Set!!
I used the Lawn Fawn Let's Toast Pull Tab Add-on Die Set in order to create my Pull Tab Mechanism!! I Die Cut the Card Pane using the Dies and then I used Distress Oxide Inks in Tumbled Glass and Peacock Feathers along with the Snowflake Stencil to add some color and Design to my Card Panel!! Then added some Water Splatters, Picket Fence and Black Soot Distress Paint Splatters to add some Texture and the look of Snow Falling!! 
Then I adhered the Scarf Puppy Image to the Lawn Fawn Pull Tab Mechanism and adhered the Tab to the back side of the Pull Tab!!

Then I adhered the Puppy in the Boot Image over the Top of the Scarf Puppy Image and when you pull the Tab the Scarf Puppy POPS up from behind the Puppy in the Boot!! 
SQUEAL!! It just makes me SMILE!! Plus how CUTE are these Puppies!!?? 
Just makes me HAPPY and I know the recipients are SURE to ENJOY this FUN Interactive Card Design too!! 
I hope I've INSPIRED you today on ways to create some 
ORNERY/PLAYFUL Interactive Cards using your FAVORITE NND Images!!??

Deck the Halls with Inky Paws SALE! 
$5 off every $30 You Spend!
That means $5 off $30, $10 off $60...up to $25 off $150!*
No Coupon Needed  •  Now through Sunday, December 6th!
*Maximum $25 discount per order.


Enter to Win!! Deck the Halls with Inky Paws Hop Prizes!!
We will be choosing two lucky winners to win a $25 store credit for Newton's Nook Designs online shop!! To enter, just leave comments on the Design Team Member and Guest blogs (see list below)! Two winners will be chosen at random from the collective blogs in the blog hop. Make sure to check out each of their blogs and comment for your chance to win. You will not know which blog has been chosen so the more you comment on the better your chances are of winning! You have until Sunday, December 6th at 9 pm EST to comment -- winners will be announced on the NND Blog on Monday, December 7th!!


THANKS SO MUCH for stopping by today and I hope you've left feeling INSPIRED!! I hope you have a FABULOUS WEEKEND!! 

COUNTRY HUGS-N-KISSES 
LARISSA   ๐Ÿ’—

S U P P L I E S
Below you will find links to the supplies used to create this project(s). Click the icon for the store underneath the thumbnails to start shopping. Where available I use compensated affiliate links at no extra cost to you. Your support helps me to keep bringing you new projects. 
Thank you!! ๐Ÿ’“