Showing posts with label Snowflake Sequins. Show all posts

Tuesday, October 12, 2021

Newton's Nook Designs Holiday Release 2021 ~ Holiday Home & Christmas Cactus!!

Pin It

HELLO CRAFTY FRIENDS!! 

I'm here with Day 2 of the 
Today we're showcasing the NEW "Holiday HomeStamp Set + coordinating Holiday Home Die Set the 
"Christmas CactusStamp Set + coordinating Christmas Cactus Die Set!! 
Let's take a look at the AWESOME New Sets!!

 
    Makes me READY for ALL things Holiday!!
Here's what I've created for today!!
I LOVE the Images in this Set ant think there are SO MANY ways you could create STUNNING Mass Produced Christmas Cards using it!! You could color the Home to mimic your own Home!! I Started with my Card Panel and then Stamped and Embossed the Sentiment towards the bottom Center of the Card Panel!! 
I Stamped and Embossed the Home Image and then used Copic Markers to Color in the Image and the Sentiment!! 
RED: R00, R14, & R39     GREEN: YG61, YG63 & YG67    BLUE: BG70, BG72 & BG75    YELLOW: Y11& YR23      BROWN: E40, E43 & E44     SNOW: BG000
I Die Cut the Home Image out using the coordinating Die!! 
Then in order to create the Heart around the Home I used the Heart Frames Die Set!! I Partially Die Cut the Stitched Heart my placing my Die Cutting Plate on the Top Part of the Die so only it would Die Cut into the Front of the Card Panel and I LOVE the way it turned out!! I Adhered the Home to the center of the Heart after inking it with some Speckled Egg Distress Oxide Ink with Foam Tape and then added some Snowflake Sequins and added some Glossy Accents to the Windows and the Bow on the Wreath!! 
For my second Card I Stamped and Embossed 3 of the Christmas Cactus Images and then Colored them with Copic Markers!! 
CHRISTMAS CACTUS: RV00, RV52 & RV55    
YG61, YG63 & YG67 
Then I used the coordinating Die Set to Die Cut the Images out!! 
Next I Die Cut my Card Panel and Inked with the Salvaged Patina Distress Oxide Ink towards the top of the Card Panel!! I Stamped and Embossed the "Merry Christmas" Sentiment!! 
I Adhered the the Images to the top of my Card Panel using some TE Foam Tape Strips and then added some Adhesive to the Flower Stamen and added some TE Sugar Cube Iridescent Glitter!! SWOON!! I LOVE the addition of the Glitter!! Then I finished off the Card Panel by adhering some Trinity Stamps Fairy Rocks Rhinestones!! They coordinate PERFECTLY with the Iridescent Glitter!! 

Would you like to WIN the "Holiday Home" or the "Christmas Cactus" Stamp Set!!?? 

We will choose ONE lucky winner for each stamp set!

Here's how to win: Comment on the NND blog and Design Team blogs (see list below)! The winner will be chosen at random from the collective reveal posts. Make sure to check out each of their blogs and comment for your chance to win. You will not know which blog has been chosen so the more you comment on the better your chances are of winning! You have until Thursday October 14th at 9pm ET to comment  -- winners will be announced on the blog post on Friday, October 15th. 

Check out all the awesome Design Team Blogs below to enter:

THANKS SO MUCH for stopping by today!! Make sure to leave me comments ALL Week for your chance to WIN!! I read EVERYONE and they MEAN more to me than you'll ever know!! 
 Make sure to check out the Newton's Nook Designs Blog on Friday, October 15th to see if you're one of the LUCKY Winners!! Then join us again tomorrow as we showcase the NEW "Christmas CocktailsStamp Set & "Dairy ChristmasStamp Set + coordinating Dies for both Sets!! 
Have a FABULOUS WEEKEND!!

COUNTRY HUGS-N-KISSES
LARISSA ðŸ’–

Friday, December 18, 2020

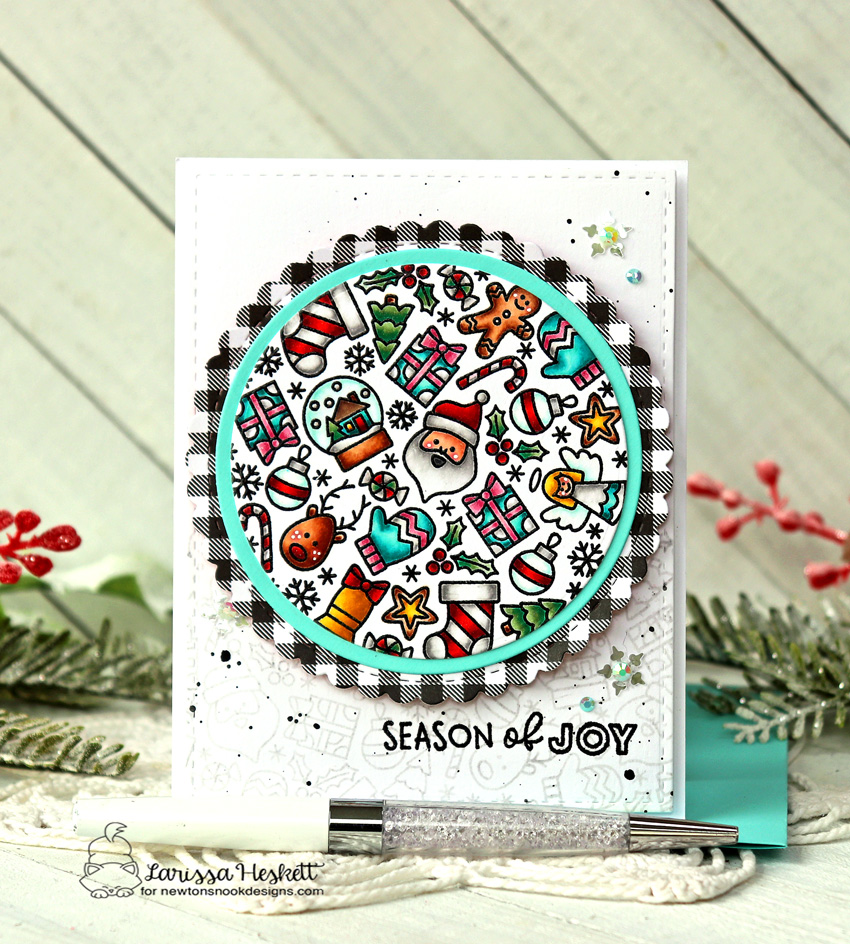
Season of Joy Card with Newton's Nook Designs!!

Pin It
HELLO CRAFTY FRIENDS!! 
I'm up on the Newton's Nook Designs Blog today sharing this Festive and Colorful Season of Joy Card!! 
I Started by Stamping and Embossing the Christmas Roundabout Stamp Set with Versa Fine Black Onyx Ink and WoW Clear Gloss Embossing Powder!! 

I used Copic Markers to Color in the Images!! 
Red: R14 & R39  Yellow: Y11 & YR23  Green: YG61, YG63 & G19  Turquoise: BG13, BG45 & BG49  Brown: E31, E33 & E7  White: N0 & N2   Pink: R81, R83 & RV34   Light Turquoise: BG10 & BG13  Skin: E000, E11 & E13   Cheeks: RV11 

Then I Die Cut the Image out using the coordinating Circle Frames Die Set!! I Die Cut a Gingham Scalloped Circle also using the Circle Frames Die Set and adhered the Turquoise Colored Circle and the Colored Embossed Circle onto the Scalloped Circle adding some Foam Squares to the back side of the Scalloped Frame to adhered it to the Card Panel once it was ready!!  
I also colored some of the Images and Parts of the Images with Shimmer Pen to add some Sparkle and Shine!! I also added some White Gel Pen Highlights too!!
For the Card Panel I Stamped the NEW Christmas Roundabout Image twice onto the bottom of the Card Panel using my MISTI Stamping Tool in TE Sea Salt Ink!! I LOVE the tone on tone stamping look!! 

Then I Stamped and Embossed the Sentiment from the Stamp Set in Versa Fine Black Onyx Ink and Embossed with WoW Embossing Clear Gloss Powder!! I added some Picket Fence and Black Soot Distress Paint Splatters!! Then I added 3 Large Snowflake Sequins and 3 Iridescent Jewels to the Center of the Snowflakes!! 
LOVE the way it turned out!!
THANKS SO MUCH for stopping by today!! I hope you feel INSPIRED and are as EXCITED about the Holiday's as I am!! I'm looking forward to just hanging out and spending some time with my Boys!! I've MISSED them and I think they're looking forward to the BREAK from wearing their Masks ALL DAY EVERYDAY!! 
Have a FABULOUS WEEKEND!!

COUNTRY HUGS-N-KISSES
LARISSA   ðŸ’—

Friday, November 16, 2018

Paper Sweeties November Release Rewind!! =)

Pin It
Paper Sweeties DT

            HELLO CRAFTY FRIENDS!! 

I'm here for the Release Rewind of the 
November 2018 *NEW* Paper Sweeties Product Release!! 
Here's a look at the NEW Products: 


Debbie Marcinkiewicz – Paper Sweeties

THANKS SO MUCH for stopping by and I hope you Have a FABULOUS WEEK!!
I'm also linking up

COUNTRY HUGS-N-KISSES
LARISSA    =)

Friday, December 16, 2016

Sweet Sleepy Fox Card with Newton's Nook Designs!! =)

Pin It
Newton

HELLO!! 
I'm up on the Newton's Nook Designs Blog today to share this sweet little fox card!!  I created a sweet little scene using the Sleepy Fox and Tree images from the Fox Hollow Stamp Set and trimmed them out using the coordinating Fox Hollow Die Set!! I  also created a sweet little Nest of Branches for the Fox to sleep on using the Branch image from the Holiday Tweets Stamp Set!! Then I added some Glitter for the Snow and used some Distress Inks for a BEAUTIFUL Evening Sky to finish off my Lovely Scene I added some Acrylic Paint Splatters and some Sequin Snowflakes with some Honey Bee Stamps Adhesive Gems for the Centers!! The Sparkle and Shine in real life is SO BEAUTIFUL!! I also Die Cut a Lawn Fawn Background Die for the Base of my Card and I LOVE the way it Finishes of the Design with the Stars and Snow Flakes!! I hope you LOVE it as mush as I do!!?? 
 

Today is the LAST day to enter our Inky Paws #38 Color Challenge!

You only have until Midnight tonight (Friday, December 16th) to enter our current Inky Paws Challenge!  To enter, all you need to do is create a card or project using a Teal, Red, White and Green and NND products!
 
The winners of this challenge will get a $10 gift card to our shop! You can view full details and link up your card to our Inky Paws Challenge on this post.
 
If you don't own a NND stamp set yet you can still play along - just download and use one of the digital freebies on our freebies page.


THANKS SO MUCH for stopping by today and I hope you have a FABULOUS WEEKEND!!
I'm also linking up to the Simon Says Stamp Monday Challenge: Let There Be Snow!!
COUNTRY HUGS-N-KISSES
LARISSA   =)