Showing posts with label Snow Angel Puppy. Show all posts

Friday, December 10, 2021

Shaped Snow Angel Gift Tags w/ Newton's Nook Designs!!

Pin It
HELLO CRAFTY FRIENDS!! 
I'm up on the Newton's Nook Designs Blog today to share a Set of SWEET Shaped Snow Angel Gift Tags and Pillow Boxes for some SPECIAL Holiday Gifts!! Think Gift Cards, Jewelry, Sweet Treats the possibilities are ENDLESS!! 

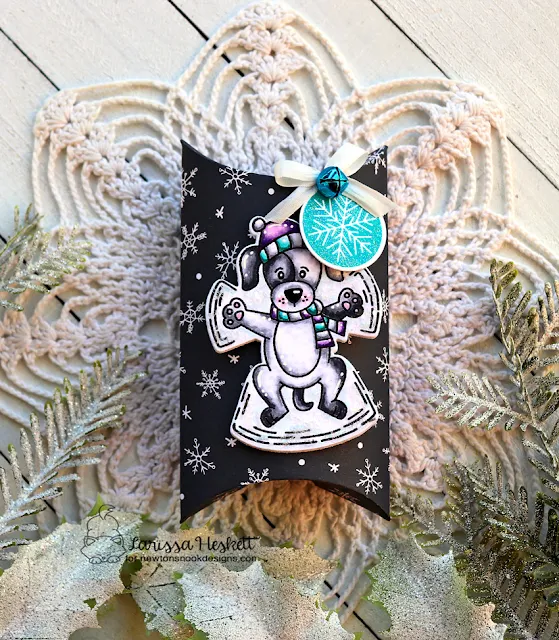
I Started by Die Cutting the NEW Pillow Box Die from Trinity Stamps!! These are SO EASY to create and a PERFECT way to use up some of your FAVORITE Patterned Papers!! 
(TIP: 6x6 Papers are too SMALL to use with this Die, so you'll need 6x8 or larger) 

I'm using Two of my NEW FAVORITE Winter Sets from 
Newton's Nook Designs
 called the Snow Angel Newton Stamp Set along with the coordinating Snow Angel Newton Die Set along with the Puppy Snow Angel Stamp Set and the Puppy Snow Angel Die Set for my Focal Images and paired it with a couple other Sets to finish off the Designs!!
 I Started by Stamping and Embossing the Image, using Versa Fine Black Onyx Ink and Embossing with WoW Clear Gloss Embossing Powder!! Then I used Copic Markers to Color in the Image!! 
Newton: E40, E43, E47 & E99      
Cheeks, Inside of Ears and Paw Pads: R11      
Hat & Scarf: N0 & N3   V00, V15 & V09    
BG10, BG45 & BG49     
Then I used the NEW coordinating Snow Angel Newton Die Set to Die Cut the Image out!! I added some White Gel Pen Details to the Image and then added some Ultra Bond Adhesive Pen to areas of the Ground around the Image and applied some Vintage Glass Glitter for the look of Snow Glittering in the Sunlight!! Then I used the same Snow Angel Newton Die Set to Create my Shaped Gift Tag!! I Scored a Piece of Cardstock and Folded it, then placed the Snow Angel Newton Die Near to Top of the Fold in the Cardstock, leaving some of the Image above the Fold Line and ran it through my Die Cutting Machine!! Then I had a Shaped Gift Tag that I was able to adhere the Colored Image to using some Ultra Bond Adhesive!!
I wanted to add a To: and From: Tag, so I Stamped and Embossed the Snowflake Image from the Jolly Tags Stamp Set and then Die Cut it out using the coordinating Tags Times Two Die Set!! I Stamped with WoW Clear Embossing Ink and Embossed with WoW Persian Indigo Glitter Embossing Powder!! SWOON!! I just LOVE the POP of both Sparkle and Color this Little Tag adds to the Package!! I finished it off with a White Silk Bow and a Metallic Mini Jingle!! Then I Stamped and Embossed the "Warm Holiday Wishes" Sentiment from the NEW Snow Much Cheer Stamp Set with Versa Mark Ink in Black Onyx and WoW Clear Gloss Embossing Powder on the inside of the Shaped Gift Tag!! 
Just makes me HAPPY!! 

For my Second Project again I'm using the NEW Pillow Box Die from Trinity Stamps!! 

I Started by Stamping and Embossing the Image, using Versa Fine Black Onyx Ink and Embossing with WoW Clear Gloss Embossing Powder!! Then I used Copic Markers to Color in the Image!! 
Puppy: N0, N3, N5 & N8      
Cheeks, Inside of Ears and Paw Pads: R11      
Hat & Scarf: N0 & N3   V00, V15 & V09    
BG10, BG45 & BG49     
Then I used the NEW coordinating Puppy Snow Angel Die Set to Die Cut the Image out!! I added some White Gel Pen Details to the Image and then added some Ultra Bond Adhesive Pen to areas of the Ground around the Image and applied some Vintage Glass Glitter for the look of Snow Glittering in the Sunlight!! Then I used the same Puppy Snow Angel Die Set to Create my Shaped Gift Tag!! I Scored a Piece of Cardstock and Folded it, then placed the Puppy Snow Angel Die Set Near to Top of the Fold in the Cardstock, leaving some of the Image above the Fold Line and ran it through my Die Cutting Machine!! Then I had a Shaped Gift Tag that I was able to adhere the Colored Image to using some Ultra Bond Adhesive!! 
I wanted to add a To: and From: Tag, so I Stamped and Embossed the Snowflake Image from the Jolly Tags Stamp Set and then Die Cut it out using the coordinating Tags Times Two Die Set!! I Stamped with WoW Clear Embossing Ink and Embossed with WoW Totally Teal Glitter Embossing Powder!! SWOON!! I just LOVE the POP of both Sparkle and Color this Little Tag adds to the Package!! I finished it off with a White Silk Bow and a Metallic Mini Jingle!! Then I Stamped and Embossed the "Merry Christmas" Sentiment from the NEW Snow Much Cheer Stamp Set with Versa Mark Ink in Black Onyx and WoW Clear Gloss Embossing Powder!! on the inside of the Shaped Gift Tag!!
Just makes me HAPPY!! 

THANKS SO MUCH for stopping by today!! I hope I've INSPIRED you today on a few different ways to use your FAVORITE Images to create Shaped Tags for some SPECIAL Holiday Gifts!! 
Have a FABULOUS WEEKEND!! 

COUNTRY-HUGS-N-KISSES
LARISSA ❄

Wednesday, November 17, 2021

Newton's Nook Designs November Release 2021 ~ Snow Angel Newton, Snow Angel Puppy & Roll with It!!

Pin It
Newton's Nook Designs November Release 2021
HELLO CRAFTY FRIENDS!!
 
I'm here with Day 3 of the 
Today we're showcasing the NEW "Snow Angel NewtonStamp Set + coordinating Snow Angel Newton Die Set,  "Snow Angel Puppy" Stamp Set + coordinating Snow Angel Puppy Die Set and the "Roll with It" Stamp Set!! 

Let's take a look at the AWESOME NEW Products!!
Snow Angel Newton Stamp Set and coordinating Snow Angel Newton Die Set by Newton's Nook Designs
Snow Angel Puppy Stamp Set & coordinating Snow Angel Puppy Die Set by Newton's Nook Designs
Roll with It Stamp Set by Newton's Nook Designs
How ADORABLE are the NEW Stamps!! SQUEAL!! I just LOVE them as making Snow Angels has ALWAYS been one of my FAVORITE activities with my Boys, Nieces and Nephews!! Some of the BEST Memories are made while creating Snow Angels!! 
For my First Card I wanted to create a FUN Spinner Card!! I LOVE to create Interactive Cards especially for the Holidays/Birthdays and I thought this Image would make for a FUN Spinner Card Design!! I Started by Stamping and Embossing the Image, using Versa Fine Black Onyx Ink and Embossing with WoW Clear Gloss Embossing Powder!! Then I used Copic Markers to Color in the Image!! 
Newton: E40, E43, E47 & E99      
Cheeks, Inside of Ears and Paw Pads: R11      
Hat & Scarf: N0 & N3   V00, V15 & V09    
BG10, BG45 & BG49     
Then I used the NEW coordinating Snow Angel Newton Die Set to Die Cut the Image out!! I added some White Gel Pen Details to the Image and then added some Ultra Bond Adhesive Pen to areas of the Ground around the Image and applied some Vintage Glass Glitter for the look of Snow Glittering in the Sunlight!! 
Then I worked on the Card Panel Inking with Distress Oxide Ink in Salvaged Patina!! I added some Water Splatters for some Texture and then let the Panel Dry completely!! Once Dry I Die Cut the Large Circle in the Panel after adhering it to a Scalloped Rectangle Frame from the Frames and Flags Die Set!! I Die Cut it from some of the NEW Coffee House Stories Patterned Paper!! Then I Stamped and Embossed several of the Snowflake Images using Versa Mark Ink and Embossed them with some WoW Embossing Bright White Embossing Powder and Heat set them!! I added some Trinity Stamps Fairy Rocks Rhinestones to the center of some of the Snowflakes for some added Sparkle!! Then I Stamped the Sentiment using Distress Ink in Salvaged Patina and Embossed with WoW Clear Gloss Embossing Powder!! I sandwiched 2 of the Snow Angel Newton Images together (the One I Colored and another I Die Cut from some White Cardstock) with a Piece of Clear Jewelry String in between and then adhered the Top and the Bottom of the Clear Jewelry String behind the Scalloped Frame using some Double Sided Adhesive, making sure the Image was centered in the middle of the Circle Window opening!! I adhered Foam Tape to the back of the Scalloped Frame and then adhered it to the Cardbase lining up the Circle Window openings!! I just LOVE how this turned out and think it would be SO FUN to create an entire Set of these Cards to make for a SPECIAL Teacher, Boss, Coworker of Friend for the Holidays!! EVERY one can use Thank You Cards in their Stash and these are SURE to Bring a SMILE to the recipients Face!! 
For my Second Card I wanted to create a CAS Card using a FUN Action Wobble Spring to make the Snow Angel Puppy Move as though he's creating the Snow Angel in the Snow on the Card Panel!! I Started by Stamping and Embossing the Image, using Versa Fine Black Onyx Ink and Embossing with WoW Clear Gloss Embossing Powder!! Then I used Copic Markers to Color in the Image!! 
Puppy: N0, N3, N5 & N8      
Cheeks, Inside of Ears and Paw Pads: R11      
Hat & Scarf: N0 & N3   V00, V15 & V09    
BG10, BG45 & BG49     
Then I used the NEW coordinating Snow Angel Newton Die Set to Die Cut the Image out!! I added some White Gel Pen Details to the Image and then added some Ultra Bond Adhesive Pen to areas of the Ground around the Image and applied some Vintage Glass Glitter for the look of Snow Glittering in the Sunlight!! 
Then I worked on the Card Panel Inking with Distress Oxide Ink in Salvaged Patina!! I added some Water Splatters for some Texture and then let the Panel Dry completely!! Then I Stamped the Sentiment using Distress Ink in Salvaged Patina and Embossed with WoW Clear Gloss Embossing Powder!! Then I adhered the Card Panel to a Scalloped Rectangle Frame from the Frames and Flags Die Set!! I Die Cut it from some of the NEW Coffee House Stories Patterned Paper!! Then to finish off the Design I added some more Ultra Bond Adhesive Pen to areas of the Ground around the Image and applied some more Vintage Glass Glitter for the look of Snow Glittering in the Sunlight!! I adhered an Action Wobble Spring to the Back Side of the Snow Angel Puppy Image and adhered it to my Card Panel!! 
SQUEAL!! This is another FUN Design PERFECT for sending someone a SMILE!! 

Would you like to win theSnow Angel NewtonStamp Set or theSnow Angel PuppyStamp Set!!?? 

We will choose ONE lucky winner for each stamp set!!

Here's how to win: Comment on the NND blog and Design Team blogs (see list below)! The winner will be chosen at random from the collective reveal posts. Make sure to check out each of their blogs and comment for your chance to win. You will not know which blog has been chosen so the more you comment on the better your chances are of winning! You have until Wednesday November 17th at 9pm ET to comment  -- winners will be announced on the blog post on Thursday, November 18th. 

Check out all the awesome Design Team Blogs below to enter:

Newton's Nook Designs

Ellen Haxelmans

Tina Herbeck

Larissa Heskett

Samantha Mann

Zsofia Molnar

Maria Russell

Farhana Sarker

Tatiana Trafimovich

Samantha VanArnhem

Amanda Wilcox


THANKS SO MUCH for stopping by today!! Make sure to leave me comments ALL Week for your chance to WIN!! I read EVERYONE and they MEAN more to me than you'll ever know!! 
 Make sure to check out the Newton's Nook Designs Blog on Thursday, November 17th to see if you're one of the LUCKY Winners!! Then come back tomorrow to see another Project I've made using the NEW "Roll with It" Stamp Set!! 
Have a FABULOUS WEEK!!

LARISSA HESKETT ❄