Hello Crafty Friends!!
I'm here for the 9th Annual Deck the Halls with Inky Paws Blog Hop with Newton's Nook Designs!! I just LOVE this time of year and ALL of the Amazing Projects that can be made for those Holiday Gifts you're giving!! I've created a STUNNING Christmas Card and coordinating Gift Tag for today!! SWOON!! Let's get started!!
 I'm using one of my FAVORITE Winter Sets from
Newton's Nook Designs called the Poinsettia Blooms Stamp Set along with the coordinating Poinsettia Die Set for my Focal Images and paired it with a couple other Sets to finish off the Designs!!
I'm here for the 9th Annual Deck the Halls with Inky Paws Blog Hop with Newton's Nook Designs!! I just LOVE this time of year and ALL of the Amazing Projects that can be made for those Holiday Gifts you're giving!! I've created a STUNNING Christmas Card and coordinating Gift Tag for today!! SWOON!! Let's get started!!
 I'm using one of my FAVORITE Winter Sets from
 Newton's Nook Designs called the Poinsettia Blooms Stamp Set along with the coordinating Poinsettia Die Set for my Focal Images and paired it with a couple other Sets to finish off the Designs!!
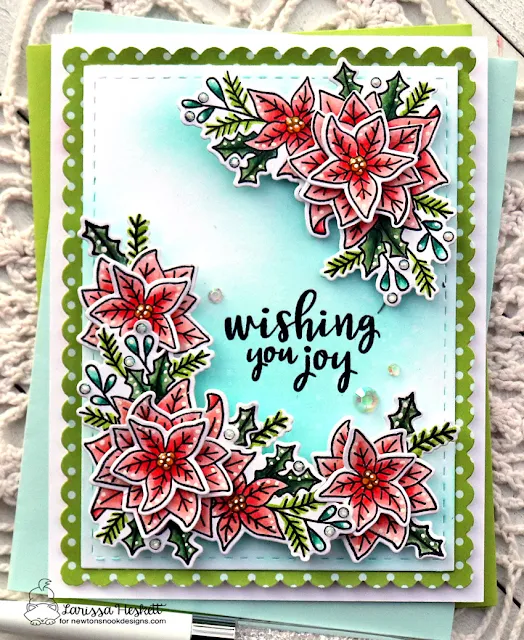
I Started by Stamping and Embossing several of the Poinsettia Blooms Images!! I LOVE dimension, so I Layered several of the Images together then I added some of the individual Holly Leaves and Pine Sprigs to finish off the Design!!
I Colored with Copic Markers!! Coral: R00, R22 & R32 Yellow: Y11 & YR23 Green: YG03 Dark Green: YG61, YG67 & G18 Turquoise: BG72, BG75 & BG79
I Die Cut ALL of the Images out using the coordinating Poinsettia Die Set!! I added some White Pen Highlight Details and some Glossy Accents to the Center of the Poinsettia Centers and Tonic Studios Blizzard Glitter Drops to the Berries!!
I Die Cut ALL of the Images out using the coordinating Poinsettia Die Set!! I added some White Pen Highlight Details and some Glossy Accents to the Center of the Poinsettia Centers and Tonic Studios Blizzard Glitter Drops to the Berries!!

For the Card Panel I Inked with Salvaged Patina Distress Oxide Ink and then added some Water Splatters for some Texture!! I Stamped and Embossed the "Wishing You Joy" Sentiment and then adhered the Layered Poinsettia Blooms to the Card Panel using Foam Tape!! A few Trinity Stamps Fairy Rocks Rhinestones frames the Sentiment and adds some Sparkle!! I wanted even more Sparkle so I added some Tonic Studios Midas Touch Glitter Pen to ALL of the Poinsettia Blooms!! The Gold Glitter adds such a STUNNING finish when the Card is moved in the Light!! Then I adhered the Card Panel to a Frames and Flags Scalloped Die Cut from some Patterned Paper!! I adhered the entire Panel onto an A2 White Cardstock Cardbase and my Card is ready to Send to someone SPECIAL!!
For the Coordinating Tags I've used the Same Poinsettia Blooms Images that I layered together just like on my Card only this time I've adhered it to a Fancy Edges Tag Die Cut!! I Die Cut one from White Cardstock that I inked with Salvaged Patina Distress Oxide Ink and then I Stamped and Embossed the Sentiment "Tis' the Season" from the Stamp Set!! I added some Trinity Stamps Fairy Rocks Rhinestones for some Sparkle and then Die Cut another Fancy Edges Tag Die from some Patterned Paper!!
I wanted to add a To: and From: Tag, so I Stamped and Embossed the Image from the Jolly Tags Stamp Set and then Die Cut it out using the coordinating Tags Times Two Die Set!! Again I Die Cut another Tag from the same Patterned Paper to add another layer and I just LOVE the way it turned out!! I finished it off by adding it to my Package with some Lawn Fawn Twine that I Curled and then topped it off with a Bow using the same Twine!!


BONUS PROJECT:
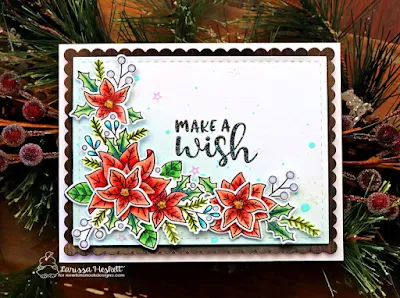
I LOVE the Poinsettia Blooms Stamp Set and ALL of the different ways that you can use it!! It's such a Versatile Set to add to your Stash, whether you're using it for Holiday Cards, Winter Birthday Cards or Winter Anniversary Cards but it can also be used for Gift Tags, Missing You Cards, Thinking of You Cards, or Sympathy Cards just by changing out the Sentiment!! Here's a Winter Birthday Card I've created using several of the same Products!! Just a different Layout Design and Color Combo!!


I started by Stamping and Embossing the Images from the Poinsettia Blooms Stamp Set!! I colored all those lovely blooms from the set using Copic Markers in shades or Red: R00, R32, & R39 Green: YG23 & YG25 YG61, YG63 & YG67 and Turquoise: BG72, BG75 & BG79 and Die Cut them out with the coordinating Poinsettia Blooms Die Set, layering them to create a Gorgeous Layered cluster of flowers in the Left Hand corner of my card!! I also added in some Berries and Boughs from the Winter Birds Stamp Set and cut them out with the Winter Birds Die Set to add more elements to the floral clusters!! For my Card Base I added some Tumbled Glass and Cracked Pistachio Distress Inks and then I mixed some Tumbled Glass and Cracked Pistachio Distress Paint together and added some Splatters to add some Dimension!!
I Stamped and Embossed the "Make a Wish" sentiment from the Birthday Essentials Stamp Set to turn this card into a Winter Birthday Card!! I wanted the Sentiment to SPARKLE so I used some WoW Neutral Shimmer Glitter Embossing Powder!! Its hard to see in the Photos, but in real life that little addition of adds a TON of Beauty to this Card!! If you are still creating Christmas cards, this would make a stunning Holiday Card too. Just add in a Holiday sentiment instead!! I framed the lovely floral panel using the scallop edged frame from our Frames & Flags Die Set!! To finish off the Design and add even MORE SPARKLE, I added some Tonic Studios Blizzard Glitter Drops (BONUS it matches the Glitter in the WoW Embossing Powder) to ALL of the Berries and then I added some Sunrise Glitter Drops to the Poinsettia Flower Centers!! A few Pretty Pink Posh Iridescent Star Sequins scattered around Finishes off the Design!!
On the INSIDE of the Card, I added some more Distress Ink and Distress Paint Splatters along with a second sentiment from the Birthday Essentials Stamp Set also Embossed with the WoW Neutral Shimmer Glitter Embossing Powder!! A few more Iridescent Star Sequins finishes it off!!


Enter to WIN!! Deck the Halls with Inky Paws Hop Prizes!!
We will be choosing two lucky winners to win a $25 store credit for Newton's Nook Designs online shop! To enter, just leave comments on the Design Team Member and Guest blogs (see list below)! Two winners will be chosen at random from the collective blogs in the blog hop. Make sure to check out each of their blogs and comment for your chance to win. You will not know which blog has been chosen so the more you comment on the better your chances are of winning! You have until Sunday, December 5th at 9 pm EST to comment -- winners will be announced on the NND blog on Monday, December 6th.
We will be choosing two lucky winners to win a $25 store credit for Newton's Nook Designs online shop! To enter, just leave comments on the Design Team Member and Guest blogs (see list below)! Two winners will be chosen at random from the collective blogs in the blog hop. Make sure to check out each of their blogs and comment for your chance to win. You will not know which blog has been chosen so the more you comment on the better your chances are of winning! You have until Sunday, December 5th at 9 pm EST to comment -- winners will be announced on the NND blog on Monday, December 6th.
Deck the Halls with Inky Paws Blog Hop List:
Newton's Nook Designs
Audrey Tokach
Thi Lam
Brenda Noelke
Channin Pelletier
Ellen Haxelmans
Tina Herbeck
Larissa Heskett <<You're Here>>
Samantha Mann
Zsofia Molnar
Maria Russell
Farhana Sarker
Tatiana Trafimovich
Samantha Van Arnhem
Amanda Wilcox
Audrey Tokach
Thi Lam
Brenda Noelke
Channin Pelletier
Ellen Haxelmans
Tina Herbeck
Larissa Heskett <<You're Here>>
Samantha Mann
Zsofia Molnar
Maria Russell
Farhana Sarker
Tatiana Trafimovich
Samantha Van Arnhem
Amanda Wilcox
THANKS SO MUCH for stopping by today, I hope I've INSPIRED You on different ways you can use the STUNNING !! Don't forget to hop along and leave comments for your chance to WIN!! I hope you have a FABULOUS WEEKEND!!
COUNTRY HUGS-N-KISSES
LARISSA 💗


