Showing posts with label Lawn Fawn. Show all posts

Thursday, September 29, 2022

S' Mores You Make my Heart Happy w/ Lawn Fawn Fanatics #133 Awesome Autumn Challenge!!

Pin It


HELLO CRAFTY FRIENDS!! 

I'm stopping in today to share a STUNNING Fall Card 
that can be used for ANY Occasions using LOTS of Lawn Fawn Products and joining in the FUN Lawn Fanatics Challenge #133 Awesome Autumn!! 

SQUEAL!! One of the things I LOVE most about Fall are the S' Mores around the Campfire and the Coolness of the Evening Air with the Smell of the Fall Harvest all around!! I hope this card transports you there and I hope you LOVE it as much as I do!!??
I Started by Die Cutting the SWEET Lawn Fawn Smiley S’mores Die Set from some Deco Foil Flock Sheets in White Latte!! I Adhered some Easy Cut Adhesive to a Piece of White Cardstock and then removed the Backing and Adhered some of the Deco Foil Flock in White Latte to the Adhesive and then ran it through my Die Cutting Machine to burnish the Flock into the Adhesive!! Then I removed the Backing Paper and Die Cut the Image!! To add some Texture and Color I Inked with some Gathered Twigs Distress Ink!! Resembles a REAL Fire Toasted Marshmallow Right!!?? 

Next I created my Card Panel using the Lawn Fawn Simple Stripes Diagonal Backdrop Die from some Distress Watercolor Cardstock!! Then I Inked with some Salvage Patina Distress Oxide and added some Black Soot Distress Paint Splatters for some Texture!!
I adhered the Images together to create my Fall Wreath!! I used the Lawn Fawn Magic Iris Fall Leaves Add-On Die and I LOVE all of the Bright Colors!! I used some Foam Tape behind some of the Die Cut Images to add some Dimension!! I LOVE the look of varying the Dimensions to add even more interest to the Scene!! BEAUTIFUL Right!!??
For even more Sparkle I added some Vintage Photo Distress Glitter to the Chocolate and some Rock Candy Glitter to the Graham Crackers!! SWOON!! I LOVE the added touch of Sparkle and Texture it adds!!
I Stamped and Embossed the "S’Mores" Sentiment from the 
Lawn Fawn S’more the Merrier Stamp Set and adhered it to the Card Panel with some Foam Tape for some Dimension!! Then I added some Trinity Stamps Bronze Baubles  to the Center of the Sunflowers for some added Shimmer and Dimension and I think the finish off the Sunflowers!! 
I used the NEW Deco Foil Happy Everything Adhesive Transfer to finish the Sentiment on the inside of the Card saying ” You Make My Heart Happy”!!
 If you missed my Post a couple weeks ago HERE you’ll want to check it out for MORE Ideas!! I Foiled again with the Rainbow Shattered Glass Deco Foil and that Ombre Color matches the Front of the Card Panel PERFECTLY!!

So there you have it a STUNNING Fall Card SURE to BRIGHTEN anyone's Day and by just changing the Sentiment could be used for ANY Occasion!! I had a BLAST Creating this Card and I'm EXCITED to I got to play along with the  Challenge!! It's been awhile since I've been able to just sit down and just PLAY!! 
THANKS SO MUCH for stopping by today, I HOPE I've INSPIRED you on ways to use those Products you may have laying around in your Stash and use them to create a SPECIAL Project!!
Have a FABULOUS WEEKEND!! 


COUNTRY HUGS-N-KISSES
LARISSA 🧡

Tuesday, April 6, 2021

Deco Foil Flocked Frog Projects w/ Therm O Web!!

Hello Crafty Friends!! 

I'm up on the Therm O Web Blog today to share some Deco Foil Flocked Frog Projects!! If you haven't given the Deco Foil Flock sheets a try yet, I'm certain you'll want to create with them after you see the Frog Projects I've made for today!! 
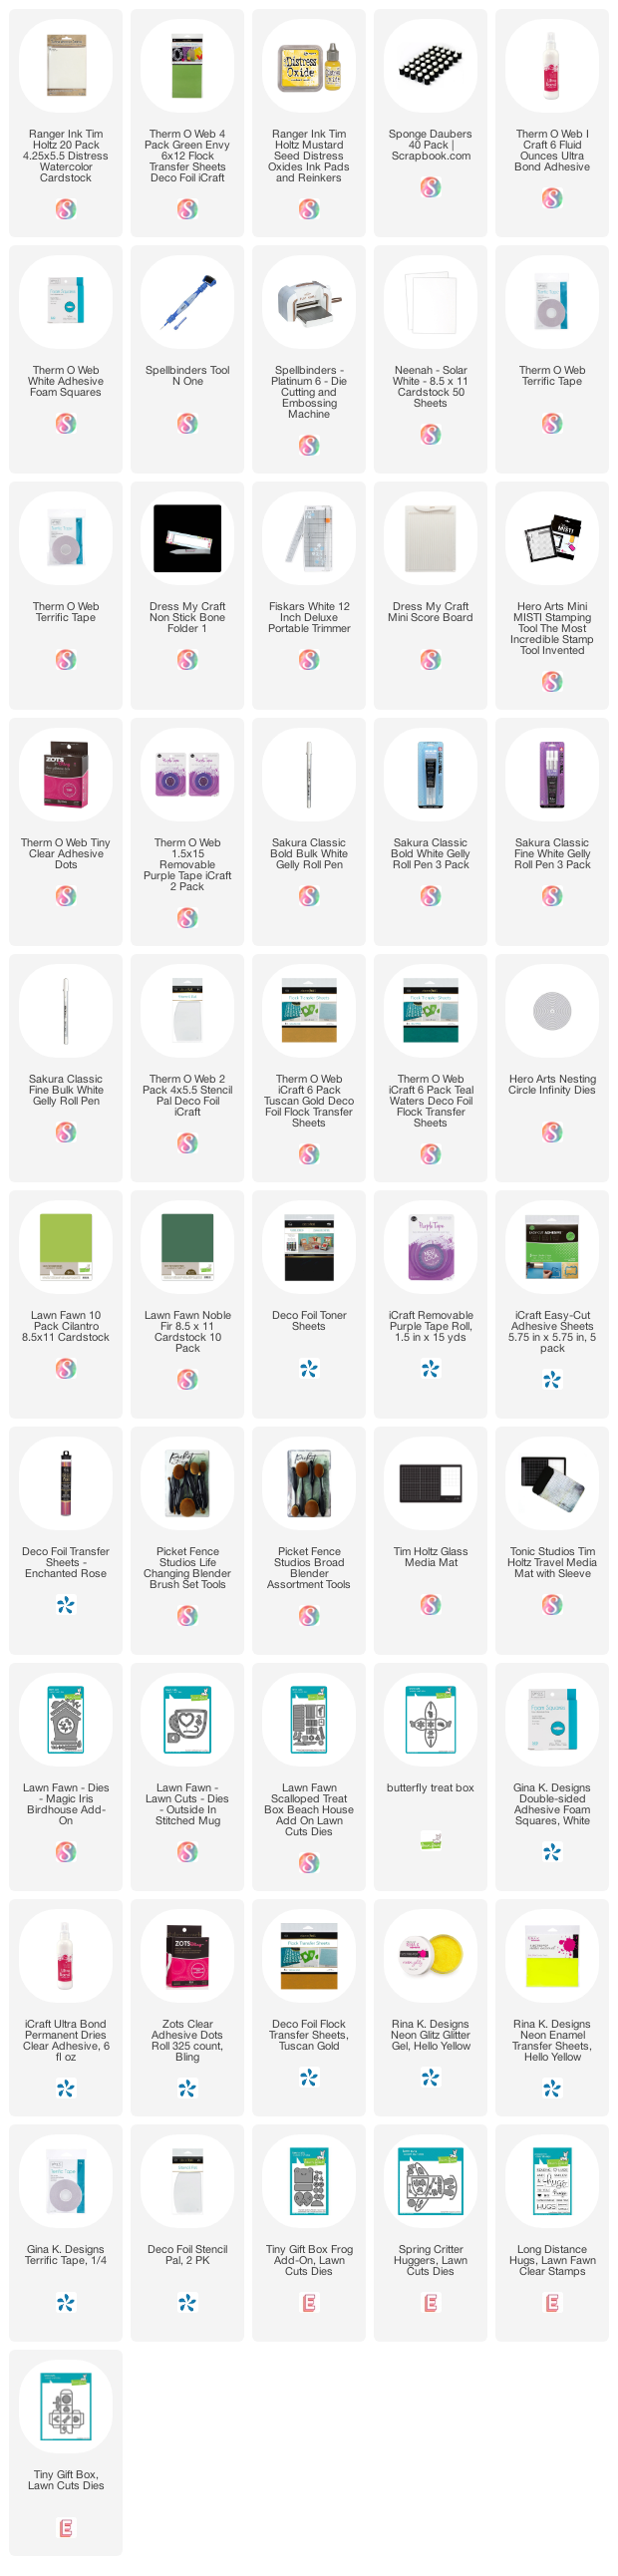
I Started by creating these ADORABLE Frog Tiny Gift Boxes!! They have so much personality!! Destined to bring a SMILE!!  I adhered all of the pieces of the Frog to my Tiny Boxes using some Ultra Bond Adhesive and then I added a SWEET little Daisy that was left over from my Daisy Coffee Mug Card HERE!! I Die Cut the Daisies from the Lawn Fawn Butterfly Treat Box Die Set from some White Cardstock!! 
For COMPLETE Photo Instructions please head to the 
For my Card I wanted to create a FUN Scene using the exact same Products for the Frogs as I used for the Tiny Gift Box Frogs!! I created the Large Frog using the Lawn Fawn Spring Critter Hugger Die Set!! I used a Small Lawn Fawn Circle Stackables Die Set for the Frog Eye and then Layered the same Eyes from the Tiny Gift Box Frog Add-On Die Set!! I LOVE how CUTE they turned out!! 
I also added the Daisies for a SWEET touch!!   
I hope I've INSPIRED you on ways to use Deco Foil Flock to make your Critters come to LIFE!!??  

If you create something please tag us on Social Media using the Hashtags #thermoweb #decofoil as we LOVE to see what you’re creating!! 
Also, JOIN us for even more FUN and INSPIRATION on our FB Page: Therm O Web Craft Room!!

THANKS SO MUCH for stopping by today and for your comments, they mean more than you know and I read every one of them!! Hope you have a FABULOUS WEEKEND!!

Larissa Heskett 🐸

S U P P L I E S
Below you will find links to the supplies used to create this project(s). Click the icon for the store underneath the thumbnails to start shopping. Where available I use compensated affiliate links at no extra cost to you. Your support helps me to keep bringing you new projects. 
Thank you!! 💓

I'm also linking up: 


Tuesday, November 17, 2020

Newton's Nook Designs November 2020 Winter Release ~ Snowfall Roundabout!!

Pin It
HELLO CRAFTY FRIENDS!! 
I'm here with Day 2 of the 
Today we're showcasing the NEW "Snowfall Roundabout" Stamp Set!! This set coordinates with the Previously Released Circle Frames Die and the Banner Trio Die Set!! 
Let's take a look at the AWESOME New Set!!

How SWEET is this New Snowfall Stamp Set!!?? I LOVE Snowflakes and the possibilities with this Set are ENDLESS!!?? I decided to create a STUNNING Card and Gift Tag/Bag Set to give away this Winter!! I LOVE that it's versatile so it can be used for ANY Occasion too!!  
Here's the STUNNING Card and Gift Tag/Bag Set that I've created using the NEW Snowfall Stamp Set!! I've paired it with some WoW Blue Glitz Embossing Glitter and some Sunny Studios & Lawn Fawn Patterned Papers!! SWOON!! LOVE how they turned out!! 
Let me walk you through the steps!! 
I Started by Stamping the NEW Snowfall Roundabout Stamp onto a Piece of TE Salt Water Taffy Cardstock using my MISTI Stamping Tool and WoW Embossing Ink!! Then I applied some WoW Blue Glitz Embossing Glitter!! I heat set it using my WoW Dual Speed Embossing Tool!!
Then I Die Cut the Image out using a Circle Die!! Next I Die Cut the Circle Frames Die from some Sunny Studio Stamps Colorful Autumn Pattern Paper!! I adhered the Embossed Circle onto the Scalloped  Frame using some Ultra Bond Adhesive and then added some of the Sunny Studios Pearls to the center of the Embossed Snowflakes again using Ultra Bond Adhesive!! 

I Stamped and Embossed the Sentiment from the NEW Snowfall Roundabout Stamp Set onto the same Sunny Studios Patterned Paper using WoW Embossing Ink and then Embossed using some WoW Bright White Embossing Powder!! Then I Die Cut it out using the coordinating Banner Trio Die Set!! I adhered it to the bottom of the Embossed Circle using some Foam Tape!! Then I adhered the Scalloped Circle to my Card Panel using some Foam Tape!! 

I Die Cut the Frames and Flags Scalloped Rectangle Frame from some Lawn Fawn Patterned Paper and then adhered the Card Panel to the Scalloped Rectangle Frame using some Ultra Bond Adhesive!! I adhered the Scalloped Rectangle to my White Cardbase using some Foam Tape and then paired it with a coordinating TE Salt Water Taffy Envelope!! I LOVE the way this Card turned out and can't you just imagine ALL of the different color combos!!?? SQUEAL!! I can see making FUN Gift Sets to give away as Gift Sets this Holiday Season!!
I Started by creating my Gift Bag from some Lawn Fawn Patterned Paper and then I got started on creating my coordinating Gift Tag!! I Started by Stamping the NEW Snowfall Roundabout Stamp onto a Piece of TE Salt Water Taffy Cardstock using my MISTI Stamping Tool and WoW Embossing Ink!! Then I applied some WoW Blue Glitz Embossing Glitter!! I heat set it using my WoW Dual Speed Embossing Tool!!

Next I Die Cut the Tag from the Embossed Image using the Fancy Edges Tag Die Set!! Then I Die Cut the Scalloped Tag Topper from some of the same Sunny Studio Stamps Colorful Autumn Pattern Paper using the Scalloped Border Die to create the Stitched Scalloped Edge!! I Heat Embossed the same Sentiment onto the Tag Topper using some WoW Embossing Ink and WoW Bright White Embossing Powder!! 
I adhered some Sunny Studio Pearls to the center of the Embossed Snowflakes using some Ultra Bond Adhesive and then I adhered the Scalloped Tag Topper!! To finish off the Design I created a Scrap Ribbon Bow and adhered it to the top of a White Mini Clothes Pin using a few Bling Zots Adhesive Dots!! Then I used the Mini Clothes Pin to adhered the Tag to the Gift Bag!! PERFECT for almost any Small Gift or a Gift Card this will be ready to use for an ANY Occasion Gift!! 

Would you like to win the “Snowfall Roundabout” Stamp Set!!?? This stamp set will be given away to ONE lucky winner!!

Here's how to win: Comment on the NND blog and Design Team blogs (see list below)! The winner will be chosen at random from the collective reveal posts. Make sure to check out each of their blogs and comment for your chance to win. You will not know which blog has been chosen so the more you comment on the better your chances are of winning! You have until Thursday November 19th at 9pm EST to comment  -- winners will be announced on the blog post on Friday, November 20th. 

Check out all the awesome Design Team Blogs below to enter:

Newton's Nook Designs

Ellen Haxelmans

Larissa Heskett

Samantha Mann

Zsofia Molnar

Maria Russell

Andrea Shell

Tatiana Trafimovich

Amy Tsuruta

Amanda Wilcox


THANKS SO MUCH for stopping by today!! 
Come back tomorrow for a look at the 
NEW "Snowman Roundabout" Stamp Set!!
Don't forget to check out the Newton's Nook Designs Blog on the 20th to see if you're one of the LUCKY Winners!! 
Have a FABULOUS WEEK!!

COUNTRY HUGS-N-KISSES
LARISSA   💗

Saturday, May 16, 2020

Paper Sweeties May 2020 Look Back Inspiration ~ Day3!!

Pin It

HELLO!! 

Welcome to Day 3 of the Paper Sweeties May 2020 Look Back Inspiration!! 
I've created some Teacher Thanks You Cards today using SEVERAL Sets!! My boys are CELEBRATING the Last Day of School today, so I thought it was the PERFECT time to share this idea for quick and AMAZING Teacher Thank You Cards!! 
Here's my Card for today!! 
I've used the SWEET Apple Image from the Homegrown Stamp Set and Stamped and Embossed the Image using Versa Mark and WoW Clear Gloss Embossing Powder!! I used my Zig Clean Color Real Brush Markers to Water Color the Apple and then I used the coordinating Homegrown Sweet Cuts Die Set to die cut the apple out!! I added a Coating of Glossy Accents for a Shiny and DELICIOUS looking Apple!! I also Stamped and Embossed the Flower Images for the Thinking of You Stamp Set and used the coordinating Thinking of You Sweet Cuts Die Set!! The Small Flower Image is from the I Pick You Stamp Set, I Fussy Cut it out after I colored them all with my Zig Markers!!  I used the Sweet Borders Sweet Cuts Die Set for the Scalloped Border, and Die Cut it from some Simple Stories Patterned Paper!! I LOVE how it grounds the Scene that I created with the Apple and Flowers!! 
 I added some Tonic Studios Aqua Shimmer Pen to the Flowers and some Morning Dew Nuvo Drops to the center of the Flowers!! I die cut some MFT Gingham Patterned Paper using the Lawn Fawn Pinked Rectangles!! I Stamped and Embossed the Sentiment form the Love You to Pieces Stamp Set and added some interest to the Background by splattering some Black Soot Distress Paint!!
Hope you feel inspired!!?? What better time than now to create some Thank You Cards for those AWESOME Teachers to show how much they are appreciated!! 

Please continue to hop along and visit the AMAZING Design Team blogs to be inspired by their AMAZING projects:
Debbie Marcinkiewicz – Paper Sweeties 
A MONTH LONG SPECIAL 
 BUY 3 DOLL AND/OR OUTFIT STAMP SETS 
GET ONE FREE!!  
(This sale does NOT include Sweet Cuts Dies) 
  Customer must leave name of FREE set they want in comment section of order form on the Paper Sweeties Website during Checkout!!
There's NO LIMIT to how many sets you can earn for FREE -
You'll get 1 FREE stamp set for every 3 that you Buy!! 


THANKS SO MUCH for stopping by and come back tomorrow for some more AWESOME Inspiration!! 

Have a FABULOUS WEEK!!

COUNTRY HUGS-N-KISSES
LARISSA 💖

Wednesday, April 1, 2020

Paper Smooches April #1 Challenge ~ Pastel!

Pin It
Challenge deadline: April 14th, 2018 at 11:59pm PST
Winners will be posted on April 16th. 
Next challenge begins April 15th.


HELLO!! 
I'm here with the NEW Paper Smooches April Challenge #1 ~ Pastel!! I LOVE using Pastel Colors especially during the Spring, so this is a FUN Challenge!! I wanted to create a Floral Bouquet Card that I could send to my Mom!! This has been the LONGEST we've gone without seeing them and its been ROUGH for all of us, especially my Kiddos!! 

I Started by creating the Card Panel Background Inking with Tumbled Glass Distress Oxide Ink!! I added some Water Splatters and let it Dry!! Then I took the Hot Dot stencil and placed it over the Background and Inked it Randomly using Tumbled Glass Distress Oxide Ink!! I LOVE the texture it adds to the Background!! I then added some Black Soot Distress Paint Splatters and some Tonic Studio Clear Glitter Pen Splatters for some Sparkle and set it aside to Dry!! 
I used SEVERAL Dies to create my Floral Bouquet, but look through your stash and see what you Dies you have!! It's really easy to create a Bouquet and just by mixing together the different Textures and types of Cardstock/Paper you use also adds to the Design!! I've used Lawn Fawn Shimmer Cardstock along with regular Cardstock and some Therm O Web Deco Foil Flock Sheets for the Greenery and some of the other Sprigs to add some extra Texture!! In real life its a GAME Changer!! 

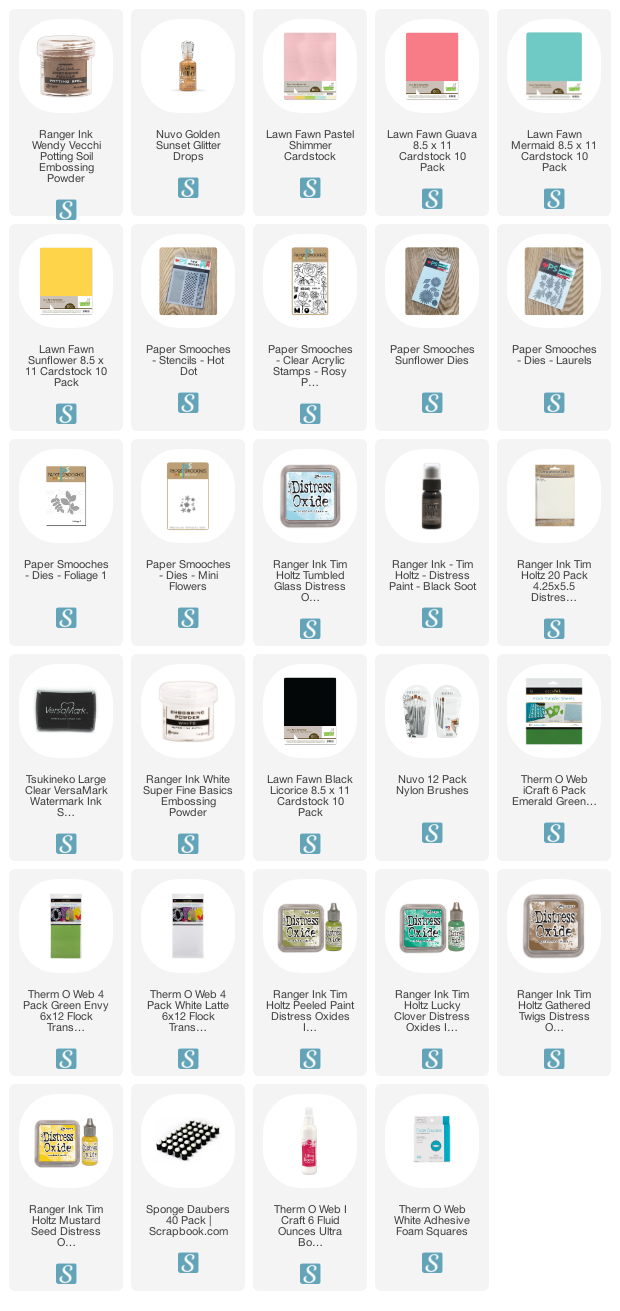
I used the Sunflower Dies and Die Cut it from some Lawn Fawn Cardstock (in Sunflower and Pastel Shimmer) inking the edges of the Die Cuts with Mustard Seed Distress Ink using and Ink Dauber for some Dimension!! For the Center I Die Cut from some Cardstock that I coated with some Versa Mark Ink and Embossed with some Ranger Potting Soil Embossing Powder and Sprinkled it with some WoW Metalic Gold Glitter Embossing Powder to add some Sparkle!! I then added some Glitter Nuvo Drops in Sunset to the holes for some Dimension!! I LOVE the way it turned out!! For the Leaves I Die Cut them from the Therm O Web Emerald Green Deco Foil Flock Sheets that I inked with some Lucky Clover Distress Oxide Ink for some Dimension!! Next I Die Cut the Flower Dies from Lawn Fawn Pastel Shimmer Cardstock and Regular Cardstock in Guava and Mermaid, Layering them together after Inking with Worn Lipstick, Ripe Persimmon and Peacock Feathers Distress Oxide Inks!! I used TE Peach Cardstock for the Centers of the Orange Flowers also Inking with Ripe Persimmon Distress Oxide Ink!! I added Studio Katia Pearls and some Iridescent Jewels for some Sparkle and Shine!! I Die Cut the Foliage 3 Dies along with Flower Dies and Laurel Dies from some Green Envy Therm O Web Deco Foil Flock Sheets and Inked with Peeled Paint Distress Oxide Ink and some White Latte Deco Foil Sheets and Inked with some Gathered Twigs Distress Oxide Inks!! I used both iCraft Ultra Bond Adhesive and Gina K Designs Foam Squares to adhere the Flowers on Card Panel!! I Like adding Dimension to make the Bouquet more realistic!! I Stamped and Embossed the Sentiment from Rosy Posy Dies onto some Black Cardstock with Versa Mark Ink and WoW Bright White Embossing Powder!! 

Here are the rules: 
  1. Create a NEW project (card, tag, layout, journaling page, etc).
  2. You must use at least one Paper Smooches stamps/dies or free digital images- please link to our website: http://www.papersmoochesstamps.com
  3. Post your project on your blog/social media platform and submit a direct link to your post/image using our linking system. 
  4. Please display our banner on your blog post (right click on the banner and save to your computer. If you have any trouble, I am happy to email the image to you, savannahland2 at comcast dot net)
  5. All skill levels are welcome!!! 
  6. You can enter as many times as you like! 
Here's what you are playing for: 3 winners

  • One winner will win a prize pack (pictured below)
  • One winner will receive a $25 Paper Smooches gift certificate
  • One winner will receive a $5 Paper Smooches gift certificate
Now its your turn!! I CAN'T WAIT to see what you create!! 
THANKS SO MUCH for stopping by today and I hope you have a FABULOUS WEEK!! 

COUNTRY HUGS-N-KISSES
LARISSA  💖


S U P P L I E S

Below you will find links to the supplies used to create this project(s). Click the icon for the store underneath the thumbnails to start shopping. Where available I use compensated affiliate links at no extra cost to you. Your support helps me to keep bringing you new projects. Thank you!!