Showing posts with label Fall. Show all posts

Thursday, November 18, 2021

Pumpkin Spice Latte Happy Everything w/ Trinity Stamps for the Fall/Winter Coffee Lovers Blog Hop!!

Pin It


HELLO CRAFTY FRIENDS!! 

I'm popping in to share another SWEET Card that I've made for the Fall/Winter Coffee Lovers Blog Hop using products from Trinity Stamps!! Trinity Stamps is a SUPER SPONSOR, and if you'd like to hop over to say a HUGE THANK YOU you can do so HERE!! 

I Started by Die Cutting the Card Panels using the Modern Embossed Rectangle Stack Die Set!! One from White Distress Watercolor Cardstock and one from some Tim Holtz Patterned Paper!! I Inked the White Distress Watercolor Cardstock Panel with some Salvaged Patina Distress Oxide Ink and and Masked of the Ground with some Tape and Inked with Gathered Twigs Distress Oxide Ink!! I added some Black Soot Distress Paint Splatters and Stamped and Embossed the Happy Everything Sentiment from the  A Sentiment for (almost) Anything Stamp Set to the Top of the Card Panel using Versa Fine Black Onyx Ink and WoW Embossing Powder!!

To create the Coffee Mug I used the Boo Brew Die Set and Die Cut it from some Doodlebug Design Gingham Patterned Paper!! I used the Orange on Orange Color to emulate a Pumpkin!! I Die Cut the Whipped Topping from some White Distress Watercolor Cardstock and Inked with Gathered Twigs Distress Oxide Ink for some Shading then I added some Distress Rock Candy Glitter for the look of Sugar Sprinkles!! I wanted to Stage the Scene and Dress my Coffee Cup up with some Fall Goodies!! So I Die Cut the other Images from the Boo Brew Die Set!! I Die Cut 2 of the Candy Sticks and Inked them to resemble Cinnamon Sticks!! Then I Die Cut 2 of the Leaves and Inked them in Peeled Paint and Lucky Clover Distress Oxide Inks!! I also Die Cut one of the Pumpkin Vine Tendrils and Inked it with Gathered Twigs and Walnut Stain Distress Oxide Inks!! I adhered them to the Mug and then added some Trinity Stamps Fairy Rocks Rhinestones to finish off the Design!! 
So there you have it a REALLY SWEET Fall Card for ANY Pumpkin Spice LOVER!! I hope I've INSPIRED you today and maybe put you in the MOOD for a Pumpkin Spice Latte of your own!! CHEERS to a FABULOUS Thursday!! 

THANKS SO MUCH for stopping by today it MEANS MORE than you KNOW!! I hope you have a FABULOUS WEEK!! Now go and CREATE something and LINK it up for SEVERAL chances to WIN!! 
I CAN'T WAIT to see what you Create!! 

COUNTRY HUGS-N-KISSES
LARISSA ðŸ’–

Tuesday, November 1, 2016

Paper Sweeties November 2016 Inspiration Challenge #49!! =)

Pin It

HELLO!!
I'm here to share the New Paper Sweeties November 2016 Inspiration Challenge #49!! I thought it would be FUN to create a Shaker Card!!
I've used the New Thankful and Thanks Stamp Sets and the Thankful Sweet Cuts Die Set along with the Sweet Borders Sweet Cuts Die Set!! I stamped the word THANKS form the Thanks Stamp Set all over the background of Card Base in the New Narwhal Lawn Fawn Ink!! Then I Stamped and Embossed the Pumpkin Image and added the Leaf and the Twig Images after using the coordinating Sweet Cuts Dies to Die Cut them out!! I Die Cut a Window and added Acetate to create the Shaker!! Some Sequins and the Stamped and White Embossed Sentiment from the Thanks Stamp Set finish it off!! I used the Die Cut Circle for the Base of my Tag and added the same Sweet Borders Sweet Cut Die Cut and the Stamped and Embossed Pumpkin, Leaf and Twigs!! I also added the THANKS Die Cut to the Inside of the Card!!
I LOVE LOVE LOVE the way they turned out and hope you do too!!?? 
I hope you'll check out the rest of the AMAZING Inspiration shared by the AWESOME DT!!
Debbie Marcinkiewicz – Paper Sweeties
November Guest Designer:  Lori Turner
THANKS SO MUCH for stopping by today and I hope you have a FABULOUS WEEK!! I CAN'T WAIT to see what you create!! =)
COUNTRY HUGS-N-KISSES
LARISSA   =)

Friday, October 7, 2016

Reversible Leaf Shrink Plastic Earrings w/ Newton's Nook Designs!! =)

Pin It

Newton
HELLO & HAPPY FRIDAY!!
I'm up on the Newton's Nook Designs Blog today!!
I'm sharing some FUN Reversible Earrings for today and I just LOVE LOVE LOVE the way they turned out!! If you follow me yo KNOW I LOVE to make Jewelry too and my Stamps make Jewelry making so FUN and EASY because you can use SO MANY of your Images to create DIY Jewelry too for Gifts with the Products you already have on hand and it truly is SO EASY to do!!
Here are the Earrings for today!! I've used the BEAUTIFUL LEAVES Stamp Set along with the coordinating BEAUTIFL LEAVES Die Set to create my Earrings!!
Beautiful Leaves Stamp Set by Newton's Nook Designs
   Beautiful Leaves Die Set by Newton's Nook Designs
Aren't they AWESOME with the Reversible Design!!?? I actually found out how to do this by complete accident!! I was wanting to see if you could Heat Emboss on Shrink Plastic so I decided to stamp and emboss the Design onto the Die Cut Shrink Plastic and then I added my Hero Arts Gold Embossing Powder when I went to heat emboss it and the piece shrunk it turned the Embossing into a FULL Die Cut covered in Embossing but on the other side the Design was still there beings I had used a Colored Ink to Stamp with rather than using Embossing Ink!! How AWESOME!!??  =)  So I decided to create Reversible Earrings and I just LOVE the look!! I have had SEVERAL Questions on how to do this Technique so I've made a Video to share!! YIPPEE!!


SQUEAL I'm SO EXCITED and I hope you'll give this a Try!! Like I said its SO EASY and you can use Products you already have on hand to create such FUN Pieces of DIY Jewelry for your Gift Giving Needs, plus if you have Littles in you life rather it be your own Kids or Nieces and Nephews or even Grandkids or just the Neighbors Kids this is also an AWESOME Project for them too!! They LOVE LOVE LOVE to watch the Shrink Plastic Melt and to have something that they can PROUDLY WEAR and SHARE that they made!! So there are TONS of ways to try out this Technique and you can create Bracelets, Key Rings or even just Embellishments for your Cards too it doesn't have to be just for Earrings!!  Part of the FUN for me is thinking outside of the Box and se what I can create!! =)
Also don't forget today is the LAST DAY to Play Along with our Newton's Nook Designs Inky Paws Challenge: HALLOWEEN!! For more info on how to play along just follow the Link!!
I CAN'T WAIT to see what you create!!   =)
Newton's Nook Designs Inky Paws Challenge #36 - Halloween Theme
THANKS SO MUCH for stopping by today and I hope you have a FABULOUS WEEKEND!!
COUNTRY HUGS-N-KISSES
LARISSA     =)

Saturday, October 1, 2016

Paper Sweeties October Inspiration Challenge #48!! =)

Pin It


Hello & HAPPY WORLD CARD Making Day!!
SQUEAL!! Today I'm here with Paper Sweeties for the New Paper Sweeties October Inspiration Challenge #48!! I've made a FUN Shaker Card and a Gift Tag!!
I CAN'T WAIT to share!!
I've used the New Thankful and Thanks Stamp Sets and the Thankful Sweet Cuts Die Set along with the Sweet Borders Sweet Cuts Die Set!! I stamped the word THANKS form the Thanks Stamp Set all over the background of Card Base in the New Narwhal Lawn Fawn Ink!! Then I Stamped and Embossed the Pumpkin Image and added the Leaf and the Twig Images after using the coordinating Sweet Cuts Dies to Die Cut them out!! I Die Cut a Window and added Acetate to create the Shaker!! Some Sequins and the Stamped and White Embossed Sentiment from the Thanks Stamp Set finish it off!! I used the Die Cut Circle for the Base of my Tag and added the same Sweet Borders Sweet Cut Die Cut and the Stamped and Embossed Pumpkin, Leaf and Twigs!! I LOVE LOVE LOVE the way they turned out and hope you do too!!??  =)
THANKS SO MUCH for stopping by and I CAN'T WAIT to see what you create for the Challenge!! Have a FABULOUS WEEKEND!!
COUNTRY HUGS-N-KISSES
LARISSA   =)

Friday, November 7, 2014

Thanksgiving Shaker Tag for Newton's Nook!! =)

Pin It

Hello!!
Happy Friday!! I can't believe the First week in November is already over and that THANKSGIVING is only three weeks away!! WOWOWOWOW!! Where does the time go!!? I'm up over on the Newton's Nook Blog today and I thought it would be FUN to create a Thanksgiving Shaker Tag!! I'm not sure about all of you, but Thanksgiving has ALWAYS been a Special Holiday for me!! From the time I was little we have ALWAYS spent it with our Family and my Grandma would have a Jar EVERY Year that we would write what we were Thankful for and then while we were eating we'd pass the Jar around and grab one of the tags out of the Jar and read it Aloud!! We do this until all of the tags have been read!! Its always been FUN to read them and to see what everyone is Thankful for!! I thought it would be Neat to make my own Tag for the Jar this year and I wanted it to be a shaker beings they have been so popular!! I've backed my tag with another Stitched Die Cut Tag that I cut from Kraft Cardstock and now I'll be able to write my message and have it ready for Jar!! =) I started by Die Cutting my Stitched Tag Base from some Kaiser Patterned Paper using a Paper Smooches Stitched Tag Die!! I then Die Cut the next smaller Paper Smooches Stitched Tag which is actually two pieces from both Oatmeal and Kraft Cardstock so I could layer them to create the base for my Shaker element!! I stamped the Pumpkin from the Love a Al` Carte Stamp Set and then paper pieced it and colored it in using my Colored Pencils and Gamsol!! I then die cut the Smaller Tag Die again two more times from some Double Sided Sticky Foam Paper and that will be the edge for my shaker tag!! I cut some acetate to place over my tag and then filled it with my Prima Clear Beads, some Glitter and some different Sequins!! Mini (2mm) Orange Sequins and some 4mm Gold Pretty Pink Posh Sequins as well!! I then Stamped my sentiment from the Simply Sentimental Stamp Set onto my Large Tag and then heat embossed it using Ranger Gold Embossing Powder!! I wanted it to POP alittle more so I stamped it again off setting it alittle and stamped it in Black Versa Fine Ink for a nice shadow!! I LOVE the way it turned out!! I stamped the Thanks and then added the Shaker Tag Element on top!! I stamped some of the Leaf images from the Falling for Autumn Stamp Set and then added Judikins Sticky Stuff Embossing Powder so I could add some Martha Stewart Glitter to them!! I fussy cut them out and added them to the top of my Tag along with a Fancy Pants Burlap Bow and some Ribbon and Burlap Twine from May Arts as my hanger!! I added a Button also threaded with Burlap Twine from May Arts and my tag was finished!! I LOVE it!!  =)
Falling into Autumn | 4x6 photopolymer Stamp Set | Newton's Nook Designs   Love a la Carte Stamp Set by Newton's Nook Designs  Simply Sentimental | 4x6 photopolymer Stamp Set | Newton's Nook Designs


Inky Paws Challenge #15 - Add a Little Sparkle - Newton's Nook Designs
Today is the LAST DAY to get inky with our Sparkle Challenge!
Our current Inky Paws Challenge ends Tonight at midnight CST (November 7th)!!
You can view full details and link up your card to our Inky Paws Challenge on this post!!

THANKS so much for stopping by today and I hope you have a Fabulous Friday/Weekend!! Don't forget to check back next week as we start the New Release Count Down for Newton's Nook Designs!! It will be the LAST Release of the Year!! Man does that seem WEIRD to Write!! You're not going to want to miss it!!

COUNTRY HUGS-N-KISSES
LARISSA   =)

Thursday, November 6, 2014

The Great Outdoors Blog Hop with PHP & Xyron!! =)

Pin It

Great Ourdoors Xyron Blog Hop


Hello!!
 Today is the fourth day of our Great Outdoors Co-Hop with Xyron, and if you missed the first three days, fear not, you can still take a hike over and see the projects you missed. Not only do we have some great projects to show you, but you can win some great products each day from Xyron. You should also hop over to the Xyron's blog each day as well,  so you can have a chance to win some great products from Paper House Productions!!

For my projects today I thought it would be FUN to show you how you could dress up your Table for either THANKSGIVING which is just a couple weeks away, or for a party that ANY one would enjoy!! I actually had my Boys in mind as we have an Event called Deer Camp each year and I KNEW they would LOVE this!! So I started by cutting the 6x6 Decorative Papers from the PHP Great Outdoors Mini Paper Pad!! I LOVE all of the designs in this pad!! =) There are SO many options!! I glued the edges of my paper strips to the back of the Bottles using my Xyron Glue Runner!! I then tied some Burlap String and added alittle Distress Glitter for some interest and my Bottles were done!! Add a Green Stripped Straw and these will be AWESOME Beverage containers!!

Outdoor Table Decor- Larissa Heskett

Outdoor Table Decor- Larissa Heskett

Outdoor Table Decor- Larissa Heskett

Outdoor Table Decor- Larissa Heskett

For my Place Cards I used the Stitched Rounded Rectangle Dies from Lil' Inker Designs and folded a piece of  cardstock then ran the die through with the top cutting edge above the Fold line so you end up with a Folded Double sided Rectangle after Die Cutting making the PERFECT base for my Place Cards!! I then cut the Decorative Paper into strips and ran it through using the same die then gluing it to the Place Card base using my Xyron Glue Runner!! I inked the edges using Distress Ink and added some Distress Glitter then stamped the Names using a Paper Smooches Alphabet Stamp Set!! I used Simon Says Dark Chocolate ink which was the perfect match!! I then added some Burlap String and my cards were finished!!

For my Gift Boxes I used the We R Memory Box Pillow Gift Box Punch Board and another piece of  patterned paper!! I left it at the 6X6 Size and I think its Perfect for a Party Favor Gift!! I then inked the edges and added one of the Great Outdoors Die Cut Stickers and some more Burlap String to finish it off!! So I hope you can see that decorating for ANY Occasion is as easy as having the PERFECT Collection of Products on hand!! Paper House Productions Papers and Stickers and the Xyron Glue sure made it EASY!!
Thursday Giveaway

Just comment on THIS post for your chance to win! Don't forget to come back tomorrow for some more great projects and another chance to win a great prize.

Now, just Hop on over to Xyron's blog to win some more great prizes, and make sure to like them on Facebook to keep up-to-date with all their fantastic products and events!

THANKS SO MUCH for stopping by today and I hope you have a FABULOUS WEEK!!

COUNTRY HUGS-N-KISSES
LARISSA  =)

Wednesday, October 29, 2014

Two Cards using PHP Die Cut Stickers!! =)

Pin It


Hello!!
I'm stopping by to share two cards I have created for you today!!
I'm up over on the Paper House Productions Blog today and this week we are focusing on our AWESOME Die Cut Stickers!! I thought it would be FUN to show you how to use them on your Cards!! They are BEAUTIFUL all on their own, but you can dress them up and make them POP even more!! I've made two cards for today!!
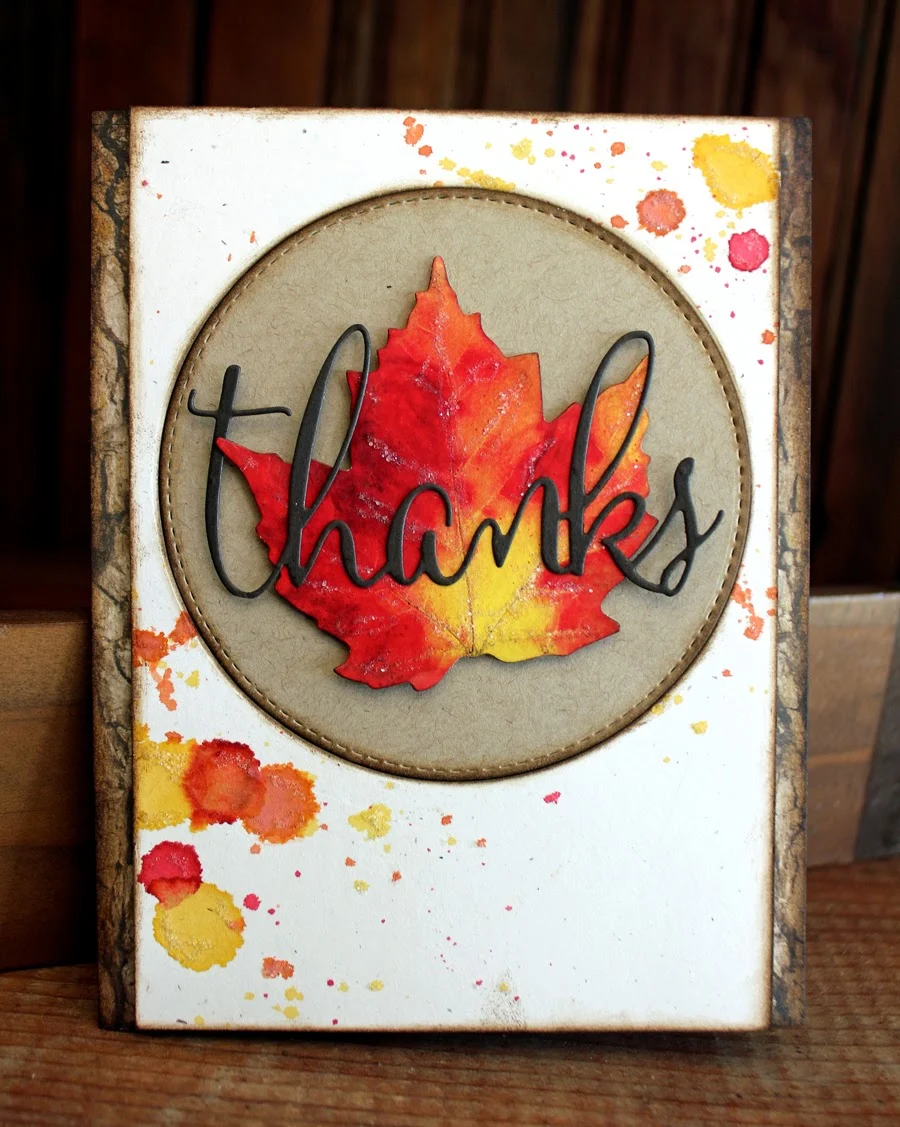
This first one I've used the BEAUTIFUL Bright Colored Leaf Die Cut and have added just alittle Distress Ink to the Edges of it and then some Rock Candy Distress Glitter for an added touch and I LOVE how it just REALLY Shines!! =)


I started by covering my Card Base with the Tree Bark Patterned Paper from the PHP Great Outdoors 6x6 Paper Pad!! I then cut a strip of Cream Cardstock and die cut a Stitched Circle then added a Kraft Stitched Circle Die Cut to adhere my Leaf using some Foam Tape!! I added a THANKS Die Cut and some Distress Ink Splatters to the edges of my Cream Cardstock for some added interest!! A little more Rock Candy Distress Glitter on a few of the Splatters finishes off my first card!!


For my second card I started with a Woods PHP Patterned Paper for my Card Base and then die cut a Stitched Circle from some Kraft Cardstock and inked the edges and added a Few Gold Splatters!! I added my Deer Die Cut using Foam Tape for added dimension!! Then an Out Doors Sticker to finish it off!! I hope I've given you some FUN Ideas on ways you can use and Dress up your PHP Die Cut Stickers!! For more AWESOME Inspiration I hope you'll check out the Paper House Production Blog where the DT will be sharing Project and Inspiration ALL Week!!
I'm also linking these up for the
Simon Wednesday Challenge Blog
This week is ANYTHING GOES!!  =)
THANKS SO MUCH for stopping by and I hope you have a Fabulous Week!!

COUNTRY HUGS-N-KISSES
LARISSA   =)

Monday, September 29, 2014

Sweet Pumpkin Coffee Cozy for the Coffee Lovers Bloghop!! =)

Pin It

CoffeeLoversBloghopBadge

Hello!!
I wanted to stop in and share the SWEET Little Pumpkin Coffee Cozy I made for the  Coffee Lovers Bloghop!! I LOVE creating with Felt and I knew I wanted to use Felt for my project today!! I started by die cutting the base for my Cozy using a Distressed Cream Felt and the Paper Trey Ink Coffee Cozy Die Collection!! I then die cut images from the New Halloween Icons Die Set from Paper Smooches!! I LOVE these Set Images and I die cut them from different Felt Colors!! I layered the different die cuts to create a SWEET Little Fall Scene!! I also have these Sweet Crate Paper Leaf Sequins in Metallic Gold and I thought they were the PERFECT addition to my Cozy!! I also added some Pretty Pink Posh Marshmallow Sequins that I colored using a Black Copic Marker!! Then I used a few Gold Seed Beads that I stitched in the centers of the Black Sequins using a Gold Embroidery Thread!! I inked the edges of all of the Felt pieces using some Black Versa Mark Ink!! I wanted an aged feel and I thought this added the look I wanted!! I can't wait to make more as Gifts and I HOPE you LOVE the way this turned out as much as I do!!


Papertrey Ink - Coffee Cozy Die Collection (set of 3)
http://www.papersmoochesstamps.com/Halloween_Icons_Dies_p/j3d-14-152.htm
I hope you'll stop by to see all of the AMAZING Creations that have been shared for the Coffee Lovers Bloghop Today, you'll be glad you did!! Plus if you have time to create something too, there are LOTS of chances to win!! =) 
THANKS SO MUCH for stopping by and have a Fabulous Week!!

COUNTRY HUGS-N-KISSES
LARISSA   =)