Friday, December 20, 2019

Christmas Card and Gift Bag w/ Newton's Nook Designs!!

Pin It
Hello Crafty Friends!!

 I'm up on the Newton's Nook Designs Blog today with this SWEET and EASY Gift Set 
                    for any of those last minute Cards/Gifts you may need to create!! 
So for my Projects today I've actually used some of the Scraps that I had left over from my Newton's Nook Designs EXCLUSIVE email Project!! If you're not signed up for that email Feature you can sign up HERE so you DON'T MISS OUT on another Feature!! NEW EXCLUSIVE Projects are shared each Tuesday!! 
I Started by Spraying the back side of the NND Ornament Stencil and then adhered it to my Card Panel and used Distress Inks with Ink Daubers!! I used Candied Apple, Spiced Marmalade, Wild Honey, Peeled Paint & Peacock Feathers!! Then I splattered it with Water Droplets for some Texture!! Then I used Distress Inks to added some Color around the Ornaments!! 
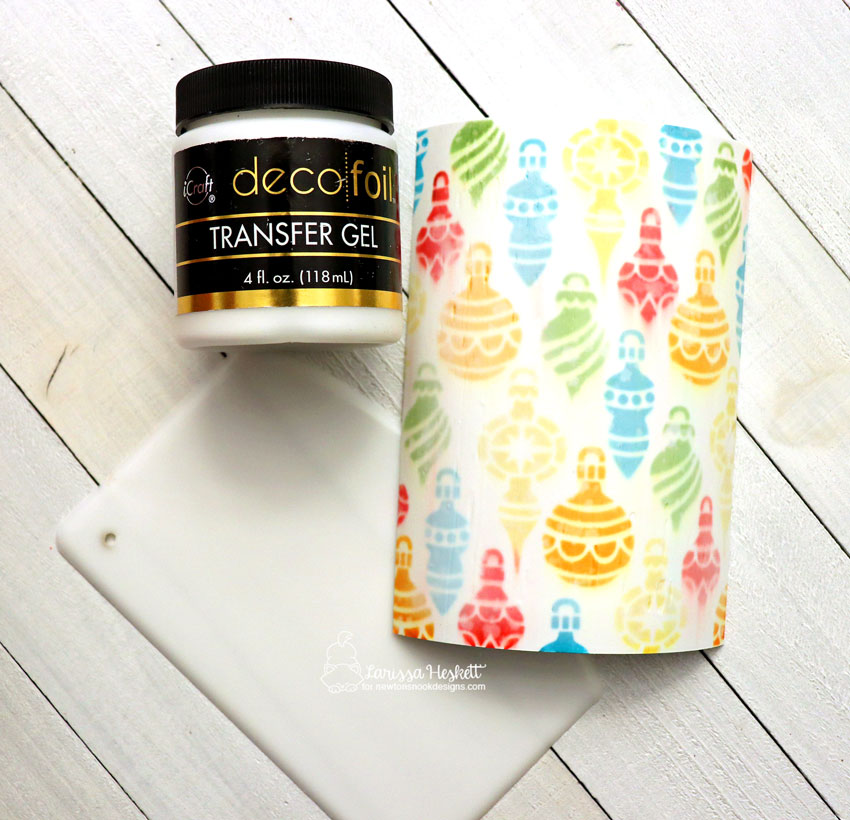
I repeated that same process on another panel!! Stopping with just the Inking of the Ornaments on the stencil!! Then I Layered a thin coating of Therm O Web Deco Foil Transfer Gel using my Stencil Pal!! Then set it aside to Dry!! 
 Once the Gel is Dry, this is what the Panel will look like!! I LOVE the look on its own too, but I wanted to use the Negative Therm O Web Brutus Monroe Gold Static Foil piece that I had left over from another project I created!! You can find that project HERE!! I ENJOY being able to share ways to MAXIMIZE your products and using those negatives and left over scraps are ALL part of that process!! Meaning from the same core products you can create 3 Cards and a Gift Bag!! 
WHOOP WHOOP!!  
Next I layered the Negative Foil piece over the top of the Stenciled Ornament piece and then ran it through my Laminating Machine!! Its hard to see in the Photo, but the Ornaments like like they are Glass 3D Ornaments and that Gold Static Foil is just STUNNING in real life!! SWOON!! This is one of my FAVORITE Techniques for using those left over Foiled Pieces!! I hope you'll give it a try as I KNOW you'll just LOVE the results too!! 
To create my Card I cut a 1 inch strip off the Side of the Stenciled Ornament Card Panel after adding some Black Soot Distress Paint Splatters!! Before Die Cutting the Panel I made sure to line up the pattern with my left over Negative Foiled Strip so that the Pattern would Line up SEAMLESSLY!! Then I adhered the Negative Foiled Strip to the back side of the Stenciled Card Panel lining up the Stenciled Design!! I then backed the Panel with some TE Oreo Cardstock and then Die Cut a NND Frames & Flags Die Cut Panel from some Lawn Fawn Paper Bag Cardstock!! I inked the edges with some Gathered Twigs Distress Ink!! For the Center of the Card I Die Cut the Frame from the NND Squares Framed Die Set also from some Lawn Fawn Paper Bag Cardstock and then added the layered Circles also from the same Die Set!! I Stamped and Embossed the Sentiment from the NND Holiday Fringe Stamp Set and inked the center with some Wild Honey Distress Ink to help make the Sentiment POP!! I added some of the Pine Leaves Die Cut from some TE Avocado Cardstock using the NND Pines & Holly Die Set!! I inked the edges using a combination of Pine Needles, Peeled Paint and Gathered Twigs Distress Oxide Ink!! Then added a Die Cut Cardinal from the NND Forrest Scene Builder Die Set from some TE Cherry Pop Cardstock!! I LOVE the way this card turned out and hope I've INSPIRED you to give these techniques a Try to use up ALL of those Scraps and leftover pieces!! 
I created a coordinating Gift Bag by using the same Techniques!! I just Die Cut the Tag using the NND Fancy Edges Tag Die and Die Cut the Stitched Circle from the NND Squares Framed Die Set!! I Stamped and Embossed the Sentiment and Inked the center using Wild Honey Distress Ink to help make it POP!! A few Pine Leaves were added and a BIG Red Bow finishes it off!! 

 I hope I've INSPIRED you today to use ALL of those leftovers!! Just look at the BEAUTIFUL Projects that await the SPECIAL recipient!!   
THANKS SO MUCH for stopping by and I hope you have a VERY FABULOUS & BLESSED CHRISTMAS WEEKEND!!

COUNTRY HUGS-N-KISSES
LARISSA   =)

Tuesday, December 17, 2019

Sing a Song of Snowflakes w/ Newton's Nook Designs + Holiday GIVEAWAY!!

Pin It
HELLO CRAFTY FRIENDS!! 

I'm up on the Newton's Nook Designs Blog today sharing this Wintery Scene Card!! I just LOVE Snowflakes and Music, so this Sentiment makes me HAPPY!! I KNEW I wanted to create a Scene using it and the SWEET Owl's Snuggled together seemed fitting for a Night Time background!! P.S Read all the way to the bottom to see how you can WIN a pretty AWESOME Holiday Giveaway!! 

I started by creating my Background!! I used Tumbled Glass Distress Ink to ink inside a Circle Mask I made!! Then I used the NND Music Stencil to Ink over the Tumbled Glass using Antique Linen!! To add some contrast I used Chipped Sapphire to ink around the edges of the Circle!! I Stamped and Embossed the sentiment from the Winter Birds Stamp Set, then Stamped and Embossed the Snowflakes also from that set using WoW White Embossing Powder!! I added some Picket Fence Distress Paint Splatters and then added some Tonic Studios Blizzard Nuvo Drops to the center of the Snowflakes!! ALL of these little details ADD to that Winter Night Feel!! 
I Stamped and Embossed the Images from the Love Owl-ways Stamp Set, and the Poinsettia Blooms Die Set. I Colored them in using Copic Markers!! 
I used the Forest Scene Builder Die Set for the Branches!! I inked the edges using Pumice Stone Distress Ink to make them POP!! I added the layered Poinsettia Blooms along with some of the Greenery to finish off the Poinsettia and added some Tonic Studios Nuvo Glitter Drops in Blizzard to the Berries!! I added Morning Dew Nuvo Drops to the Beaks, Feet and the center of the Poinsettia for some dimension!! I really LOVE how these sets compliment each other, but equally stand on their own!! 
SO MANY POSSIBILITIES!! 😉


THANKS SO MUCH for stopping by today!! I hope I've INSPIRED you!! Have a FABULOUS WEEK!!

Want to WIN this Holiday Giveaway worth over $85.00!!?? Here's how to WIN!! 
Enter Giveaway by: • Leaving a Comment both here and Instagram (https://www.instagram.com/larissaheskettdesigns/) • Tagging as many friends as you’d like for an extra entry • Following my Instagram Account (unfollowers will be ineligible for future giveaways) Giveaway Closes Dec. 24th 2019 @ 11:59 pm CST and winner will be posted and contacted!!

GOOD LUCK and HAPPY HOLIDAYS!! 💝

COUNTRY HUGS-N-KISSES
LARISSA   =)

Wednesday, December 11, 2019

SWEET Holiday Peppermint Latte w/ Paper Sweeties!!

Pin It

HELLO!!

It's a FUN & INSPIRATIONAL 25 Days with a NEW Project shared Daily!! 
You can find the Schedule Below!! 
Here's my project for today!!
I just had to create a Festive Cup of Peppermint Mocha Latte with a FULL Dollop of Cream!! YES PLEASE!! So YUMMY with Peppermint Sprinkles!! I used the Keep Calm and Drink Coffee Sweet Cuts to Die Cut my Cup from some Patterned Paper!! Then I Stamped and Embossed the "SWEET" Sentiment for a play on a Rea Runn Cup from the NEW Blessed Stamp Set!! Then for the Dollop of Cream I used the Frosting Image from the Cupcakes and Sprinkles Stamp Set and Die Cut it out using the coordinating Cupcakes and Sprinkles Die Set!! I Colored it with Copic Markers to match the Coffee Cup and make it alittle more Festive!! Then added some Morning Dew Nuvo Drops to the Sprinkles for some Dimension and Shine!! 
I wanted to add a SWEET Gingerbread Cookie and some Holly to add to the Holiday Feel and Stamped and Fussy Cut the Images from the Happy Holidays Planner Series Stamp Set!! I used Copic Markers to Color them in and added some Morning Dew Nuvo Drops to the Berries and the Bow and some White Gel Pens to finish off the Images!! I added the images to a For You Stitched Tag Die Cut and then adhered it to a Stenciled Panel and a Patterned Paper Cardbase that I put together ans I LOVE the way it turned out!! To finish off the design I used some Watermelon Seam Binding Ribbon, the Holly Leaves from the Meet Me Under the Mistletoe Sweet Cut Die Set Die Cut from some TE Avocado Felt and added a Red-n-White Twine Bow that I added a Mini Red Jingle Bell to using a Bling Zots Glue Dot!! I'm pretty sure this would make ANYONE SMILE this Holiday Season!! 

  SURPRISE DAY – choose your SALE ALL MONTH LONG when you shop ON-LINE through our website!!
December 5th: Diane Hover
December 6th: Larissa Heskett
December 7th:  Larissa Heskett
December 8th: Karen Letchworth
December 9th: Taylor Golzbein
December 10th: Mackie Robertson 
December 11th: Larissa Heskett
December 12th: Diane Hover
December 13th: Maria Patrick
December 14th: Karen Bull
December 15th: Debbie Marcinkiewicz 
December 16th: Mackie Robertson 
December 17th: Lisa Golzbein
December 18th: Lilian Forsyth 
December 19th: Diane Hover
December 20th: Maria Patrick
December 21st: Lilian Forsyth 
December 22nd: Taylor Golzbein
December 23rd: Lisa Golzbein
December 24th: Karen Letchworth
December 25th: Debbie Marcinkiewicz

THANKS SO MUCH for stopping by today and I hope you 
have a FABULOUS WEEKEND!! 

I'm also linking up:

COUNTRY HUGS-N-KISSES
LARISSA   =) 

Tuesday, December 10, 2019

Rainbow Gift Tags w/ CAS-ual Fridays for the Holidays!!

Pin It
HELLO CRAFTY FRIENDS!! 

Larissa here today to share a SUPER FUN Holiday Tag!! 
I have several Nieces and they ALL LOVE anything Rainbow so I thought it would be FUN to create some Rainbow Gift Tags!! I'm pretty sure these would make anyone on your Gift giving list SMILE in delight!!
I Started by Die Cutting my Tag by using the Tag Buddies Fri-Die Set and then I Stamped and Embossed the SWEET Angel from the NEW Angels Hugs Stamp Set with WoW White Embossing Powder!! Then I created a Mask in order to mask the Embossed Angel Image so I could Ink the Rainbow Background!! I used Distress Inks in Candied AppleCarved PumpkinMustard SeedPeeled PaintPeacock Feathers and Wilted Violet using Ink Daubers!! I then removed the Mask and used Copic Markers to Color in the Angel Image!! 
                          (Skin: E00, E11 & E13  Cheeks: RV11  Hair: E31, E33 & E37)
To finish off the Tag I added Glossy Accents to the Angel Wings, some White Gel Pen Freckles and some Pretty Pink Posh Gold Jewels to the center of several of the Flowers on the Robes!! I added the Tag to a White Shimmer Cardstock Pillow Box and added a FUN Rainbow Scrap Ribbon Bow!! It finishes off the Gift PERFECTLY and I just KNOW they are going to LOVE these this Holiday Season!! 

Don't forget to visit the CAS-ual Fridays Stamps Blog for TONS of AMAZING Inspiration and to shop the NEW, Old and Sale Products in the CFS Shop!! You can also use my discount code LARISSASENTME to SAVE 15% off anything in the Shop!! 
WHOOP WHOOP!! 

I'm also Linking up:


THANKS SO MUCH for stopping by today and I hope you have a FABULOUS WEEK!! 
Larissa 💗

Saturday, December 7, 2019

Sugar and Spice for 25 Days of Christmas w/ Paper Sweeties!!

Pin It

HELLO!!

It's a FUN & INSPIRATIONAL 25 Days with a NEW Project shared Daily!! 
You can find the Schedule Below!! 
Here's my project for today!! 

So I LOVE Sequins and when I saw the NEW Inky Antics Reversible Sequin Fabric, I KNEW I wanted to use it for some FUN Holiday Cards!! I started by Die Cutting the Sugar and Spice Sweet Cuts Die from the center of my Card Panel!! Then I backed it with some of the Champagne to Gold Reversible Sequin Fabric using some strong Gina K Designs Terrific Tape!! 

I wanted to add a Bow and some Holly Leaves to finish off the Design!! I  Die Cut it from some TE Felt in A Cherry on Top and Avocado!! I backed the Panel with a Scalloped Rectangle Die and adhered it to a Tim Holtz Plaid Cardbase using Foam Tape!! 
SQUEAL!! Here's a look at the FUN Reversible Sequin Fabric in action!! I just LOVE this so much and I'm pretty sure you could Mass Produce these too and have SEVERAL HAPPY recipients!! 

  SURPRISE DAY – choose your SALE ALL MONTH LONG when you shop ON-LINE through our website!!
December 5th: Diane Hover
December 6th: Larissa Heskett
December 7th:  Larissa Heskett
December 8th: Karen Letchworth
December 9th: Taylor Golzbein
December 10th: Mackie Robertson 
December 11th: Larissa Heskett
December 12th: Diane Hover
December 13th: Maria Patrick
December 14th: Karen Bull
December 15th: Debbie Marcinkiewicz 
December 16th: Mackie Robertson 
December 17th: Lisa Golzbein
December 18th: Lilian Forsyth 
December 19th: Diane Hover
December 20th: Maria Patrick
December 21st: Lilian Forsyth 
December 22nd: Taylor Golzbein
December 23rd: Lisa Golzbein
December 24th: Karen Letchworth
December 25th: Debbie Marcinkiewicz

THANKS SO MUCH for stopping by today and I hope you 
have a FABULOUS WEEKEND!! 

I'm also linking up:

COUNTRY HUGS-N-KISSES
LARISSA   =) 

Friday, December 6, 2019

7th Annual Deck the Halls with Inky Paws Blog Hop!!

Pin It
Hello!!
Welcome to the 7th Annual Deck the Halls with Inky Paws Blog Hop for Newton's Nook Designs!! I'm SO EXCITED to be here with you today to share some AMAZING Inspiration for the FAST approaching Holidays!! I still can't believe December is already here, where did the Year go!!?? I'm sure if you are hopping along today, you're like me and ENJOY making the Holidays SPECIAL for those you CHERISH!! That's why creating handmade Cards and Gifts are so important!! Today I have a STUNNING Scene Card to share, plus a BONUS Card created by Greyson my 6 yr. old for his FAVORITE 1st Grade Teacher Mrs. Peterson!! I LOVE getting him involved with his Teacher Gifts every year and I'm not sure who ENJOYS it more!!?? I can promise you though his Teacher will feel pretty SPECIAL when he gives her his handmade Card/Gift in a couple Weeks!! 
Let's get started!! 
I wanted to create a STUNNING Scene Card!! I've ALWAYS LOVED Cardinals, but especially during the Holidays!! I started by using some Therm O Web Deco Foil Gel and the NND Holiday Foliage Stencil on my Cardbase!! After the Gel was dry, I Inked the background with Distress Oxide Inks in Iced Spruce, Peeled Paint and Lucky Clover!! Water Droplets were added for some texture!! Then I Foiled it using some Deco Foil in Jade!! I then added some Distress Paint Splatters in Picket Fence, Brass and Lucky Clover!! 
Next I worked on my Scene!! I started by Die Cutting the Stitched Panel from the NND Frames & Flags Die Set!! I then Stamped and Embossed the Cardinal Image and the Berry Images from the Winter Birds Stamp Set!! I colored them using Copic Markers and the Die Cut them out using the coordinating Winter Birds Die Set!! 

I used the Forest Scene Builder Die Set to create the Branches Die Cutting them from some TE Toffee Cardstock!! I inked the edges using some Gathered Twigs Distress Oxide Ink!! I wanted the look of Snow so I used the Lawn Fawn Embossing Pen and added some WoW Embossing Powder in Vintage Champagne!! It's a White Embossing Powder with Gold Glitter and I LOVE the addition of the Gold Glitter in real life!! I Die Cut several of the Pine Cone Images from the NND Pines & Holly Die Set from some TE Chocolate Truffle Cardstock and adhered them to some TE Toffee Cardstock!! Then fussy cut them out and inked them with some Gathered Twigs DOI!! I added the same Embossing Powder to resemble Snow, and also added some Liquid Adhesive and some Rock Candy Distress Glitter for some Sparkle and Texture!! 
I Die Cut several of the Pines also from the NND Pines & Holly Die Set from some TE Cilantro Cardstock and inked it them using Distress Oxide Inks in Gathered Twigs, Pine Needles and Peeled Paint!! I added the same Embossing Powder and then adhered everything together to create my Scene!! I really LOVE the way it turned out and I hope I've inspired you to look through your stash and see what Images you can combine with some of your FAVORITE Scene Building Dies to create some STUNNING Winter Scenes!!
Here's Greyson's Card!! He LOVES Rainbow and Colored the SWEET Mice from the NND Naughty or Mice Stamp Set using Copic Markers!! Then we worked on the Background!! He wanted Rainbow Snowflakes!! So we used the NND Snowfall Stencil along with some Therm O Web Pixie Spray to keep it in place!! He used Distress Inks in Candied Apple, Carved Pumpkin, Mustard Seed, Peeled Paint, Faded Jeans and Dusty Concord along with an Ink Dauber!! We added some WoW Clear Gloss Embossing Powder over the Snowflakes and heat set!! Then we covered the background with Tumbled Glass and Faded Jeans Distress Oxide Inks, added some Water Droplets and then added some Snowflake Sequins, Iridescent Jewels and Blizzard Glitter Nuvo Drops to finish off the Background!! 
I helped him line up the coordinating NND Naughty or Mice Dies and we used Therm O Web Purple Tape to keep them in place!! After Die Cutting them out we added some White & Black Gel Pen for some Freckles and the Nose and I added some High Lights to the Images!! We also added some Morning Dew and Blizzard Glitter Nuvo Drops for some Sparkle and Dimension!! 
We used the NND Speech Bubbles Die to Stamp and Emboss the Sentiment with WoW White Embossing Powder and added it to the Card using 3D Foam Squares!! I'm pretty certain his Teacher is going to CHERISH this handmade Card for years to come!! 


Deck the Halls with Inky Paws SALE!!
$5 off every $30 You Spend!
That means $5 of $30, $10 of $60...up to $25 off $150!*
No Coupon Needed
Now through Sunday, December 8th!
*Maximum $25 discount per order.

Enter to Win!! 
Deck the Halls with Inky Paws Hop Prizes!!
We will be choosing two lucky winners to win a $25 store credit for Newton's Nook Designs online shop! To enter, just leave comments on the Design Team Member and Guest blogs (see list below)! Two winners will be chosen at random from the collective blogs in the blog hop. Make sure to check out each of their blogs and comment for your chance to win. You will not know which blog has been chosen so the more you comment on the better your chances are of winning! You have until Sunday, December 8th at 9 pm EST to comment -- winners will be announced on the NND blog on Monday, December 9th.
Deck the Halls with Inky Paws Blog Hop List:

THANKS SO MUCH for stopping by today!! Don't forget to visit the Newton's Nook Designs Blog on December 9th 
to see if you're one of the LUCKY Winners!! 
Have a FABULOUS WEEKEND!!

I'm also linking up:

Simon Says Stamp Wednesday Challenge: Traditional Christmas 

COUNTRY HUGS-N-KISSES
LARISSA  =)