Thursday, July 31, 2014

Paper Sweeties August Inspiration #22~Let's Celebrate!! =)

Pin It

2ndBirthday Tomorrows the day ...


Hello!! 
I have some pretty EXCITING News to share today!! =) I've been asked to join the Paper Sweeties Team and I've said YES!! =) I can't wait to Share and Inspire you using the SWEET Paper Sweeties Products!! It's Time to CELEBRATE with Paper Sweeties!! It's Paper Sweeties 2nd Birthday and we're celebrating with a BIG Blog Hop and a Fun Birthday Challenge so make sure you link up because there are some GRAND Prizes to be won. You won't want to miss out!!
Today I'm playing along as the Guest Designer and the Newest DT Member!! You should be coming here from the AMAMZING Tammy Hobbs Blog!! If not please refer to the List below and don't miss out on a thing!! =)
I've decided to use the Tea For Two Stamp Set and the Coordinating Tea For Two Sweet Cuts Die along with a sentiment from the You're My Prince Charming Stamp Set!! I LOVE it!! I Paper pieced it and then created a really FUN Background!!
I started with a piece of Vellum and sprayed it with some Perfect Pearls Mist in Biscotti and some Prima Bloom Spray in Pearl Pink!! I then heat set it and used an Iron to flatten it out!! I then took some Distress Ink in Gathered Twigs and lightly went over the top!! I then picked out a Sweet Pink Polka Dot patterned Paper and Stitched the Vellum over top with my Sewing Machine!! =) This is the FIRST time I've sewn on a Card and I LOVE it!! YIPPEE!! =) I inked the edges and then added some Sequins in between the two layers!! I then stitched it closed and stitched on some Pretty Lace and Tulle Ribbon!! I Stamped and Embossed my Sentiment onto a thin strip of Vellum and then added some pearls to both sides of the sentiment!! I LOVE my card and I wish you could see how BEAUTIFUL this Vellum Background is in real life!! =)


I hope you LOVE my card and that you're ready to be AMAZED by the Design that PattieGoldman has created!!
 
Here is the Entire Blog Hop List!!
AND ... introducing our August Guest Designer + newest Design Team contributor:  Larissa Heskett

AND ... our August Special Guest Designers:
 
Amy Linkletter
 
THANKS SO MUCH for stopping by today and have a FABULOUS WEEKEND!!
 
COUNTRY HUGS-N-KISSES
LARISSA  =)

Paper Sweeties July Inspiration #21~Patriotic Prints!! =)

Pin It

papersweeties inspiration21 A Sprinkle of Inspiration and A Dash of Creativity   July 2014

Hello!!
I'm sharing the card I've made for the Paper Sweeties Inspiration #21~Patriotic Prints Challenge!!
I was inspired by the Quilts and the Colors that were shown in the challenge photo!! I decided to stamp the Main Image from the Paper Sweeties Splish Splash Stamp Set!! Isn't it SWEET!!??
I decided to paper piece the Image and then I added some Red Glitter Ritz Glitter to the Heart Leaves and some Ranger Clear Embossing Powder to the Umbrella!! I also restamped the Branch on the image using some Versa-Mark so that I could add some Distress Embossing Powder in Vintage Photo for a really realistic Tree Bark texture!! LOVE the texture and the FUN shine and shimmer it adds to the image!! I inked the birds tummies with some Tumbled Glass Distress Ink to give them some dimension so they appeared plump rather than flat and then I used a Black Soot Distress Marker to color all of the edges of my images so they all look seamless!! I adhered everything using a Glue Pen just because all of the images are so small and I didn't want to have glue everywhere!! I decided on a FUN Half Rounded Window Shape fusing an MFT Die or the Image background and I added some Distress Inks and some Perfect Pearls Mist in Biscotti for a neat shimmer and water aged look!! I matted it with a couple different mats to make it pop and then I die cut some PTI Scribble Die Cuts that I inked alittle and sprayed with the same Perfect Pearls Mist in Biscotti to give them a similar look!! I then used a E31 Brick Beige Copic Marker to go around my entire Image to give it a nice outline shadow to make it POP from the background and I think it really added that extra WOW to the whole Image!! I was going for a Nest feel and I tucked it behind the Half Round Window and added a Red Bow!! I stamped the sentiment on the bottom right corner of my Window Background and adhered it all to the Quilted looking Patterned Paper I used from the Studio Calico South of Market Collection using some Foam Tape for even more Dimension!! I inked the edges of everything with some Gathered Twigs Distress Ink just to tie it all together and I REALLY LOVE how it turned out!! =)
I had originally started out in a totally different direction and as I started working on this card it took me in a different direction so I just went with it and I'm so GLAD I did!! =) Sometimes you've just got to go with the feel of a design rather than trying to force a design that isn't working!!  Trust me when I say you'll usually ALWAYS be more HAPPY with the end results!! =)


What do you think!!??
THANKS SO MUCH for stopping by today and I hope you have a FABULOUS WEEK!!

COUNTRY HUGS-N-KISSES
LARISSA   =)

Wednesday, July 30, 2014

12 Tags of 2014 Challenge~Sun Set Bird Tag!! =)

Pin It

DSC00428

Hello!!
Happy Hump Day!!
Boy where has July went SO FAST!!?? I'm not ready for Summer to be over!!
I created a FUN Tag for the 12 Tags of 2014 Challenge over on Tim Holtz Blog!!
I don't have any of the AWESOME Under the Sea Dies so I had to get creative with the supplies I did have and I still wanted to give all of the FUN Techniques a Try!! =) So after looking through my stash of Tim Holtz Stamps and Dies I ended up deciding I'd use the Bird Image from the Spooky Stuff Stamp Set and try to use  it in a more Country type scene!! I used the Zig Zag Border stamp for my Picket Fence from the Classics #6 Stamp Set!! I covered the bird image with some Tumbled Glass Distress Ink and some Gathered Twigs for the beak and feet!! Then I covered it in some Rock Candy Dristress Crackle Paint!! I LOVE how it turned out!! After it was dry I cut it out with a small border just to add some color so it wouldn't look like a scary bird!! =) I inked the edges of my Picket Fence and then I Die Cut two rows of Trees from the Tim Holtz Sizzix On the Edge Tree Line Die!! I used Tim's Kraft-Core Core`dinations CardStock in the Peeled Paint and Spring Moss Colors!!
I then sanded then alittle and added the matching Distress Glitter and some Distress Embossing Powder!! I didn't add mutch of the powder because I still wanted them to look like trees!! Once the Glitter was dry I went over then with some Gathered Twigs Distress Ink to add more definition!! =) I layered them together for a FUN tree line!! I used the Tim Holtz Sun Rays Embossing Folder and embossed some Clear Packaging!! I colored my tag base using Squeezed Lemonade, Ripe Persimmon and Gathered Twigs Distress Inks!! I wanted the background to look like a Sun Set and I think it turned out AWESOME!! I added some Perfect Pearls Mists in Biscotti, Orange and Gold and even though its hard to see in the pictures on real life it's SO NEAT looking behind the Embossed Clear Packaging!! LOVE IT!!  =)


I hope you like my take on the Challenge and if you'd LOVE to see all of the other INSPIRATION you should go and check out the Blog Post here!!
THANKS SO MUCH for stopping by and have a FABULOUS WEEK!!
 
COUNTRY HUGS-N-KISSES
LARISSA   =)

Tuesday, July 29, 2014

Happy Birthday Card with Reverse Confetti and The Cutting Edge Challenges!! =)

Pin It

July14Color

'

Hello!!
I'm stopping in to share the card I've made for a couple challenges!! =)
I LOVED the Colors for the Reverse Confetti July Color Challenge and the New Cutting Edge Challenge which just happened to fit PERFECTLY with my Design!! I've been wanting to play along with the Cutting Edge Challenge since the very first Challenge they posted and I've made a card for each challenge too, but I've never seemed to make the Linking up deadline!! So you can image how EXCITED I am that I'm FINALLY able to play along with this challenge for the First Time!! YIPPEE!! =)

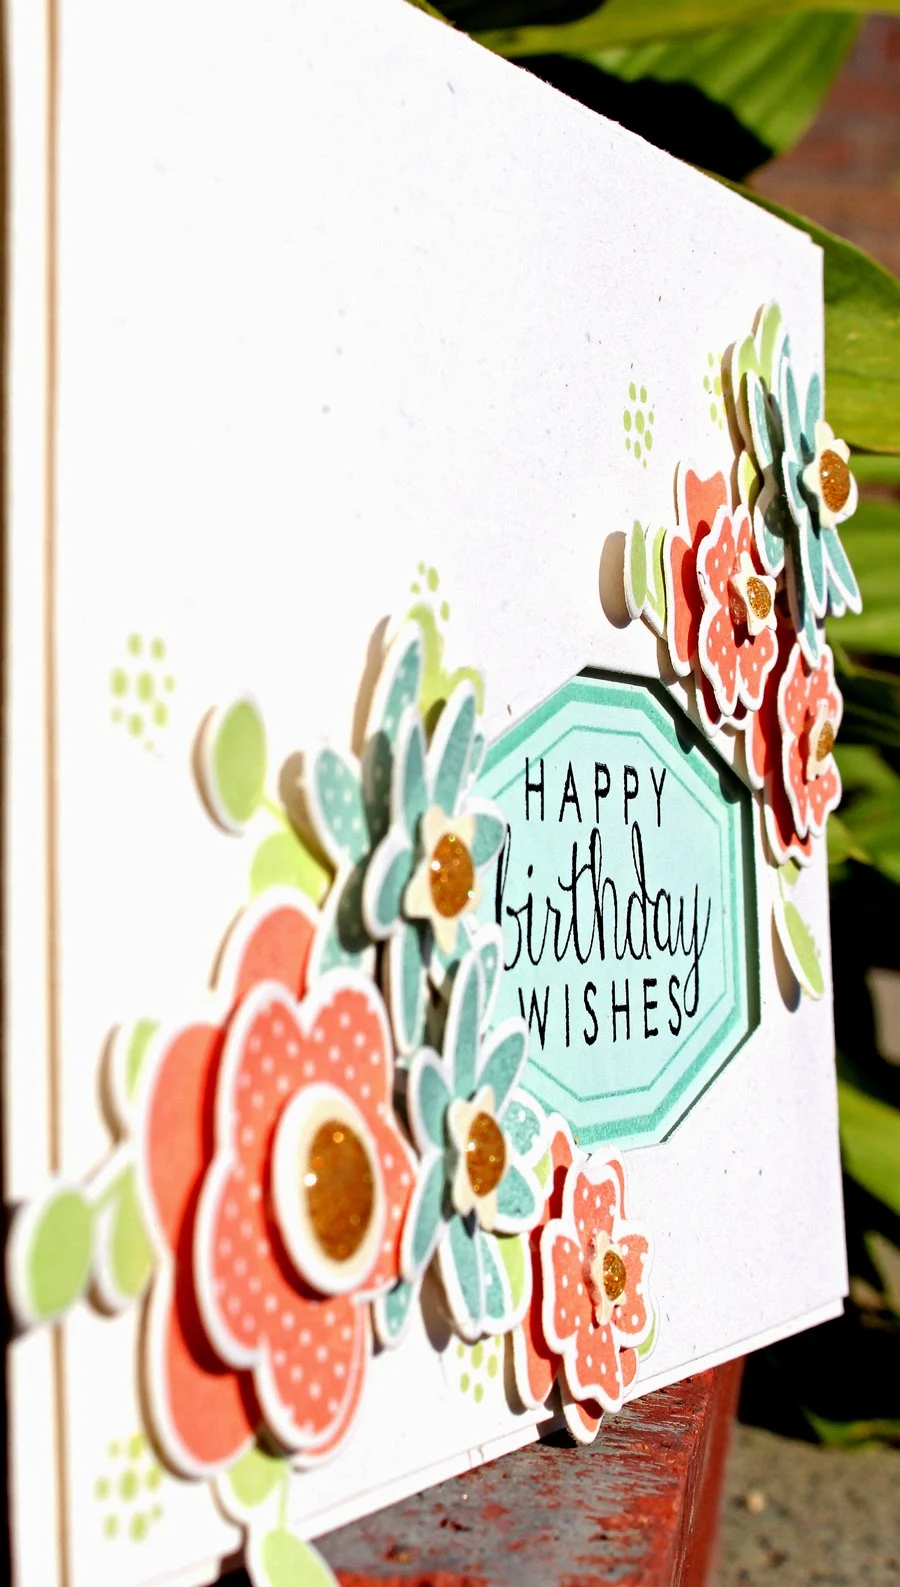
I started by stamping and Die Cutting all of my Flower Images using the Reverse Confetti Petals' N Posies Stamp Set!! I then die cut each of them out using the coordinating Reverse Confetti Petals' N Posies Dies!! I wanted to layer a couple of each of the images together to create some FUN Dimension and I LOVE the way they turned out!! I used PTI Inks in Melon Berry, Ocean Tides and Spring Moss to get a pretty close match to the Challenge colors!! =) I wanted to create a FUN Window and I decided that the Label Image and Die from the Reverse Confetti Label Me Stamp Set was the Right Fit for my Design!! I Stamped the Label Image onto some Prima Tag Cardstock using the PTI Ocean Tides Ink and then I used the coordinating Reverse Confetti Label Me Die to die cut the Label Image onto my Card Front!! I then layered the Stamped Image behind the Card Front using some Foam Tape to pop it up alittle just to add even more depth!! I then stamped some of the little Dot Cluster images using the PTI Spring Moss Ink and then I layered my Flowers together to create a FUN arrangement!! I added some My Mind's Eye Gold Glitter Enamel Dots to the centers of the Flowers and I really LOVE how they just added that finishing touch and finished my card off!!


THANKS SO MUCH for stopping by today and I hope you have a FABULOUS WEEK!!

COUNTRY HUGS-N-KISSES
LARISSA   =)

Sunday, July 27, 2014

Paper Smooches SPARKS Designer Drafts Challenge!! =)

Pin It


HELLO!! 
I hope you're having an AMAMZING Weekend!!?? =)
It's been a BUSY County Fair week here and even though I LOVE it, I'm glad tomorrow is the last day of the Fair for this year!!
Anyway, back to the New Paper Smooches SPARKS Challenge for this week we have a really FUN Designer Drafts Challenge!! YIPPEE!! I LOVE these and I can't wait to see what you'll create!! I decided to use Several Different Paper Smooches Stamp and Die Sets to create my card this week!! I LOVE how it turned out because it is SO MY Style!! =) I used Paper Smooches Denim & Daisies and Blossoming Buds Stamp Sets along with the Paper Smooches StitchedPocket, and Toppers Dies!! I used Patterned Papers from Pink Paislee Pen Pals and the Authentique Precious Collections!! I used Enamel Dots from My Mind's Eye and some 8mm Crystal Sequins from Pretty Pink Posh to add some dimension to the Flower Centers!! I stamped and Embossed the Pocket using some WOW Silver Glitter Embossing Powder and I LOVE the way it looks!! =)


I hope you'll go and check out the other Paper Smooches SPARKS DT Blogs to see what they have been INSPIRED to create!!

Katie
Larissa~You're Here!! 
Lori
Lynn
Savannah

You'll have until Saturday, August 2nd at 11:59 PST to play along with the Challenge!! Hop on over to the Paper Smooches Sparks Blog to play along with us!! I can't wait to see what you create!! I look forward to stopping by your Blog to leave some PSS LOVE too!!
THANKS for stopping by and have a FABULOUS WEEK!!

COUNTRY HUGS-N-KISSES
LARISSA   =)

Friday, July 25, 2014

PTI July Blog Hop Post 2~1st Sewing Projects by Beckett and Irelyn!! =)

Pin It

July Blog Hop Inspiration

Hello!!
I'm here to share another entry for the PTI July Blog Hop!!
After I had made and given Irelyn her Coin Purse this morning, the kids decided they wanted to do their own projects!!  =) I thought AWESOME this will keep them occupied for atleast a couple hours!! =) (BONUS it took them 4 hours)
They each picked out their own colors of PTI Felt and they designed and picked out the other dies they wanted to use to decorate the Fronts of their Pockets!! I die cut the New PTI Phone Case Die Set!!  
Papertrey Ink - Phone Case Die
They had a BLAST making these and I gave them each a Blunt Needle to use for the Stitching!! They neither one have ever done anything like this and before so I think for their first projects they turned out AMAZING and I'm sure we will be doing this project again!! =)


THANKS SO MUCH for stopping by and have a FABULOUS WEEKEND!!

COUNTRY HUGS-N-KISSES
LARISSA   =)

Paper Trey Ink July Blog Hop!! =)

Pin It

July Blog Hop Inspiration

Hello and Happy Friday!!
I'm stopping in to share a FUN little Project I've made for the Paper Trey Ink July Blog Hop!!
I've used the PTI Purse Dies and the coordinating PTI Coin Purse Pocket Die Set to create a Sweet Little Coin Purse for my niece!! =)
Papertrey Ink - Coin Purse Die       Papertrey Ink - Coin Purse Pockets Die Collection (set of 4)
I saw this fabric and fell in LOVE!! Isn't it CUTE!!?? I LOVED the colors and the Images!!
I used the Pocket Die to create a Layered Front Pocket and I've used some Iron-On Stabilizer to add to the Fabric along with adding a Felt Layer to make this alittle more STURDY!! I KNOW that Little Girls LOVE their Purses and I wanted to make sure that this was going to hold up to LOTS of abuse by a 4 yr. old!! =) I won't have to worry about it getting ripped or unraveling from LOTS of use!! I added some Brown Sequins and a seed bead to the eyes for a pop of glitz!! I think it really finishes the owl off in style!!

I can't wait to be INSPRED by ALL of the other creations that are going to be shared today on the PTI Blog for the Blog Hop!!  I hope your able to play along!!??
THANKS SO MUCH for stopping by and I hope you have a FABULOUS WEEKEND!! =)

COUNTRY HUGS-N-KISSES
LARISSA   =)

Newton's Nook Designs Inky Paws Challenge #12!! =)

Pin It

Hello and Happy Friday!! =)
I'm stopping in to share the New Newton's Nook Designs Challenge over on the NND Inky Paws Challenge Blog and the FUN card I create for it!!
I LOVE this photo and I would LOVE to be on a BEACH somewhere just relaxing right now!! =)
We have been BUSY with our County Fair this week and I'm ready for a Vacation!!
I thought it would be FUN to create a little Framed Scene for my card do I started by stamping the Frame from the NND Around the House Stamp Set!!  I then cut out the inside of the frame and layered a Wave Image that I stamped and fussy cut from the New NND Beach Party Stamp Set!! I added some sand and one of the Sweet little Sand and Shovel Buckets from the New NND Newton's Summer Vacation Stamp Set!!
I paper pieced it for a realistic look and I LOVE the way it looks!! I also thought it need some Sea Gulls so I took the Image from the New NND Flamingo Stamp Set and stamped them with a second Generation stamp for a more faded image!! I added some Vellum over my Stripped Patterned Background to dull the starkness of them and so I could add my Sentiment!! I stamped it with Versa Mark and then Embossed it using some Ranger Platinum Embossing Powder and I LOVE the way it turned out!!

I hope your Inspired to play along and that you'll go and visit the other DT Blogs for even more INSPIRATION!! THANKS so much for stopping by today and I hope you have a FABULOUS WEEKEND!! =)

COUNTRY HUGS-N-KISSES
LARISSA   =)

Wednesday, July 23, 2014

JustRite Non-Traditional Christmas Card Challenge!! =)

Pin It

HELLO and HAPPY Hump Day!!
I wanted to play along with the New
JustRite Friday Challenge #125 Non-Traditional Christmas!!
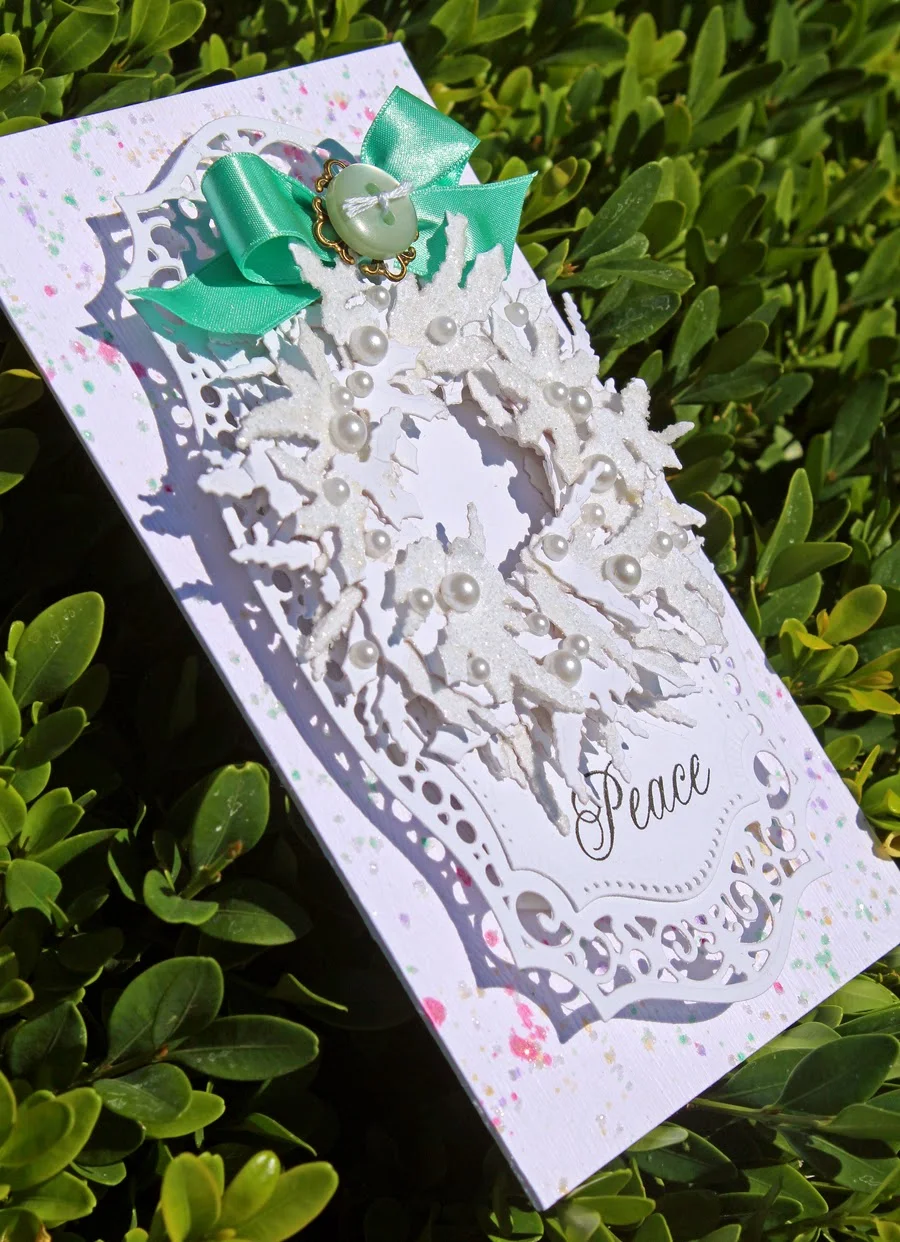
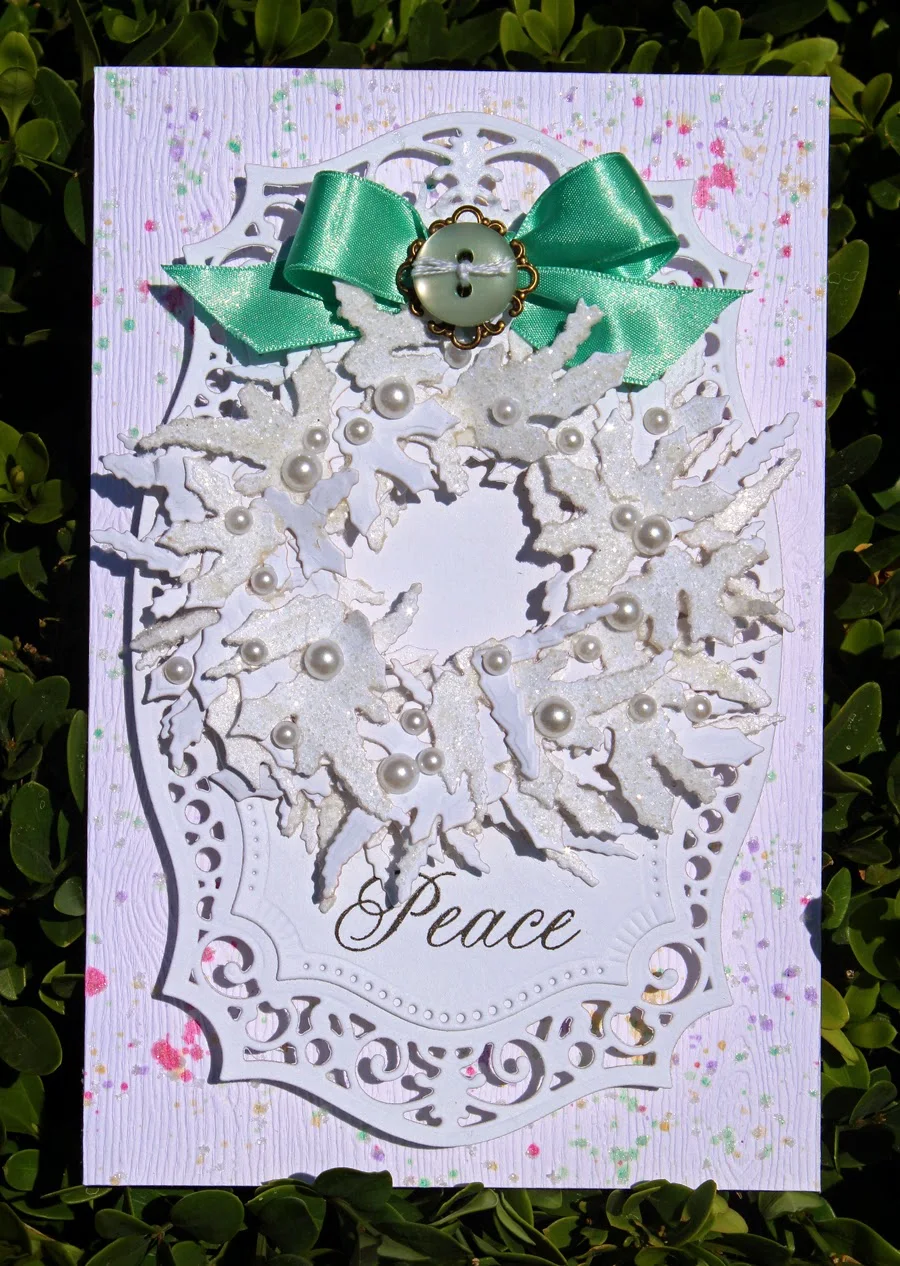
We were asked to create a Non-Traditional Colored Christmas Card!! I fell in LOVE with the Spellbinders Build a Wreath Die Set last year and I wanted to create a FUN Holiday Wreath!! I used ALL White for my Wreath and then I covered some of the Pieces with some Rock Candy Distress Glitter!! I think white is a pretty Non-Traditional Color for a Holiday Wreath and I LOVE the look!! I added some White Pearls for some BEAUTIFUL Ornaments and I LOVE the way it turned out!! I die Cut a Spellbinders Frame and layered the Wreath onto it!! I played around with several different backgrounds for this card because I couldn't decide if I wanted a whimsical design or a more regal and clean design!! I ended up using a Wood Grain Embossed Background that I splattered with some Ink in the Turquoise, Bubble Gum Pink, Soft Purple and Vanilla!! Then I took a Glue Pen and added some Glue to each of the splatters and added some of the Rock Candy Distress Glitter to them!! I LOVE the way it came together!! I used Foam Tape to pop up the Panel and then I added a Turquoise Stain Bow and a FUN Vintaj Metal Square and a Turquoise Button that I tied with some White Floss!! I stamped my Sentiment from the JustRite Christmas Vintage Labels Four Clear Stamp Set and my card was finished!!
Christmas Vintage Labels Four Clear Stamps

                        
I was also Inspired by this BEAUTIFUL Image!! I've seen the AWESOME Festive Friday Challenge but I have NEVER had the time to play along!! This week I'm HAPPY to say I have FINALLY been able to play along and I LOVE the way my card turned out!! I think my Wreath is a pretty close match to the one in the photo!! =)


What do you think!! I took a couple pictures of my card both inside and outside so hopefully you could see how BEAUTIFUL it Sparkles in the light!!?? I hope you'll stop by the Just Rite Blog to check out all of the other Creations!! =) THANKS SO MUCH for stopping by and have a FABULOUS WEEK!! '

COUNTRY HUGS-N-KISSES
LARISSA   =)

Friday, July 18, 2014

Paper House Productions~Making the Team!! =)

Pin It

****TEAM REVEAL**** 

Hello Ladies!

We are so excited to start this next term with you! We are woking hard to get you all of your products and we have scheduled an official team reveal for this Friday on the blog! Here is the graphic if you would like to have/share it!

Thank you!

Hello!!
I'm stopping in to share some really EXCITING News today!! =)
I've made the New Paper House Productions Design Team for another term!! YIPPEE!! =)
I look forward to sharing more of my Projects and Joining in on several Blog Hops with LOTS of chances to win some of the AMAZING Paper House Production Products!! =)
THANKS so much for stopping by today and for leaving me some LOVE!!

Have a FABULOUS WEEKEND!!

COUNTRY HUGS-N-KISSES
LARISSA  =)

Newton's Nook Designs Anniversary Blog Hop!! =)

Pin It
Hello!!
Are you ready for some AMAMZING Inspiration!!??
I'm here with the Newton's Nook Designs Anniversary Blog Hop!! We are Celebrating Newton's Nook Designs 1st Birthday and you're not going to want to miss out on all of the FUN and Inspiration!! I have created a couple REALLY FUN Party Projects for today and I hope you ENJOY them!!


I've used some really FUN Party Bags from Pebbles as my starting point!! These type of bags are SO FUN to fill with ANYTHING your little heart desires!! =) I then die cut a Stitched Tag Die from Pretty Pink Posh and stamped my Image of Newton from the NEW Newton's Summer Vacation Stamp Set which is available today in the Newton's Nook Designs Store!! I wanted to incorporate some FUN Party Images like his hat and some Confetti and they were stamped from the Newton's Birthday Bash Stamp Set!! I layered my Sentiment too and I LOVE the way it turned out!! I colored my Images using some Colored Pencils and Gamsol!! Then I took a Wink of Stella Clear GLitter Pen and colored over the Party Hat and the Tube for a little added Sparkle and FUN!! The Large Burlap Bow is by My Mind's Eye and I think its the PERFECT way to finish off these Bags!! You could also make your own with little trouble!! =)
For the Second Tag: I used the same Bag and Die for my Tag Base but I stamped and Paper Pieced three of the Sweet little Cupcakes from the Newton's Nook Designs Love al a Carte Stamp Set!! I stamped onto some Glitter Paper for the Cupcake Lining and then some Patterned Paper for the Tops and the Hearts and Fussy Cut everything out and glued it together!! I added some Wink of Stella Glitter Pen in Clear to the Sprinkles and the Hearts after I colored the Sprinkles with my Colored Pencils!! I LOVE how YUMMY they look!! =) I stamped two different Sentiments to create a really FUN Personalized Tag!! =) One is from the Newton's Birthday Bash Stamp Set and the other is from the Baskets of Wishes Stamp Set!!

Here's how to Win!!
Comment on the Design Team Member and Guest blogs (see list below)! TWO winners will be chosen at random from the collective blogs in the blog hop. Make sure to check out each of their blogs and comment for your chance to win. You will not know which blog has been chosen so the more you comment on the better your chances are of winning! You have until Sunday, July 20th at 9 pm CDT to comment  -- winners will be announced on the blog post on Monday, July 21st. We are running a giveaway on our Facebook page too so make sure to enter here for another chance to win!!
 

THANKS SO MUCH for stopping by today and I hope you have a FABULOUS WEEKEND!!

COUNTRY HUGS-N-KISSES
LARISSA  =)