Showing posts with label Reverse Confetti. Show all posts

Wednesday, August 26, 2020

Wishing you a Beautiful Day w/ Reverse Confetti!!

Pin It
August Stock You Stash w/ Reverse Confetti

HELLO CRAFTY FRIENDS!! 

I'm sharing this BEAUTIFUL Wedding Card I've made as I play along with the August Reverse Confetti Stock You Stash Challenge : Wedding!! I haven't played along in awhile and with a few weddings coming in the next 2 months I thought I'd get CRAFTY!! 
Wishing you a Beautiful Day by Larissa Heskett using Reverse Confetti Stitched Burst Cover Panel, The Best Days, Rose Garden & Word Up  #reverseconfetti #weddingcard #cardmaking #thebestdays #stitchedburst
I Started by creating my Card Panel!! I Die Cut the Stitched Burst Cover Panel and then I added some Tumbled Glass Distress Oxide Ink just in the center of the Panel so that my Imaged will POP against the Glow of the Inking!! 


Wishing you a Beautiful Day by Larissa Heskett using Reverse Confetti Stitched Burst Cover Panel, The Best Days, Rose Garden & Word Up  #reverseconfetti #weddingcard #cardmaking #thebestdays #stitchedburst
Next I Stamping and Embossing the BEAUTIFUL Image from The Best Days Stamp Set!! If your NEW to my Blog you'll notice that I like to Stamp my Images and Emboss them using WoW Clear Gloss Embossing Powder!! I LOVE how VIBRANT the Images are and that I have less Bleeding when I'm coloring with Copic Markers or Watercolor!! 
I used Copic Markers to Color!! 
I used:  Yellow: Y11, Y15 & YR23  Purple: V01, V15 & V09   Pink: RV10, RV34 & RV39  Green:  YG00, YG13 & YG17   G20 & BG18  
I Die Cut the Images out using the coordinating The Best Days Die!! Then I added some Sunshine Glitter Nuvo Drops to the center of the Flowers and some Iridescent Pearl Nuvo Drops to the Berries!! I Stamped and Embossed the Sentiment from the (discontinued) Rose Garden Stamp Set!! I Stamped with Vera Mark Ink and Embossed with WoW Bright White Embossing Powder!! Then I Fussy Cut around the Sentiment!! 
Wishing you a Beautiful Day by Larissa Heskett using Reverse Confetti Stitched Burst Cover Panel, The Best Days, Rose Garden & Word Up  #reverseconfetti #weddingcard #cardmaking #thebestdays #stitchedburst
I adhered the Flower Images together in the center of the Card Panel using Foam Tape!! Then I adhered the Fussy Cut Sentiment also using Foam Tape!! I LOVE the way it turned out and how BEAUTIFULLY those Flowers POP against that Die Cut and Inked Card Panel!! I added another Sentiment on the inside of my Card using the Word Up Stamp Set reading Congratulations 
Wish I was there with You 
Wedding Celebrations are alittle different lately due to COVID, so I really LOVE that this sentiment is included in this Stamp set and I've found I've been using it ALOT!! 
I also wanted to create a coordinating Envelope so I used the     Stitched Burst Cover Panel and ran it through my Die Cutting Machine just Die Cutting the Flap of the Envelope!! Such an EASY process that really makes this Envelope feel SPECIAL!! 
THANKS SO MUCH for stopping by today and I hope you have a FABULOUS WEEK!! 

COUNTRY HUGS-N-KISSES
LARISSA  💗

Sunday, May 26, 2019

Creative Birthday Cards w/ Greyson using Reverse Confetti Products!! =)

Pin It


HELLO CRAFTY FRIENDS!! 
I'm stopping in to share some Cards that my Lil' Crafty Side Kick Greyson and I created yesterday!! If you follow me you may recognize Greyson's Work!!?? He started Kindergarten so he hasn't been able to craft with me as much as he'd like, but with School Out for Summer the FIRST thing he wanted to do was CRAFT!! He WANTED to use the Cute Images from Reverse Confetti to create some Birthday Cards for a few of his Classmates and this is what we came up with!!
Greyson wanted to create a shaker Card and thought it would be FUN to create in on the Floor and have "Sprinkle" or "Confetti" so it looks like they fell on the Floor!! His creative Ideas ALWAYS AMAZE & INSPIRE Me!! We Stamped and Embossed the Images from the Furever Friends Stamp Set and he Colored them in with Copic Markers!! Then we Die Cut them out using the coordinating Furever Friends Die Set!! We also Stamped and Embossed a CREATIVE Birthday Cake using the Images from Later Alligator (the Birthday Cake) and a retired set (for the Dog Bowl with Bones)!! We Masked the Cake Image so it looks like its in the Dog Bow along with the Bones!! We LOVE how it turned out!! The Little Bow Images are also from the Later Alligator Stamp Set and we used them to decorate the Bone Balloon and the Birthday Cake Bowl!! We added some Tonic Studios Nuvo Drops in Black, Morning Dew and Blizzard Glitter for touches of Sparkle and Shine!! 

For the "PARTY" Shaker floor we used the NEW Party & Celebrate Confetti Dies and Die Cut it from some Woodgrained Patterned Paper!! Then we used Distress Oxide Ink in Vintage Tea to add some Dimension!! Then added some Honeybee Stamps Sprinkles and some Tonic Studios Mini Stars!! Greyson thought we NEEDED a Balloon so we Stamped and Embossed the Bone Image and added the "Hooray" by masking a sentiment from the Word Up Stamp Set!! Then tied a piece of Black Thread and adhered it to the card using some 3D Foam Squares!! 
We wanted to create a 3D Frame to make our Scenes POP o we decided to use the All Framed Up Confetti Dies and Die Cit it from some of the NEW Sweet Strips Patterned Paper!! We Die Cut some Craft Foam also from the Framed Up Die to POP up the Frame!! Then Die Cut the next Frame from some Black Cardstock and adhered it right to the Card Front!! 
We LOVE the way it turned out and Greyson is pretty certain that his Friend is going to LOVE this Birthday Card!!
 I used mostly ALL of the same images for my Card Design except I chose to create a Flat Scene with NO shaker element!! I used Copic Markers to color in my Images and added touches of Tonic Studios Nuvo Drops for Sparkle and Shine too!! I even created a Masked Birthday Cake and some Bone Balloons for my Scene!!
I chose to Stamp and Emboss the Sentiment from the Birthday Wishes Stamp Set in WoW White Embossing Powder onto the Woodgrained Patterned Paper and I LOVE the way it turned out!! 

 Greyson and I have been crafting up a STORM so be on the look out for some more INSPIRATION to follow SOON!! THANKS SO MUCH for stopping by today and I hope you have a FABULOUS WEEKEND!!

COUNTRY HUGS-N-KISSES
LARISSA   =) 

Monday, April 29, 2019

You're Beary Special Mom w/ Reverse Confetti!!

Pin It


Hello Crafty Friends!! 
Today I'm stopping by to share a SWEET Mother's Day Card I made and am linking up to the April Reverse Confetti Stock you Stash Challenge!! I wanted a BRIGHT and CHERRY Card so I used a couple different Sets both older and newer to create my Card!!
This Sweet Bear from the NEW Big Bear Stamp Set just makes me SMILE!! I LOVE all of the things she/he can hold!! I wanted there to be a Card, Flowers and and a HEART full of Candies!! Then I used the Banner in Bloom Stamp Set to Stamp and Emboss some Flowers in White on my Cardbase and the Banner to POP up on the Focal Image!! I LOVE how BEAUTIFUL these are and the REALLY stand out once colored!! I used Copic Markers and then added Tonic Studio Glitter Nuvo Drops for some Sparkle and Dimension!! I Die Cut the Pierced Round Top Layers Die Cut and Inked it using some Distress Oxide Ink in Tumbled Glass and then added Water Droplets!! I Adhered everything with Foam Tape and adhered it to my Cardbase!! A few Sequins and Jewels finishes off the Designs!! 

On the inside of the Card I added the MOM Die Cut from the NEW Mom & Dad Duos Set!! I Die Cut it from some Cardstock that I inked using Distress Oxide Ink in Tumbled Glass!! I LOVE the way it turned out and KNOW my Mom is going to CHERISH this Card!!

THANKS SO MUCH for sharing and I hope you have a FABULOUS WEEK!!

I'm also linking up

Grab our badge:


COUNTRY HUGS-N-KISSES
LARISSA   =)

Wednesday, February 27, 2019

Encouragement Cards w/ Reverse Confetti Stock your Stash!!

Pin It


HELLO!!

Today I'm sharing a Set of Cards I've made for a "Basket of Cards" that I'm donating for our Local Schools G.I.F.T Gala Event to raise money for our Local Teachers!! I've made 2 Baskets: each with 15 Handmade Cards in several genera along with coordinating Envelops, Postage Stamps, a Set of Nice Gel Pens, Seals and a Storage Basket!! I'm hoping they Sale Well as I LOVE supporting the AMAZING Teachers we're SO BLESSED to have in our School!!
These were made using some of my FAVORITE Reverse Confetti Products, so I thought I'd link them up!!
 I've used the BEAUTIFUL Falling Hearts Panel Confetti Cuts and Die Cut it from some White Cardstock 4 times so I could layer them all together for a thick Die Cut!! For the Layered Hearts I used the All Heart Cover Panel Confetti Cuts They are the PERFECT Size for Layering, so I Die Cut them from the Reverse Confetti Patterned Play and Cue the Confetti 6X6 Paper Pads!! For the Cardbase frame I used the Lacy Scalloped Rectangle Die and then I Stamped the sentiments from the One Fine Day Stamp Set!! For some Sparkle I added some Blizzard Glitter Nuvo Drops and added it to the Red Patterned Paper Hearts and it adds just the PERFECT finishing touches!!

THANKS SO MUCH for stopping by today and I hope you have a FABULOUS WEEK!!

I'm also Linking Up:

Grab our badge:

COUNTRY HUGS-N-KISSES
LARISSA   =)

Monday, May 28, 2018

Unicorn Blooms Birthday Card using Reverse Confetti Products!! =)

Pin It


SQUEAL!!
Stopping in to share a Card I've made using the Reverse Confetti Banner In Bloom Stamp Set and the coordinating Banner In Bloom Die Set along with my FAVORITE Lacy Scallop Frame Die Set and Images from the Unicorn Wishes Stamp Set and the coordinating Unicorn Wishes Die Set!! I'm playing along with the NEW Stock your Stash Challenge!! The theme was Birthday and I needed a SPECIAL Card for a SWEET Friend!! So I wanted it to have a Magical, but Grown Up feel!! 

I started by Stamping and Embossing the Flower Cluster Images to create a FUN Background!! After Coloring the Images with Copic Markers I added some Gold Paint Splatters!! I Die Cut the Lacy Scallop Frame Die Set from some Reverse Confetti Midnight Cardstock!! I Stamping and Embossing the Banner In Bloom Image and Die Cutting it out!! Colored it with Copic Markers and then Embossed the Sentiment with some ColorBox Gold Glitter Embossing Powder!! I wanted the Flowers to REALLY POP so I added some Tonic Studios Aqua Shimmer Pen!! In real Life its just SO BEAUTIFUL with the way that it Shimmers when the Light Hits it!! =) Next I Stamped and Embossed two Unicorn Images and Die Cut it out using the coordinating Dies!! I wanted some Dimension so I Decided to Fussy Cut the Nose, Mane and Tail, the Horn and the heart so I could layer them on top of the Unicorn Image for a 3-D look!! I even cut an extra flower from the Banner In Bloom Image so I could add a Flower to the Unicorns Ear!! I used Tonic Studio Aqua Shimmer Pen and some Nuvo Drops for even more Sparkle and Dimension!! I Die Cut a Scallop Lace Circle and Inked it with some Tumbled Glass Distress Ink and water splatters!! Created my Scene and my Card was Done!! 

I'm also linking up 


COUNTRY HUGS-N-KISSES
LARISSA    =)


Wednesday, April 18, 2018

Newton's Nook Designs April Release 2018 ~ "Umbrella Pals"!!

Pin It
                            Hello!!
                               SQUEAL!!
                                     I'm here with Day 1 of the 
                          Today we're showcasing the NEW  
        "Umbrella PalsStamp Set + coordinating "Umbrella PalsDie Set!! 
                  Let's take a look at this AWESOME New Set!!
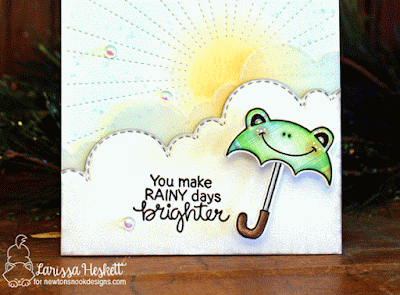
How CUTE is this Set!!?? I just LOVE it and I had FUN creating this Interactive Card!! I used a Reverse Confetti Die for the Background and added some Tumbled Glass Distress Ink and some Scattered Straw Distress Ink for the Sun!! hen used the NND Sky Border Die Set to create some Clouds!! One layer from Vellum and the other from Cardstock that I colored the edge of with a N2 Copic Marker!! I Stamped and Embossed the sentiment and Stamped and Embossed the Frog onto some Lawn Fawn Plaid Paper and then added some Copic Marker coloring just to make the Features POP!! Then for a FUN interactive Element I add an Action Waubbler onto the back of the Umbrella!! So when the recipient gets it they can Play with the Umbrella!! A few Studio Katia Iridescent Gems finishes off my Card!! 

Would you like to win the “Umbrella Pals” Stamp Set!!??
This stamp set will be given away to ONE Lucky Winner!!
Here's how to win: 
Comment on the NND blog and Design Team blogs (see list below)! Thewinner will be chosen at random from the collective reveal posts. Make sure to check out each of their blogs and comment for your chance to win. You will not know which blog has been chosen so the more you comment on the better your chances are of winning! You have until Thursday April 19th at 9pm EST to comment  -- winners will be announced on the blog post on Friday, April 20th. 
Check out all the awesome Design Team Blogs below to enter:
 
THANKS SO MUCH for stopping by today!! I CAN'T WAIT to share the rest of the Release with you!! Please come back again tomorrow for a look at the NEW "Little Lillies" Stamp Set + coordinating Die Set and April Showers Stamp Set!! The New Products will be available on Friday April 20th!! Have a FABULOUS WEEK!!
 
COUNTRY HUGS-N-KISSES
LARISSA     =)

Thursday, March 29, 2018

Cards Greyson and I created for a Couple Challenges!! =)

Pin It

HELLO!!
I'm here today to share a couple cards for the
Reverse Confetti Sketch for You to Try Sketch # 58!!
I was creating my card when my 5 yr. old Greyson asked if he could create a Card for the Challenge too!!?? I said "SURE, why not"!! He was pretty EXCITED with the idea that he could WIN!! ;)
So lets start with Greyson's Card!!
He used the Reverse Confetti ABC Cover Panel Die and the NEW Honey Bear Stamp Set and the coordinating Honey Bear Die Set!! He also used the Circle N- Scallops Die Set and the Stitched Flag Trio Die Set!! He Stamped and Embossed all of the Images and colored them with Copic Markers!! Then we Die Cut them out using the coordinating Die Set!! Added some Tonic Studios Aqua Shimmer Pen and some White and Black Gel Pen Details!! I LOVE the way it turned out and he plans on giving this to his teacher at his Pre-School Graduation coming up in May!! =(
I'm SO NOT READY for him to Graduate and to be heading to Kindergarten next Fall!! I'm gonna MISS my Crafting Buddy!!


Here's my Card and I'm also playing along with the Color Throwdown Challenge #486!!
 
I've used the SWEET Hippity Hoppity Stamp Set and the coordinating Hippity Hoppity Dies along with the NEW  Stitched Rays Cover Panel Die and the Circle N- Scallops Die Set and the Stitched Flag Trio Die Set!! I Stamped and Embossed all of the Images and colored them with Copic Markers!! Then I Die Cut them out using the coordinating Die Set!! I added some Tonic Studios Aqua Shimmer Pen, Morning Dew Nuvo Drops and some White and Black Gel Pen Details!! I LOVE the way it turned out!! 

THANKS SO MUCH for stopping by today and I hope you have a FABULOUS and BLESSED EASTER WEEK/WEEKEND!!

I'm also linking up

Simon Says Stamp Wednesday Challenge: Anything Goes

Grab our badge:
Word Art Wednesday Challenge #328-#329: Anything Goes


COUNTRY HUGS-N-KISSES
LARISSA    =)

Monday, January 29, 2018

Sending Warm Hugs w/ Reverse Confetti!! =)

Pin It


HELLO!!
Happy Monday!!
I'm stopping in to play along with the Color Throwdown #477 Challenge and I just LOVE LOVE LOVE the way my Card turned out!! These Images and the Colors both just make me SWOON, so I just HAD to create a Projects to play along!! I decided to use Reverse Confetti Products!! I wanted to create a FUN Textured Background to resemble the Texture of the Table Mats and Coasters!!
 
I used the Negative Stripes from the Vertical Stripes Cover Panel Die and Wove them into the Tall Stripe Panel Die!! I used RC Iced Aqua Cardstock and Inked the Edges with Tumbled Glass Distress Ink for even more Dimension to the Woven Design!! I used a Reverse Confetti Patterned Paper from the Warm Heart 6x6 Pad for the Base of my Card!! I Die Cut the Lacy Scallop Circles from RC Cloud Cardstock and Die Cut a Circle to layer inside from the Circles n' Scallops Die Set!! I Inked the Background with Tumbled Glass Distress Ink and added Water Droplets, then I stamped and Embossed the Snowflake Images from the Merry Chirstmoose Stamp Set using White Embossing Powder and added some Tonic Studios Orange Soda Glitter Drops to the centers of each of the Snowflakes!! I added some Hickory Smoke Distress Ink to the Edges of the Lacy Scallop Circle just to make it POP!! I Stamped and Embossed the SWEETT Snowman Image from the Cool Friend Stamp Set and Colored it in using Copic Markers!! I used the coordinating Cool Friend Die Set to Die Cut it out and added it to the center of the Circle using Foam Tape!! I Die Cut the Banner from some RC Stormy Cardstock using the RC Stitched Flag Trio Cuts Set and Stamped and Embossed the Sentiment from the Cool Friends Set!! I created some FUN Layered Snowflake Die Cut accents using the RC Snowflake Trio Cuts and the Let It Snow Cuts from RC Cloud Cardstock I added some Hickory Smoke Distress Ink to make them POP and some Tonic Studios Orange Soda Glitter Drops to the centers for some Dimension and Sparkle!!
I LOVE how it turned out and hope you do too!!??

THANKS SO MUCH for stopping by and I hope you have a FABULOUS WEEK!!

I'm also linking up

Simon Says Stamp Monday Challenge: Resist It


Simon Says Stamp Wednesday Challenge: Layer It Up

Grab our badge:
Word Art Wednesday Challenge: Anything Goes #318-#319


COUNTRY HUGS-N-KISSES
LARISSA   =)