Showing posts with label Pebbles Inc.. Show all posts

Monday, November 5, 2018

25 Days of Christmas Tags 2018 Event w/ Newton's Nook Designs!!

Pin It
Image may contain: text
HELLO!!
I'm here for Day 5 of the  25 Days of Christmas Tags 2018
over on the In My Creative Opinion Blog!!
Here's a Preview of ALL of the AMAZING Companies Participating and Sponsoring this AWESOME Event!!
Today I'm here with the FABULOUS
Newton's Nook Designs as both the guest and sponsor!!
Newton
There's a $25 gift certificate 
to giveaway to one lucky winner!!
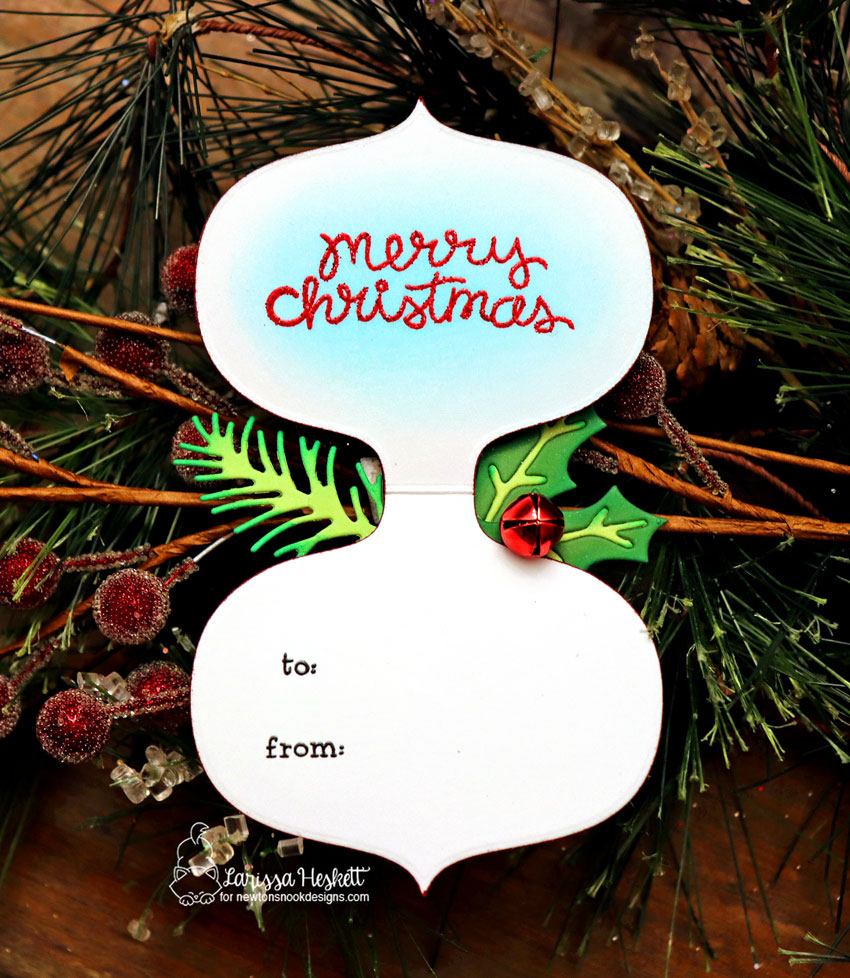
Here's the Festive Holiday Shaker Tags/Ornaments
I've made for today!!
 I LOVE being able to combine my Tags as Gifts/Ornaments as well!! Seems like after I spend so much time on them I'd like for them to be used in another way, rather than just thrown away!! So I created these FESTIVE Holiday Shaker Tags, that also double as Ornaments!!
 I Die Cut the Glittered Polka Dot Patterned Paper from Pebbles Inc. Cozy & Bright 6x6 paper pad using the NEW "Ornamental ShakerDie Set!! Then I Die Cut both the Acetate Sheets and Double Sided Adhesive Foam layers to create my Shaker Tag!! I can't tell you enough how in LOVE I am with the Double Sided Adhesive Foam Sheets!! They make creating Shakers SO EASY, because the adhesive is already there!! NO MORE MESSY Acetate Windows due to Glue being where it doesn't belong!! That's a HUGE Game changer for me!!😉 I added some White Snowflake Sequins, Sparkling Clear Sequins, White Sequins, Silver Star Sequins and some Vintage Glass Glitter for my Shaker Elements!! 
For the Finishing Details I added the Pine and Holly Leaves that were Die Cut from the Pines & Holly Die Set to add them along the top of the Ornament!! A Red Metallic Jingle Bell finishes it off!! I used some Therm O Web Toner Sheet to Foil using Silver Deco Foil and Die Cut it for the Ornament Topper!! Then used some We R Memory Keepers Wire and the Wire Jig to create the Ornament Hook!! I also added some of the Distress Rock Candy Glitter to a Piece of Cardstock and used the Decorative Strip Dies that are included in the "Ornamental ShakerDie Set to create some Die Cut Decorative Stripes for the Center of the Ornaments!! There are SO MANY CREATIVE ways you could use just these Dies!! I LOVE VERSATILITY and this Set ROCKS!! In real life its the PERFECT Finishing touch!! Its so hard to see how well it matches the Glitter on the Patterned Paper, but TRUST me when I say the Recipients will definitely be WOWED!! 
For the inside of the Tags I've Stamped a Sentiment from the NEW "Holiday Stockings" Stamp Set!! I've used a different one for each Tag!! Stamping them in Versa Mark Ink and Embossing them with Red and Green WoW Glitter Embossing Powder after I added alittle Tumbled Glass and Scattered Straw Distress Inks to make the Sentiments POP!! The To: and From: were Stamped and Embossed using Stamps from the "Joyful Tags" Stamp Set!! I added some Distress Picket Fence Paint Splatters to dress up some Silver and Gold Pillow Boxes and my FESTIVE Holiday Shaker Tags/Ornaments are ready for the Gift Giving Season!! These will be Given to my Son Beckett's Teachers for the Holidays!! I LOVE LOVE LOVE the way they turned out, and hope you do too!!?? 
I created this Second Shaker Tag exactly the same way, just changing up the Design!! 
THANKS SO MUCH for stopping by and I hope you'll play along!! You can play along and create a tag too!! You can find the details and ink up at Tracey's Blog Here!!
Have a FABULOUS WEEK!!

I'm also linking up:

Grab our badge:

COUNTRY HUGS-N-KISSES
LARISSA   =)

Wednesday, October 31, 2018

CAS-ual Fridays Stamps November Release 2018 ~ Merry Christmas Fri-Dies & Happy Hanukkah Fri-Dies!!

Pin It
No automatic alt text available. Image may contain: text

HELLO CRAFTY FRIENDS!!
I'm here today with Day 4 of the CAS-ual Fridays Stamps November Release 2018!!
Today we're showcasing the NEW Merry Christmas  Fir Dies & Happy Hanukkah Fri-Dies Sets!! 
I LOVE how FUN it is to be able to use those AMAZING Holiday Patterned Papers that we have just by adding a BEAUTIFUL Sentiment and some other little details!! This Patterned Paper is from the Cozy & Bright Pebbles Inc. 6x6 Pad!! I Die Cut it to fit my A2 Cards base and then added some Metallic Silver Distress Paint Splatters!! I also added some Silver Snowflake Sequins and some Pretty Pink Posh Silver Jewels for the center of the Snowflake Sequins!! The Sentiment was Die Cut 4 times from some Grey Cardstock and stacked together!! Then I Die Cut the top layer from some Therm O Web Deco Foil Toner Sheets that I Foiled with some Rebekah Meier Designs Vintage Tin Foil!! I LOVE the Vintage Feel of this Card!! 

I repeated the same Process as above, just chose a different Patterned Paper to use!! These are Super  EASY to make and think how much FUN you would have being able to use ALL of those Papers you may be hoarding!!??   (Wink Wink)

THANKS SO MUCH for stopping by and I hope you'll come back tomorrow for Day 5 of the Release!!

I'm also linking up:

COUNTRY HUGS-N-KISSES
LARISSA    =)

Monday, October 29, 2018

CAS-ual Fridays Stamps November Release 2018 ~ Dashing Stamp Set & Snow Fri-Dies!!

Pin It
Image may contain: text No automatic alt text available.

HELLO CRAFTY FRIENDS!! 
I'm here today with Day 2 of the CAS-ual Fridays Stamps November Release 2018!!
Today we're showcasing the NEW Dashing Stamp Set & coordinating Snow Fri-Dies!! 
I've created this BEAUTIFUL 3-D Snowflake Card for today!! I started with this Red Snowflake Patterned Paper by Pebbles Inc. Then I added some Picket Fence Distress Paint Splatters!! I Die Cut several of the Snowflakes from the Flurry Fri-Die Set and the Funky Flakes Fri-Dies Set!! I Die Cut them from Vellum, Gold Pearl Glitter Cardstock that I made using some WoW Gold Pearl Glitter Embossing Powder and some Therm O Web Toner Sheets that I foiled with Red Deco Foil!! For the Center of the Snowflakes I Stamped and Embossed the Snowflake Images from the NEW Dashing Stamp Set with some WoW Gold Pearl Glitter Embossing Powder and then Die Cut them out using 1/2 inch and 3/4 inch Circle Dies!! I finished them off using some Pretty Pink Posh Gold Jewels!! For the Sentiment I Stamped and Embossed the "Let It" using Versa Mark Ink and Clear Embossing Powder!! I wanted it to be subtle, but thought the Ice look was a PERFECT compliment to the Snowflakes!! I Die Cut the "Snow" Sentiment from the Cardbase and then Die Cut 4 layers of Cardstock and layered the all together, creating a Raised Inlaid Design!! I Coated the top layer with Versa Mark and Clear Embossing Powder to make it appear like Ice as well and I LOVE the way it turned out!! A few Snowflake Sequins finish off the Design!! 

THANKS SO MUCH for stopping by and I hope you'll come back tomorrow for Day 3 of the Release!!

COUNTRY HUGS-N-KISSES
LARISSA    =)