
HELLO CRAFTY FRIENDS!!
I'm here today with my first Post as Trinity Stamps Guest Designer for March!! SQUEAL!! I'm so EXCITED!! So today I'm going to share a couple of Cards with you showing you how you can use the NEW Bed of Roses Stencil Set!! I LOVE Stencil Sets as they are SO VERSITILE and there are so many ways you can use them!! Plus with the Size of the NEW Bed of Roses Stencil Set is 6x9, so you can actually get more than one Card/Project from just one Stenciling!! So that's a BONUS too!! Let's get started!!

Here are the Cards I've made for today!! They make me SO READY for Spring, but Florals can be used ALL Year Long!! I LOVE to use my Distress Oxide Inks and you can step things up by using some Therm O Web Deco Foil Flock and Gina K Designs Glitz Glitter Gel!! SWOON!! The Color possibilities are ENDLESS too!! I can see a Set of these in Rainbow Colors for a Gift Set to give as a Gift as well!! Then did you spy the coordinating Envelopes!!?? Yep, how SPECIAL do they make these Cards when sending them to someone SPECIAL!!??

I Started by Spraying the back side of the Stencils with Therm O Web Pixie Spray!! It's a GAME changer when working with Layering Stencil Sets!! Then I adhered the Roses Stencil over my Cardstock and pressed in firmly into place!!

Then I inked with a Layer of Milled Lavender Distress Oxide Ink and an Ink Dauber!!


Then I took the Distress Oxide Ink in Milled Lavender again and Inked around the area of the Roses!! I wanted to create the Base of the Roses!! Making the Bases a little larger than the Stenciled Design!! Having that Stenciled Rose Design in place helps to know exactly where to ink!!

Here's the Panel completely inked!!

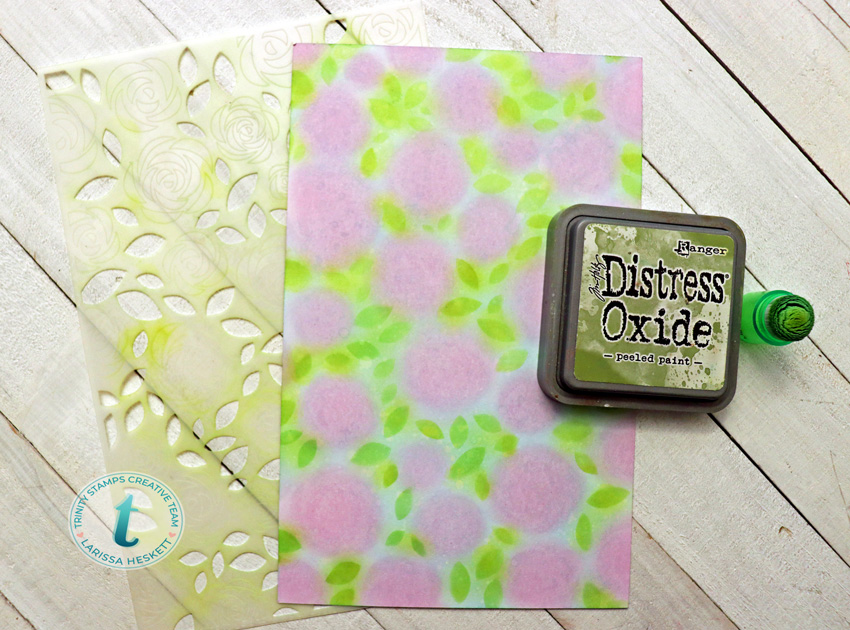
Next I adhered the Leaves Stencil over the Panel and Inked with Peeled Paint Distress Oxide Ink using an Ink Dauber!! Then to add some extra Dimension to the Leaves I inked over the top of them with some Peacock Feathers Distress Oxide Ink using an Ink Dauber!! SWOON!!
I LOVE this Color combo for Spring Designs!!

Here's what the Panel looks like after I removed the Leaves Stencil!! Isn't it just STUNNING!!?? Imagine all of the different Color Combos that you can use and how you can even play with the colors depending on the Season!!
ENDLESS Possibilities!!

Next I realigned the Roses Stencil over the Top of my Panel and placed it into place!! Then I Inked with Wilted Violet Distress Oxide Ink!!

This is what the Panel looks like after inking all of the Roses!! STUNNING Right!!??

Here's the Card I created using the Inked Panel!! Plus, I still have enough Cardstock left to create a Couple more projects!!
I started by Die Cutting all of the Panels using the NEW Modern Embossed Rectangle Stack Dies!! I absolutely LOVE these Dies and the AWESOME Embossed detail they leave on the edges of the Panels!! I Die Cut the Cardbase using White Cardstock and the largest Rectangle Die!! Then I created the Doodlebug Gingham Patterned Paper Panel using the next Size Rectangle Die!! I Die Cut the 4th Rectangle from the Stenciled Cardstock to create the Focal Panel!!

I added some Black Soot Distress Paint Splatters to the Stenciled Panel to add some extra Texture!! Then once it was completely dry I adhered all of the panels together with Therm O Web Ultra Bond Adhesive!! Then I Stamped and Embossed the Hello There Sentiment from the Hello There Stamp Set onto the Second to Smallest Rectangle Die cut from some White Cardstock!! I Stamped with Versa Fine Black Onyx Ink and Embossed with WoW Clear Gloss Embossing Powder!!

I adhered the Stamped and Embossed Sentiment onto my Card Panel using some Gina K Designs Foam Tape and then added some Trinity Stamps Fairy Rock Rhinestone Embellishments to add some Sparkle and finish off the Design!!

I created some coordinating Envelopes as well by Stenciling the Envelope Flaps!! I used Purple Tape to Mask off the Flap and then used the same inks that I used on the Panels to ink on the Envelope Flaps!! Such an EASY process that results in a STUNNING presentation!!


Here's the Card I created using the Flocked and Glitz Glitter Geled Panel!! Plus, I still have enough Cardstock left to create a Couple more projects!!
I started by Die Cutting all of the Panels using the NEW Modern Embossed Rectangle Stack Dies!! I absolutely LOVE these Dies and the AWESOME Embossed detail they leave on the edges of the Panels!! I Die Cut the Cardbase using White Cardstock and the largest Rectangle Die!! Then I created the Sunny Studio Stamps Gingham Patterned Paper Panel using the next Size Rectangle Die!! I Die Cut the 4th Rectangle from the Stenciled Cardstock to create the Focal Panel!!
I started by Die Cutting all of the Panels using the NEW Modern Embossed Rectangle Stack Dies!! I absolutely LOVE these Dies and the AWESOME Embossed detail they leave on the edges of the Panels!! I Die Cut the Cardbase using White Cardstock and the largest Rectangle Die!! Then I created the Sunny Studio Stamps Gingham Patterned Paper Panel using the next Size Rectangle Die!! I Die Cut the 4th Rectangle from the Stenciled Cardstock to create the Focal Panel!!

I added some Black Soot Distress Paint Splatters to the Stenciled Panel to add some extra Texture!! Then once it was completely dry I adhered all of the panels together with Therm O Web Ultra Bond Adhesive!! Then I Stamped and Embossed the Hello There Sentiment from the Hello There Stamp Set onto the Second to Smallest Rectangle Die cut from some White Cardstock!! I Stamped with Versa Fine Black Onyx Ink and Embossed with WoW Clear Gloss Embossing Powder!!

So there you have it 2 Cards created using the exact same Trinity Stamps Bed of Roses Stencil Set, but Stepping it up a notch by using different Products to help make the Design come to LIFE!! I hope I've INSPIRED you and that you'll give these techniques a try to create a Set of Cards and coordinating Envelopes of your own to send to someone SPECIAL to help BRIGHTEN their Day!!
THANKS SO MUCH for stopping by today and I hope you'll join me EVERY Saturday this Month as I showcase some more of the AMAZING Trinity Stamps Products!!
Have a FABULOUS WEEKEND!!
COUNTRY HUGS-N-KISSES
LARISSA 💜
S U P P L I E S
Below you will find links to the supplies used to create this project(s). Click the icon for the store underneath the thumbnails to start shopping. Where available I use compensated affiliate links at no extra cost to you. Your support helps me to keep bringing you new projects.
Thank you!! 💓

Two terrific cards, Larissa! Congrats on guesting!
ReplyDelete