HELLO CRAFTY FRIENDS!!
HAPPY FRIDAY!!
I'm up on the Newton's Nook Designs Blog today sharing a FUN Happy Howl-Oween Card!! If you followed during the Release you might have seen my Card that I shared using the CUTE NEW Image from the "Happy Howl-oween" Stamp Set!!??
If not here's a look at that Project!!
I LOVE being able to STRETCH the use of my Products and sometimes I KNOW not every crafter feels comfortable Coloring Larger more intricate Images!! So I wanted to show that you can use those Images as is and then create a BOLD background using whatever medium you may like to use!! SO MANY OPTIONS right!!?? Even just using a Die Cut Panel would be FUN for a Simple Background especially if you're wanting to make SEVERAL of the same design!! I LOVE the look don't you!!??
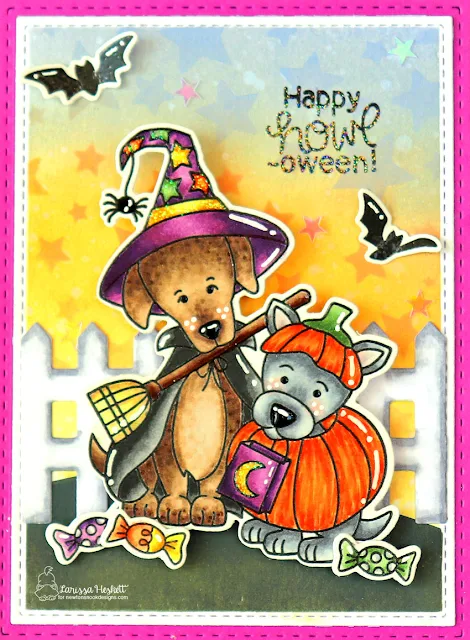
So for my Card today I wanted to share a SIMILAR Design, meaning I used almost the EXACT same Products!! I changed up the Design a little by adding the Fence Die Cut behind the Image and then I added some Stamped and Embossed Bats and a Few of the SWEET Candy Images also from the same Set!! It's NEAT to compare the two to see what your preference is and maybe there's room for BOTH of the different designs just depending on your time and how many of each Card Design you were needing to create!!
I used Distress Oxide Inks in Scattered Straw, Carved Pumpkin and Shaded Lilac for the Sky using the Cascading Stars Stencil!! For the Ground I used Peeled Paint and Black Soot along with the Hills & Grass Stencil!! I Stamped and Embossed the Sentiment using some WoW Neutral Sparkle Glitter Embossing Powder and I LOVE the added Sparkle it gives to the Card!! A Sprinkling of Iridescent Stars were added to the background too for even more Sparkle and Shine!!
After Stamping and Embossing the Images I used Copic Markers to Color them in!!
(Witch Puppy: E40, E42, E43, E44 & E47 Pumpkin Puppy: C00, C0, C2 & C4 Cheeks: ROO Pumpkin: YR00, YR14 & YR18 Purple Images: V01, V04, V06 & V09 Yellow Images: Y11, Y15 & YR23 Green Images: YG61, YG63 & YG67 Witches Cape: N0, N2, N4 & N8 Fence Die Cut: C0 & C2 Blending out with a Colorless Blender)
I used a Black Glaze Pen for the BOTH Puppy Noses and Eyes and the Spider and added some White Gel Pen Details for Highlights!! I added some Blizzard Glitter Nuvo Drops for some Dimension and Shine to the Stars and Band on the Witches Hat and to the Moon on the Treat Bag along with some Morning Dew Nuvo Drops for the Broom Handle to help make it look more 3D!! I used Therm O Web 3-D Foam Squares to POP the Images up and Then I framed the whole panel with a postage edged frame from our Framework Die Set in some Passion Punch & Oreo TE Cardstock and created my Cardbase from some TE Build a Scene Halloween Patterned Paper!!
THANKS SO MUCH for stopping by and I hope I've given you some Inspiration today on another FUN way to use those SWEET Images that you have that may seem a little daunting on how to color at first glance!!?? Give them a TRY, I KNOW you'll be HOOKED just like I am!!
Have a FABULOUS WEEKEND!!
COUNTRY HUGS-N-KISSES
LARISSA =)


Your coloring on this is incredible! CUTE card Larissa!
ReplyDelete