Showing posts with label Pretty Posies. Show all posts

Saturday, March 21, 2020

CAS-ual Friday's and Crafting of Hue Special w/ Critter Inspiration!!

Pin It

Image may contain: text

HELLO!! 
I'm here today with CAS-ual Fridays Stamps and Crafting of Hue for a Critter Inspiration Special!! I've created a SWEET Spring Birthday Card for today sing the Somebunny Stamp Set, Bunny Fri-Dies, Pretty Posies Stamp Set and the Posies Fri-Dies!! Let's get to it!! 
I Started by Stamping and Embossing my Images using Versa Fine Black Onyx Ink and WoW Clear Gloss Embossing Powder!! I then Colored everything In with Copic Markers!! Normally, I would have colored my Flowers alittle Lighter, but I wanted them to be BOLD for this Card!! So I colored them BRIGHT and FULL of Color!! (Orange Flowers: YR02, YR18 and YR68  Yellow Flowers: Y11, Y15 and YR23  Pink Flowers & Balloon: RV00, RV02, RV13 & RV17  Greenery: YG03, YG17 & G05  Bunny: C0, C2 & C5   Cheeks and Inside of Ears: RV00)  
Once colored, I used the Coordinating Dies to Die Cut everything Out!! Then I added some Nuvo Drops in Walnut Crystal to the center of the Flowers!! I set them aside to Dry and once Dry I added some White Gel Pen Highlights!! I really think these small detail really add ALOT to the Images!!  
For my Background I Inked the Card Panel with Tumbled Glass Distress Oxide Ink added Water Splatters and then added some Black Soot Distress Paint Splatters!! I LOVE how BRIGHT it is so that the Bunny really POPS!! 
I then adhered everything to create my Scene using some Foam Tapes in areas!! Then I added a Few Iridescent Jewels!! I Stamped and Embossed the Sentiment and Cut it Down backing it with a Small Black Border and adhering it to the top of the Flowers!! I also added some Tumbled Glass Distress Oxide Ink to help make it blend in and PoP!! I also added some Clear Glitter Pen to the Flowers and Balloon Images and then I added some Morning Dew Nuvo Drops to the Balloon to make it Shiny!! I LOVE the way it turned out!! 

THANKS SO MUCH for stopping by today and don't forget to HOP along and be INSPIRED by all of the other Design Team Creations!! Also if you shop the SALE be SURE to use my DISCOUNT CODE: LARISSASENTME to save an EXTRA 15% off you order!! That's a 35% Discount altogether on EVRYTHING!! WHOOP WHOOP!! 
Time to go SHOPPING!! 
I hope you have a SAFE and HEALTHY Weekend!! 

COUNTRY HUGS-N-KISSES
LARISSA   ðŸ’–

Tuesday, March 5, 2019

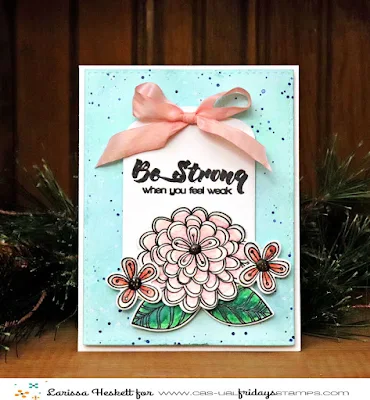
Be Strong When You Feel Weak w/ CAS-ual Fridays Stamps!! =)

Pin It
Hello Crafty Friends!! 
I'm up on the CAS-ual Friday Blog today sharing a SWEET Encouragement Card!! I'm using the BEAUTIFUL Pretty Posies Stamp Set along with the coordinating Posies Fri-Dies the Be Stamp Set for the sentiment and the Tag Buddies Fri-Dies!! I just LOVE the Sentiments, especially the one I've used on my Card today!! I hope you come and see how I used Distress Oxide Inks to watercolor my Images!! I LOVE the 3-D appearance it gives to them!! 

I hope this puts a SMILE on your Face for a POSITIVE & HAPPY Week ahead!! I'm SO READY for the warmer days and Spring Weather ahead!! 

THANKS SO MUCH for stopping by today!! 
 Have a FABULOUS WEEK!! 

LARISSA   =)

You can also use my discount code LARISSASENTME, to save 15% off on all of the goodies in the CFS Shop!!


I'm also Linking Up:

Grab our badge:

Thursday, February 12, 2015

Paper Sweeties February Release Sneak Peek!! ;)

Pin It

Hello!!
I'm here to share the Project I've made for the Paper Sweeties February Release Sneak Peek!! I think you're REALLY going to LOVE the SWEET RELEASE this month!! I wanted to start off with this BEAUTIFUL Little Gift Bag that I created!! I LOVE this time of year!! I started by stamping my Flower Images from the New Paper Sweeties Pretty Posies Stamp Set!! I used Judikins Sticky Stuff Embossing Powder and then added some Martha Stewart Neon Yellow Glitter!! I repeated this three times die cutting one of them with the coordinating Paper Sweeties Pretty Posies Sweet Cuts Die Set!! Then I fussy cut the other two layers so I could create a 3-D Flower!! I stamped and die cut the Stem and Leaf and then I layered it all together!! I stamped and embossed my Thanks Sentiment from the New Paper Sweeties Garden Time Stamp Set and then added some stitching for the ground!! I layered it all together on a Sweet Yellow Doily and added it to my Polka Dot Paper Bag!!
I hope you'll go and see what the rest of the AMAZING DT has created and that you'll leave them some LOVE!! ;)
Debbie MarcinkiewiczPaper Sweeties
Jill Norwood 
Jinny Newlin *special Guest Designer*
THANKS SO MUCH for stopping by today and I hope you'll stop back by tomorrow for a look at the Paper Sweeties February Release Countdown!! Have a Fabulous Week!!

COUNTRY HUGS-N-KISSES
LARISSA  ;)