Showing posts with label Newtons Nook Designs. Show all posts

Monday, September 8, 2025

Newton's Nook Designs September ~ Falloween Release ~ Autumn Coffees, Spooky Coffees & Card Layout 5 Die!!

Pin It
Newton's Nook Designs Falloween Release available September 12th, 2025

Hello Crafty Friends!!

Welcome to Release Week for the Newton's Nook Designs September 2025 ~ Newton's Nook Designs Falloween Release!! Today I'm sharing a couple Projects that I've made using the NEW Autumn Coffees and Spooky Coffees Stamp Sets + Coordinating Dies along with the Card Layout 5 Die!!  
Here's a Close up look at ALL of the NEW Products being showcased for Today!!
Newton's Nook Designs Autumn Coffees Stamp Set and Autumn Coffees Die Set, Spooky Coffees Stamp Set, Spooky Coffees Die Set & Card Layout 5 Die
SQUEAL!! I LOVE how PERFECT these NEW Products are for ALL of those Drink Lovers!! I CAN'T WAIT to share what I've made for today!! Let's get Started!!
Freshly Boo'd Card by Larissa Heskett for Newton's Nook Designs using Spooky Coffees Stamp Set, Spooky Coffees Die Set, Basic Papers Pastel, Basic Frames Die Set, Frames and Flags Die Set, Circle Frames Die Set, Halloween Postage Sampler Stamp Set and Halloween Postage Sampler Die Set
Here's the First Card I've created for today!! I LOVE being able to create my own background Paper because its so hard to pick a FAVORITE Image!! This way I can use them all on one Project!! 

I Started by Stamping and Embossing the Image from the NEW Spooky Coffees Stamp Set using Versa Mark Onyx Ink and WoW Clear Embossing Powder!! Then I Colored the Image using Copic Markers!! 
Turquoise: BG10, BG13 & BG45   Pink: RV00
Brown: E40, E43 & E47
Then I Die Cut the Image out using the coordinating
NEW Spooky Coffees Die Set!! I added some White Gel Pen Highlights!! 


Next I Stamped and Embossed the Background Panel, again using Versa Mark Onyx Ink and WoW Clear Embossing Powder!! Then I added some Distress Spritz Splatters in Salvaged Patina and Seedless Preserves!! I LOVE the added touch of Color and Shimmer it adds to the Background Panel!! 
Freshly Boo'd Card by Larissa Heskett for Newton's Nook Designs using Spooky Coffees Stamp Set, Spooky Coffees Die Set, Basic Papers Pastel, Basic Frames Die Set, Frames and Flags Die Set, Circle Frames Die Set, Halloween Postage Sampler Stamp Set and Halloween Postage Sampler Die Set
I Stamped and Embossed the Sentiment onto the Card Panel using Milled Lavender Distress Oxide Ink and WoW Clear Embossing Powder!! 

I Die Cut the Scalloped Circle from some Turquoise Cardstock and then a Black Cardstock Circle and a White Cardstock Stitched Circle using the Dies from the Circle Frames Die Set!! I Inked the White Cardstock Circle with some Milled Lavender and Hickory Smoke Distress Oxide Ink Masking off the Ground for a clean line!! Then I adhered the Scalloped Circle Focal Image using Foam Adhesive for some Dimension!! 
I Stamped and Embossed the Spider Image (SNEAK PEEK) it'll be coming later in the Release Week but I felt like it was the PERFECT Touch!! I adhered the Amethyst Rhinestones from Trinity Stamps for even more Sparkle and Shine and I LOVE how they finish off the Design!! 
Freshly Boo'd Card by Larissa Heskett for Newton's Nook Designs using Spooky Coffees Stamp Set, Spooky Coffees Die Set, Basic Papers Pastel, Basic Frames Die Set, Frames and Flags Die Set, Circle Frames Die Set, Halloween Postage Sampler Stamp Set and Halloween Postage Sampler Die Set
So there you have it, I hope it makes you INSPIRED to try a Design like this!!
Let's get to the 2nd Card for today!! 

Thanks a Latte Shaker Card by Larissa Heskett for Newton's Nook Designs using Autumn Coffees Stamp Set, Autumn Coffees Die Set, Card Layout 5 Die, Circle Frames Die Set, Autumn Woofs and Autumn Meows Paper Pads
For my Second Card I've created a FUN Shaker Card!! Shakers are one of my FAVORITE Card Designs to create and the Card Layout Dies make them SO EASY!! You can opt to use Foam Strips or use several Cardstock Frames like I did in order to create the Shaker Frame!! 

I Started by creating the Card Layout 5 Shaker Frame!! I Die Cut 5 Frames from White Cardstock and Layered them together!! Then I Die Cut the Main Frame as well as the Inside Pieces from some Patten Paper from both the Autumn Meows and Autumn Woofs Paper Pads!! 
I added the Trinity Stamps Embellishments I used the NEW Polished Pistachio Confetti, Orange Shaker Pop and Honey Shaker Pop Mixes for the Shaker Bits and I LOVE how they look with the Pattern Papers!! The Colors coordinate so well together!! 
Thanks a Latte Shaker Card by Larissa Heskett for Newton's Nook Designs using Autumn Coffees Stamp Set, Autumn Coffees Die Set, Card Layout 5 Die, Circle Frames Die Set, Autumn Woofs and Autumn Meows Paper Pads
Next I Stamped and Embossed the Image from the NEW Autumn Coffees Stamp Set!! I colored it with Copic Markers!!
Orange:
YROO, YR18 & YR68   Brown: E40, E43 & E47
Yellow:
Y00, Y13 & YR23    Cream: W0 & W2
Turquoise: BG10    White: N0    Green: YG61 & YG63
Then I Die Cut the Image out using the coordinating
NEW Autumn Coffees Die Set!! I added some White Gel Pen Highlights!! 

Then I Layered a Scalloped Frame and Stitched Circle from the Circle Frames Die Set!! I also Stamped and Embossed the Sentiment onto another Stitched Circle also from the Circle Frames Die Set!! I LOVE how the WoW Bright White Embossing Powder POPS off the Colored Cardstock!! 
 This Design just makes me HAPPY and the Sound of the Shaker Embellishments just adds to the Design!! This would be a PERFECT Card for ANY Occasion and you could even include a Gift Card for any EXTRA Surprise!! 
Thanks a Latte Shaker Card by Larissa Heskett for Newton's Nook Designs using Autumn Coffees Stamp Set, Autumn Coffees Die Set, Card Layout 5 Die, Circle Frames Die Set, Autumn Woofs and Autumn Meows Paper Pads
I LOVE how this Card turned out and  hope it INSPIRES You to create some Shaker Cards using your FAVORITE Card Layout Dies!! 

Enter to Win a $25 Prize!

One lucky winner will receive a $25 prize to spend at Newton's Nook Designs online shop! The winner will be chosen at random from the collective blog posts featuring our new products this week. For a chance to win, leave comments on the Design Team Member Blog Posts (see list below) from Tuesday September 9 through Thursday September 11th. You will not know which blog has been chosen so the more you comment on the better your chances are of winning! You have until Thursday, September 11th at 9 pm ET to comment -- winners will be announced on the NND blog on Friday, September 12th.

Check out all the awesome Design Team Blogs below to enter:

Newton's Nook Designs

Donna Idlet

Larissa Heskett

Samantha Mann

Diane Morales

Amanda Wilcox


THANKS SO MUCH for stopping by today I hope you feel INSPIRED!!?? Make sure to join us again tomorrow for another look at the NEW Products!! We'll also be sharing MORE Inspiration with an Instagram Hop on Friday and another chance to WIN!! The New Products will be available in the Newton's Nook Designs Store on Friday September 12th, 2025!!
I hope you have a 
FABULOUS WEEK!! 

COUNTRY HUGS-N-KISSES
LARISSA
 ðŸ’–

Tuesday, August 15, 2023

Newton's Nook Designs August Release ~ Chrysanthemum Stamp Set + coordinating Chrysanthemum Die Set!!

Pin It
Newton's Nook Designs August Release Available August 18th 2023

 
HELLO CRAFTY FRIENDS!!

Welcome to Day of the Newton's Nook Designs August Release!! Toady we are Showcasing the NEW Chrysanthemum Stamp Set!! 
Here's a Look at the NEW Set!! 
Chrysanthemum Stamp Set + coordinating Chrysanthemum Die Set by Newton's Nook Designs
SWOON!! I LOVE this addition to the Floral Collection!!
Here's what I've created for today!! 

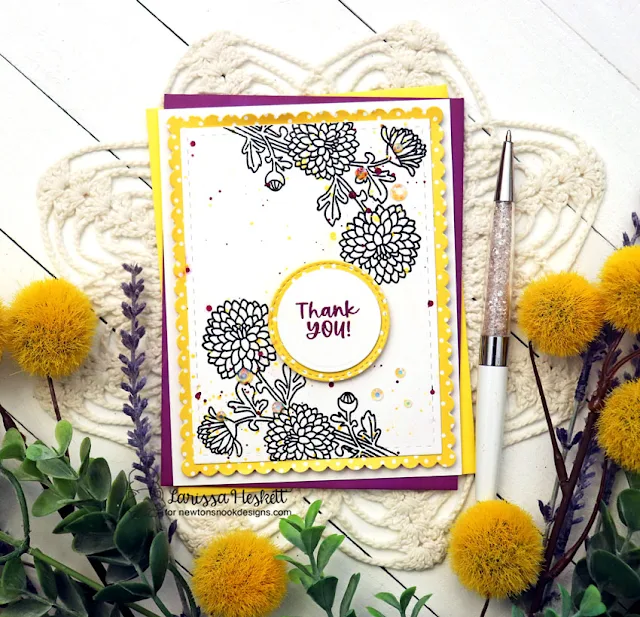
Thank You Card by Larissa Heskett for Newton's Nook Designs using Chrysanthemum Stamp Set, Chrysanthemum Die Set, Frames & Flags Die Set, Circle Frames Die Set and Springtime Paper Pad
I Started by Stamping and Embossing the Images onto the Card Panel using Versa Fine Black Onyx Ink and WoW Clear Gloss Embossing Powder!! Then I added some Yellow and Purple Distress Mica Splatters to the Card Panel!! SQUEAL!! I LOVE the POPS of both Color and Shimmer this adds to the Card!! 
Thank You Card by Larissa Heskett for Newton's Nook Designs using Chrysanthemum Stamp Set, Chrysanthemum Die Set, Frames & Flags Die Set, Circle Frames Die Set and Springtime Paper Pad
Then I Die Cut the Scalloped Rectangle Frame from the Frames & Flags Die Set from some of the Springtime Paper Pad in Yellow Dot Paper!! I also Die Cut a Circle from the same Paper using the Circle Frames Die Set!! I Stamped and Embossed the Sentiment using Seedless Preserves Distress Oxide Ink and WoW Clear Gloss Embossing Powder!! 
Thank You Card by Larissa Heskett for Newton's Nook Designs using Chrysanthemum Stamp Set, Chrysanthemum Die Set, Frames & Flags Die Set, Circle Frames Die Set and Springtime Paper Pad
I Adhered the Circle Sentiment on to the Card Panel using Foam Tape for some Dimension and then added some Trinity Stamps Fairy Rocks Rhinestones to finish off the Card Design!! I LOVE the Iridescent Sparkle!! 
Thank You Card by Larissa Heskett for Newton's Nook Designs using Chrysanthemum Stamp Set, Chrysanthemum Die Set, Frames & Flags Die Set, Circle Frames Die Set and Springtime Paper Pad

Would you like to win the “Chrysanthemum” Stamp Set?
This stamp set will be given away to ONE Lucky Winner!!

Here's how to win: Comment on the NND blog and Design Team blogs (see list below)! The winner will be chosen at random from the collective reveal posts. Make sure to check out each of their blogs and comment for your chance to win. You will not know which blog has been chosen so the more you comment on the better your chances are of winning! You have until Thursday August 17th at 9pm ET to comment  -- winners will be announced on the blog post on Friday, August 18th. 


THANKS SO MUCH for stopping by today!! Make sure to leave me comments from ALL of the Release Week Posts for your chance to WIN!!
Then check out the Newton's Nook Designs Blog on Friday, August 18th to see if you're one of the LUCKY Winners!! 

Have a FABULOUS WEEK!!

LARISSA HESKETT ðŸ’–

Thursday, July 14, 2022

Newton's Nook Designs July Release 2022 ~ Bokeh Balloons Stencil Set ~ Birthday Release Recap!!

Pin It
Newton's Nook Designs July 9th Birthday Celebration Release 2022
HELLO CRAFTY FRIENDS!!
 
I'm here with Day 4 of the 
Today I'm showcasing the NEW Bokeh Balloons Stencil Set!!
Let's take a look at this AWESOME NEW Set!!
If you LOVE Stencil Sets, this one is a MUST Have for your Collection!! I LOVE all of the possibilities with this Set!! You can use ANY of your FAVORITE Inks or Mediums to make this Set come to life!!
SQEAL!! Cards for ANY Occasion made EASY!! 

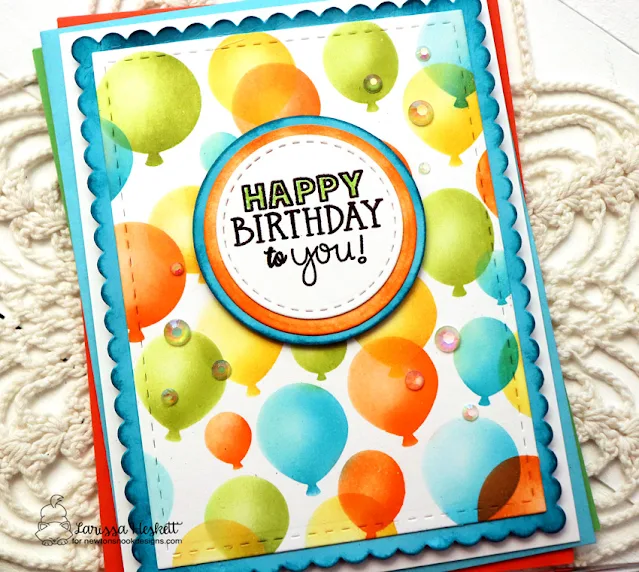
I Started by Spraying the back side of the NEW Bokeh Balloons Stencils with Pixie Spray!! Then I Placed Stencil #1 onto the Card Panel I Die Cut from some Distress Watercolor Cardstock and placed it firmly into place!!  

Then I Inked the Balloons using some Distress Oxide and Distress Inks using some SSS Small Ink Blending Brushes to add some Shading to the Balloons for the look of Dimension and Highlights!! I used Scattered Straw and Fossilized Amber for the Yellow Balloons, Ripe Persimmon for the Orange Balloons, Peeled Paint for the Green Balloons and Salvaged Patina and Peacock Feathers for the Turquoise Balloons!! 

I removed the Stencil #1 once it was completely Inked and then Lined up the Etching marks on the Stencil #2 with the Inked Balloons and pressed the Stencil Firmly into place and then Inked again with the same Ink combos trying not to overlap any of the same color of Balloons!! Once completely Inked I removed the Stencil #2 and this is the BEAUTIFUL Panel I was left with!! 

Next I Stamped and Embossed the "Happy Birthday to You" Sentiment from the NEW Birthday Oval Stamp Set using Versa Fine Black Onyx Ink and Embossed with WoW Clear Gloss Embossing Powder onto a Circle Die Cut from the Circle Frames Die Set!!
Then I Colored the "Happy" with a
Copic Marker YG03
I Die Cut two Layering Circles and Inked them with Distress Inks to match the Inked Balloons!! Then I layered them together and adhered the Circle Sentiment to the Card Panel using Foam Tape!! 
I then Die Cut a Scalloped Frame from some Distress Watercolor Cardstock using the Frames & Flags Die Set and Inked it with Peacock Feathers Distress Ink!! Then I adhered the Stenciled Card Panel and adhered the Scalloped Panel onto a White A2 Cardbase using Faom Tape!! 
I finished off the Card Design by adding some Trinity Stamps Fairy Rocks Rhinestones to add a touch of Sparkle and I LOVE how this Card turned out!! It's SO VERSITLE too as it could be used for either a Masculine or Feminine Birthday Card!! 

Would you like to win the Bokeh Balloons Stencil Set!!?? 
This stamp set will be given away to ONE lucky winner!!

Here's how to win: Comment on the NND blog and Design Team blogs (see list below)! The winner will be chosen at random from the collective reveal posts. Make sure to check out each of their blogs and comment for your chance to win. You will not know which blog has been chosen so the more you comment on the better your chances are of winning! You have until Thursday July 14th at 9pm ET to comment  -- winners will be announced on the blog post on Friday July 15th. 

Check out all the awesome Design Team Blogs below to enter:

Newton's Nook Designs

Donna Idlet

Ellen Haxelmans

Larissa Heskett

Samantha Mann

Zsofia Molnar

Farhana Sarker

Tatiana Trafimovich

Amanda Wilcox

THANKS SO MUCH for stopping by today!! Make sure to leave me comments from ALL of the Release Week Posts for your chance to WIN!!
Then check out the Newton's Nook Designs Blog on Friday, July 15th to see if you're one of the LUCKY Winners!! 

Have a FABULOUS WEEKEND!!

LARISSA HESKETT ðŸ’™

Tuesday, August 18, 2020

Newton's Nook Designs August Release ~ Paw-tumn Newton, Fall Roundabout & Heartfelt Wishes!!

Pin It

HELLO CRAFTY FRIENDS!! 
I'm here with Day 2 of the 
Today we're showcasing the NEW "Paw-tumn Newton" Stamp Set + coordinating Dies"Fall Roundabout" Stamp Set, and "Heartfelt Wishes" Stamp Set!! 
Let's take a look at the AWESOME New Set!!
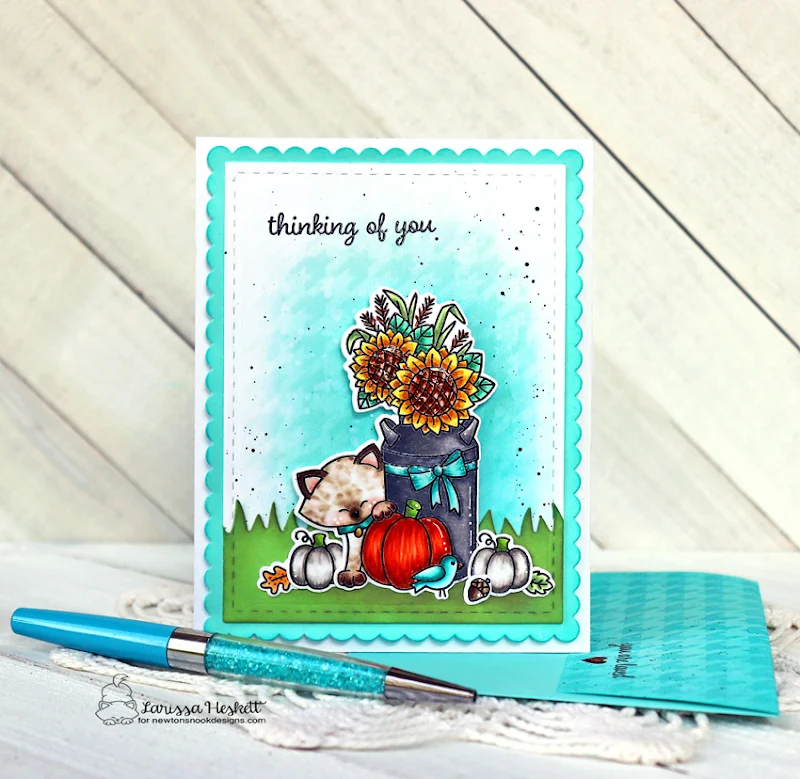
I Started by Stamping and Embossing the Images from the NEW Paw-tumn Newton Stamp Set!! I used Copic Markers to color them!! Sunflowers: Y11, Y15 & YR23  Greenery: G00, G02 & G17  YG61, YG63 & YG67  Milk Can: T0, T1, T3 & T5   Kitten: E40, E43, E44 & E47   Pumpkins: YR00, YR02, YR18 & YR68   T0, T1 & T3   Bird: BG10, BG45 & BG49  Leaves: YG61, YG63 & YG67    Y11, Y21 & Y26  Acorn: E40, E43, & E47  
Then I used the coordinating NEW Paw-tumn Newton Dies to Die Cut the Images!! I added some White Pen Details and some Gold Glitter Pen and Morning Dew Nuvo Drops to the Sunflowers for some extra Sparkle and Dimension!! 
I created the Background using the NEW Houndstooth Stencil!! I Sprayed the back of the Stencil with Therm O Web Pixie Spray and then adhered it to my Card Panel!! I then Inked with some Peacock Distress Oxide Ink!! Then I removed the Stencil and Inked over the Stenciled Design with some Tumbled Glass Distress Oxide Ink!! Then I added some Water Splatters and some Black Soot Distress Paint Splatters!! I Stamped and Embossed the Sentiment and then I Die Cut the Grass using the NND Land Borders Die and Inked it up using some Shabby Shutters and Lucky Clover Distress Oxide Inks!! I added some Vintage Photo Distress Oxide Ink for the Shadows!! 
I adhered the Images to my Card Panel to create the Scene!! Then I Die Cut a Frames & Flags Scalloped Rectangle from some TE Cookie Monster Cardstock and adhered the Card Panel to the center of the Frame!! I adhered it to my Cardbase using some Fun Foam and Gina K Designs Terrific Tape!! I wanted to create a coordinating Envelope, so I used a TE Cookie Monster Envelope and adhered the NEW Houndstooth Stencil over the Envelope Flap and Inked with Peacock Feathers Distress Oxide Ink using the TE Blender Brushes!! I Stamped and Embossed the Sentiment from the NEW Heartfelt Wishes Stamp Set!! I added some Red Glitter Nuvo Drops to the Stamped Heart!! I finished off the Envelope by adding some Black Soot Distress Paint Splatters!! 
For my next Card I created a Multi Colored background using strips of Therm O Web Deco Foil Flock Sheets in Emerald Green, Teal Waters, Tuscan Gold, Green Envy and Sunshine Yellow!! I adhered them all onto my Card Panel and then Inked around the edges of the Panel with some Vintage Photo Distress Oxide Ink!! Then I stamped the Sentiments from the NEW Fall Roundabout Stamp Set onto the Deco Foil Flock Strips using Snowflake Stazon Pigment Ink!! I LOVE the way it looks!! 
Then I Stamped and Embossed the NEW Fall Roundabout Stamp onto a TE Toffee Cardstock with WoW Bright White Embossing Powder!! I Die Cut it using the Circle Frames Die and then I inked the edges with Vintage Photo Distress Oxide Ink!! I Colored in the Leaves with a Gold Glitter Pen!! SWOON!! The shimmer is just BEAUTIFUL!! Then I Die Cut a Deco Foil Emerald Green Circle and the White Scalloped Frame and adhered them all together!! I adhered it to the Card Panel using Gina K Designs Foam Squares!!  
I adhered some Pretty Pink Posh Marigold Jewels and my Card was finished!! I wanted to create a coordinating Envelope so I started with a MFT Green Room Envelope and I Stamped the NEW Fall Roundabout Image onto the Flap of the envelope using some Sugar Cube TE Ink!! I Stamped and Embossed the Fall Blessing Sentiment with some Vintage Photo Distress Oxide Ink!! It's so FUN being able to create coordinating envelopes, plus it lets me use my products in a different way!! I hope I've INSPIRED you to give it a try!!??

Would you like to win the "Paw-tumn Newton" or "Fall Roundabout" Stamp Set!!?? 

 This stamp set will be given away to ONE lucky winner!!

Here's how to win: Comment on the NND blog and Design Team blogs (see list below)! The winner will be chosen at random from the collective reveal posts. Make sure to check out each of their blogs and comment for your chance to win. You will not know which blog has been chosen so the more you comment on the better your chances are of winning! You have until Thursday August 20th at 9pm EST to comment  -- winners will be announced on the blog post on Friday, August 21st. 

Check out all the awesome Design Team Blogs below to enter:

Newton's Nook Designs

Ellen Haxelmans

Larissa Heskett

Samantha Mann

Zsofia Molnar

Maria Russell

Andrea Shell

Tatiana Trafimovich

Amy Tsuruta

Amanda Wilcox


THANKS SO MUCH for stopping by today!!  
Don't forget to visit tomorrow for a look at the 
NEW "Batty Newton" Stamp Set + coordinating Dies"Spooky Roundabout" Stamp Set, and the Spiderweb Stencil!! Don't forget to check out the Newton's Nook Designs Blog on the 21st to see if you're one of the LUCKY Winners!! 
Have a FABULOUS WEEK!!

COUNTRY HUGS-N-KISSES
LARISSA   ðŸ’—
S U P P L I E S
Below you will find links to the supplies used to create this project(s). Click the icon for the store underneath the thumbnails to start shopping. Where available I use compensated affiliate links at no extra cost to you. Your support helps me to keep bringing you new projects. Thank you!!