Showing posts with label Hyacinth Stamp Set. Show all posts

Thursday, April 23, 2026

Thanks so Much Card w/ Newton's Nook Designs!!

Pin It


Hello Crafty Friends!! 
Today I'm sharing a SWEET Spring Thank You Card using a combination of some of my FAVORITE Spring Images!! I LOVE that you can use several of the Images from the Postage Sampler Sets along with some of your favorite Floral Images to create a Scene FULL of Delight!! I hope this Card INSPIRES You to create some Scenes for your next Thank You Card!!
I Started by Stamping and Embossing the Images from the Autumn Fields Stamp Set, Hyacinth Stamp Set and the Images from the Easter Postage Sampler Stamp Set on White Cardstock using Versa Fine Black Onyx Ink and WoW Clear Gloss Embossing Powder!!
  Then I Colored the Images using Copic Markers!!

Green: YG61, YG63 & YG67
Yellow: Y00, Y13 & YR23    Brown: E40, E43 & E47
  Pink: RV00, RV52 & RV55   Purple: V000, V15 & V09
White: N0 & N3  Orange: YR00 & YR68
   Dark Green: G12, G14 & G19
I used the coordinating 
Autumn Fields Die Set, Hyacinth Die Set and Easter Postage Sampler Die Set to Die Cut the Image out!! I added White Gel Pen & Black Glaze Pen Highlights and then I added some Sunshine Glitter Nuvo Drops to the center of the Hyacinth Flowers for some added dimension and Sparkle!! Then I added some Glossy Accents to the center of the Sunflowers for some Dimension and Shine!!

For the Background Panel I Die Cut a Piece of White Cardstock using the Basic Frames Die Set!! Then I Inked the Background using Gathered Twigs and Salvaged Patina Distress Oxide Inks!! I Masked the Bottom of the Panel and then added some Black Soot Distress Paint Splatters as well as some Salvaged Patina Distress Spritz Splatters!! I LOVE the Texture and Shimmer it adds to the Background!! 

I Die Cut some Pattern Paper from the Bright Basics Paper Pad using the Framework Die Set, cutting it on a Diagonal for a FUN Look and adhered the Stitched Background Panel!! Then I Stamped and Embossed the Sentiment onto the Banner Trio Die Cut from some Black Cardstock and Embossed with some WoW Bright White Embossing Powder!! I adhered it to the bottom of the Images and the Card is Finished!!

So there you have it a SWEET Spring Thank You Card using a combination of some of my FAVORITE Spring Images!! I hope this INSPIRES You to create some Thank You Cards for your needs and have FUN combining Images from different Collections!! If you create something I hope you'll share with us on Social Media!! 
Happy Crafting, Friends!! 
 Larissa Heskett
 ðŸ’—


Thursday, April 2, 2026

A Little Hello Card with Newton's Nook Designs!!

Pin It


HELLO CRAFTY FRIENDS!!

Today I'm up on the Newton's Nook Designs Blog sharing an GORGEOUS Spring Card card featuring the Tulips Stamp Set and coordinating Tulips Die Set, Hyacinth Stamp Set, Spring Blooms Paper Pack and the Circle Frames Die Set!! SQUEAL!! I just ADORE how all of these products work together and I hope it INSPRES you to combine some of your FAVORITE Products together!! Let's get started!!

I Started by Stamping and Embossing the Tulips and Butterfly from the Tulips Stamp Set!! I Stamped with Versa Fine Black Onyx Ink and WoW Clear Gloss Embossing Powder!! Then I used Copic Markers to Color the Images!! 
Yellow: Y00, Y13 & YR23       Green: YG61, YG63 & YG67
Purple: V00, V15 & V09        Grey: N0 & N3
Then I used the coordinating Tulips Die Set to Die Cut the Images out!! I used a White Gel Pen to add some Highlights to the Images!! 

Next I Cut the BEAUTIFUL Tulip Pattern Paper from the Spring Blooms Paper Pack to create my Card Panel!! Then I Die Cut the Green Pattern Paper also from the Spring Blooms Paper Pack using the Circle Frames Die Set!! I Die Cut some White Cardstock using the same Circle Frames Die Set and Inked it using some Salvaged Patina and Peeled Paint Distress Oxide Inks to create my Background!! Then I Adhered the Tulip and Butterfly Images!! I Stamped and Embossed the Sentiment from the Hyacinth Stamp Set using WoW Clear Gloss Embossing Powder and then adhered it to some Circle Frames using the same pattern Paper!! I added some Trinity Stamps Rhinestones to finish off the Design and I LOVE the way this GORGEOUS Spring Card turned out!! 

I hope this Card INSPIRES You today to create some Spring Cards using some of your FAVORITE Products!! I'm so READY for ALL of the Spring Flowers!! 

THANKS SO MUCH for stopping by today!!  
I hope you have a 
FABULOUS and BLESSED Easter Weekend!! 

COUNTRY HUGS-N-KISSES

LARISSA ðŸ’– 


Thursday, April 17, 2025

Newton's Nook Designs April Release 2025 ~ Filigree Oval Frame Die Set!!

Pin It

HELLO CRAFTY FRIENDS!! 

Welcome to Release Week for the Newton's Nook Designs April Release 2025!!
Today I'm sharing a Project that I've made using the
NEW Filigree Oval Frame Die Set!!
Here's a Close up look at the NEW Product being showcased Today!!

How BEAUTIFUL is this NEW Filigree Oval Frame Die Set!!??
I LOVE all of the possibilities and a FUN Fact about that Oval Frame is that it fits PERFECTLY inside of the Oval Frame Die Set Oval for the PERFECT Layered Oval!! You can see that on my Project HERE from yesterday!! SQUEAL!! That makes me HAPPY as I can now use it for even more Projects!! 

I Started by Die Cutting the NEW Filigree Oval Frame Die from some White Cardstock 3 Times and I adhered them altogether!! I removed all of the Oval Frame Centers and Inked one of them using some Salvaged Patina Distress Oxide Ink!! Then I adhered the Filigree Oval Frame Stack to an A2 White Cardstock Cardbase and adhered the Inked Oval Frame to the center!! 

I Stamped and Embossed the Hyacinth Image from the Hyacinth Stamp Set using Versa Fine Black Onyx Ink and Embossed with WoW Clear Gloss Embossing Ink!! Then I Colored with Copic Markers!!
Then I used the coordinating Hyacinth Die Set to Die Cut the Image out!! I added some White Gel Pen Highlights and some Nuvo Glitter Gel to the center of the Flowers for some Sparkle and Dimension!! Then I adhered the image to the center of the Oval Frame!! 


I Stamped and Embossed the Sentiment onto some White Cardstock using Versa Fine Black Onyx Ink and WoW Clear Gloss Embossing Powder and then Die Cut it out using the Circle Frames Die Set!! I then adhered the Sentiment to the NEW Filigree Oval Frame and adhered a Sprinkling of some Trinity Stamps Amethyst Accent Rhinestones for even more Sparkle and Shine and I LOVE how it turned out!! 


Enter to Win a $25 Prize!

One lucky winner will receive a $25 store credit to spend at Newton's Nook Designs online shop! The winner will be chosen at random from the collective blog posts featuring our new products this week. For a chance to win, leave comments on the Design Team Member Blog Posts (see list below) from Wednesday, April 16 and Thursday April 17th. You will not know which blog has been chosen so the more you comment on the better your chances are of winning! You have until Thursday, April 17th at 9 pm ET to comment -- winners will be announced on the NND blog on Friday, April 18th.


Check out all the awesome Design Team Blogs below to enter:

Newton's Nook Designs

Donna Idlet

Larissa Heskett

Samantha Mann

Diane Morales

Farhana Sarker

Amanda Wilcox

THANKS SO MUCH for stopping by today and make sure to join us again tomorrow for a look at more of the NEW Products that'll be available in the Newton's Nook Designs Store on Friday April 18th, 2025!!
I hope you have a 
FABULOUS and BLESSED EASTER WEEK/WEEKEND!! 

COUNTRY HUGS-N-KISSES
LARISSA ðŸ’–


Thursday, February 27, 2025

Newton's Nook Designs Spring Release ~ Hyacinth Stamp Set & Daisies Die Set!!

Pin It

Newton's Nook Designs Spring Release 2025 available on Friday February 28th
HELLO CRAFTY FRIENDS!! 

Welcome to Release Week for the Newton's Nook Designs December Release 2024!! Today I'm sharing a Project that I've made using the NEW Hyacinth Stamp Set + coordinating NEW Hyacinth Die Set
& the Daisies Die Set!!
Here's a Close up look at ALL of the NEW Products being showcased Today!!
Newton's Nook Designs Hyacinth Stamp Set  and coordinating Hyacinth Die Set & the Daisies Die Set
SWOON!! I'm ADORING these NEW Sets!! Spring Flowers are my FAVORITE and I LOVE that these products can be used Year Round for ANY Occasion!!
Here's what I've created for today!!
Happy Easter Card by Larissa Heskett for Newton's Nook Designs using Hyacinth Stamp Set, Spring Heights Stamp Set, Happy Easter Die Set, Frames & Tags Die Set & Basic Frames Die Set
I Started by Stamping and Embossing the NEW Hyacinth Stamp Set Images on White Cardstock using Versa Fine Black Onyx Ink and WoW Clear Gloss Embossing Powder!! Then I used Copic Markers to color the Images!! 
Yellow: Y00, Y13 & YR23   Purple: V000, V15 & V09
   Green: G12, G14 & G19
I used the coordinating NEW Hyacinth Stamp Set to Die Cut the Image out!! I added White Gel Pen & Black Glaze Pen Highlights and then I added some Sunshine Glitter Nuvo Drops to the center of the Flowers for some added dimension and Sparkle!!
Happy Easter Card by Larissa Heskett for Newton's Nook Designs using Hyacinth Stamp Set, Spring Heights Stamp Set, Happy Easter Die Set, Frames & Tags Die Set & Basic Frames Die Set
Next I create the Card Panel Die Cutting a Piece of White Cardstock using the Basic Frames Die Set!! I used the Argyle Stencil and some Salvaged Patina Distress Oxide Ink and Inked the Background!! Then I added some Mica Stain & Black Soot Distress Paint Splatters!! I LOVE the Dimension and Sparkle they add!! 
Happy Easter Card by Larissa Heskett for Newton's Nook Designs using Hyacinth Stamp Set, Spring Heights Stamp Set, Happy Easter Die Set, Frames & Tags Die Set & Basic Frames Die Set
I Die Cut the NEW Happy Easter Die Set from some White Cardstock 3 times and adhered them together!! I adhered them to the Card Panel and then adhered the Butterflies popping up the Wings for some Dimension!! I adhered the Hyacinth Image to a Panel from the A2 Card Layout 2 Die using Foam Tape for Dimension and adhered it to the Card Panel!! 
SQUEAL!! I LOVE the Dimension and the Sparkle and those Butterflies make me HAPPY and BRIGHTEN the Scene!! 
Happy Easter Card by Larissa Heskett for Newton's Nook Designs using Hyacinth Stamp Set, Spring Heights Stamp Set, Happy Easter Die Set, Frames & Tags Die Set & Basic Frames Die Set
I adhered the Card Panel to a Frames & Tags Die Set Panel Die Cut from some Turquoise Cardstock!! I LOVE how this turned out and I hope it INSPIRES you!! 
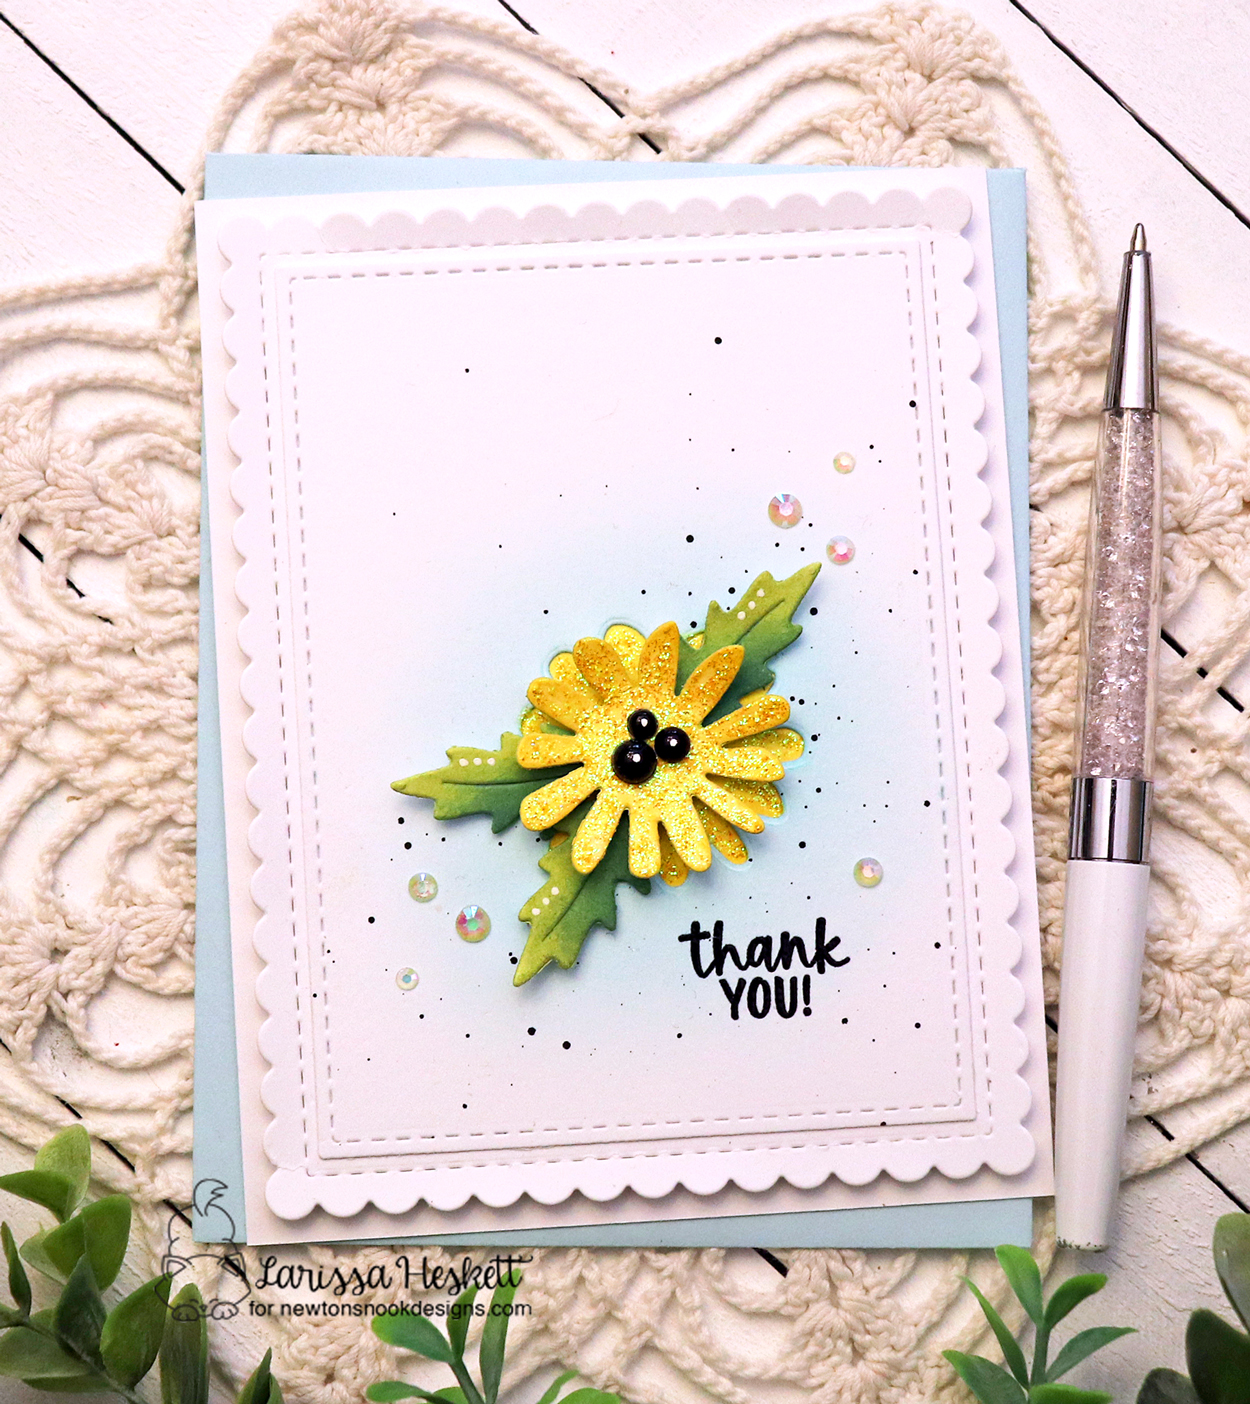
Daisy Thank You Card by Larissa Heskett for Newton's Nook Designs using Daisies Die Set, Hyacinth Stamp Set, Frames & Flags Die Set & Basic Frames Die Set
I Started by Die Cutting the NEW Daisies Die Set from some White Cardstock then I used Fossilized Amber Distress Oxide Ink to Ink the Daisy I then added some Sunshine Glitter Nuvo Drops!! I Inked the Leaves with some Bundled Sage & Rustic Wilderness Distress Oxide Inks!! I added some White Gel Pen Highlights and some Black Baubles to the Center of the Daisy!! 
Daisy Thank You Card by Larissa Heskett for Newton's Nook Designs using Daisies Die Set, Hyacinth Stamp Set, Frames & Flags Die Set & Basic Frames Die Set
I Die Cut the Card Panel from some White Cardstock using the Basic Frames Die Set!! I Die Cut the Daisy Die from the Card Panel and then I Inked with some Salvaged Patina Distress Oxide Ink!! Then I added some Black Soot Distress Paint Splatters for some Texture!! 
Daisy Thank You Card by Larissa Heskett for Newton's Nook Designs using Daisies Die Set, Hyacinth Stamp Set, Frames & Flags Die Set & Basic Frames Die Set
I Stamped and Embossed the "Thank You!" Sentiment using Versa Fine Black Onyx Ink and WoW Clear Gloss Embossing Powder!! Then I adhered the Die Cut Daisy off setting it from the Die Cut Panel Daisy and popping it up with some Foam Tape for Dimension!! 
Daisy Thank You Card by Larissa Heskett for Newton's Nook Designs using Daisies Die Set, Hyacinth Stamp Set, Frames & Flags Die Set & Basic Frames Die Set
I adheres some Trinity Stamps Fairy Rocks Rhinestones for some added Sparkle and Shine and then I adhered the Panel to a Frames & Flags Scalloped Panel Die Cut from White Cardstock!! I LOVE the Simple and Classic Design!! The Iridescent Sparkle from both the Daisy and the Fair Rocks Rhinestones really adds to the HAPPINESS of this Card!! 

Enter to Win a $25 Prize!!

One lucky winner will receive a $25 store credit to spend at Newton's Nook Designs online shop!! The WNNER will be chosen at random from the collective blog posts featuring our new products this week. For a chance to WIN, leave comments on the Design Team Member Blog Posts (see list below) from Tuesday, February 25th through Thursday February 27th. You will not know which blog will be randomly chosen so the more you comment on the better your chances are of winning!! You have until Thursday, February 27th at 9 pm ET to comment -- winners will be announced on the NND blog on Friday, February 28th!!

Want another chance to WIN!!?? We will be having an Instagram Hop on Friday with a Second Prize!!
Please join us over on Instagram on Friday, February 28th for details!!

Check out all the awesome Design Team Blogs below to enter:

Newton's Nook Designs

Donna Idlet

Larissa Heskett

Samantha Mann

Diane Morales

Farhana Sarker

Amanda Wilcox


THANKS SO MUCH for stopping by today and make sure to join us again tomorrow for a look at more of the NEW Products that'll be available in the Newton's Nook Designs Store on Friday February 28th, 2025!!
I hope you have a 
FABULOUS WEEK!! 

COUNTRY HUGS-N-KISSES
LARISSA ðŸ’–