Showing posts with label Foam Tape. Show all posts

Thursday, January 19, 2023

Spellbinders Clubs Blog Hop January 2023 ~ NEW Stitching Die Club + Giveaways!!

Pin It


HELLO CRAFTY FRIENDS!! 

I'm here today with Spellbinders for the January 2023 Clubs Blog Hop!! The Kits are SUPER Popular as they are an AMAZING Value!! Please note, the Large Die, Stitching Die, and 3D Embossing Folder of the Month Clubs are Sold Out for January!!  You will be able to Join these Clubs Next Month, in February though!!  Be sure to Join, and DON'T MISS OUT on the NEW Designs!!   
You should have arrived from the AMAZING Jess Gerstner Blog!!
 
I've created 2 Cards for today showing a couple different Ideas on how you can use the NEW Stitch Club Dies for January!!
 I Started with this Card Design using a Rainbow Color Pallet!! I used DMC Threads and LOVE hoe Bright and Cheerful this Card turned out!!   

I Stamped and "Thank You" Sentiment from the Sentimental Greetings Stamp Set that coordinates with the Stitching Die Set for this Month!! 

Then I added some of the Aurora AB Color Essentials Gems for a touch of Sparkle and I LOVE how it finished off the Design!! 

For my Second Card I've created a Shaker Card and I LOVE ALL of the possibilities with Set to create Shakers!! 

I Stamped and "Thank You" Sentiment from the Sentimental Greetings Stamp Set that coordinates with the Stitching Die Set for this Month!!
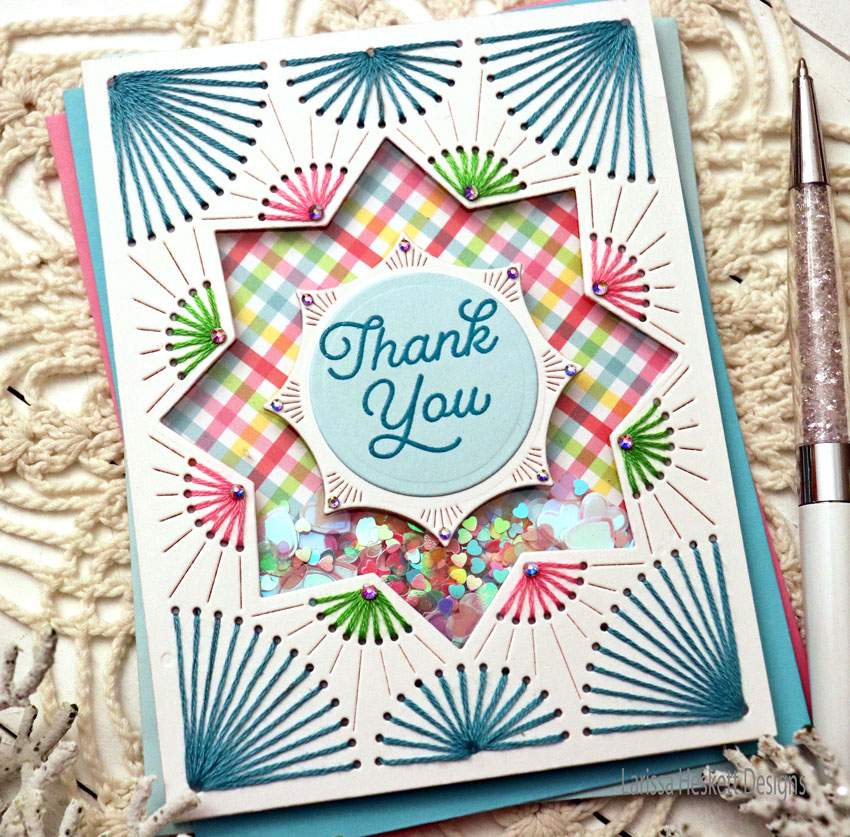
Then I added some of the Aurora AB Color Essentials Gems for a touch of Sparkle and I LOVE how it finished off the Design!!

I added some TS Embellishments for the Shaker Elements and I LOVE how FUN it is to Shake!! 

This Card Design would be PERFECT for almost ANY Occasion, just by switching out the Sentiment!! 
So there you have a Couple of Cards using the NEW Stitching Die Club!! I hope I've INSPIRED you today!!??
If you create something please be sure to tag us on Social Media using the #spellbinders #SpellbindersClubKits #NeverStopMaking and @spellbinders because we LOVE to see what you've Created!! 
Giveaway:
To celebrate this release, we are Giving Away a $25 Gift Certificate to 3 Lucky Blog Readers – selected from the comments on our blog. Giveaway closes on Sunday, January 22nd, 11:59 pm MST. The winner will be announced in this blog hop post the following Wednesday. The winner is responsible for shipping costs, duties, and taxes. Please note, store credit (gift certificate) cannot be applied to Club Subscriptions. Store credit can be applied to shop past Club products, Club extras and regular releases!! 


THANKS SO MUCH for stopping by today!! I hope I've INSPIRED you with some different ideas on ways to use the NEW Stitch Die Club of the Month Set and if you want to Join make sure to get signed up!!
Your NEXT STOP: the AMAZING Teri Duncan

Have a FABULOUS WEEKEND!! 

COUNTRY HUGS-N-KISSES
LARISSA đź’—

Wednesday, January 20, 2021

Newton's Nook Designs January Release 2021 ~ Love Emergency!!

Pin It


HELLO CRAFTY FRIENDS!! 

I'm here with Day 3 of the 
Today we're showcasing the NEW "Love EmergencyStamp Set + coordinating Love Emergency Die Set!!
Let's take a look at the AWESOME New Set!!
I LOVE this NEW "Love Emergency" Stamp Set and I wanted to create a Heart Tunnel Design in the Background!! That's where I started for this Card!! I Die Cut the Stitched Rectangle and laid out the NEW Heart Frames Die Set in order to create my Heart Tunnel!! 
I Die Cut the Stitched Heart Die from the Card Panel and then Inked the edges with some Tumbled Glass Distress Oxide Ink!! I used the NEW Slimline Heart Stencil to Ink the Stenciled Heart in the center of the Stitched Heart again using Tumbled Glass Distress Oxide Ink!! Then I used a Smallest Stitched Heart Die and Die Cut it from the Center of the Stenciled Heart in the Stitched Heart Die Cut!! I used Copic Markers in R14, R37 & R39 to color the Small Heart!! Then I went to work on the rest of the Background Panel!! I Masked off the Ground with some Purple Tape and then I Inked the Ground with Smoked Hickory Distress Oxide Ink!! Then I used the Purple Tape to Mask off the Ground and I inked the Sky with some Tumbled Glass Distress Oxide Ink!! Then I added some Water Splatters and Black Soot Distress Paint!! 
I Stamped and Embossed the Ambulance from the NEW "Love EmergencyStamp Set using Versa Fine Black Onyx Ink and Embossing with WoW Embossing Ink in Clear Gloss!! Then I Colored in the Image using Copic Markers!! 
I used: Ambulance: C2 & C0  Bumpers: C3 & C2  Tires: C8, C5 & C3  Red: R14, R37 & R39  Turquoise: BG00 & BG10  Yellow: Y11, YR23
  
Next I Stamped and Embossed the Sentiment also from the NEW "Love EmergencyStamp Set using Versa Fine Black Onyx Ink and Embossing with WoW Embossing Ink in Clear Gloss!! I placed everything into my MISTI Stamping Tool and then Stamped my sentiment!! 
 In order to create the Tunnel affect to my Heart Background I glued the Red Heart to the Background Card Panel!! Then I Adhered the Second Heart Layer using Gina K Designs Foam Tape and adhered it over the Red Heart!! Then I Adhered the Main Card Panel using 2 Layers of Gina K Designs Foam Tape!! In real life the affect if really STUNNING!! 
Then I adhered the Ambulance Image to the Card Panel using more Foam Tape!! I attached the Card Panel to a NND Framework Die Cut from some Grey Cardstock!! A few Iridescent Jewels paired with a TE Sea Salt A2 Envelope Finishes off the Design!! 

Would you like to WIN the 

Smitten Kitten Stamp Set!!?? 

We will choose ONE lucky winner for each stamp set!! 

Here's how to win: Comment on the NND blog and Design Team blogs (see list below)! The winner will be chosen at random from the collective reveal posts. Make sure to check out each of their blogs and comment for your chance to win. You will not know which blog has been chosen so the more you comment on the better your chances are of winning! You have until Thursday January 21st at 9pm EST to comment  -- winners will be announced on the blog post on Friday, January 2nd. 

Check out all the awesome Design Team Blogs below to enter:

Newton's Nook Designs

Ellen Haxelmans


THANKS SO MUCH for stopping by today!! Make sure to leave me comments ALL Week for your chance to WIN!! I read EVERYONE and they MEAN more to me than you'll ever know!! Come back tomorrow for a look at the NEW Newton’s Mug Stamp Set and the coordinating Newton's Mug Stamp Set + “Love CafĂ©” Stamp Set and the coordinating Love CafĂ© Die Set!!
Don't forget to check out the Newton's Nook Designs Blog Friday January22nd to see if you're one of the LUCKY Winners!! 
Have a FABULOUS WEEK!!

COUNTRY HUGS-N-KISSES
LARISSA   đź’—

Sunday, October 13, 2019

You Are My Sunshine w/ Brutus Monroe!!

Pin It

Hello Crafty Friends!! 
I'm here today to share my last Guest Designer Project for Brutus Monroe!! I've created a STUNNING Card combining a Stenciled Glitter Glaze Background with Stamped Images!! 
I started by using a piece of Brutus Monroe Wagon Cardstock!! I sprayed the back of my Brutus Monroe Mermaid Lagoon ~ Tangled Wave Stencil with some Therm O Web Pixie Spray and adhered it over the Cardstock!! Then I took some of the Brutus Monroe Glitter Glaze in Scarlet and applied it over the Stencil using my Stencil Pal!! 
I removed the Stencil and washed it along with my Stencil Pal and set it aside to Dry!! I LOVE the way the colors work together!! It the PERFECT combination!! 
Next I Stamped and Embossed the Butterfly Image from the Take Flight Stamp Set and used Copic Markers in (Y11, YR23, R02, R05, R08, E41, N6 & N10) to color in the Image!! I added some Morning Dew Nuvo Drops to the Body of the Butterfly and the some of the Details on the Wings!! I also added some Midas Shimmer Pen to add some Gold Shimmer to the Yellow areas of the Butterfly!! I Stamped the Sentiment from the Sunshine Sunflower Stamp Set and inked it with some Zest Ink to make it POP!! 
I adhered the Butterfly Image after Fussy Cutting it out onto the Stenciled Card Panel using some Brutus Monroe Foam Tape!! I also added Foam Tape to the Sentiment and adhered it underneath the Butterfly!! A few Gold Foiled Pearls were scattered around to finish off the Design!! I layered a piece of Brutus Monroe Macchiato Cardstock and Die Cut a Scalloped Frame from some Brutus Monroe Lunch Bag Cardstock that I inked with some Walnut Distress Ink to tie it all together!! I adhered the Panel onto a Not Your Mamas Cadrbase and my card is ready to send to BRIGHTEN someone's Day!! 
THANKS SO MUCH for stopping by today and I hope I've INSPIRED you to give the Stenciled Glitter Glaze Technique a try with your Stamped Images!! Not only do they add texture, but the Sparkle and Shine are just STUNNING!! 
Have a FABULOUS WEEK!! 
COUNTRY HUGS-N-KISSES
LARISSA    =)