Saturday, February 22, 2020

Celebrating w/ CAS-ual Fridays Stamps and Crafting of Hue!!

Pin It
HELLO!!
I'm here with CAS-ual Fridays Stamps and were joining in a Sponsor Weekend with the Crafting of Hue Facebook Group!! If you're looking for a FUN and INSPIRING FB Group to join this is an AMAZING one!! 
I'm using the SWEET "Somebunny" Stamp Set today!! This set is SO VERSATILE!! I LOVE that you can use it for so many occasions!! Here's a close up look at this Set!! 
Isn't it the CUTEST!!?? Today I'm sharing a Masculine Card!! I wanted to show how EASY this set makes it to create a more Masculine Design as those are sometimes the thing I struggle with the most because I'm always more drawn to the "PRETTY" Stamp Sets!! So I want to show how you can use any of those Images and make them more Masculine just by the Design and Colors that you use!!
 I Started by Die Cutting my Stitched Panel!! I then used some Therm O Web Purple Tape and Masked off the edges of the Panel!! I wanted to stamp the "Hoppy Birthday" Sentiment across the bottom 2/3 of my Card!! So I placed it in my MISTI Stamping tool and stamped the Sentiment to create my Design using some Grout Grey Ink from MFT!! This is one of my FAVORITE Grey Inks!! I use it ALOT and LOVE that it can go either Grey or Kraft depending on what colors you pair with it!! Once the Stamping was all done, I Stamped and Embossed the Bunny Image using Versa Fine Black Onyx Ink and Embossing with WoW Clear Gloss Embossing Powder!! If you follow me you know I LOVE to Emboss ALL of my Images because of how BOLD it makes them look especially after coloring it!! I used Copic Markers!! (Bunny: W0, W2 & W5   Cheeks and Inside of Ears: R11  Balloon: R43, R46 & R89) 


I added some Tonic Studios Shimmer Pen to the Balloon and the Cheeks and Inside of the Ears on the Bunny, then I added some Morning Dew Nuvo Drops to the Balloon for some Dimension and Shine!! I inked the Sky on the Panel with some Tumbled Glass Distress Oxide Ink and added some Water Splatters for some Texture!! I also added some Black Soot Distress Paint Splatters and I LOVE the extra touch it adds to the design!! I adhered the Bunny onto the Panel using Foam Tape and then finished off the design with a few Pretty Pink Posh Silver Jewels!! A NND Scalloped Frame Die Cut from some TE Oreo Cardstock finishes off the Design!! I hope I've INSPIRED you to try to create some Masculine Cards using those "CUTE" Images in your Stash!! 

THANKS SO MUCH for stopping by today and I hope you'll check out the Crafting of Hue FB Group if you're looking for a Friendly and Inspiring Group to join!! 
Have a FABULOUS WEEKEND!! 

COUNTRY HUGS-N-KISSES
LARISSA   =) 

Thursday, February 20, 2020

Newton's Nook Designs February Release ~ Easter Lily & Hello Spring!!

Pin It
Hello!!
SQUEAL!!
         I'm here with Day 4 of the Newton's Nook Designs February Release!! 
       Today we're showcasing the NEW "Easter LilyStamp Set + coordinating "Easter LilyDies and the "Hello SpringStamp!! Let's take a look at the AWESOME New Sets!!
Easter Lily Stamp and Die Set by Newton's Nook Designs

Hello Spring Stamp by Newton's Nook Designs
Easter Blessings by Larissa Heskett for Newton's Nook Designs using Easter Lily Stamp and Die Set and Frames and Flags Die Set  #newtonsnook #newtonsnookdesigns #easterlily #eastercards
 For my first Card I wanted to use two of the Images!! I LOVE Lilies and this Image is just BEAUTIFUL!! I wanted to color them in a Traditional White Color, but I also think this would be just a BEAUTIFUL in other colors as well!! I Stamped and Embossed the Images and Colored them using Copic Markers!! I used Lilies: E81, Y00 & Y11   Greenery: YG61, YG63 & YG67) I then Die Cut them using the coordinating Die!! 
Easter Blessings by Larissa Heskett for Newton's Nook Designs using Easter Lily Stamp and Die Set and Frames and Flags Die Set  #newtonsnook #newtonsnookdesigns #easterlily #eastercards
 I Stamped and Embossed the Sentiment using WoW Clear Gloss Embossing Powder!! Then added Tumbled Glass Distress Oxide Ink to the top 3/4 of the Card Panel!! I added the Lily Images using Foam Tap and then adhered some Gold Pretty Pink Posh Jewels!! To finish off the Design I added some Tonic Studios Sunshine Glitter Nuvo Drops to the Stamen and adhered the Card Panel to a Frames and Flags Scalloped Frame Die Cut from some Wood Grain Patterned Paper that I inked with some Vintage Photo Distress Oxide Ink!! I LOVE the way it turned out!! 
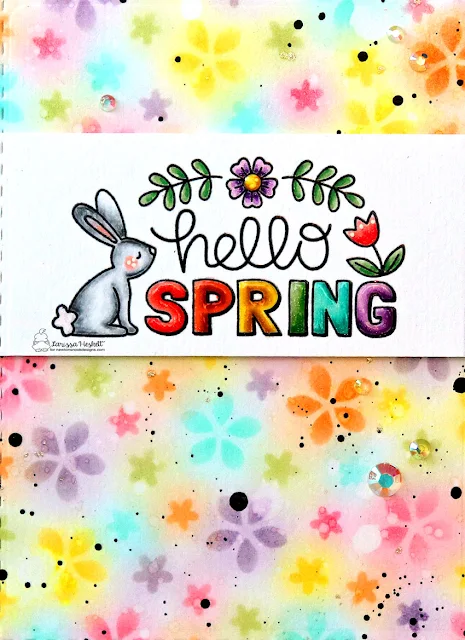
Hello Spring by Larissa Heskett for Newton's Nook Designs using Hello Spring Stamp, Petite Flowers Stencil and Frames and Flags Die Set  #newtonsnook #newtonsnookdesigns #hellospring #petiteflowersstencil #distressinks
I Started by Stamping and Embossing the NEW "Hello Spring" Image and colored it in using Copic Markers!! (Bunny: N0, N2 & N4  Cheeks and Inside of Ears: R11  Letters: R00, R11 & R22  YR00, YR02 & YR68  Y11, Y15 & YR23  YG61, YG63 & YG67  BG10, BG45, & BG49  V0, V09 & V15  Flowers: V0, V09 & V15  R00, R11 & R22  YG61, YG63 & YG67) 
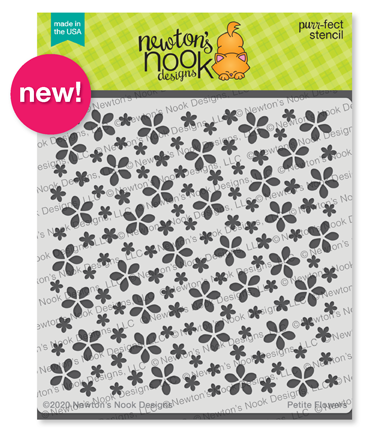
Petite Flowers Stencil by Newton's Nook Designs
Next I created the STUNNING Floral Rainbow Patterned Paper using the NEW Petite Flowers Stencil!! I Sprayed the back of the Stencil with some Therm O Web Pixie Spray and adhered it to my Card Panel!! I then took Distress Inks in Worn Lipstick, Carverd Pumpkin, Mustard Seed, Peeled Paint, Peacock Feathers and Wilted Violet and added them over the Stencil using Ink Daubers!! Once the Stencil Design was filled in, I removed the Stencil and then applied a small amount of the same color of Ink over and around the Stenciled Image to tie the entire piece together!! I then added some Water Splatters and removed it, then applied some Black Soot Distress Paint Splatters!! I adhered the Hello Spring Strip with Faom Tape and Adhered some Pretty Pink Posh Iridescent Jewels!! Then I adhered the Card Panel to a Frames and Flags Scalloped Frame Die Cut from some TE Oreo Cardstock!! 
Hello Spring by Larissa Heskett for Newton's Nook Designs using Hello Spring Stamp, Petite Flowers Stencil and Frames and Flags Die Set  #newtonsnook #newtonsnookdesigns #hellospring #petiteflowersstencil #distressinks
To finish off the Design I applied some Morning Dew Nuvo Drops over the Letters, The Bunny Tail and to the center of the Flower and I added some White Gel Pen Highlights!! 
I LOVE the way it turned out and I hope it INSPIRES you to try to create your own Patterned Papers using your Stencils!! 

Would you like to win the Easter Lily” or the “Hello SpringStamp Set!!?? 
This stamp set will be given away to ONE lucky winner!!
Here's how to win: Comment on the NND blog and Design Team blogs (see list below)! The winner will be chosen at random from the collective reveal posts. Make sure to check out each of their blogs and comment for your chance to win. You will not know which blog has been chosen so the more you comment on the better your chances are of winning! You have until Thursday February 20th at 9pm EST to comment  -- winners will be announced on the blog post on Friday, February 21st.

Check out all the awesome Design Team Blogs below to enter:

THANKS SO MUCH for stopping by today!!  
Don't forget to visit the Newton's Nook Designs Blog on the 21st to see if you're one of the LUCKY Winners!! 
Have a FABULOUS WEEK!!

COUNTRY HUGS-N-KISSES
LARISSA  =)

Wednesday, February 19, 2020

Newton's Nook Designs February Release ~ Newton's Rain Boots!!

Pin It
Hello!!
SQUEAL!!
         I'm here with Day 3 of the Newton's Nook Designs February Release!! 
       Today we're showcasing the NEW Newton's Rain Boots” Stamp Set + coordinating Dies!! 
Let's take a look at the AWESOME New Set!!
Newton's Rain Boots by Newton's Nook Designs
I've also used a couple of the other NEW Sets already showcased this week!!
The Raindrops Stencil and the Sky Scene Builder Die Set!! 
Here's a close up look just in case you missed them!! 
Raindrops Stencil by Newton's Nook Designs
Sky Scene Builders Dies by Newton's Nook Designs
It's HARD to pick a FAVORITE, but I think if I had too this Image would be it!! Isn't it just the SWEETEST!! Here's a look at the Card I created!! 
Cute Boots by Larissa Heskett for Newton's Nook Designs using Newton's Rain Boots, Raindrops Stencil & Sky Scene Builders Die Set #newtonsnook #newtonsnookdesigns #newtonsrainboots #thermoweb #wowembossing
 I Started by Stamping and Embossing the Images from the Set!! SQUEAL!! They just make me SMILE!! I then used Copic Markers to color them in!! I used (Cat: E40, E42, E44, E47 & E99  Cheeks and Inside of Ears: R11  Rain Boots: BG10, BG45 & BG49  N0, N2 & N4   N4, N6 & N8  Flowers: R43, R46 & R89  N0, N3 & Y11  R00, R22 & Y11  Ducks: Y11, Y15 & YR23  R11  YR02 & YR68) 
Next I Started on the Background Panel!! I knew I wanted to use the NEW Raindrop Stencil, so I sprayed the back of the Stencil with some Therm O Web Pixie Spray and adhered it over my Background Panel!! I Inked with some Tumbled Glass Distress Ink and then applied some Therm O Web Transfer Gel using the Stencil Pal randomly concentrating most of the Gel on the Right hand side of the Card Panel!! I removed my stencil and set the Panel aside to Dry!! Here's a Close up look as I know it's hard to see in the Front Facing Picture!! 
Cute Boots by Larissa Heskett for Newton's Nook Designs using Newton's Rain Boots, Raindrops Stencil & Sky Scene Builders Die Set #newtonsnook #newtonsnookdesigns #newtonsrainboots #thermoweb #wowembossing

I LOVE the subtle look that the Gel gives so that the SWEET Images remain the Focal Point of the Design!! Next I Inked the background with some Tumbled Glass Distress Oxide Ink, leaving some White areas for interest!!  Then Die Cut 3 of the Clouds from the NEW Sky Scene Builder Set and colored them some Hickory Smoke Distress Oxide Ink using an Ink Dauber!! I placed the Panel in my MISTI Stamping Tool and used a Static Tool to remove any dampness from the area where I Stamped and Embossed the Sentiment!! I used WoW Clear Gloss Embossing Powder and masked off the "Cute Boots" part of the sentiment and Embossed it with some of the   WoW Embossing Glitter!! I LOVE the addition of the Sparkle!! I Die Cut 2 of the Land Border Dies for the Layered Grass and Inked them using Peeled Paint and Lucky Clover Distress Oxide Inks!! 
Cute Boots by Larissa Heskett for Newton's Nook Designs using Newton's Rain Boots, Raindrops Stencil & Sky Scene Builders Die Set #newtonsnook #newtonsnookdesigns #newtonsrainboots #thermoweb #wowembossing
I adhered the Grass Layers and the Clouds down to the Background Panel using some iCraft Ultra Bond Adhesive and then I adhered the Flowers and adhered the Images using some Foam Tape!! Some White and Black Gel Pen Details add character to the Images and then I added some Nuvo Drops in Sunshine Glitter to the center of the Flowers and Nuvo Drops in Morning Dew to the Buckle and Bottom of the Rain Boots and to the Beaks and Feet of the Ducks for some Dimension!! I just LOVE the way this turned out and I CAN'T WAIT to see what you create with this SWEET Set!! 

Would you like to win the “Newton's Rain Boots Stamp Set!!?? 
This stamp set will be given away to ONE lucky winner!!
Here's how to win: Comment on the NND blog and Design Team blogs (see list below)! The winner will be chosen at random from the collective reveal posts. Make sure to check out each of their blogs and comment for your chance to win. You will not know which blog has been chosen so the more you comment on the better your chances are of winning! You have until Thursday February 20th at 9pm EST to comment  -- winners will be announced on the blog post on Friday, February 21st.

Check out all the awesome Design Team Blogs below to enter:

THANKS SO MUCH for stopping by today!! Please come back tomorrow for a look at the NEW "Easter LilyStamp Set + coordinating "Easter LilyDies and the "Hello SpringStamp!!  
Don't forget to visit the Newton's Nook Designs Blog on the 21st to see if you're one of the LUCKY Winners!! 
Have a FABULOUS WEEK!!

COUNTRY HUGS-N-KISSES
LARISSA  =)

Tuesday, February 18, 2020

Newton's Nook Designs February Release ~ Bitty Bibs & Sky Scene Builder Dies!!

Pin It
Hello!!
SQUEAL!!
         I'm here with Day 2 of the Newton's Nook Designs February Release!! 
       Today we're showcasing the NEW "Bitty BibsStamp Set + coordinating "Baby BibsDies and the "Sky Scene BuilderDies!! Let's take a look at the AWESOME New Sets!!
Newton's Nook Designs Bitty Bibs Stamp Set & Baby Bobs Dies  #newtonsnook #bittybibs #babybibs #babycards

Newton's Nook Designs Sky Scene Builder Dies #newtonsnook #skyscenebuilder #scenecard
How FUN are these NEW Sets!!?? I'm just in LOVE and here's what I've Created!!
Congratulations by Larissa Heskett for Newton's Nook Designs using Bitty Bibs, Baby Bibs Dies, Frames and Flags Die Set  #newtonsnook #bittybibs #babybibs #babycards
I LOVE the color Lavender especially for Baby Cards!! So that's the direction I went and I LOVE the results!! I Started by Stamping and Embossing the Sweet Bunny Bib Image and I colored it in with Copic Markers using (Bunny: N0, N2 & N4  Cheeks and Inside Ears: R11 Flowers: V0, V15 & V09  Y00 & YR23) I Die Cut the Frames and Flags Scalloped Frame from some TE Lavender Glaze Cardstock and used Wilted Violet Distress Ink to ink the Edges of the Scalloped Frame!!

Congratulations by Larissa Heskett for Newton's Nook Designs using Bitty Bibs, Baby Bibs Dies, Frames and Flags Die Set  #newtonsnook #bittybibs #babybibs #babycards
I Die Cut the Lawn Fawn Outside In Stitched Heart Stackables Die into the from of my Card Panel and then Inked around the Heart with Wilted Violet Distress Ink!! I also Inked around the Heart Die Cut just to make it POP against the background!! I also stamped the "Darling Little One" Sentiment using Wilted Violet Distress Ink!! I added the Heart using Foam Tape and then added the Bitty Bib Image and coordinating Die that I also Inked with Wilted Violet Distress Ink!! I Die Cut 2 of the Bows from some Cardstock and Inked it with some Worn Lipstick Distress Ink!! Then I layered them together using a Bling Zot Adhesive Dot in the center and then added an Iridescent Jewel to the center of the Bow along with adding some to the Front of the Card Panel along with Stamping and Embossing the "Congratulations" Sentiment!! 
I wanted to add this Sentiment onto the inside of the Card, because I just LOVE it!! So I Die Cut another Heart from the Lawn Fawn Ouside In Stitched Heart Die from some Taylored Expressions Lavender Glaze Cardstock and Inked the edges with Wilted Violet Distress Ink and then I Stamped and Embossed the Sentiment with WoW Clear Gloss Embossing Powder and the Word Cuter with some Purple Glitz Embossing Powder!! I LOVE the way it turned out!!

Would you like to win the “Bitty Bibs Stamp Set!!?? 
This stamp set will be given away to ONE lucky winner!!
Here's how to win: Comment on the NND blog and Design Team blogs (see list below)! The winner will be chosen at random from the collective reveal posts. Make sure to check out each of their blogs and comment for your chance to win. You will not know which blog has been chosen so the more you comment on the better your chances are of winning! You have until Thursday February 20th at 9pm EST to comment  -- winners will be announced on the blog post on Friday, February 21st.

Check out all the awesome Design Team Blogs below to enter:

THANKS SO MUCH for stopping by today!! Please come back tomorrow for a look at the NEW "Newton's Rain BootsStamp Set + coordinating "Newton's Rain BootsDies!!  
Don't forget to visit the Newton's Nook Designs Blog on the 21st to see if you're one of the LUCKY Winners!! 
Have a FABULOUS WEEK!!

COUNTRY HUGS-N-KISSES
LARISSA  =)

Monday, February 17, 2020

Newton's Nook Designs February Release ~ Hop into Spring, Raindrops & Petite Flowers Stencil!!

Pin It
Hello!!
SQUEAL!!
         I'm here with Day 1 of the Newton's Nook Designs February Release!! 
       Today we're showcasing the NEW Hop into Spring” Stamp Set + coordinating Dies, and the NEW Raindrops Stencil and Petite Flowers Stencil!! Let's take a look at the AWESOME New Sets!!
Hop into Spring Stamp and coordinating Die Set by Newton's Nook Designs

Raindrops Stencil and Petite Flowers Stencil by Newton's Nook Designs
How FUN are these NEW Sets!!?? I'm just in LOVE and here's what I've Created!! 
You're Some Bunny Special by Larissa Heskett for Newton's Nook Designs using Hop into Spring, Frames and Flags, Land Borders, Plaid Layering and Argyle Layering Stencils  #newtonsnook #newtonsnookdesigns #hopintospring #layeringstencils
 I Started by Stamping and Embossing the Image onto some Distress Watercolor Cardstock!! I used Copic Markers to color the Image in using (Bunny: E40, E42, E44 & E47  Cheeks and Inside of Ears: R11  Flowers: Y00, Y11 & YR23  R43, R46 & R89  R00, R11 & R43   Leaves: YG61, YG63 & YG67  Watering Can: N0, N2, N4 & N8) 
After Coloring I Die Cut the Image out using the coordinating Dies!! I then created the Panel Die Cutting it from some Distress Watercolor Paper using the Frames & Flags Die Set and Inked the Sky using some Tumbled Glass Distress Oxide Ink!! I added some Water Splatters to add some Texture and set it aside to dry!! I Die Cut some Grass using the same Frames and Flags Die and the Land Borders Die and Inked it using Peeled Paint and Lucky Clover Distress Oxide Inks!! Then I Stamped and Embossed the Sentiment and added the Image using Foam Tape!! A few Pretty Pink Posh Silver Jewel's were added for some Sparkle!! 
You're Some Bunny Special by Larissa Heskett for Newton's Nook Designs using Hop into Spring, Frames and Flags, Land Borders, Plaid Layering and Argyle Layering Stencils  #newtonsnook #newtonsnookdesigns #hopintospring #layeringstencils
Then I created the Background Panel!! I wanted a FUN Plaid Paper so I created my own using the NND Plaid Stencil Set and Argyle Stencil Set!! I used Mustard Seed Distress Ink first along with the Plaid Stencil #1 and an Ink Dauber, then I used Festive Berries Distress Ink along with the Plaid Stencil #2!! I wanted to add in some Coral so I lined up the Plaid Stencil #1 and applied some Abandoned Coral Distress Oxide Ink!! Again make sure you Pounce as to not mix the Inks!! Next I Inked with Tumbled Glass Distress Oxide Ink along with the Argyle #1 Stencil!! Make sure to Pounce when applying this layer as the Inks will blend together if you don't!! For the last layer I applied the Silver Glitz Glitter Gel through the Argyle Stencil #2 using a Stencil Pal!! I LOVE layering these sets to create my own designs and with the addition of some Therm O Web and Gina K Designs Silver Glitz Glitter Gel it really makes the Design Sparkle and Shine!! I adhered the Panel onto the Cardbase using Foam Tape and my card was done!! 


Would you like to win the “Hop Into Spring Stamp Set!!?? 
This stamp set will be given away to ONE lucky winner!!
Here's how to win: Comment on the NND blog and Design Team blogs (see list below)! The winner will be chosen at random from the collective reveal posts. Make sure to check out each of their blogs and comment for your chance to win. You will not know which blog has been chosen so the more you comment on the better your chances are of winning! You have until Thursday February 20th at 9pm EST to comment  -- winners will be announced on the blog post on Friday, February 21st.

Check out all the awesome Design Team Blogs below to enter:

THANKS SO MUCH for stopping by today!! Please come back tomorrow for a look at the NEW "Bitty Bibs" Stamp Setcoordinating "Baby Bibs" Dies and the "Sky Scene Builder" Dies!!  
Don't forget to visit the Newton's Nook Designs Blog on the 21st to see if you're one of the LUCKY Winners!! 
Have a FABULOUS WEEK!!

COUNTRY HUGS-N-KISSES
LARISSA  =)