Showing posts with label Monarchs Stamp Set. Show all posts

Friday, June 9, 2023

A Happy Hello w/ Newton's Nook Designs!!

Pin It
HELLO CRAFTY FRIENDS!! 

I'm up on the Newton's Nook Blog today sharing this SWEET Shaker Card using a combination of Products!! I LOVE being able to Mix-n-Match Products from my Stash to create NEW Designs and f you follow me you KNOW Shaker Cards are one of my FAVORITE Style of Cards to make!!
Let's get Started!!
 
A Happy Hello Card by Larissa Heskett for Newton's Nook Designs using Heartfelt Butterflies, Monarchs Stamp Set and Heart Frames Die Set
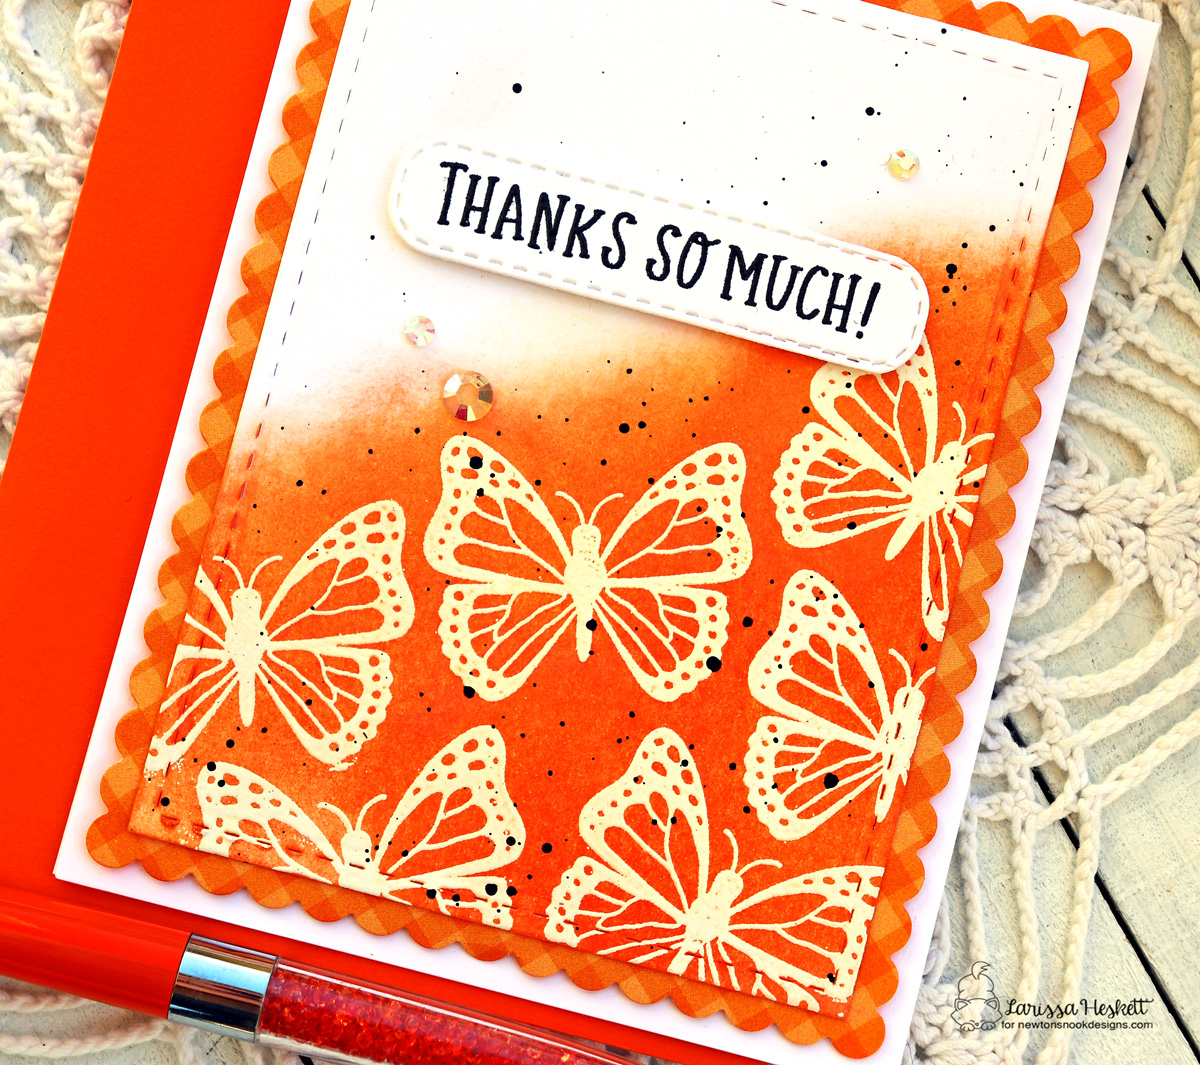
I started out by stamping the big heart filled with butterflies from our Heartfelt Butterflies Stamp Set!! I Stamped with Versa Fine Black Onyx Ink and Embossing with WoW Clear Gloss Embossing Powder!! A Happy Hello Card by Larissa Heskett for Newton's Nook Designs using Heartfelt Butterflies, Monarchs Stamp Set and Heart Frames Die Set
Then I colored all the butterflies in shades of orange to create the feeling of a sky full of Monarchs. I used Copic Markers!!
Orange: YR00, YR18 & YR68     Yellow: Y00, Y13 & YR23
Grey: N0 & N3     Turquoise: BG10, BG49
A Happy Hello Card by Larissa Heskett for Newton's Nook Designs using Heartfelt Butterflies, Monarchs Stamp Set and Heart Frames Die Set
I made this FUN image into a Shaker Window, by adding a Heart Frame over the top using our Heart Frames Die Set and adding an Acetate Window and tons of Trinity Stamps Bokeh Heart Flat Confetti inside!! So GORGEOUS, I LOVE the Iridescent Sparkle!!
A Happy Hello Card by Larissa Heskett for Newton's Nook Designs using Heartfelt Butterflies, Monarchs Stamp Set and Heart Frames Die Set
Next, I Stamped and Embossed the pretty butterfly from our Monarchs Stamp Set and added orange and a hint of blue to the image, using the same Copc Marker colors as above!! I Die Cut it out using the coordinating Monarchs Die Set!! I added a hint of Salvaged Patina Distress Oxide Ink blending across the Card Panel and adhered the Heart Frame Scalloped Shaker Frame on top!! I Stamped and Embossed the "A Happy Hello" Sentiment from the Heartfelt Butterflies Stamp Set along the side of the heart!! A few lovely Trinity Stamps Fairy Rocks Rhinestones finishes off this Stunningly SWEET Shaker Card!!  

THANKS SO MUCH for stopping by today!! I hope I've INSPIRED you to take a look at your Stash and combine some of your FAVORITE Products together to create a whole New Design!! Have a FABULOUS WEEKEND!!

LARISSA HESKETT 🦋

Friday, February 10, 2023

Hello Sunshine w/ Newton's Nook Designs!!

 Pin It
Hello Sunshine by Larissa Heskett Designs for Newton's Nook Designs using Lemon Twist, Monarchs, Spring Time Patterned Paper Pad, Frames & Flags Die Set
Hello Crafty Friends!! 

I'm up on the NND Blog today sharing this BRIGHT and CHEERFUL Card!! It's been SO COLD here in Nebraska, making me DREAM of being somewhere WARM with BEAUTIUFL and RIPE Lemons being ready for Harvesting and Cooking with them!! It's HARD for us here in Nebraska to imagine anything being Harvested in the Winter but Meyer Lemons are!!
DID YOU KNOW!!?? American-grown lemons are available all year, since lemon trees bloom all year and can have flowers, ripe and unripe fruit all at the same time. The Meyer lemon, is the one lemon that's at its peak in the winter, with a season that runs from November until about April!! Lemons ripen anywhere between four and 12 months after flowering. Flowers most commonly appear in spring, the fruit develops over Summer, and then slowly turns from Green to Yellow in Fall or Winter!! I LOVED researching about Lemons before I made this card as I wanted to create something that was Time Correct!! 
Here's what I've created for today!!  

Hello Sunshine by Larissa Heskett Designs for Newton's Nook Designs using Lemon Twist, Monarchs, Spring Time Patterned Paper Pad, Frames & Flags Die SetI started by Stamping and Embossing the Images from the Lemon Twist Stamp Set and Monarchs Stamp Set with Versa Fine Black Onyx Ink and WoW Clear Gloss Embossing Powder!! Then I Colored the Images with Copic Markers!! 
Yellow: Y00, Y11, Y13 & YR23    Green: YG00, YG63 & G19
White: N0 & N3     Coral: R00 & 22
Orange: YR00, YR18 & YR68     Turquoise: BG13 & BG49

Hello Sunshine by Larissa Heskett Designs for Newton's Nook Designs using Lemon Twist, Monarchs, Spring Time Patterned Paper Pad, Frames & Flags Die Set
I Die Cut the Images Out using the coordinating Lemon Twist Die Set and Monarchs Die Set!! I wanted to add some Sparkles to the Lemons so I used a Paint Brush and applied some of the Therm O Web Rina K. Designs Neon Glitz Glitter Gel in Hello Yellow!! SWOON!! In real Life this adds so much texture and sparkle to the Lemons!! REALLY adds to the BRIGHT and CHEERFUL Feel I was going for!! I finished off the Images by adding some White Gel Pen Details!! 
Hello Sunshine by Larissa Heskett Designs for Newton's Nook Designs using Lemon Twist, Monarchs, Spring Time Patterned Paper Pad, Frames & Flags Die Set
Next I Die Cut the Card Panel from some Distress Watercolor Cardstock and then I Inked the Background with some Salvaged Patina Distress Oxide Ink!! I added some Splatters of Salvaged Patina Distress Oxide Ink and then let it Dry completely!! I added some Water Splatters and some Midas Touch Glitter Pen Splatters for a touch a Sparkle!! Then I added some of the Midas Touch Glitter Pen over the Lemons too for even more Sparkle!! It adds the RIGHT touch of Gold and is STUNNING in real life!! Have I mentioned lately that I LOVE GLITTER!! 😍
Hello Sunshine by Larissa Heskett Designs for Newton's Nook Designs using Lemon Twist, Monarchs, Spring Time Patterned Paper Pad, Frames & Flags Die Set
I placed the Images where I wanted them on my Card Panel and then Stamped and Embossed the "Hello Sunshine" Sentiment using Versa Fine Black Onyx Ink and WoW Clear Gloss Embossing Powder!! I Adhered the Images using some Foam Tape for some Dimension to some of the Images!! then I added some Trinity Stamps Fairy Rocks Rhinestones!! I Die Cut some of the Spring Time Patterned Paper using the Frame & Flags Die Set!! Then I adhered the Scalloped Panel onto the Card Base using some Foam Tape!! I just ADORE this Card and ALL of the Sparkle!! The BRIGHT and CHEERFUL Design make me feel even more EXCITED for Spring ahead!! 
Newton's Nook Designs
So there you have it, a BRIGHT and CHEERFUL Card PERFECT for sending a CHEERFUL HELLO!!
THANKS SO MUCH for stopping by today and I hope I've INSPIRED you!! Have a FABULOUS WEEKEND!! 

COUNTRY HUGS-N-KISSES
LARISSA 
 💗

Wednesday, February 16, 2022

Peony Blooms Birthday Wishes Card w/ Newton's Nook Designs ~ Featuring Retiring Products!!

Pin It
HELLO CRAFTY FRIENDS!! 

It's time to make room for NEW Products so we are Retiring Select Designs!! 

They can ALL be found HERE!! 

These Designs are discounted up to 40% off while supplies last so hurry to get your favorites before they're gone for good!!
All week the Design Team will be sharing Inspiration using some of their favorite products from our Retiring List and today I'm sharing my Project using some of my FAVORITE Retiring Products and combining them with some of my current FAVORITE Products!! 
Let's get Started!! 
I Started by Dry Embossing my White Cardstock Card Panel using the Retiring Hardwood Stencil!! It's important to remember to lightly spray down your Cardstock with a Misting of Water let it dry just a little then place the Stencil over the top of the Cardstock and placing it on a Rubber Mat then run it through your Die Cutting Machine using the Layering method for your Machine!! SWOON!! I LOVE that you can use your Stencils for Dry Embossing too!! 
Next I Inked over the Dry Embossed Card Panel using Salvaged Patina Distress Oxide Ink!! Then I used Distress Crayons in Crooked Broomstick and Empty Tomb, using a Paper Towel to color on and then Rubbing it over the Dry Embossed Card Panel to add some Color to the Raised Woodgrain Design!! I LOVE the slight Metallic Finish it adds too!! Reminds me of Tarnished Painted Wood!! 
Here's a Close up look at the dimension it adds to the Dry Embossed Woodgrain Design!!
Really makes it POP!!
 
SWOON!! I LOVE to create Shaker Cards!! There are SO MANY ways to create them too!! Here I've Die Cut the Frames & Flags Scalloped Rectangle and Die Cut the Center out to create a thin Frame in order to create our Shaker Frame, Die Cut from some White Cardstock!! 

I Started by Stamping the Images from the Peony Blooms Stamp Set with Versa Fine Black Onyx Ink and then I Embossed them used WoW Clear Embossing Powder!! I used Copic Markers to Color the Images!! 
Peonies: Y000, Y11, Y15 & YR23   
Greenery: YG03 & YG17
YG61, YG63 & BG75
 
  
Then I used the coordinating Peony Blooms Die Set to Die Cut the Images out!! 
I Adhered an Acetate Sheet to the backside of the Scalloped Frame and then added some TE Foam Strips to create my Shaker Wall!! I added some Sparkling Clear Sequins in 3mm, 4mm, 6mm, 8mm and 10mm sizes and some Mini Gold Heart Confetti along with some Iridescent Shivers!! SWOON!! I just LOVE the way they sound when the shake and the SPARKLE that they add to background of the Peonies!! Then I adhered the Peony Images to create my Floral Arrangement using Foam Tape in different areas to make them POP a little more!! I also Stamped and Embossed the "Birthday Wishes" Sentiment from the Monarchs Stamp Set and adhered it to the center of the Cluster using Foam Tape!! I finished off the Peonies by adding some Glitter Nuvo Drops to the centers for some Dimension and Sparkle!!  
I wanted to create a coordinating Envelope, so I used the 
Retiring Hardwood Stencil and Inked with Salvaged Distress Oxide Ink!! Then I applied the same Distress Crayons in Crooked Broomstick and Empty Tomb, using a Paper Towel to color on and then Rubbing it over the Edged of the Envelope so that it would match the Card Panel!! Then I added some Brass Distress Paint Splatters to finish off the Design!!

So there you have it, I hope I've INSPIRED you on some NEW Ways to use some of my FAVORITE Retiring Products and if you want to check them ALL out please just click 
HERE!! Make sure to visit the Newton's Nook Designs Blog ALL Week as the rest of the Talented Design Team shares even more Inspiration using their FAVORITE Retiring Products!! 


THANKS SO MUCH for stopping by today and I hope you have a FABULOUS WEEK!! 


COUNTRY HUGS-N-KISSES 
LARISSA 🌻

Friday, March 12, 2021

Monarch Emboss Resist Card Duo w/ Newton's Nook Designs!!

Pin It
Newton
HELLO CRAFTY FRIENDS!! 
I'm up on the Newton's Nook Designs Blog today with a Duo of SWEET Embossed Resist Cards!! I'm SO EXCITED about Spring and I'm READY to see those BEAUTIFUL Butterflies!! So I'm using the NND Monarchs Stamp Set!! 
This set gives me ALL of the FEELS!!
Whether you Stamp and Color or use for techniques like this Emboss Resist, this Set is SO FUN to create with!! 
I Started by picking out my Patterned Paper!! Choosing the Doodlebug Gingham double Sided Paper!! I Die Cut 2 Frames using both sides of the Paper and the Frames & Flags Die!! 
Next I took the Monarchs Image and Placed it in my MISTI Stamping Tool!! I made sure to coat my Card Panel with Plenty of Anti-Stick Static Powder and then I Stamped the Monarch Images using WoW Clear Embossing Ink and and Embossing with WoW Bright White Embossing Powder!! I Heat Set the Images and then let them Cool!! Once Cool I applied some Ripe Persimmon Distress Oxide Ink using a Ranger Ink Blending Tool!! SWOON!! I just LOVE the way this technique makes the Images POP off the Card Panel!! Then I used a Damp Cloth to wipe away any of the excess Ink on top of the Embossing!! 
I added some Black Soot Distress Paint Splatters and let it dry!! While the Paint Splatters were drying I Stamped and Embossed the "Best Wishes" Sentiment from the Floral Roundabout Stamp Set!! I Die Cut a Banner from the Banner Trio Die Set and Stamped with Versa Fine Black Onyx Ink and Embossed with WoW Clear Gloss Embossing Ink!! Then Heat Set it and adhered it to the Card Panel using Gina K Designs Foam Tape!! Then I adhered the Card Panel onto the Die Cut Doodlebug Designs Patterned Paper Scalloped Rectangle Frame with some Ultra Bond Adhesive!! Then I adhered the Scalloped Panel onto my A2 Cardbase using some Gina K Designs Foam Tape!! I added some Trinity Stamps Fairy Rock Rhinestones!! I just LOVE the way they finish off the Card Design!! I paired it with an MFT A2 Envelope in Persimmon!! 
 For my second Card I repeated the exact same Steps as above!! 
I just used the "Thanks So Much" Sentiment from the same Floral Roundabout Stamp Set!!      

So there you have it 2 BEAUTIFUL Cards using the Monarchs Stamp Set and a Resist Emboss Technique!! So FUN to create!! Think about using Techniques like this along with some of your other FAVORITE Stamps to create a Rainbow of Cards to Give away as a Gift!!  

Hope you can STAY WARM this Weekend!!?? Both Snow and Rain are in the forecast and a drop to 25 degree temps, after being in the 70's all week means my Craft Room is going to be CALLING me this weekend!! 
THANKS SO MUCH for stopping by and I hope you have a FABULOUS WEEKEND!!  

COUNTRY HUGS-N-KISSES 
LARISSA
   🦋

S U P P L I E S
Below you will find links to the supplies used to create this project(s). Click the icon for the store underneath the thumbnails to start shopping. Where available I use compensated affiliate links at no extra cost to you. Your support helps me to keep bringing you new projects. 
Thank you!! 💓

Tuesday, May 19, 2020

Newton's Nook Designs May 2020 Release ~ Monarchs and Butterflies Stencil!!

Pin It
Hello!!
I'm here with Day 2 of the Newton's Nook Designs May Release!! Today we're showcasing the NEW 
"Monarchs" Stamp Set + coordinating Monarchs Die Set and the Butterflies Stencil Set!! 
Let's take a look at the AWESOME New Sets!!
Monarchs Stamp and Die Set by Newton's Nook Designs
Butterflies Stencil Set by Newton's Nook Designs
SWOON!! How BEAUTIFUL is this NEW Set!! 
I'm SO EXCITED about it and all of the possibilities!!
 Here's what I've created for today!! 
Thinking of You Monarch Card by Larissa Heskett for Newton's Nook Designs using Monarchs Stamp and Die Set, Banner Trio Die and Frames Squared Die Set #newtonsnookdesigns #newtonsnook #monarchsstampset #banertrio #framessquared
I Started by Stamping the Monarch Image from the NEW "Monarchs" Stamp Set and then Die Cut it out using the NEW coordinating Monarchs Dies!! I Colored it with Copic Markers using YR00, YR02 & YR68   BG10 & BG45!! Then I Die Cut the Frame from the Frames Squared Die Set from some TE Cardstock and adhered the Butterfly using Foam Tape just to the body so the Wings could be folded up for some dimension!! Then I Stamped and Embossed the same Monarch Image onto the bottom half of my Card Panel!! I Stamped in Versa Fine Black Onyx Ink and Embossed with WoW Clear Gloss Embossing Powder!! I added some Black Soot Distress Paint Splatters!! 
Thinking of You Monarch Card by Larissa Heskett for Newton's Nook Designs using Monarchs Stamp and Die Set, Banner Trio Die and Frames Squared Die Set #newtonsnookdesigns #newtonsnook #monarchsstampset #banertrio #framessquared
I Die Cut the NEW Banner Trio Die from some TE Oreo Cardstock and then cut another Strip from some White Cardstock to Stamp and Emboss my Sentiment!! I adhered the Framed Butterfly onto the Cardbase using Foam Tape and then adhered the Banner over the bottom part of the Framed Butterfly using liquid adhesive just for the Tails!! I added some Pretty Pink Posh Jewels in Aquamarine and some Studio Katia Pearls to add some Sparkle and I used a Tonic Studios Glitter Pen to add some Sparkle to the Butterfly!! I LOVE how it turned out and can't wait to Create MORE Cards with this Set!! 

Would you like to win the“Monarchs Stamp Set!!?? 
We will choose ONE lucky winner for each stamp set!
Here's how to win: Comment on the NND blog and Design Team blogs (see list below)! The winner will be chosen at random from the collective reveal posts. Make sure to check out each of their blogs and comment for your chance to win. You will not know which blog has been chosen so the more you comment on the better your chances are of winning! You have until Thursday May 21st at 9pm EST to comment  -- winners will be announced on the blog post on Friday, May 22nd.
Check out all the awesome Design Team Blogs below to enter:

THANKS SO MUCH for stopping by today!!  
Don't forget to visit tomorrow for a look at the NEW "HummingbirdStamp Set + coordinating dies and a check out the Newton's Nook Designs Blog on the 22nd to see if you're one of the LUCKY Winners!! 
Have a FABULOUS WEEK!!

COUNTRY HUGS-N-KISSES
LARISSA 🦋