Showing posts with label Floral Roundabout. Show all posts

Friday, February 11, 2022

You Are Amazing Shaker Card w/ Newton's Nook Designs!!

Pin It

HELLO CRAFTY FRIENDS!! 

I'm sharing this SWEET "You Are Amazing" Shaker Card today over on the Newton's Nook Designs Blog!! 
SWOON!! Shaker Cards are one of my FAVORITE type of Cards to create!! There are SO MANY Occasions to use them for and its FUN to be able to mix and Match your different Products!! I Started by Die Cutting my Card Panel from some Distress Watercolor Cardstock!! Then I Inked with Salvaged Patina Distress Oxide Ink!! I placed the NEW Petite Hearts Stencil over the Card Panel after spraying the back with Therm O Web Pixie Spray!! Pressing it firmly into place and then I inked again with Salvaged Patina Distress Oxide Ink!! I removed the Stencil and then covered the Panel with a piece of Stamp Packaging!! I Placed it over the Front of my Card Panel then I used Double Sided Adhesive and folded the edges around the outside of the Card Panel leaving the Top Panel open so I could add my Shaker Elements!! 

I added some Trinity Stamps XoXo Clay Embellishments, some Rainbow Reflection Rhinestones some Little Sweetheart Tiny Heart Sprinkles, some Crafty Love Clay Embellishments and some Iridescent Glitter Flakes!! Then I Adhered the Top Flap around the Card Panel sealing off the Shaker Elements inside of the Packing that I wrapped around the Card Panel!! I Die Cut some of the NEW Love & Meow's 6x6 Paper using the Frames & Flags Die Set and adhered the Shaker Card Panel to the Scalloped Frame using Double Sided Adhesive!! Then I adhered the Shaker Panel to my Cardbase using some Foam Tape for some Dimension!! I Stamped the "You Are Amazing!" Sentiment from the Floral  Roundabout Stamp Set to a Banner Die Cut from some White Distress Watercolor Cardstock using the NEW A7 Frames & Banner Die Set with some Salvaged Patina Distress Oxide Ink!! I adhered the Banner to the Shaker Panel using Double Sided Tape and I just LOVE the way this Card turned out!! 

THANKS SO MUCH for stopping by today!! I hope I've INSPIRED you on some ways to use your Products for non-holiday Cards!! If you haven't tried Shaker Cards, I hope this will give the Inspiration to create one!!?? I PROMISE you WON'T regret it, and the Recipients SMILE and JOY will have you creating MORE and MORE of them!!  
Have a FABULOUS WEEKEND!! 

COUNTRY HUGS-N-KISSES
LARISSA  💗

Friday, January 7, 2022

Thanks So Much w/ Newton's Nook Designs!!

Pin It
HELLO CRAFTY FRIENDS!! 

I'm sharing this SWEET Winter Thank You Card today over on the Newton's Nook Designs Blog!! 

I just LOVE this SWEET Image and although it was designed as a Holiday Set, when you pair the Image with a different Sentiment it can be used for MANY different occasions!! Think Birthday, Thinking of You, Missing You and Thanks You like I've created for today!! By simply changing up the Colors you use for the Hats and Scarves it can got from Holiday to Winter!! SO VERSATILE!! 

I Started by Stamping and Embossing the Image from the Dairy Christmas Stamp Set with Versa Fine Black Onyx Ink and WoW Embossing Powder!!
Then I used Copic Markers to Color the Image!! 
Cow: N0, N3, N5 & N8   R000, R11   E40, E44 
 Blanket & Scarf: BG10, Bg45 & BG49   R00, R14 & R37   YR00, YR18 & YR68    Y11, Y15 & YR23   G40, G43 & G45   B21, B32 & B34   V00, V15 & V09   N0, N3  
Pig: R00, R11 & R22  
Chicken: R00, R14 & R89  N0, N3  E40,E99
Hats: BG10, BG45 & BG49   N0, N3 

Then I used the coordinating Dairy Christmas Die Set to Die Cut the Image out!! I added some White Gel Pen Details and some Fine Iridescent Glitter using a Glue Pen!! 

For the Card Panel I Inked with Salvaged Patina Distress Oxide Ink after Masking off the Ground!! I used Copic Markers N0, N3 & N5 to create some Frozen Grass and added some Glue Pen and Fine Iridescent Glitter!! Then I added some Iridescent Snowflake Sequins using Zots Bling Adhesive Dots!! I wanted even more Dimension and Sparkle so I added some Trinity Stamps Fairy Rocks Rhinestones to the center of the Snowflakes again using Zots Bling Adhesive Dots!! I Die Cut a Stitched Banner from the Banner Trio Die Set from some White Cardstock and Inked the edges with some Hickory Smoke Distress Oxide Ink!! I Stamped and Embossed the "Thank So Much" Sentiment from the Floral Roundabout Stamp Set using Versa Fine Black Onyx Ink and WoW Clear Gloss Embossing Powder!! Then I adhered it straight to the Card Panel using Ultra Bond Adhesive!! I adhered the Card Panel to a Scalloped Frame Die Cut from the Meowy Christmas Paper Pad using the Frames and Flags Die Set!! Then I adhered the entire Panel to an A2 Cardbase using some Foam Tape!! 

THANKS SO MUCH for stopping by today!! I hope I've INSPIRED you on some ways to use your Holiday Images for non-holiday Cards!! Get MORE out of them and BRIGHTEN MORE Recipients Days!! 
Have a FABULOUS WEEKEND!! 

COUNTRY HUGS-N-KISSES
LARISSA  💖

Friday, April 9, 2021

Thinking of You Porch Swing Friends Card w/ Newton's Nook Designs!!

Pin It

Hello Crafty Friends!! 

I'm up on the Newton's Nook Blog today sharing this SWEET Thinking of You Card!! 
I was INSPIRED by the Inky Paws Challenge!!
I started by Stamping and Embossing the SWEET Porch Swing Friends Image using Versa Fine Black Onyx Ink and WoW Clear Gloss Embossing Powder!! Then I used Copic Markers to color the Image in!! 
SWING: N0, N2, N4 & N6   PURPLE: V01, V15 & V09   TURQUOISE: BG11, BG45 & BG49   
YELLOW: Y11, Y15 & YR23   DOG: E43, E44 & E47  
CAT: E40, E42, E47, E49 & E99   
CHEEKS & INSIDE OF THE EARS: R81

Then I used the coordinating Porch Swing Friends Die Set to Die Cut the image out!! I added some White Gel Pen & Black Gel Pen Details to finish the Image off!! 
I Die Cut the Large Scalloped Circle from the Circle Frames Die Set from some TE Lavender Glaze Cardstock!! Then inked the edges of the Circle Frame with some Wilted Violet Distress Oxide Ink!! I Die Cut a Large Circle from some White Cardstock and Inked it with some Tumbled Glass Distress Oxide Ink!! I adhered the Porch Swing Friends Image to the Circle with Gina K Designs Foam Tape!! Then adhered the Circle Frame to the Card Panel that I also Inked with Distress Oxide Ink and added some Water Splatters for some Texture using more Gina K Designs Foam Tape after I Stamped and Embossed the "Thinking of You" Sentiment from the Floral Roundabout Stamp Set!! 
I finished off the Design with some Pretty Pink Posh Jewels and then paired it with a coordinating TE A2 Lavender Glaze Envelope!! I just LOVE the Color combination and I hope I've INSPIRED you!! Don't forget you have until 
Friday, April 9, 2021 at Midnight CST. to enter for a chance to WIN a $20 Store Credit to the Newton's Nook Design online shop!!

THANKS SO MUCH for stopping by and I hope you have a 
FABULOUS DAY/WEEKEND!!  

COUNTRY HUGS-N-KISSES 
LARISSA
  💗
 

Friday, April 2, 2021

Emboss Resist Birthday Card Duo w/ Newton's Nook Designs!!

Pin It
HELLO CRAFTY FRIENDS!! 
I'm up on the Newton's Nook Designs Blog today with a Duo of SWEET Embossed Resist Cards!! I'm SO EXCITED about Spring and I'm READY to see those BEAUTIFUL Flowers!! 
So I'm using the NND Floral Roundabout Stamp Set!! 
Here's a Look at both of the Cards together!! 
Here's a look at the Floral Roundabout Stamp Set, just incase you've MISSED this one!! It's one of my FAVORITES as I LOVE all of the Sentiments included in this Set too!! Whether you Stamp and Color or use it for techniques like this Emboss Resist, this Set is SO FUN to create with!! 
I Started by picking out my Patterned Paper!! Choosing the Doodlebug Gingham double Sided Paper!! I Die Cut 2 Frames using both sides of the Paper and the Frames & Flags Die!! 

Next I took the Floral Roundabout Image and Placed it in my MISTI Stamping Tool!! I made sure to coat my Card Panel with Plenty of Anti-Stick Static Powder and then I Stamped the Floral Roundabout Image using WoW Clear Embossing Ink and and Embossing with WoW Bright White Embossing Powder!! I Heat Set the Images and then let them Cool!! I wanted to create a FUN Half Image Design, making sure that they met in the Middle but I repeated the Process again on the other side!! Once Cool I applied some Evergreen Bough Distress Oxide Ink using a Ranger Ink Blending Tool!! SWOON!! I just LOVE the way this technique makes the Images POP off the Card Panel, and I LOVE the Minty Color of Evergreen Bough!! Then I used a Damp Cloth to wipe away any of the excess Ink on top of the Embossing!! 
I added some Black Soot Distress Paint Splatters and let it dry!! While the Paint Splatters were drying I Stamped and Embossed the "Happy Birthday" Sentiment from the Birthday Roundabout Stamp Set!! I Die Cut a Banner from the Banner Trio Die Set and Stamped with Versa Fine Black Onyx Ink and Embossed with WoW Clear Gloss Embossing Ink!! Then Heat Set it and adhered it to the Card Panel using Gina K Designs Foam Tape!! Then I adhered the Card Panel onto the Die Cut Doodlebug Designs Patterned Paper Scalloped Rectangle Frame with some Ultra Bond Adhesive!! Then I adhered the Scalloped Panel onto my A2 Cardbase using some Gina K Designs Foam Tape!! I added some Trinity Stamps Fairy Rock Rhinestones!! I just LOVE the way they finish off the Card Design!! I paired it with a Taylored Expressions A2 Envelope in Mint Julep!! 
 For my second Card I repeated the exact same Steps as above!! 
 I Stamped and Embossed the "Best Wishes" Sentiment from the Floral Roundabout Stamp Set!!
So there you have it 2 BEAUTIFUL Cards using the Floral Roundabout Stamp Set and a Resist Emboss Technique!! So FUN to create!! Think about using Techniques like this along with some of your other FAVORITE Stamps to create a Rainbow of Cards to Give away as a Gift!!  
 
THANKS SO MUCH for stopping by and I hope you have a 
FABULOUS and BLESSED EASTER DAY/WEEKEND!!  

COUNTRY HUGS-N-KISSES 
LARISSA
   🎕

S U P P L I E S
Below you will find links to the supplies used to create this project(s). Click the icon for the store underneath the thumbnails to start shopping. Where available I use compensated affiliate links at no extra cost to you. Your support helps me to keep bringing you new projects. 
Thank you!! 💓

Friday, September 11, 2020

Thinking of You Card w/ Newton's Nook Designs!!

Pin It
Newton
HELLO CRAFTY FRIENDS!! 
I'm up on the Newton's Nook Design Blog today sharing this BEAUTIFUL Thinking of You Card showcasing the Hummingbird Stamp Set!! SWOON!! I just LOVE the Images in this Set and there are SO many ways to use them!! 
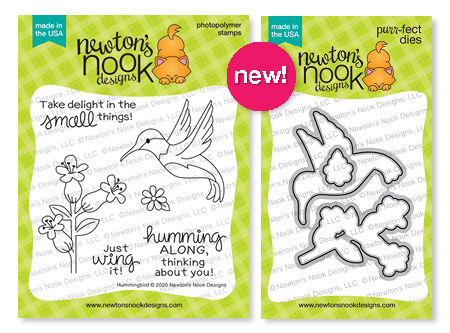
Hummingbird Stamp & Die Set by Newton's Nook Designs
Here's a look at the Hummingbird Stamp Set just in case its NEW to you!!??
Thinking of You Card by Larissa Heskett for Newton's Nook Designs using Hummingbird Stamp Set, Floral Roundabout Stamp Set and Circle Frames Die Set #hummingbird #floralroundabout #circleframes #thinkingofyou #tayloredexpressions
I Started by Stamping and Embossing my Images and coloring them with Copic Markers!! 
I used Versa Fine Black Onyx Ink and WoW Clear Gloss Embossing Powder!! I used Copic Markers to color the Images!! I've used NEW to me Copic Marker Colors!! I'm trying to step out of my Normal Color Combos and experiment with some NEW Combos!! It was FUN to see how they came together and I really like the Combo!! (Flowers: BV000, BV00, BV02 & BV08  Y00 & Y13   Hummingbird: YG00, YG11, YG17 & YG99  RV00, RV02, RV06 & RV09   E40 & E81)
After Coloring I Die Cut them out using the coordinating Hummingbird Die Set!! I added some White and Black Gel Pen details to add some highlights!!  
Thinking of You Card by Larissa Heskett for Newton's Nook Designs using Hummingbird Stamp Set, Floral Roundabout Stamp Set and Circle Frames Die Set #hummingbird #floralroundabout #circleframes #thinkingofyou #tayloredexpressions
Next I created my Circle Focal Point using the 
Circle Frames Die Set!! I Die Cut some TE Cookie Monster Cardstock using the Scalloped Circle and a White Stitched Circle!! I Inked using some TE Cookie Monster Ink and then I Stamped and Embossed the sentiment "Thinking of you" from the Floral Roundabout Stamp Set three times around the circle edge!!  Although the sentiment comes as a straight Stamp, you can easily create a curve with it onto your stamping block or your MISTI Stamping Tool!! I like to create a Panel that I Die Cut my Circle from and then I add the Panel inside of my MISTI Stamping Tool and then I add the Circle to the Die Cut opening that it was Die Cut from after I apply some removable adhesive to the base of the MISTI so that the Circle will stay in place while I'm Stamping!! I align the Sentiment where I want it and then pick it up with the MISTI!! Just another AWESOME  thing about photopolymer stamps!!
Thinking of You Card by Larissa Heskett for Newton's Nook Designs using Hummingbird Stamp Set, Floral Roundabout Stamp Set and Circle Frames Die Set #hummingbird #floralroundabout #circleframes #thinkingofyou #tayloredexpressions
 After Heat Embossing I added some Rose Quarts Glitter Pen Splatters for some Sparkle and Shine!! The Rose Iridescent Glimmer really adds to the Design!! Plus, who doesn't like some Sparkle!!?? 😍
For the Card Panel background I added a subtle pattern of flowers using the large image from the Floral Roundabout Stamp Set!! I Stamped with some TE Sea Salt!! I LOVE this Ink not only for Subtle Stamping, but it also Stamps really well on Colored Cardstock for a BEAUTIFUL Tone-on-Tone look!! Then I added some Black Soot Distress Paint Splatter and some Nuvo Rose Quartz Shimmer Splatters!! Then I finished off the design with some Studio Katia Pearls!! They have a BEAUTIFUL Iridescent finish on them and it really coordinates with the Rose Quarts Splatters!! I created a FUN coordinating Envelope too!! I used a coordinating TE Cookie Monster Envelope so it matches the Card PERFECTLY and Stamped the Floral Roundabout Stamp Set using TE Sea Salt Ink!! Then I added some Rose Quartz Splatters to tie it all together!! I LOVE the way this Card and Envelope Set turned out!! 
I hope I've INSPIRED you today!!?? 
THANKS SO MUCH for stopping by and I hope you have a FABULOUS WEEKEND!!
 

COUNTRY HUGS-N-KISSES
LARISSA  🌸

Monday, May 18, 2020

Newton's Nook Designs May 2020 Release ~ Birthday Roundabout, Floral Roundabout, Circle Frames Die Set and Banner Trio Die Set!!

Pin It
Hello!!
I'm here with Day 1 of the Newton's Nook Designs May Release!! Today we're showcasing the NEW "Birthday RoundaboutStamp Set, "Floral Roundabout" Stamp Set, Circle Frames Die Set and the Banner Trio Die Set!! 
Let's take a look at the AWESOME New Sets!!
Birthday Roundabout Stamp Set, Floral Roundabout Stamp Set, Circle Frames Die Set and Banner Trio Die Set by Newton's Nook Designs
SQUEAL!! How FUN are these NEW Products!! 
I'm SO EXCITED about them!!
 Here's what I've created for today!! 
Happy Birthday Card & Gift Bag by Larissa Heskett for Newton's Nook Designs using Birthday Roundabout Stamp Set, Circle Frames Die Set and Banner Trio Die Set #newtonsnook #newtonsnookdesigns #birthdayroundabout #circleframes #bannertrio #wowembossing #distressmarkers
 I wanted to create a FUN CAS Card and Gift Bag that could be used for either gender's Birthday!! I Started by White Embossing the NEW Birthday Roundabout Image onto some White Cardstock using some WoW Bright White Embossing Powder!! Then I Die Cut the NEW Circle Frames Scalloped Circle from some Cherry Pop TE Cardstock!! 
Happy Birthday Card & Gift Bag by Larissa Heskett for Newton's Nook Designs using Birthday Roundabout Stamp Set, Circle Frames Die Set and Banner Trio Die Set #newtonsnook #newtonsnookdesigns #birthdayroundabout #circleframes #bannertrio #wowembossing #distressmarkers
I Stamped the Happy Birthday Sentiment onto a Sea Salt TE Cardstock Banner Die Cut using the NEW Banner Trio Die Set and used Tim Holtz Distress Markers to Color each Letter the Colors of the Rainbow and huffed on the Stamp then Stamped!! I LOVE this technique for stamping FUN Multicolored Sentiments!! Then I adhered them to both my Card Panel and my Gift Bag using some Foam Tape for some Dimension!! A Few Pretty Pink Posh Silver Jewels finish off the Designs!! The Rainbow Scrap Bow I made finishes off the Gift Bag and I LOVE how this set turned out!! You could even use this set for Father's Day or any other type of Celebration!! 

Thanks So Much Card by Larissa Heskett for Newton's Nook Designs using Floral Roundabout Stamp Set, Circle Frames Dies and Banner Trio Die #newtonsnook #newtonsnookdesigns #floralroundaboutstamp #circleframesdie #bannertriodie #copicmarkers #tecaardstock #wowembossing
For my Next Card I Stamped and Embossed the NEW Floral Roundabout onto some White Cardstock using Versa Fine Black Onyx Ink and WoW Clear Gloss Embossing Powder!! Then I used Copic Markers to Color the Image!! I added some Tonic Studios Glitter Pen for some Sparkle and then some Nuvo Glitter Drops, PPP Jewels and some Studio Katia Pearls for the center of the Flowers to add some dimension and Sparkle!! I Die Cut the NEW Circle Frame Scalloped Circle from some TE Confetti Cake Cardstock and then adhered it using some Liquid Glue!! 

Thanks So Much Card by Larissa Heskett for Newton's Nook Designs using Floral Roundabout Stamp Set, Circle Frames Dies and Banner Trio Die #newtonsnook #newtonsnookdesigns #floralroundaboutstamp #circleframesdie #bannertriodie #copicmarkers #tecaardstock #wowembossing
I Stamped and Embossed the sentiment onto a NEW Banner Trio Die Cut from some TE Oreo Cardstock using Versa Mark Ink and WoW Bright White Embossing Powder!! Then I wanted to Stamp the same Image onto the bottom of the Card Panel using some TE Sea Salt Ink!! I Stamped the Image a few times using my Misti Stamping tool until the entire area was stamped and I LOVE the look!! I adhered both the Scalloped Circle and the Banner with Foam Tape and my card was done!!
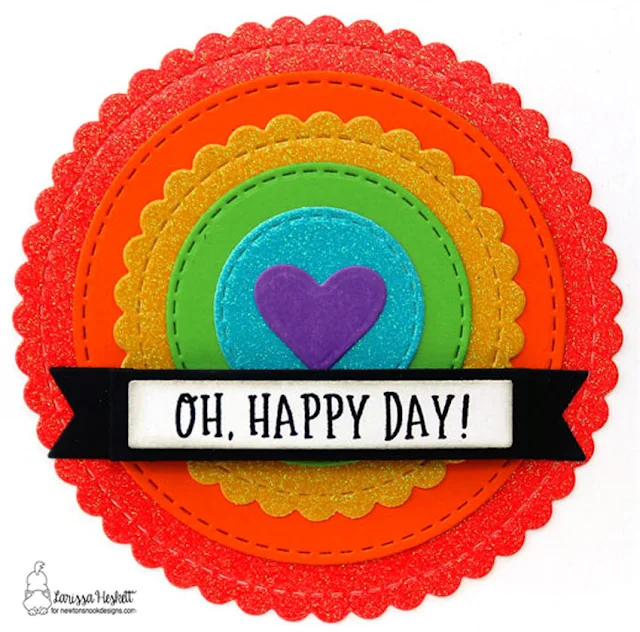
Oh Happy Day Rainbow Circle Card by Larissa Heskett for Newton's Nook Designs using Circle Frames Die Set, Banner Trio Dies and Floral Roundabout Stamp Set #newtonsnookdesigns #newtonsnook #circleframesdie #bannertriodie #floralroundaboutstamp #glittercardstock
 For my last Card I wanted to show how FUN it is to Layer the NEW Circle Frame Dies for a Quick and EASY Card!! I used some Glitter Papers, along with some TE Cardstock in Pumpkin and Pea Pod to create the FUN Rainbow Design!! In real life its SO PRETTY and would surly BRIGHTEN anyone's Day!!
Oh Happy Day Rainbow Circle Card by Larissa Heskett for Newton's Nook Designs using Circle Frames Die Set, Banner Trio Dies and Floral Roundabout Stamp Set #newtonsnookdesigns #newtonsnook #circleframesdie #bannertriodie #floralroundaboutstamp #glittercardstock
I Stamped and Embossed the Sentiment onto a NEW Banner Trio Die and then adhered it to the center of the Card!! I LOVE the NEW Products and I CAN'T WAIT to share the rest of my Projects with you this week!! 

Would you like to win the“Birthday RoundaboutStamp Set or the Floral RoundaboutStamp Set!!?? 
We will choose ONE lucky winner for each stamp set!
Here's how to win: Comment on the NND blog and Design Team blogs (see list below)! The winner will be chosen at random from the collective reveal posts. Make sure to check out each of their blogs and comment for your chance to win. You will not know which blog has been chosen so the more you comment on the better your chances are of winning! You have until Thursday May 21st at 9pm EST to comment  -- winners will be announced on the blog post on Friday, May 22nd.
Check out all the awesome Design Team Blogs below to enter:

THANKS SO MUCH for stopping by today!!  
Don't forget to visit tomorrow for a look at the NEW "Monarchs" Stamp Set + coordinating dies and the Butterflies Stencil Set and a check out the Newton's Nook Designs Blog on the 22nd to see if you're one of the LUCKY Winners!! 
Have a FABULOUS WEEK!!

COUNTRY HUGS-N-KISSES
LARISSA  =)