HELLO CRAFTY FRIENDS!!
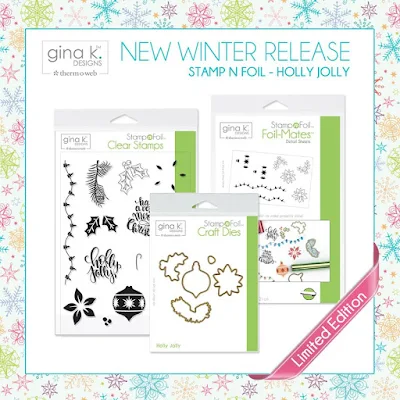
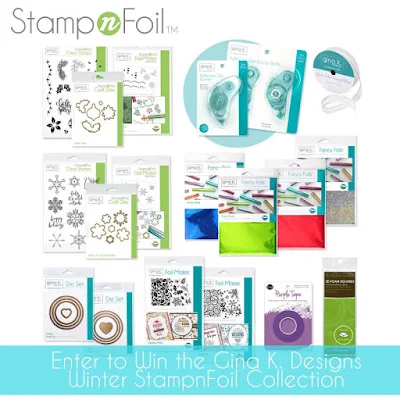
Today we're CELEBRATING the NEW Therm O Web & Gina K Designs Winter Stamp-n-foil Release with a FUN Blog Hop!! Here's a look at the ENTIRE Release!!
I've used the NEW Holly Jolly Collection for my Projects today and I just LOVE how FUN this set is too create with!! There are SO MANY possibility!! So lets take a Closer Look at the Holly Jolly Collection and the Projects that I've created using it!!
Here's my First Card using the NEW Gina K Designs Holly Jolly Stamp-n-Foil Products!! They're going to be PERFECT for all of your Holiday Project making needs!!
I started by Stamping the Stamp-n-Foil Images onto the Stamp-n-Foil Papers!! I've used Several Gina K Design Inks to create a Multi Colored Poinsettia!! Peach Bellini, Tomato Soup and Red Hot for the Flower, and Jelly Bean Green and Fresh Asparagus for the Leaves!!
I used Deco Foil in Black to Foil the Poinsettias and I LOVE the way they turned out!! Next I took the coordinating Dies to Die Cut them out!! I created 3 for my Project today!!
I wanted the Background to be one Layer so I Stamped the Pine Branch Image using a couple Gina K Designs Inks in Jelly Bean Green and Asparagus and some Lucky Clover Distress Ink!! I also added some Double Stamping just to create alittle more dimension!! Then I Inked the background with some Tumbled Glass Distress Ink, just to make the Pine Branches and Poinsettias POP off the Card Front!!
I Stamped and Embossed the Sentiment and then added some Black Soot and Picket Fence Paint splatters!! After the Paint Splatters were Dry I also added some Water Droplets and I really like the texture and depth it adds to the Pine Branches!!
I Stamped the Poinsettia Centers using some Gina K Designs Sweet Corn Ink and then added some Tonic Studios Glitter Pen to the Poinsettia Leaves and some Nuvo Drops over the Dots to add some Dimension!! Then adhered some of the iCraft 3-D Foam Squares to the Back of the Poinsettias and adhered them to the Card!!
For even more Sparkle I adhered some Cream Snowflake Sequins I had in my Stash!! I added some Tonic Studios Nuvo Drops to the Center of the Snowflake Sequins too, just to tie it all together!! I used the New Gina K Designs Permanent Adhesive Dot Runner to adhere the Card panel to the Gina K Designs Premium Cardstock in Luxury White A2 Cardbase!!
For my Second Card I've created a Shining Holiday Card using one of my FAVORITE Multi-Foiled Techniques to make the Lights appear as though they're actually "Blinking"!!
When I saw the NEW Stamp-n-Foil Foil Mates Holly Jolly Detail Sheets, I KNEW I had to create a card using the Lights and several of Gina K Designs Fancy Foils!!
After cutting the Foil into small pieces (I used Gina K Designs Fancy Foils in Sparkling Silver, Radiant Red, Glittering Green, Dazzling Orange, Brilliant Blue, Red Velvet, Grass Green, and Sweet Mango) and using Purple Tape to adhere them in place, run them through the Laminating machine and then SQUEAL in delight after you removed the Foils!! You'll have a String of Lights that actually looks as though the Lights are "Blinking"!! How AWESOME is that!!??
Here's a Quick Video to show them "Blinking"!! It's always so hard to show just how AMAZING the Shine/Sparkle or in this instance the "Blinking" effect is without seeing it in real life!! SUPER FUN Right!!?? Who wouldn't want a Holiday Card like this!!??
Next I Stamped the Holly Leaves and Berries!! I used Gina K Designs Inks in Peach Bellini, and Red Hot for the Berries and Gina K Designs Inks in Key Lime, Lucky Clover and Distress Ink in Lucky Clover for the Leaves!!
I Foiled them using Black Deco Foil and then used the coordinating Gina K Designs Dies to Die Cut them out!! I ended up cutting the Whole Berry away to use on top of the Ornament after I applied Tonic Studios Morning Dew Nuvo Drops to add some Dimension!!
For the Ornament I Stamped the Design using Reverse Confetti Inks in Baby Blue and Navy Blue!! Using an Ink Dauber to apply the Navy Blue Ink just around the edges of the ornament for some Dimension!! Then I used the coordinating Gina K Designs Holly Jolly Dies to Die Cut it out!!
I Foiled the Ornament using Gina K Designs Sparkling Silver and Deco Foil in Gold for the Ornament Topper!! I also Stamped and Embossed the Ornament Hook from the Set and then Foiled it using Gold Deco Foil as well!! I Fussy Cut it out and adhered it using the New Gina K Design Adhesive Tape Runner!!
I Stamped the Holly Images on my Card Base to create a Holly Garland across the top of my Card!! I used Gina K Designs Ink in Jelly Bean Green, Fresh Asparagus and Distress Ink in Lucky Clover!! I also added some Ink to resemble the Soft Glow of the Lights!! I used Carved Pumpkin Distress Ink, Red Hot and Lime Green Gina K Designs Ink and Baby Blue Reverse Confetti Ink!! Then I used Distress Ink in Tumbled Glass to add some Inking behind my Ornament and then Stamped and Embossed the Sentiment!! Some Black Soot and Picket Fence Distress Paint Splatters and then it was time to put my Card together!!
I adhered on of the Light Strings to the Card using the Gina K Designs Adhesive Tape Runner and the other Set of Lights Strings using some iCraft 3-D Foam Squares that I cut down to fit behind the Lights!! I also used iCraft Foam Squares to adhere the Ornament and Holly Leaves!! To finish of the Ornament I added some Sequins and Tonic Studios Nuvo Drops in White!! I added some White Gel Pen Details and my Card was done!!
I hope I've INSPIRED you today and I KNOW you'll want to Hop along to see what ALL of the other AMAZING Designs Created!! Please follow the Links Below to get even more Inspiration, Don't forget to Leave comments along the way for a chance to WIN!!
You could WIN the "Baby It Cold Outside" !!
It's a PRIZE PACKAGE Valued at over $150!!
It's a PRIZE PACKAGE Valued at over $150!!

You can also visit our Instagram page and our Facebook and our YouTube Pages so you can FOLLOW US and SUBSCRIBE!!
Gina K Designs will be also be hosting a Blog Hop and offering a Gift Certificate so please visit there for another chance to WIN!!
Audrey Eckstrom Pettit
Chrissie Tobas
Daniela Dobson
Juliana Michaels
Katrina Hunt
Larissa McConville Heskett ~ You're Here
Rebecca Keppel
Shemaine Smith
THANKS SO MUCH for stopping by today and I hope you have a FABULOUS WEEK!!
I'm Linking up
Juliana Michaels
Katrina Hunt
Larissa McConville Heskett ~ You're Here
Rebecca Keppel
Shemaine Smith
THANKS SO MUCH for stopping by today and I hope you have a FABULOUS WEEK!!
I'm Linking up
COUNTRY HUGS-N-KISSES
LARISSA =)
LARISSA =)


So much cuteness! I love your designs!
ReplyDeleteHow darling!
ReplyDeleteI love all the
sparkle and the
blinking lights
are terrific.
Carla from Utah
Beautiful cards. I love them. What a cool idea with the fancy foils.
ReplyDeleteWOW!!! Boy did you ever highlight the process to arrive at such beautiful and very classy cards! Thank you so much!!! I really appreciate the time and effort!
ReplyDeleteWow! Love your cards! The blinking lights are awesome - will need to try that technique! Thanks for sharing!
ReplyDeleteVery pretty cards. I love the look of the lights, such a neat idea to add the shadow.
ReplyDeleteAll of your creations are wonderfully made, and I thank you for showing the end product of the foiled lights in a video.
ReplyDeleteWow Larissa! Both cards are so fabulous! I love the card with the foil lights! I'm going to have to try using that technique. Thanks for the chance to win one of the release sets.
ReplyDeleteCute cards! Love the blinking light idea!
ReplyDeleteBeautiful projects you created. Cute lights.
ReplyDeleteWOW! What a great idea to make the lights twinkle. thanks for the video!
ReplyDeleteLovely cards! Thanks for the inspiration and the tutorials!
ReplyDeleteSuch fantastic cards. Love the colors and foiling.
ReplyDeleteThanks so much for sharing...
Love your cards! I especially like your multi-colired poinsettia!
ReplyDeleteBeautiful! Thank you for showing us the step by step!
ReplyDeleteThe flowers and greenery are wonderful.
ReplyDeleteLove, love, love!! Every single thing about these cards! Major inspiration.
ReplyDeletewow your cards are stunning - LOVE how the focal images pop
ReplyDeleteYou certainly made your light and bauble pop and shine bright. You've a lot of patience cutting the foil in so many little bits but boy was it worth it. I'm glad I don't gave to pick my favourite out from them haha. Absolutely STUNNING cards. Thankyou for the detailed tutorials I'm pretty sure I will be doing some of your ideas for Christmas this year. Xx
ReplyDeleteI really like your cards because of the way you blended a few colors in the background, shadow effect. The poinsettia leaves are especially nice!
ReplyDeleteSo pretty and festive. Love the lights.
ReplyDeleteI love the way your poinsettias are dancing across your first card, so pretty! And your strands of lights with the fancy ornament are so fun! A wonderful pair of cards Larissa!
ReplyDeleteLove your step by step photos! Beautiful cards.
ReplyDeleteReally nice cards...thank you for all the detailed information that you shared.
ReplyDeletethe foil will be wonderful
ReplyDeletefor ornaments. Love how
you put the lights behind
them. Great cards.
thanks for sharing
txmlhl(at)yahoo(dot)com
wooow, these are fabulous cards. Love so much and the tip with the lights is fantastic. Thanks so much
ReplyDeleteI love the timeless lights and Christmas bulb.. love the color choices..
ReplyDeleteSimply stunning! Loving this hop!!
ReplyDeleteGorgeous cards. Love this set!
ReplyDeleteBoth cards are awesome and yep I want the "blinking lights" card lol. This is a fantastic release and your inspiration has me ready to start working these cards now! :)
ReplyDeleteGreat designs, I love the ornament card!
ReplyDeleteGreat designs. Your blinking lights are amazing. TFS.
ReplyDeleteThese cards are fabulous!! Thanks for showing the blinking lights, so fun.
ReplyDeleteI just love these sets! Beautiful!
ReplyDeleteThanks for sharing so much beauty with all of the card maker products. I truly love the foil and snowflakes.
ReplyDeleteAwesome projects with these fabulous new sets! Such beautiful projects along the hop! Excited about this release!
ReplyDeleteGorgeous and wonderfully festive cards! You've included so many amazing details. Stunning designs.
ReplyDeleteI love all the new ideas!
ReplyDeleteLovely cards, really like the one with the ornament!
ReplyDeleteOMG OMG OMG!! Love love love these cards!!!!!!
ReplyDeletewonderful cards. Those Christmas lights were a labor of love and how beautiful they are. Thank you for sharing.
ReplyDeleteWow! Beautiful cards!!! Love the colors!!!
ReplyDeleteWOW!! I don’t know which I LUV more..the shading or the foiling of ornaments.. or the blinking lights... just WOW! Work of art!
ReplyDeleteOh my word...I have no words! These are stunning and so creative! The blinking lights are awesome sauce!
ReplyDeleteThe cards are great. The colors are gorgeous.
ReplyDeleteThese are both so pretty. Love the 'blinking' lights!
ReplyDeleteBeautiful cards! Did you fussy cut out all of those strings of lights or is there a die?? I love those little lights!!
ReplyDeleteNeat cards! :)
ReplyDelete