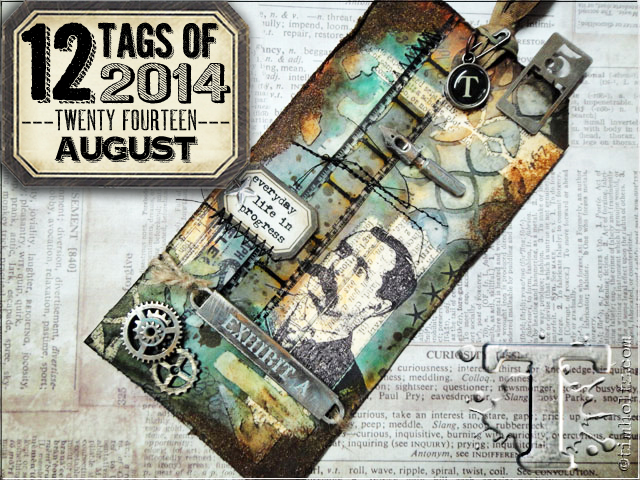
Hello!!
I'm stopping in to share the Tag I've made for the Tim Holtz 12 Tags of 2014 ~ August!! =)
You can check out his AWESOME tutorial on hisBlog!!
I LOVE the way it came together!!
THANKS SO MUCH for stopping by and have a Fabulous Week!!
Hello!!
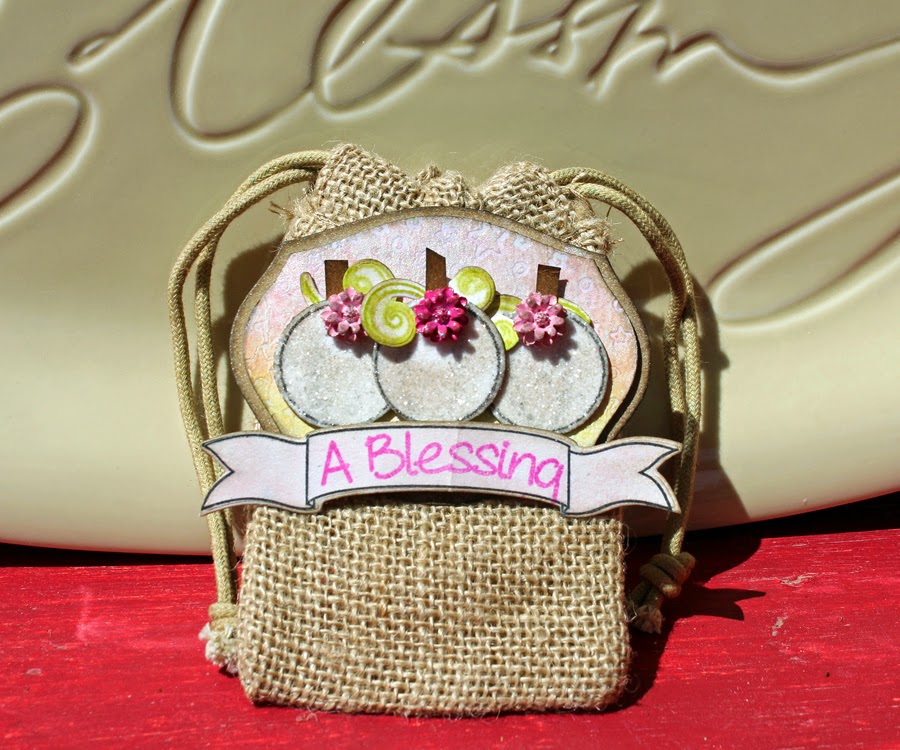
I'm stopping by today to share the Project I've made for the New Paper Sweeties Inspiration #23 September 2014 ~ Pretty Pumpkins Challenge hosted over on thePaper Sweeties Blog!!
Can you even believe that Fall is just here!!?? I'm ready just because its my FAVORITE time of the year!! =) I was SO Inspired by the Beautiful Pumpkins in this Inspiration Photo!! Just look at them~insert BIG SMILE!! I decided it would be FUN to create a Gift Tag for a Gift and I found the Sweetest little Burlap Bags for my base!! I die cut a couple of Layered PTI Dies for my Base and on the Smallest one I wanted to create a background for my Tag Design!! I Stamped the Stars Border Stamp from the New PS Be Happy Stamp Set with Versa Mark and then I heat Embossed it using Ranger Clear Embossing Powder!! I then took my Distress Inks in Spun Sugar and Squeezed Lemonade and sponged over the entire Tag making sure they blended in the middle for a FUN sunset look!! I then Sprayed over it using some Prima Blooms Pearl White Spray and I LOVE the way it turned out!! I wanted to make a Trio of Pumpkins for the Center of the Tag so I die cut 3 Circles and 4 Spirals using the PS Be Happy Sweet Cuts and Party Time Sweet Cuts Die Sets!! I wanted my Pumpkins to Sparkle like the ones in the Photo so I coated my Circle Die Cuts with Versa-Mark Ink and then covered them with some Ranger Sticky Stuff Powder!! After Heat Embossing I covered them with some Rock Candy Distress Glitter and then I took the Coordinating PS Be Happy Stamp Set and stamped the Circle outline using some Versa Fine Black Onyx Ink!! I added some Distress Ink to the Edges and cut some Stems from some Kraft Cardstock and glued them in place!! I stamped the Spiral Images from the PS Party Time Stamp Set using some Shabby Shutters Distress Ink and Sprayed them with some water for a wicking effect!! I then added some Webster's Pages Resin Flowers that I painted with Martha Stewart Glossy Acrylic Paint to go with my color scheme!! EEEKKKK I LOVE how these Pumpkins turned out!! =)
I added the to the Tag using Foam Tape!! I die cut and stamped the Banner using the PS Hello Friend Stamp Set and the PS Be Happy Sweet Cuts Die Set!! I wanted the Sentiment to be BOLD so I decided to stamp the Sentiment from the New PS You Are Fab Stamp Set in Picked Raspberry Distress Ink and then I added some Spun Sugar and Gathered Twigs Distress Inks too to tie it all together with the rest of the Tag!!
What do you think!!?? Pretty Sweet right!!?? =) I AGREE!!
I hope you'll head over to visit the rest of the Paper Sweeties DT Blogs to see what BEAUTIFUL Inspiration they have to share with you!! Amber Kroening
I'm also hoping that you'll play along with us this month I can't wait to see how you are Inspired plus you'll have a chance to win a Gift Code for some YUMMY Paper Sweeties Goodies!! =) BONUS!! THANKS SO MUCH for stopping by and I hope you have a Fabulous Labor Day Week!! =)
Hello!! Well what a week I've had!! =} Last Sunday after my M-I-L Cathy's funeral we were putting stuff away and I wanted to hang the Family photo we had used for her service!! It had been hanging on our wall above our Staircase, so we pulled out our heavy duty ladder and beings Adam was busy with our little 18 month old Greyson I decided no problem, I'll just climb up the ladder real quick and hang the photo!! Well as I climbed to the top I thought I'd feel more secure if I kinda sat on the top step which made me about 6 feet up on the ladder in our landing and about 10 feet above our basement floor!! Well the ladder started to fold and I was catapulted to the bottom of our staircase and landed on the carpeted cement basement floor FACE FIRST!! Adam saw me fly through the air and ran down the stairs to check on me and I jumped up not knowing who he was or what had happened!! All I knew was my face, arms and chest hurt and I WANTED MY MOM!! =) Adam was able to get me in the pickup and drove me to the Hospital where I was treated for a Concussion and Several Fractures and Breaks!! I spent most of the week in the Hospital and then had Apt's with Specialists who will be preforming my up coming surgeries!! Needless to say I haven't been able to create and with both arms Broken well I will be out for atleast a month!! The GOOD NEWS is that I'm VERY LUCKY and I will recovery (even if its Slowly)!! I also have several Projects that I had already been working on that I'm hoping I'll be able to share with you during my Healing Process!!
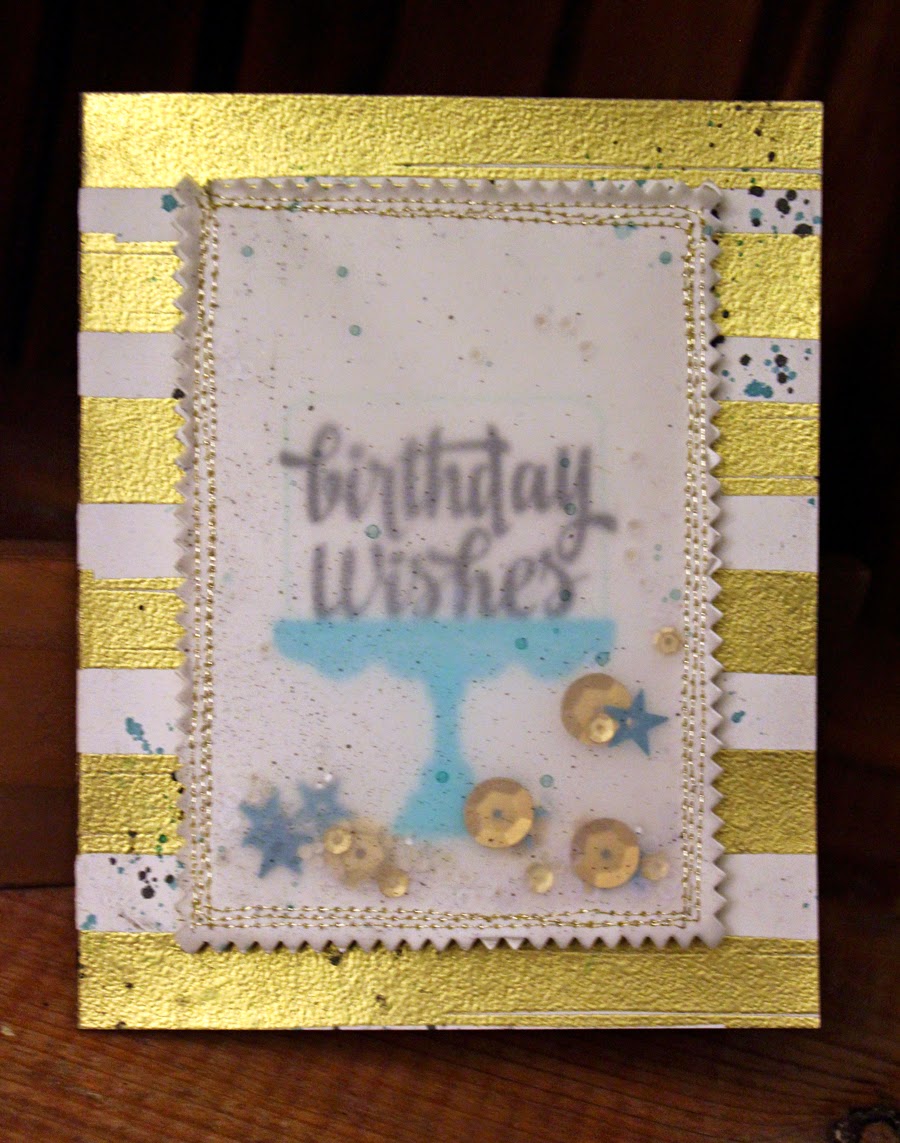
Todays Card I Created for the AEI♥U Challenge #14–Sequins! I'm a HUGE Fan of Sequins and I LOVE adding them to my Cards!! I needed a Birthday Card for my Sister Britni who just turned 30 on Monday!! She LOVES the colors Turquoise and Gold a I knew I wanted to create a FUN Vellum Shaker Panel for my main Element!! So I started by Die Cutting the AE Pinked Edge Rectangle from both Cardstock and Vellum!! I then stamped the AWESOME Cake Stand Image from the AE FanFare Stamp Set!! I wanted it to be Turquoise so I embossed it with some AC Zing Embossing Powder!! I then added the Top of the Cake Stand and Embossed it too!! I took the Birthday Wishes Stamp from the AE Sending You Stamp Set and stamped it in Black ink inside the Glass Top of the Cake Stand!! EEEKKKK I LOVE the way it turned out!! I knew I wanted to add some Gold Sequins so I thought it might be FUN to add some Gold Metallic Stitching all the way around my Pinked Edge Panel!! I added some PPP Gold and Clear 6mm Sequins, some SC 10mm Gold Sequins and some SC Turquoise Star Sequins for the inside of my Vellum Shaker Panel and I LOVE it SO MUCH!! I then decided to Emboss the AE Brushed Stamp Set image to create a FUN Gold Metallic Strip down the front of my Card Base using my FAVORITE Ranger Gold Embossing Powder!! I added some Ink Splatters and then added the Vellum Shaker Panel using some Foam Tape!! My sister LOVED the card and I wish you could have seen it in REAL LIFE, because I think the Photos just don't do it justice!! This card turned out SO BEAUTIFUL!! =)
Anyway, hopefully you can see how Beautiful it is with these Photos that were taken for me with some HELP from my SWEET Husband!! =) Beggars can't be TOO Choosy can they!! =) HAHAHAHA!! I have a feeling he isn't going to enjoy this as much as I think he should!! THANKS SO MUCH for stopping by today and I hope you'll head over to the AEI♥U Challenge #14–Sequins! and check out all of the other AMAZING Entries!!
Have a FABULOUS WEEKEND!!
Hello!!
I'm stopping in to share the LAST Project I've made for the Spellbinders Creating A Gilded Life Contest over on the Spellbinders Blog!! I wanted to create a BEAUTIFUL Gilded Jewelry Box that I could set in my Master Bathroom for my Most Often Worn Jewelry Pieces!! =) I wanted the colors to match with my space and I KNEW I wanted to use some of the New Spellbinders A Gilded Life Products to create it, so when they posted the Challenge I thought AWESOME!! I'll be able to enter the Jewelry Box I had already envisioned making in my head!! I started with a Jenny Bowlin Cigar Box as my Base beings it already has the divided compartments it was the PERFECT fit for my Needs!! =) I then took some My Mind's Eye Patterned Paper and cut it down to fit the sides of my Box!! I then took the Spellbinders A Gilded Life Vintage Brocade Die and Embossed all of the Patterned Paper Pieces and I REALLY LOVE how it looks!! I then wanted the Embossing to POP so I added some Metallic Pewter Paint and then buffed it off with a Wet Wipe so that the paint was only left in the Embossed areas!! Then after it had dried I took some Gathered Twigs Distress Stain and went over the Entire Box!! After that I took the Black Soot Distress Ink and went over it again with just a light hand as not to cover the entire thing with Black Ink but rather just to add high lights to really make the Embossing come to life and WOWOWOWOWOWOW!! It did!! I LOVE how it turned out!! I then Die Cut some of the Spellbinders A Gilded Life Metal Foil Sheets in the Pewter Color using the Petite Monarch Die!! I had to piece three pieces together to cover the entire box front, but you really can't even tell where I added onto the strips!! I then added some Black Saz-On ink and some Bronze Glimmer Spray to the Foil Die Cuts to make the Details POP and I opted to leave all of the pieces intact as I feel it gives a Better Look to the over all Design on my Box!! I added some Black Pearls and some Red Gems to add even more Glamour!! I wanted to have a FUN Statement piece on the top of my Box so I decided on layering two of the Spellbinders A Gilded Life Pieces together to achieve the look I was after once I had played around with several different ideas!! I took the Spellbinders Heart Dies and Die Cut some Burlap Fabric and some Batting and a Cardboard base!! Then I stitched around the edge of the Heart using some Gold Embroidery Thread!! I then took my Distress Inks and some of the Black Ink and then some Glimmer Mist and Perfect pearls Mist to cover the Heart for some added Texture and Sparkle!! I also added some Bronze and Gold Spray Splatters for another FUN touch!! I then took my Spellbinders A Gilded Life Heart Angel Pendant and the Crowned Medallion and colored them using my Copic Markers!! WOWOWOWOWOWOW!! This is an AWESOME way to add color to these!! It almost looks like a Gel Medium because it gives a kind of shine once the color has dried!! You can even mix colors and added layers which is DOUBLE AWESOME!! I also covered the crown with some Clear Embossing Powder after coloring the entire area with my Embossing Pen!! I added my Gems first though so that they would Blend into the crown and be trapped so I knew they wouldn't come off!! I used my Copics to Color the Wreath and then I added alittle Green Glitter using some Matte Multi- Medium!! I also added some Vintaji Enamel Gel to the Angels Wings and some Distress Rock Candy Crackle Medium to the center of the Heart!! I LOVE the look and then I used my Red Copic Marker to color over it and added some Ink for a Distressed look!! LOVE LOVE LOVE how it turned out!! I used some E6000 Glue to adhere the Two Pieces together and then I added a Pin back so it could be worn as a Pin too!! =) I adhered the Heart using some Fabric Glue and my Box was finished!!
I've made a Video to share too so Hopefully you can see it better!! =)
Well what do you think!!?? I just LOVE it and I already have it sitting on my Dresser in the Bathroom!! =) THANKS SO MUCH for stopping by and for visiting my Blog and leaving me some LOVE!! I REALLY APPRECIATE it!! I hope you'll check out ALL of the other creations and that if I'm one of the LUCKY Finalists that you shower me with your Votes!!?? Have a FABULOUS WEEKEND!! =)
Hello!!
I'm back again with another Project for the Spellbinder's Creating A Gilded Life Contest!!
I wanted to make a Necklace using one of the Spellbinders A Gilded Life Small Rose Medallion Pendant Bezels!!
I had found this BEAUTIFUL Bib Necklace Plate at Hobby Lobby and I wanted to see if I could use it for the Base of my Necklace!! I used some Jump Rings and some Jewelry Wire to attach the Small Rose Medallion Pendant to the Front of the Bib Necklace Plate!! I then had to attach a Chain for my Necklace and I ended up using a really Pretty Chain Necklace I found also at Hobby Lobby!! I then decided it would be really BEAUIFUL to add some FUN Dangling Gems to the Chain!! So after looking through my Gems I decided on some Turquoise, Quarts in both Clear and Yellow and some Chalcedony Gems and attached Head Pins to create little Eye Charms for my Necklace!! I then adhered them to the Chain!! I REALLY LOVE the Color and the Playfulness, but yet it is still has a REALLY Classy Feel!! =) I wanted to use some Vintage Lace that was part of one of my M-I-L's Vintage Doilies!! She just passed away a week in a half ago and I wanted a piece of her that I could have with me and wear whenever I wanted to have her close to me!! I cut one of the small flowers from the doily and placed it in the center of my Rose Medallion!! I wanted it to stay put so I added some Matte Multi-Medium to the inside of the Rose Medallion and then placed the Vintage Lace Flower on top and let it dry!! Then I added another slightly larger piece of Turquoise for the Center of my Vintage Lace Flower again using the Matte Mutli-Medium to hold it in place inside of the Rose Medallion Bezel!! Then I adhered the Clear Acrylic Top using some E6000 Glue!! To say I'm in LOVE with how this Necklace turned out is an understatement!!
I've Created a Video to share too!! =)
So what do you think!!?? Don't you LOVE how this turned out!!?? I hope you'll stop by the Spellbinders Blog and check out ALL of the other AMAMZING entries and if I'm one of the LUCKY Top 3 chosen I'll need your VOTES in order to Win a Trip to the Spellbound 3 Retreat with my AMAMZING Mother for some MUCH need Relaxation and Pampering!! =)
THANKS SO MUCH for stopping by and for leaving me some LOVE!! I appreciate it!! Have a FABULOUS WEEKEND!! =)
Hello!!
I'm stopping in to share the BEAUTIFUL Vintage Charm Bracelet I made for the Spellbinders Creating A Gilded Life Contest!! I was having SO much FUN creating using the New Spellbinders A Gilded Life Products that I just kept right on creating!! =) I wanted to create something that I would wear and LOVE so I thought LONG and HARD about what I wanted to use for the Charm Bracelet!! I seem to HOARD Vintage Buttons and Charms, Pearls, Lace ect. so after looking through my stash of GOODNESS I decided to go through my Vintage Buttons and Pearls and make a Vintage Inspired Charm Bracelet!! I wanted to go with a Tan/Brown, Black, Cream and Pink color scheme as I had an OLD Necklace I have had from my Grandmothers stash for several years and I never knew what to do with it!!?? I have seen LOTS of Charm Bracelets that people create and then they can attach them to a Necklace and wear them that way too!! A Dual Purpose Piece of Jewelry!! =) WHOOP WHOOP!! So I KNEW that was going to be my goal for this Vintage Charm Bracelet!! I started by turning all of my Vintage Pieces into Charms!! I had to adhere some of the Pearls to Head Pins and then I also added some Jump Rings to the Vintage Buttons!! After having everything ready to attach to my Charm Bracelet Base I adhered the Spellbinders A Gilded Life Relics-B to my Bracelet Base first so I had them exactly where I wanted them!! Then I filled in around them adding ALL of my other Vintage Charms!! I LOVE the way it turned out!!
I've created a Video to share too!! =)
Here is the Vintage Charm Bracelet once I've added it to my Grandmothers Vintage Necklace!! I LOVE~LOVE~LOVE the way it looks!! So not only is it BEAUTIFUL, but its sentimental too!! I KNOW I'm going to be wearing this ALOT!! What do you think!!
I have a FUN Gift Box that I've made too!! Just to show how EASY it is to Dress up a Gift using the New Spellbinders A Gilded Life Vintage Brocade and Petite Monarch Dies!! I used the Vintage Brocade Die to Emboss my Box!! I LOVE the look and it dresses up a Plain Box and turns it into EXTRODINARY in just Minutes!! Then I've cut a FUN Felt Border from the Petite Monarch Die for the Front of the Box and creating a Flower too using the same Petite Monarch Die and then the Spellbinders Creating a Flower 3 Dies!! I LOVE the way it turned out!!
I'll be back with another project to share and I HOPE you'll visit the Spellbinders Blog and check out ALL of the Entries!! Like I said before if I'm one of the LUCKY Top 12 Entries Chosen I could win a Trip to Spellbound 3 with my AMAZING Mother, but I'd need your VOTES to WIN!! =)
THANKS SO MUCH for stopping by and LEAVING me your LOVE!! I REALLY APPRECIATE it!! Have a FABULOUS WEEKEND!! =)
HELLO!!
I'm stopping in today to share the Leather Bracelet Project I've made using the New Spellbinders A Gilded Life Products for the Spellbinders Creating A Gilded Life Contest!! =) If I'm chosen as one of the TOP 3 Projects, I could win a Trip for me and my BEAUTIFUL Mom to go to the AMAZING Spellbound 3 Retreat, All Expenses Paid!! How AWESOME would that be!!?? Well I have a couple projects that I have made for this contest and I will be sharing them ALL so I hope you'll check them all out and leave me some LOVE!! Plus, if I'm one of the Top Projects Picked I'll need YOUR VOTES to WIN!! =)
I thought it would be FUN to create a Bracelet using the New Spellbinders A Gilded Life Products!! I LOVE CHUNKY Bracelet's so I knew I wanted to start with a pretty wide band and this Brown Leather Cuff that I picked up at Hobby Lobby was the PERFECT fit!! I wanted to Emboss the Leather for a REALLY Neat texture so I ran it through my die cutting machine with a Spellbinders Embossing Plate on an Embossing mat and I REALLYLOVE the Texture it gave!! I then thought it would be FUN to add some Paint so that the texture would show up alittle more and then I sealed it using some Multi-Matte Medium!! I then took my Spellbinders A Gilded Life Large Heart Bezel and added some Ranger Vintaji Soft Pink Enamel Gel for a really FUN Two Toned look so that all of the details of the Heart Bezel would POP!! I attached it to my Cuff again using Rivets from the inside of the Bezel through the bottom side of the cuff using my Vintaji Rivet Punch!! I then added some Vintage Lace that was cut using the Spellbinders A Gilded Life coordinating Heart BezelDies and then added a Spellbinders A Gilded LifeRelic-B to the inside of my Bezel on top of the Lace!! I finished the inside of the Bezel off by adding some Pearls and a few pinches of some Distress Rock Candy Glitter and some Pink German Glass Glitter and I really LOVE the way it looks!! I attached the Clear Acrylic Top over the Bezel using some E6000 Glue!! Now I have a Mini Shaker Heart Bezel Leather Bracelet!! SO FUN!! =)
I hope youLOVE my Bracelet as much as I do and I hope you'll check out all of the other AMAMZING creations that were created for this contest over on the Spellbinders Blog!! Like I had mentioned earlier, I'll need your VOTES for the AMAZING Trip with my Mom if I'm one of the LUCKY Projects that is chosen for the TOP 3!! I'd LOVE to win and spend this time with my Mom making BEAUTIFUL Creations and MEMORIES!! =) THANKS SO MUCH for stopping by today and for your LOVE!! I APPRECIATE it MORE than you'll ever know!!
Have a FABULOUS WEEK!!
Hello!!
I'm here today with Newton's Nook Designs for their August Release!! We are Showcasing the Simply Sentimental Stamp Set today!!
I LOVE this set and I think you will too!! I thought it would be FUN to create an ENTIRE stamped background for my cad today and I stamped it on the diagonal!! Then I cut a Stitched Strip Die Cut using a Die from Lil' Inker Designs and backed it with some colors cardstock and some Vellum that I sprayed with some Perfect Pearls so it has a REALLY pretty Pearlized Shimmer to it!! I also stamped a Koala Bear from the New Newton's Nook DesignsHanging AroundStamp Set that we showcased yesterday and a little Branch and used him beside my Stamped and Glitter Embossed THANKS Sentiment!! I've added some Silver Ink Splatters and some My Mind's Eye Enamel Dots to finish off my card!! I REALLY LOVE the way it turned out!!
Don't you LOVE the FONTS in this set!!?? It is going to be such a Versatile Stamp Set!!
Would you like to win “Simply Sentimental”?This set will be given away to TWO lucky winners!
Here's how to win:
Comment on the NND blog and Design Team and Guest blogs (see list below)! Two winners will be chosen at random from the collective blogs release posts. Make sure to check out each of their blogs and comment for your chance to win. You will not know which blog has been chosen so the more you comment on the better your chances are of winning! You have until Tuesday, August 19th at 9pm CDT to comment -- winners will be announced on the blog post on Wednesday, August 20th.
Check out all the awesome Design Team Blogs below to enter:
Hello!!
I'm here to share the New Newton's Nook Designs Release with you!! =)
Today we are taking a look at the New Hanging Around Stamp Set!!
OMG!! You are going to LOVE this SWEET New Set!! I have SO MANY Ideas for using this set and I can't wait to share what I have made for today!! I thought it would be FUN to show how this set could be used for a Baby Card!! I have several friends/family expecting New Little Babies soon so I wanted to create a Little Girl Baby Card and I LOVE the way it turned out!! I started by Die Cutting a Lil Inker Designs Stitched Rectangle Die Cut onto some Dove Grey Card Stock from WPlus9!! I wanted to layer the Rope Stamp with a Heart Border Die Cut from IO Stamps and I ended up combining two different colors of cardstock to make the HEARTS really pop!! Then I colored them with a Clear Glitter Wink of Stella Glitter Marker for some FUN Sparkle!! I also stamped the Sweet little Bow Images and fussy cut them out to add them to the ends of the rope!! I stamped the Sweet Little Monkey Image onto some Oatmeal Cardstock from WPlus 9 and then used my ColoredPencils to color it in!! I used Gamsol to blend it all together and then added some Clear Glitter Wink of Stela Glitter Marker to the main body portion of the Monkey!! I added some Dark Pink Glitter Gelly Roll Pen to the Heart Nose and I really LOVE the way it looks in real life!! I fussy cut the Image and then added it to the Stamped Scene Die Cut!! I wanted to make it look like she was REALLY Hanging on to the Heart Border Vine Die Cut so I cut the Monkeys Hand just enough to get the Vine underneath it!! I then stamped and embossed my sentiment from Simply Sentimental one of the other New Stamp Sets from the August NND Release!! You'll get a closer look at it tomorrow!!
I stamped the Sweet Little Monkey Image again on the Inside of the card and then added just alittle bit of color for her cheeks and used the same Dark Pink Gelly Roll Pen to color in her nose!! I added s strip of the same patterned paper from Crate Paper I used for the front of my card and stamped the rest of the Sentiment also from the other New NND Stamp Set for this Month!! I REALLY LOVE how it turned out!! =) I hope you've ENJOYED my card for today and I hope you'll visit the Rest of the NND Design Team for even MORE Inspiration and for a chance to WIN one of these New Hanging Around Stamp Sets!!
I've also created a Video to share the Stamp Set and some different ideas on ways that you can use it!! I hope you ENJOY it!!
Would you like to win “Hanging Around”?This set will be given away to TWO lucky winners!
Here's how to win:
Comment on the NND blog and Design Team and Guest blogs (see list below)! Two winners will be chosen at random from the collective blogs release posts. Make sure to check out each of their blogs and comment for your chance to win. You will not know which blog has been chosen so the more you comment on the better your chances are of winning! You have until Tuesday, August 19th at 9pm CDT to comment -- winners will be announced on the blog post on Wednesday, August 20th.
Check out all the awesome Design Team Blogs below to enter: