HELLO CRAFTY FRIENDS!!
I'm here with the FUN Newton's Nook Designs & WoW Embossing Inspiration Week!! I'm a HUGE FAN of both of these companies!! If you follow me you'll know that I might be alitte OBSESSED with the WoW Glitter Embossing Powders!! Infact, I probably use it on the majority of my Projects!! 😬
I've created 2 Projects today!! First I've made this SWEET Halloween Card!! I just LOVE this Witchy Newton Image!! It makes me SMILE every time I see it!! If you're an animal lover too, I'm SURE you have the same reaction!!??
I started by creating my FUN background using the NEW Gingham Stencil!! I just LOVE this Stencil and there are SO MANY ways to use it!! I've used both Dusty Concord and Carved Pumpkin Distress Oxide Inks!! I sprayed the back of my stencil with some Therm O Web Pixie Spray, then placed it over my A2 Cardstock panel!! I Started with the Dusty Concord Distress Oxide Ink and inked the design!! Then removed the Stencil and washed the excess Ink off!! I wanted to create a FUN Crosshatched Design so I flipped the Stencil and then replaced it over the Inked Design linking it up again using Carved Pumpkin Distress Oxide Ink!! I absolutely LOVE the results!!
Halloween makes me think of ALL things FUNKY!! So I thought it would be FUN to use the Bokeh Stencil Set over the top of the Gingham and I Inked it up with an Ink Dauber using Versa Fine Black Onyx Ink after using an anti-static tool!! Then added some of the WoW & Simon Says Stamp Witching Hour Embossing Powder!! SWOON!! All of that SPARKLE makes this girls HEART HAPPY!! It's hard to see in the Photos, but in real life this Powder is just AWESOME!!
I wanted to create a Background to help ground my Sweet Image, so I Die Cut a Circle and inked with Caved Pumpkin Distress Oxide Ink!! Went over it with an Anti-static Tool and then placed the Cascading Stars Stencil over the Circle Die Cut and Inked used Rusty Hinge Distress Oxide Ink and Embossed them using WoW Gloss Clear Embossing Powder!! A few Water Splatters add some extra texture to the background!!! Then I adhered my Stamped and Embossed Image that I colored with Copic Markers!!
I framed the Background Circle with a couple other Circle Die Cuts one from TE Oreo Cardstock and and one from TE Grape Jelly Cardstock and then Stamped and Embossed the "Best Wishes" Sentiment onto a Circle Die Cut from the Frames Squared Die Set using WoW Clear Gloss Embossing Powder!! I Framed it to match the Focal Image and adhered both using Foam Tape to my Cardbase!! A few Sequins with some Iridescent Jewels finishes off the Design!!
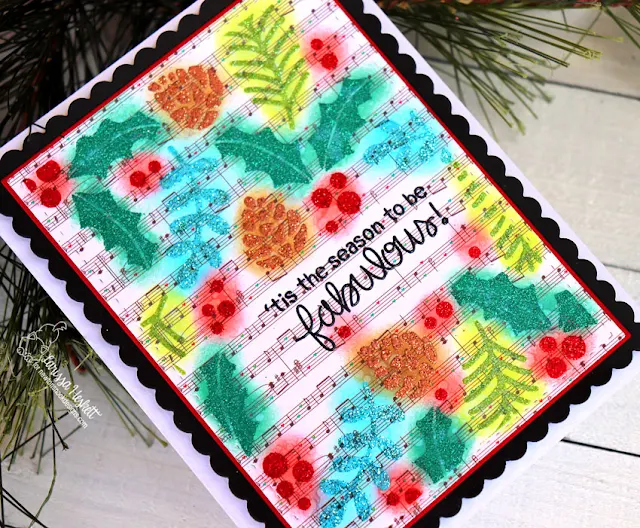
For my Last Card I wanted to create a FESTIVE Holiday Card!! I LOVE Music Paper for the Holidays and I thought it would be FUN to create an Embossed Stencil Design!! I LOVE how it turned out and hope you'll give this Technique a try this Holiday Season!!
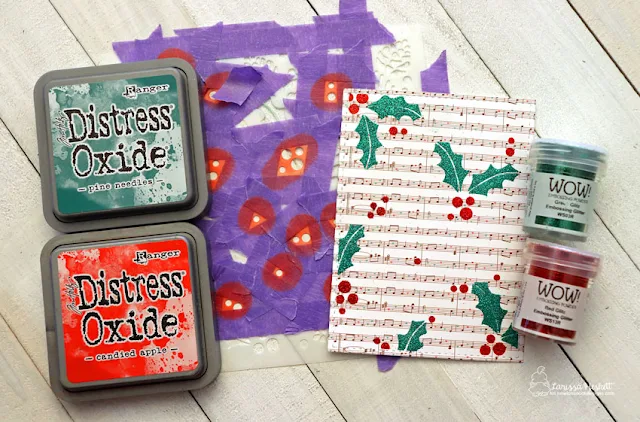
I started by spraying the back of the Holiday Foliage Stencil with some Therm O Web Pixie Spray and then I placed it over the Lawn Fawn Music Patterned Paper!! I then took an Ink Dauber and Inked the Holly Leaves with Pine Needles Distress Oxide Ink after using some Purple Tape to mask them off!! I covered the Inked leaves with WoW Green Glitz Glitter Embossing Powder and heat Set it!! I removed the Purple Tape washed off the Stencil and then replaced it over the Design masking off the Berries!! I inked them with Candied Apple Distress Oxide Ink and then Embossed them with WoW Red Glitz Embossing Powder and Heat set them!! Then before I Stenciled any more of the Design, I Stamped and Embossed the sentiment from the Christmas Haul Stamp Set!! I LOVE this sentiment and I used the WoW Gloss Clear Embossing Powder over my Versa Fine Black Onyx Ink!!
I then repeated the Process filling in the other Images using Distress Oxide Ink in Vintage Photo Distress Oxide Ink for the Pine Cones and Embossing with Metallic Copper Sparkle Embossing Powder, Peeled Paint Distress Oxide Ink and Embossing with Lime Ricky Embossing Powder!! For the last Images I Inked with Versa Mark Ink and Embossed with Calypso Embossing Powder!! I thing the Design is AMAZING the way that it is, but I wanted to make the Embossed Design POP even more, so I used the same Distress Oxide Inks along with an Ink Dauber to Ink over the Images!! Then I splattered it with some Water Droplets to help add some more Texture!!
I Die Cut a TE Cherry Pop Cardstock Panel and then Die Cut the Frames and Flags Scalloped Frame from some TE Oreo Cardstock!! Then I adhered it to the Card Base using some Foam Tape to POP it up and add some Dimension!! I LOVE this Card!!
I hope I've given you some ideas on ways to mix your Images and Stencils with the AWESOME WoW Glitter Embossing Powders!! Don't forget to stop by both of Newton's Nook Designs Blog and the WoW Embossing Blog for MORE inspiration and to get entered for chances to WIN!!
Prizes
Newton’s Nook Designs: $25 gift card
WOW! Embossing Powder: $25 gift card
Here's how to win: Leave comments on the NND & Design Team blog posts using WOW products all week (September 23-27) to enter. One winner will be randomly chosen from blog posts throughout the week so the more posts you leave comments on the better your chances are of winning! You have until Friday September 27th at midnight CST to comment. The winner will be announced on the NND blog post on Monday, September 30th.
THANKS SO MUCH for stopping by and I hope you have a FABULOUS WEEKEND!!
COUNTRY HUGS-N-KISSES
LARISSA =)


Such fabulous cards! Love the Christmas card - that glitter embossing is fantastic!
ReplyDeleteThese cards are incredible! Soooo many new ideas to try! Thank you so much for sharing inspiration!
ReplyDeleteAwesome cards! Love the stenciled designs and the application of embossing powders! I have not used the powders with stencils before, and it's such a great idea! Fun Halloween card with that cute Newton image, and a beautiful Christmas card with the Holiday Foliage stencil!
ReplyDeletestunning cards!
ReplyDeleteGorgeous cards! You did a great job. :)
ReplyDeleteWow, your plaid BG came out spectacular. Love that card & love your awesome coloring of kitty/boot. And I love a card with any type of text like the BG of your pretty Christmas card.
ReplyDeleteMarisela Delgado said: So cute. mariandmonsterd@yahoo.com
ReplyDeleteBoth are gorgeous! I LOVE the plaid background for the Halloween Kitty! TOO CUTE!
ReplyDeleteI love your attention to detail! These are fabulous!
ReplyDeleteCute, colorful and fabulous!
ReplyDeleteLove the black blob on the first card that
ReplyDeletehas eyes. Funtastic card.
Covered Christmas also. thanks for
sharing. txmlhl(at)yahoo(dot)com
These cards are both gorgeous!! Suecat
ReplyDelete