Well I LOVE the colors for the Prima Product Picks for December and I just HAD to make time to play along!! I decided to make a canvas piece and I wanted to use the bicycle metal piece that I had been eyeing in its package on my table for a couple weeks!! I came up with a cut little house scene and I LOVE the way it came out!! =)
I used several of the Prima rub-ons and the stamps and then also some of the little resin flowers and then ALL of the paper used for the whole piece are the BEAUTIFUL Prima papers from several different lines, but they are all Prima!! =)
So here is what I came up with I hope you LOVE it as much as I do!!
THANKS for stopping by and have a FABULOUS New Year's Weekend!! =)
Yeah for a WONDERFUL 2012!! =) COUNTRY HUGS-N-KISSES LARISSA =)
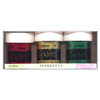
Here are the cards that I came up with for the challenge!! =) I actually made 2 different cards and I had so much fun playing with the different pattern mixtures!! For the first card I used a Pink Paislee patterned paper for the background and then added some vintage seam binding and made a fun box pleated ruffle across the bottom of the card!! I then added a May Arts Brown Polka dot grosgrain ribbon to the top to hide the top of the ruffle and then used a Crate Paper yellow lace ribbon to the top of it. I had the Jenni Bowlin bingo card and wanted to add it and thought it needed something else so I found the Twinery brown twine and it was a perfect match to the bingo card so I wrapped it around the card in between the grosgrain and the lace ribbons!! It was perfect!! I then added the glass flower with a gem in the center.
For my second card I wanted to play with my stamps some so I decided to start with this music paper from Melissa Francis that is printed in a Navy ink(it is hard to see in the photo but in person it is really neat)!! I used a Hero Arts circle snowflake stamp and white heat embossed it on top of the music paper. I then used a DeNami tree stamp and stamped that on a light mustard yellow paper and added green flower soft to that with glossy accents. I then added a blue sparkle fluff to the top of the flower soft again with glossy accents then added a layer of white fluff to the top of that so that just alittle of the blue fluff was showing through. I then stamped another DeNami stamp in a circle Merry Christmas and punched it out with a circle punch and added it to the side of the tree. I added a green May Arts silk ribbon and added a pearl to the center after I tied it into a bow!! I added it to a kraft card base and rounded the top two edges then added a brown ink to the edges to age it and make it pop more!!
I hope you enjoyed my cards, I had so much fun creating them and playing along with the challenge!!
THANKS for stopping by and have a FABULOUS WEEK!! =)
MERRY CHRISTMAS!! =)
I hope you all are having a WONDERFUL CHRISTMAS today!!
I decided to play along with the challenge for Make it Monday #46!!
I made some really cute tags using the Riddersholm desing paper tags and the Snowflake dies that I cut out of 100% wool felt and made a fun tag then I cut another snowflake out of raw canvas and layered it under the cute paper tags!! I added them to my packages and they were a HUGE hit!!
THANKS for the challenge and for stopping by today!! Have a FABULOUS DAY!! =)
This week we are fearturing the AWESOME Bazzill Basics and Riddersholmdesign of Denmark on the May Arts Blog. You can check it all out here: http://www.mayarts.com/blog/
I played with their AMAZING products and here is what I came up with!!
May Arts Ribbon used: 336-38-34 GROSGRAIN /DIAGONAL STRIPES, SM10 STRING/BURLAP and EX61SATIN CUTOUTS.
I have also made a couple videos for you showing you how to make the cute little boxes and how to tie my FAVORITE BOWS!! You can watch them here:
Don't forget to head over to the blog for your chance to win some AMAZING PRODUCTS!!
THANKS for stopping by and have a FABULOUS WEEK!! =) COUNTRY HUGS-N-KISSES LARISSA
I used this fun fluff on the pine branches of the tree and ATC Card Tags to look like snow!! I LOVE the way it looks!! If you haven't ever tried it you should give it a try!!
Here is a photo of both my cards and an ATC cards that I made for some packages to use as tags!!
THANKS for stopping by and have a FABULOUS HOLIDAY WEEK!! =)
Well today I decided to play along with the MoxieFab Blog Challenges!!
Here are a couple that I decided to join in on!!
This was a REALLY NEW technique for me!! I have seen all of the fun masking
techniques out there and I have always wanted to try it, but could never bring myself to just take a chance. Then I saw the challenge and knew this was my chance!! So I cut out the number dies from Paper Trey Ink onto a masking sheet and the added it to the front on my card!! I ran out of room for the whole year so I decided to run with it and just add the 1 in on top out of black cardstock. I used Color Box white pigment ink to ink in over the numbered masking sheet and then made sure it was dry before I removed it and then traced over the numbers with my black sharpie pen. I then placed the masked numbers on top of the white inked numbers and removed the large masking sheet leaving only the masked numbers on my card!! I then inked up my Dictionary Unity Stamp with archival black ink and stamped over the masked numbers onto the front of my card!! I was SO HAPPY with the results!! =) Then I removed the masking from the numbers and added the ribbon and lace to the bottom of my card and it looked like it was still missing something??
So then I decided to cut out a script HAPPY from another Paper Trey Ink die and layer that on top of the #1, again cutting it out of Black cardstock!!
I hope you LOVE the card as much as I do and if you haven't tried masking I hope you'll give it a try!!
Next I decided to join the Trigger Tuesday Challenge with the houndstooth challenge and I LOVE my card!! Here are the challenge pictures.
I decided to use the houndstooth stamp from Hero Arts and Basic Grey and I stamped it in Hero Arts Shadow Ink Green Leaf. I wanted a green color, but yet I wanted it just be a soft and airy green color. I turned out perfect for the base. Then I added a doily that I sprayed with Tattered Angels Walnut Gold Glimmer Mist!!
Then I used a Paper Trey Ink Build a Flower Die#1 to make a really fun gold poinsettia!!
I added a green leaf and then used some of the May Arts Pearl Wire Ribbon to add to both sides of the flower!! I placed a Prima Dove Button in the center of the flower and I LOVE how it came out!!
I then stamped and white embossed a sentiment from the Paper Trey Ink Stamp set Stylish Holiday Sentiments. It was the PERFECT finishing touch!! I inked around the edges with the same leaf green shadow ink and knew the card was finished!!
So I hope you enjoyed my cards and that you'll join the challenges in the New Year over at the MoxieFab Blog!! =)
You can find it here: http://www.moxiefabworld.com/
Can you BELIEVE that Christmas is only a week away!!?? =}
I always think I'm ready and then it gets here and I find I am not quite ready!!
I sure hope you're ready and if not that you'll be ready in 7 days!!
I wanted to say a BIG THANKS to everyone who joined me for the 10 Day of Holiday Creating with Ribbon. I had a fun time sharing my project videos with you and I can't wait to send the winners their prizes to help make you're holidays just alittle brighter!!
I am also going to share just one more project with you. Beckett my son is in preschool and they always have a party where they have a book exchange. Then the mother's get together and plan alittle party with games, treats and drinks. I wanted to make the treats this year so I thought I'd share this fast little project with you just in case your looking for something fun to send with your kids, or to take to a holiday gathering!! It is so easy that Beckett actually helped make them and now he can feel a sense of pride when he hands them out to his classmates because he actually helped make them. =)
So here is the video:
Here are some photos I took of the finished Reindeer Treats.
I used the Stampin' Up Owl punch, a 23/4 in. circle punch, a 3in. scalloped circle punch and the Stampin' Up 3 Hearts punch. I used Core`dinations brown cardstock and Bazill black and white cardstock, and a Making Memories red glitter paper from a few years ago. I used Prima decorative cardstock for the tag bases, and a stamp set from Paper Trey Ink with Jenni Bowlin Chili Powder ink.
They were a HUGE hit at Beckett's Party this morning!! =)
Now on to the LUCKY WINNERS!! I have posted them according to the day that you won.
Day #1. Pendra
Day #2. Kelly Sas
Day #3. Kelly Massman
Day #4. Ilona
Day #5. Denise B.
Day #6. famillemarleau (Johanne L.)
Day #7. Pennycent 1955
Day #8. KimScrapper
Day #9. Laurie-Blackbeary Forest
Day #10. Jolac46
CONGRATS to the lucky winners!! Please send me an email here: mcclar26@yahoo.com
letting me know what your mailing address is and please put what day you won in the info line.
I will get your prizes out to you ASAP!!
THANKS AGAIN for joining me for the fun!!
Have a FABULOUS WEEK!! =)
WOW!!
Today was such a BEAUTIFUL WINTER DAY!! =)
We had the most fun today playing outside and ENJOYING the snow!!
Beckett our 5 yr. old son decided it was the PERFECT day to build a snowman!!
I had read a post on Ali Edwards Blog that gave me the idea to wrap 25 books that we had around the house that either had something to do with Christmas or that taught a good lesson!! So I went through ALL of our books and some of grandmas books to found 25 that I could wrap up and every night
before bed Beckett could unwrap one and then we would read it for our bedtime story.
Well we read the story about FROSTY last night and today I guess Beckett decided that he wanted to make his own Frosty!! So we went out and Beckett gave us each a section that we were supposed to make. Adam (daddy) had the bottom ball, Beckett had the middle ball and I (mommy) had the head ball. After we got the snowman made we were adding the finishing touches and Beckett said I think our snowman is sad!! =( I think he needs a FRIEND!!?? Adam and I looked at each other and we said well lets get to rolling our sections again (because we both thought he wanted to make another snowman). He actually meant a doggie friend!! So we laughed and said okay a snow dog shouldn't be hard to make at all, Beckett rolled the head and then made the body with Adams help. Then he found the perfect branch for a tail and we used two rock for the ears. I broke some little sticks and used them for the eyes and eyelashes, then for a mouth and used some bark for the nose. He turned out TOO CUTE!! Beckett decided his name was BINGO!! Then he said my snowman is SO HAPPY he has a friend now!! I had fun taking pictures of Adam and Beckett rolling their sections and I look forward to the day when we look back at these pictures and laugh at the memories of this day!! =)
So here are some of the photos!!
I sure hope your was filled with as much fun and laughter as ours was!! =)
Beckett thought his snowman was thirsty so he gave him an A&W Root Beer!! It was pretty funny!!
Then he thought he'd like to play with his dump truck so he brought it out for him to play with!! I LOVE the imaginations that little ones have, sometimes I think having these bright lights in our lives make us remember the joys in the season and in make believe!!
THANKS for stopping by and have a FABULOUS WEEKEND!! =)
P.S. I'll be back with a video and the names of the winners from my 10 Days of Holiday Creating with Ribbon~~it was just too nice of a day to spend it inside!! =) Hope you all understand!!